Salesforce
Salesforce is a leading CRM platform that helps organizations streamline sales, marketing, and customer relationship management.
The CustomerLabs + Salesforce integration lets you bring in Accounts, Contacts, and Opportunities from Salesforce to build unified customer profiles and activate them across your marketing stack.
How the Integration Works
Section titled “How the Integration Works”- Salesforce sends event-based data to CustomerLabs via record-triggered flows
- CustomerLabs receives and processes the data
- Identity resolution maps records to user and account profiles
- Enriched data can be synced to your ads and marketing platforms
Prerequisites
Section titled “Prerequisites”- Admin access to a Salesforce account
- Admin access to an active CustomerLabs account
1. Connect Salesforce with CustomerLabs
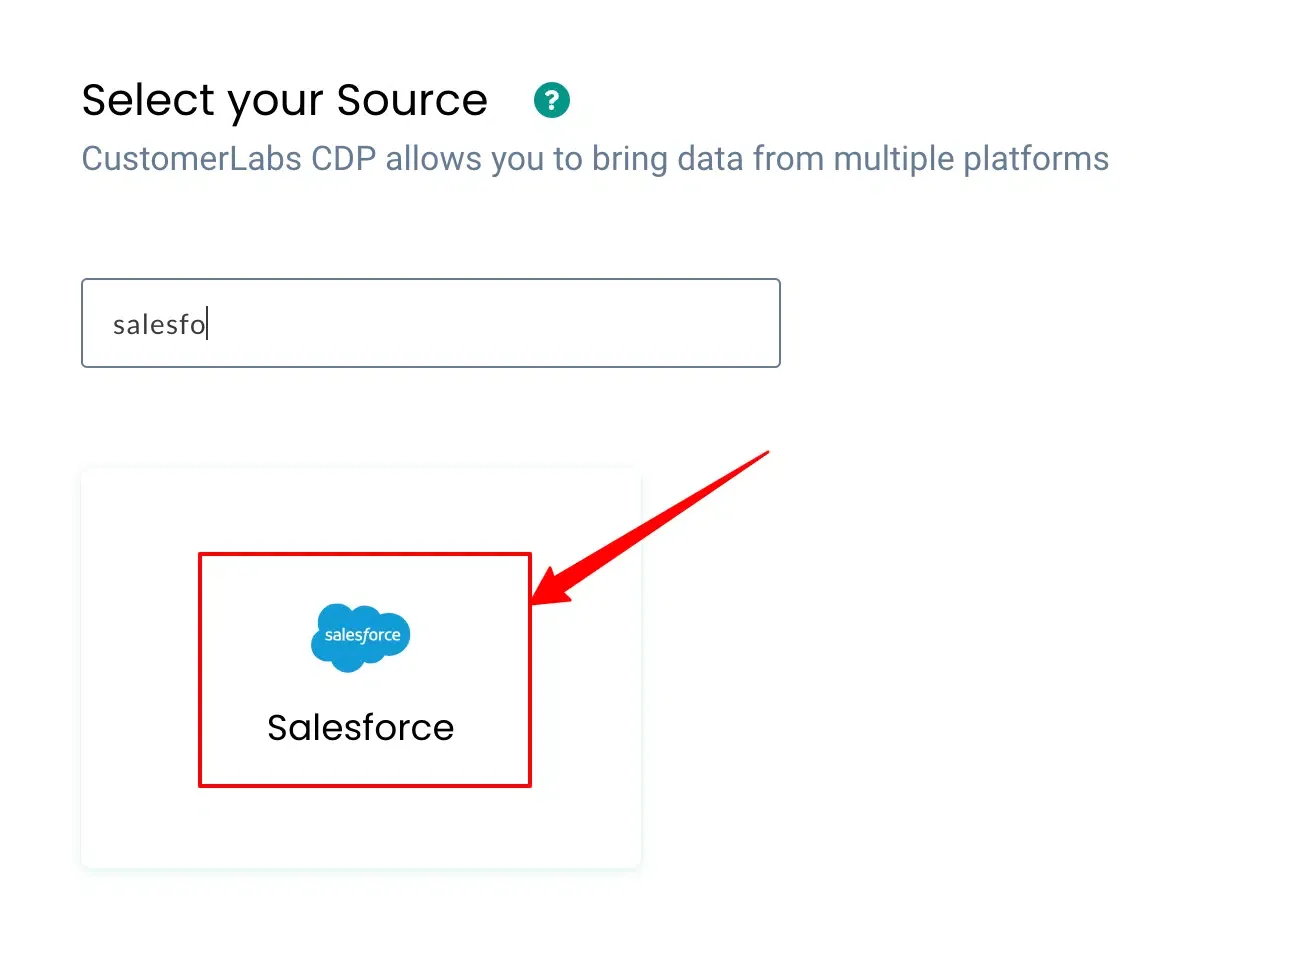
Section titled “1. Connect Salesforce with CustomerLabs”Step 1: Add Salesforce as a Source in CustomerLabs
Section titled “Step 1: Add Salesforce as a Source in CustomerLabs”-
Log in to your CustomerLabs account.
-
Navigate to Sources from the left-hand menu and click Connect Source.
-
Select Salesforce from the source list.
-
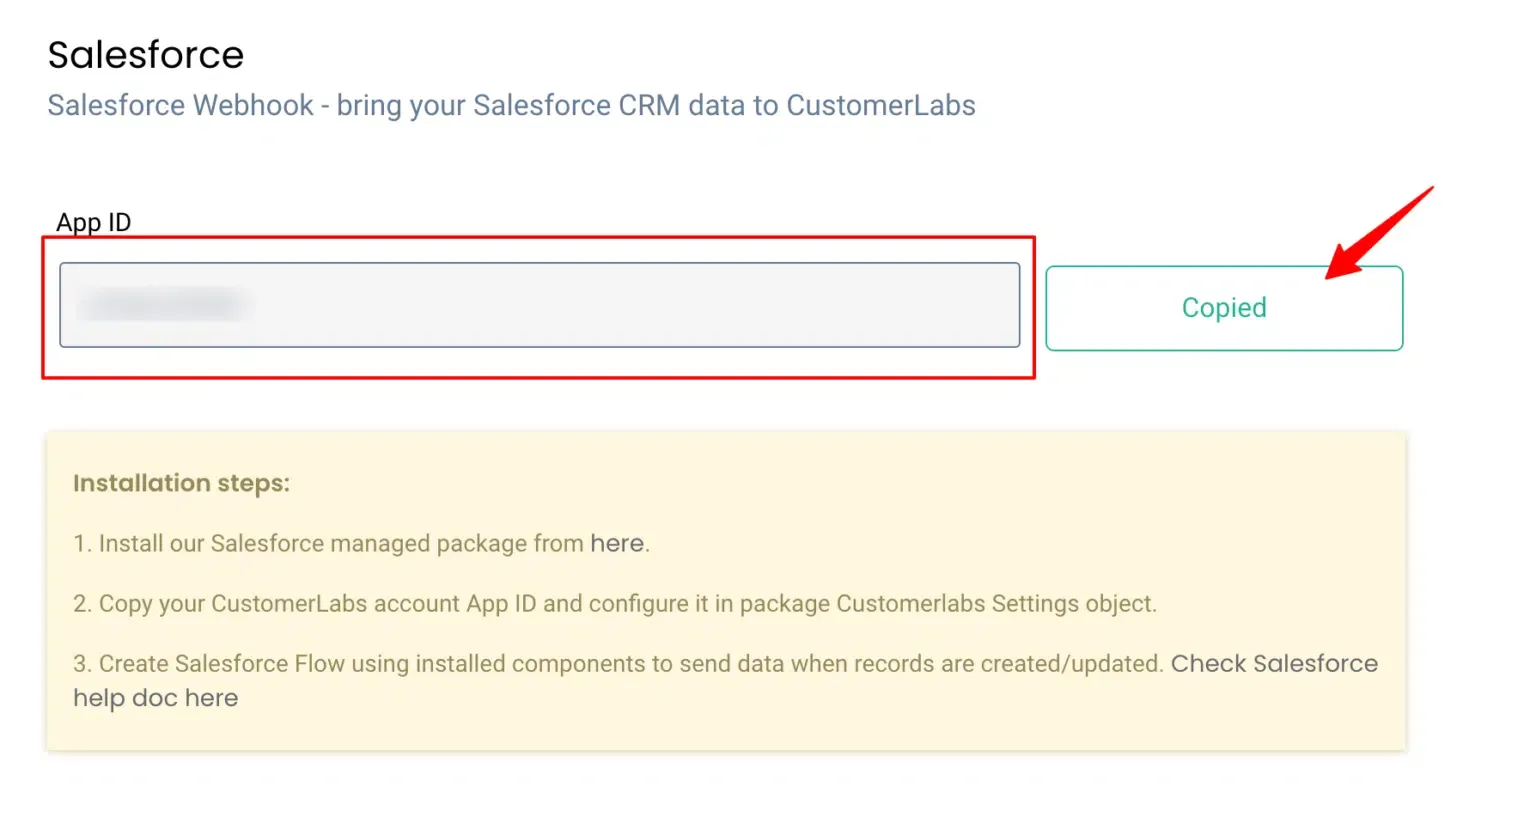
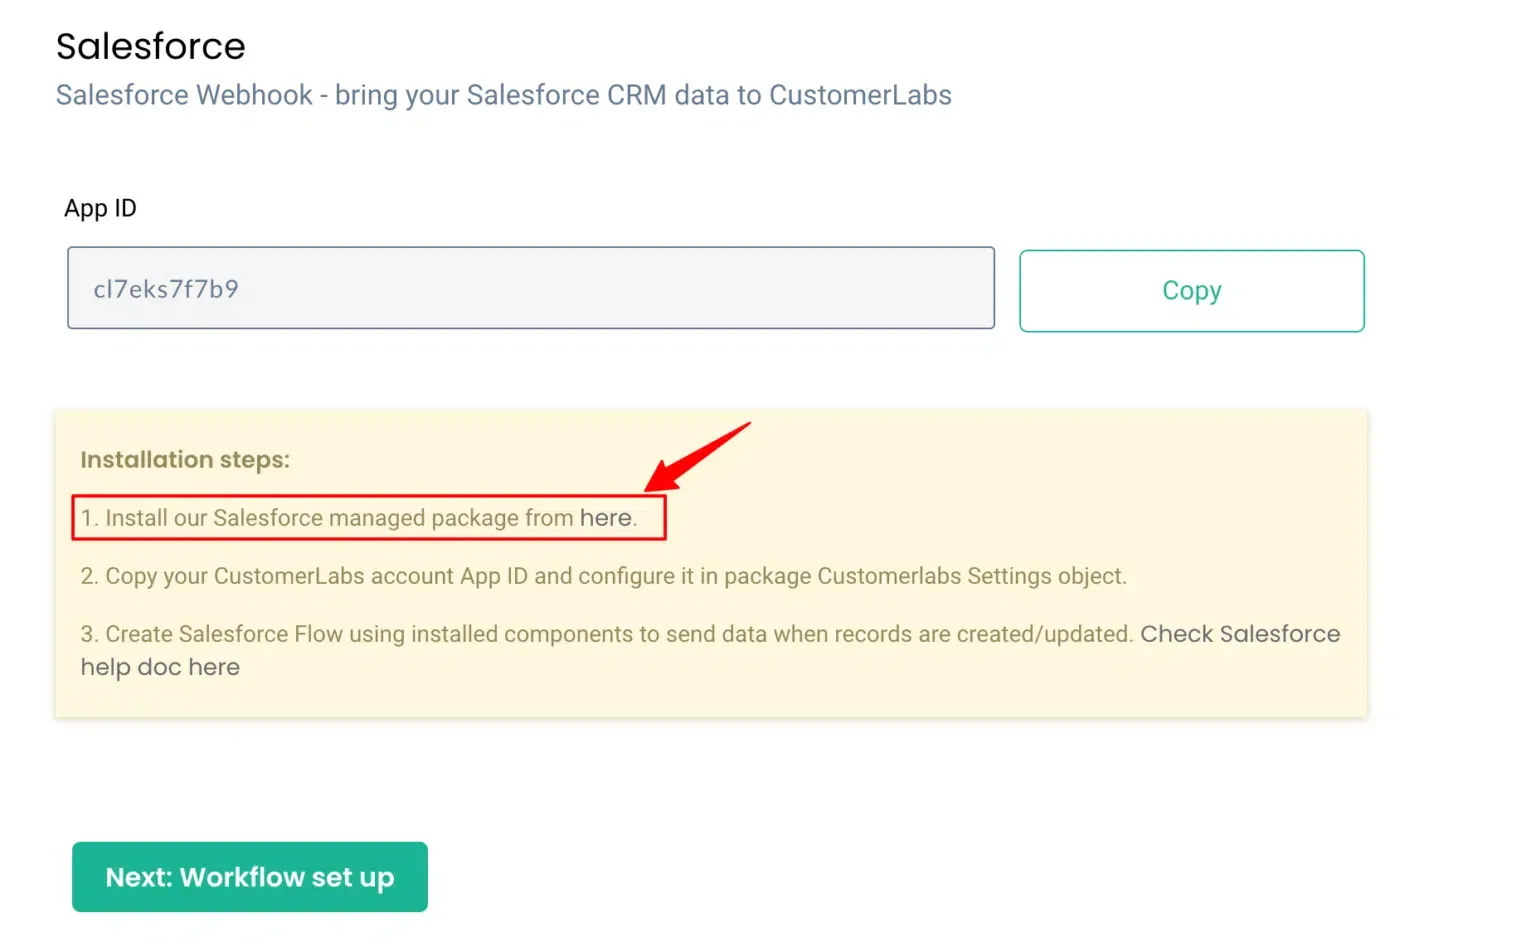
Copy the Webhook URL and App ID generated — you will need both in the following steps.
Step 2: Install the CustomerLabs Package in Salesforce
Section titled “Step 2: Install the CustomerLabs Package in Salesforce”-
Use the installation link provided in CustomerLabs to open the package installer.
-
Log in to Salesforce as an Admin.
-
Select Install for Admins Only and click Install.
-
Once installation is complete, click Done.
Step 3: Configure CustomerLabs Settings in Salesforce
Section titled “Step 3: Configure CustomerLabs Settings in Salesforce”-
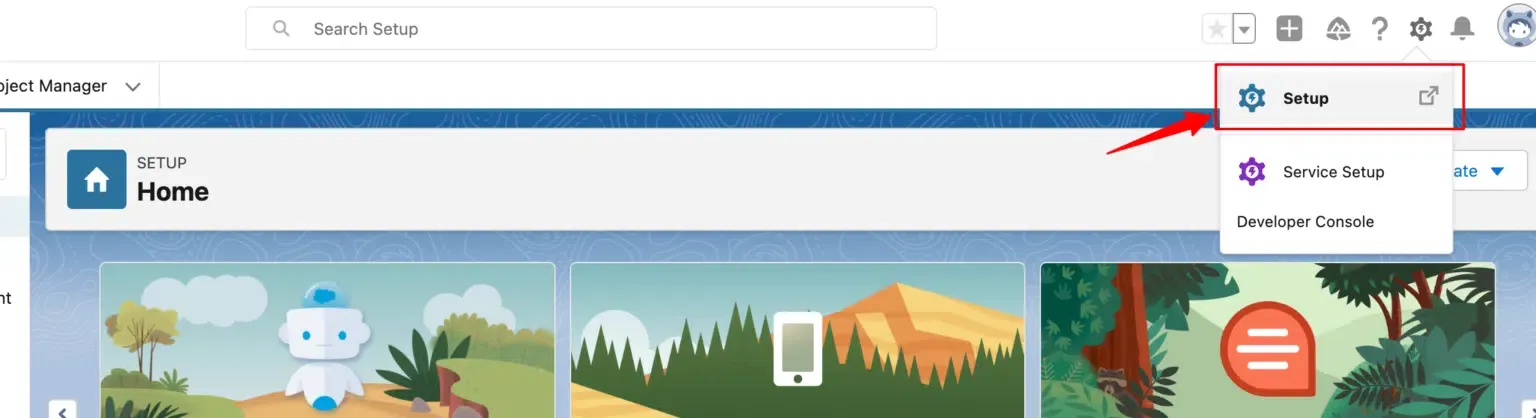
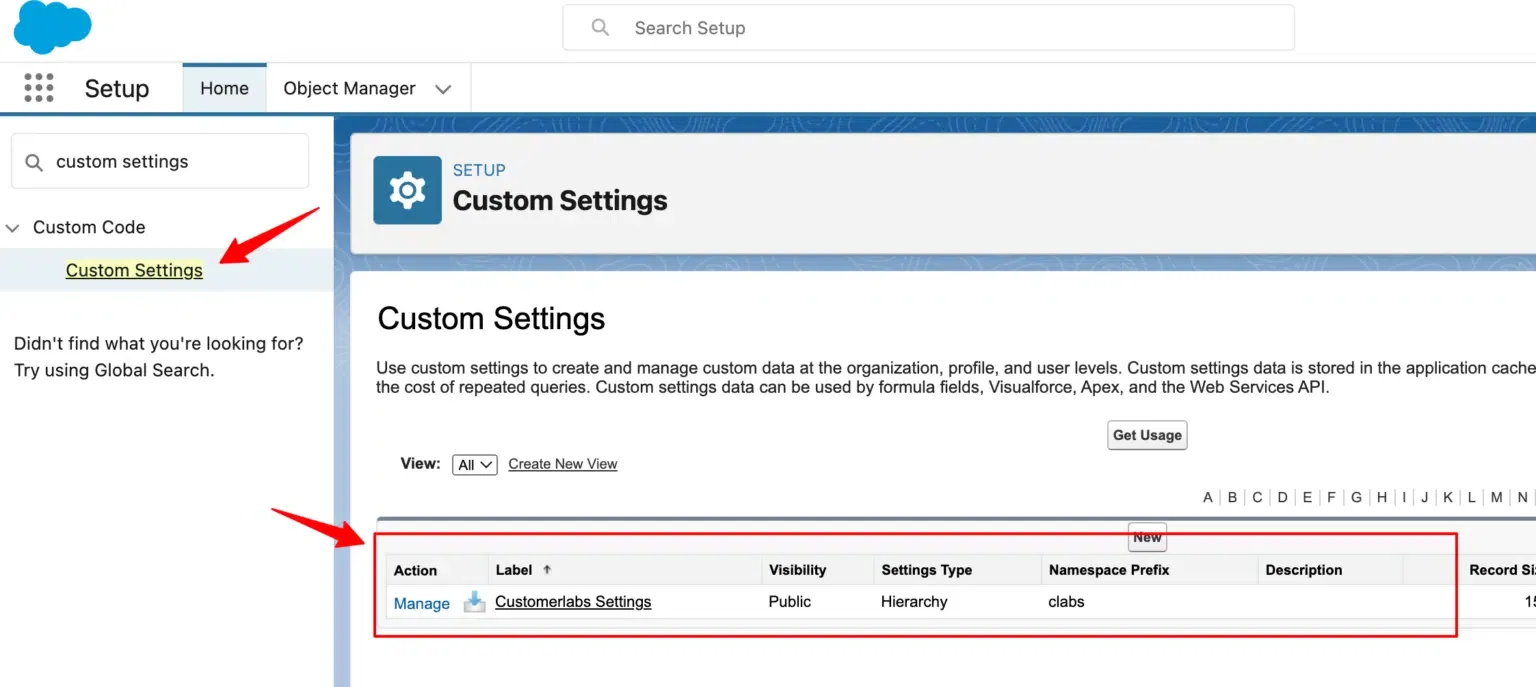
In Salesforce, click the gear icon and go to Setup.
-
In the Quick Find box, search for Custom Settings.
-
Click CustomerLabs Settings from the list.
-
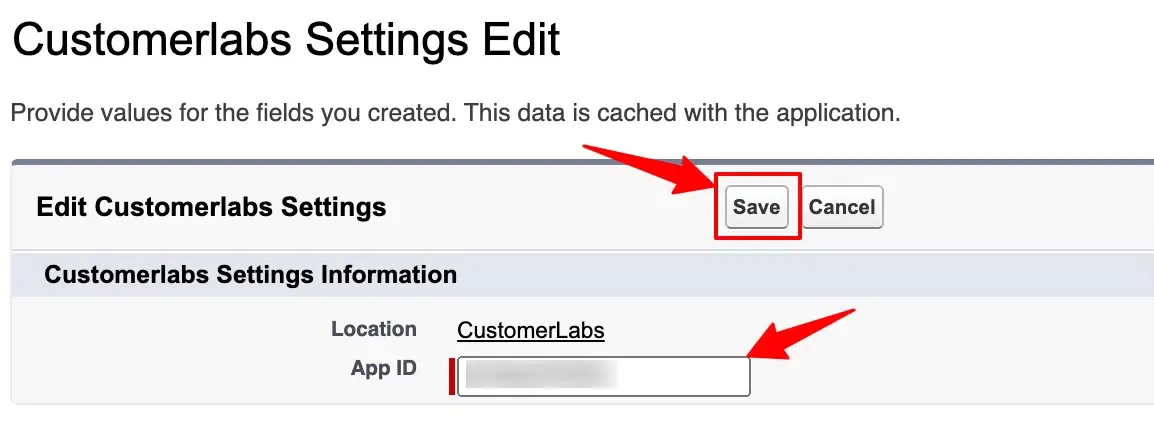
Click Manage, then click Edit.

-
Paste your CustomerLabs App ID into the field.
-
Click Save.
Step 4: Configure Remote Site Settings
Section titled “Step 4: Configure Remote Site Settings”-
In the Quick Find box, search for Remote Site Settings.
-
Click New Remote Site.

-
Enter the following values and click Save:
Field Value Remote Site Name CustomerLabs Remote Site URL https://hook.customerlabs.co Active Enabled 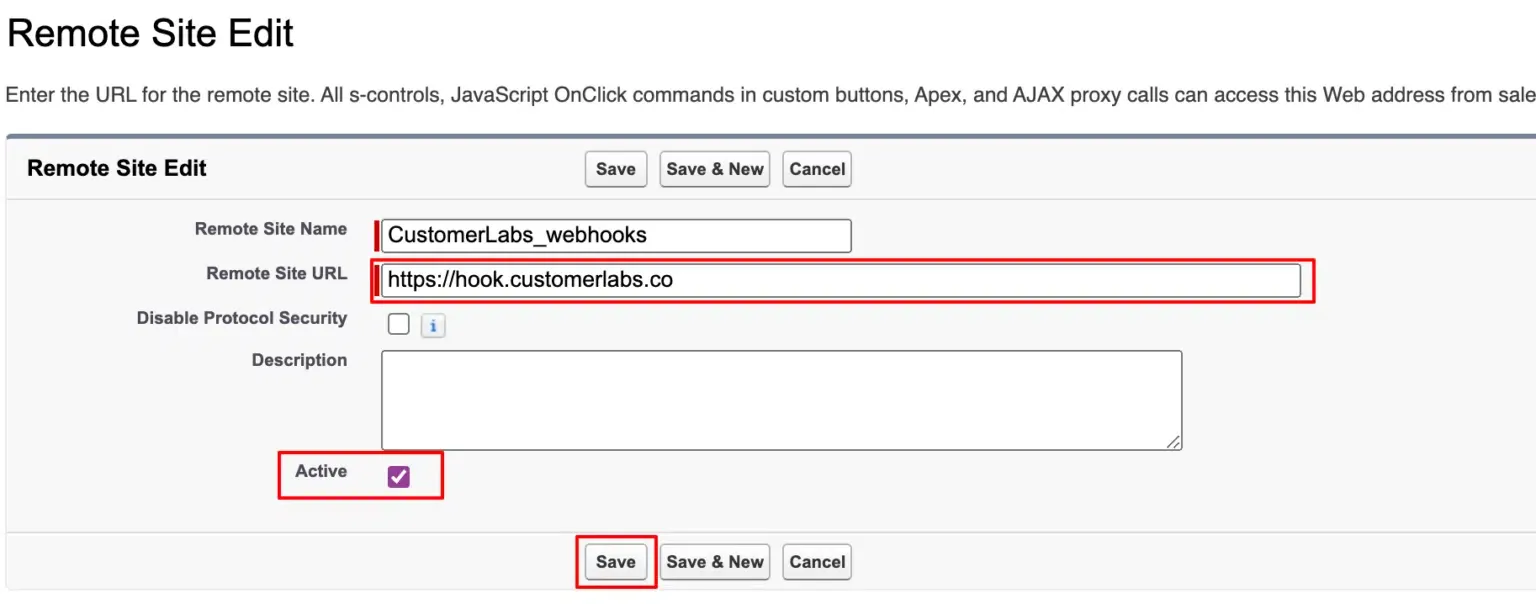
2. Set Up Flows in Salesforce
Section titled “2. Set Up Flows in Salesforce”Flows allow you to send event-based data from Salesforce to CustomerLabs automatically when records are created or updated. Create a separate flow for each object or trigger condition you want to track.
Flow 1: Send Data When a New Account Is Created
Section titled “Flow 1: Send Data When a New Account Is Created”Create the Flow
Section titled “Create the Flow”-
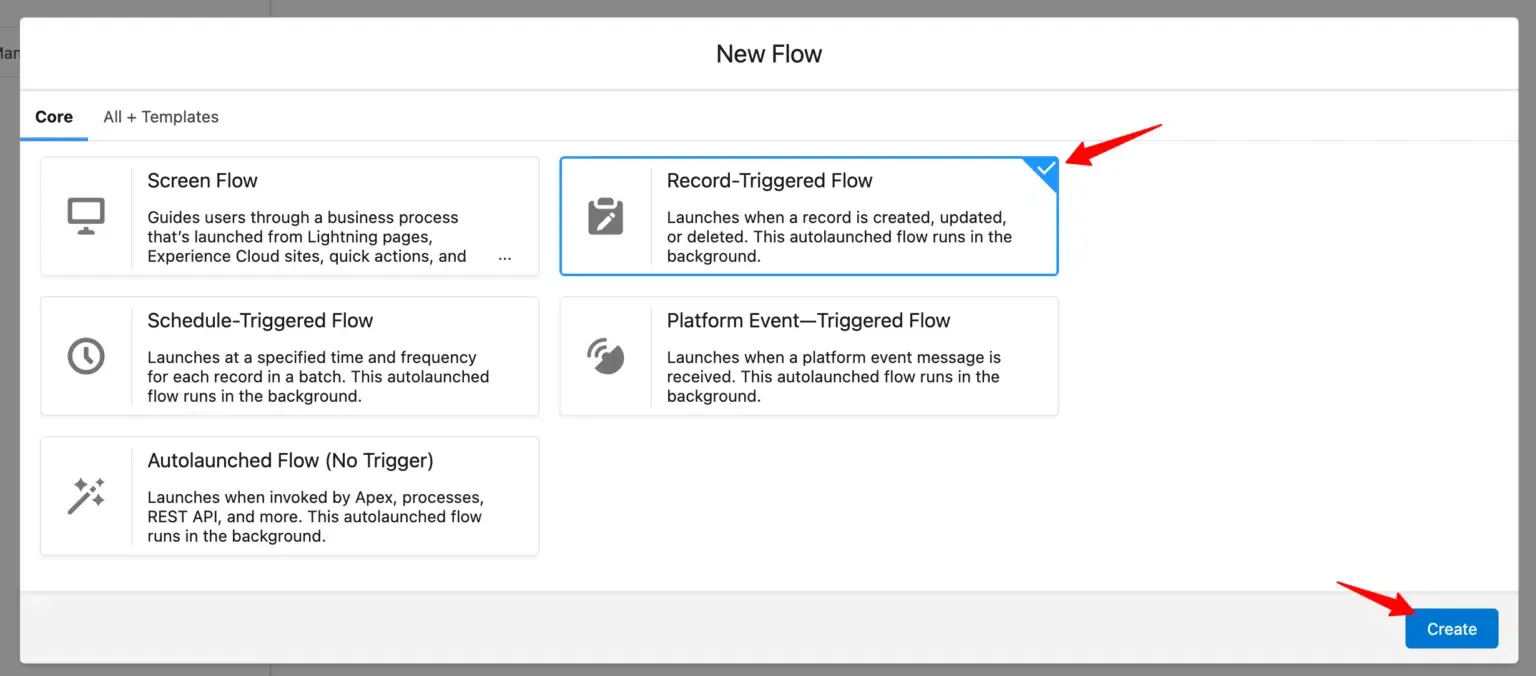
In Salesforce Setup, search for Flows under Process Automation.

-
Click New Flow.
-
Select Record-Triggered Flow and click Create.
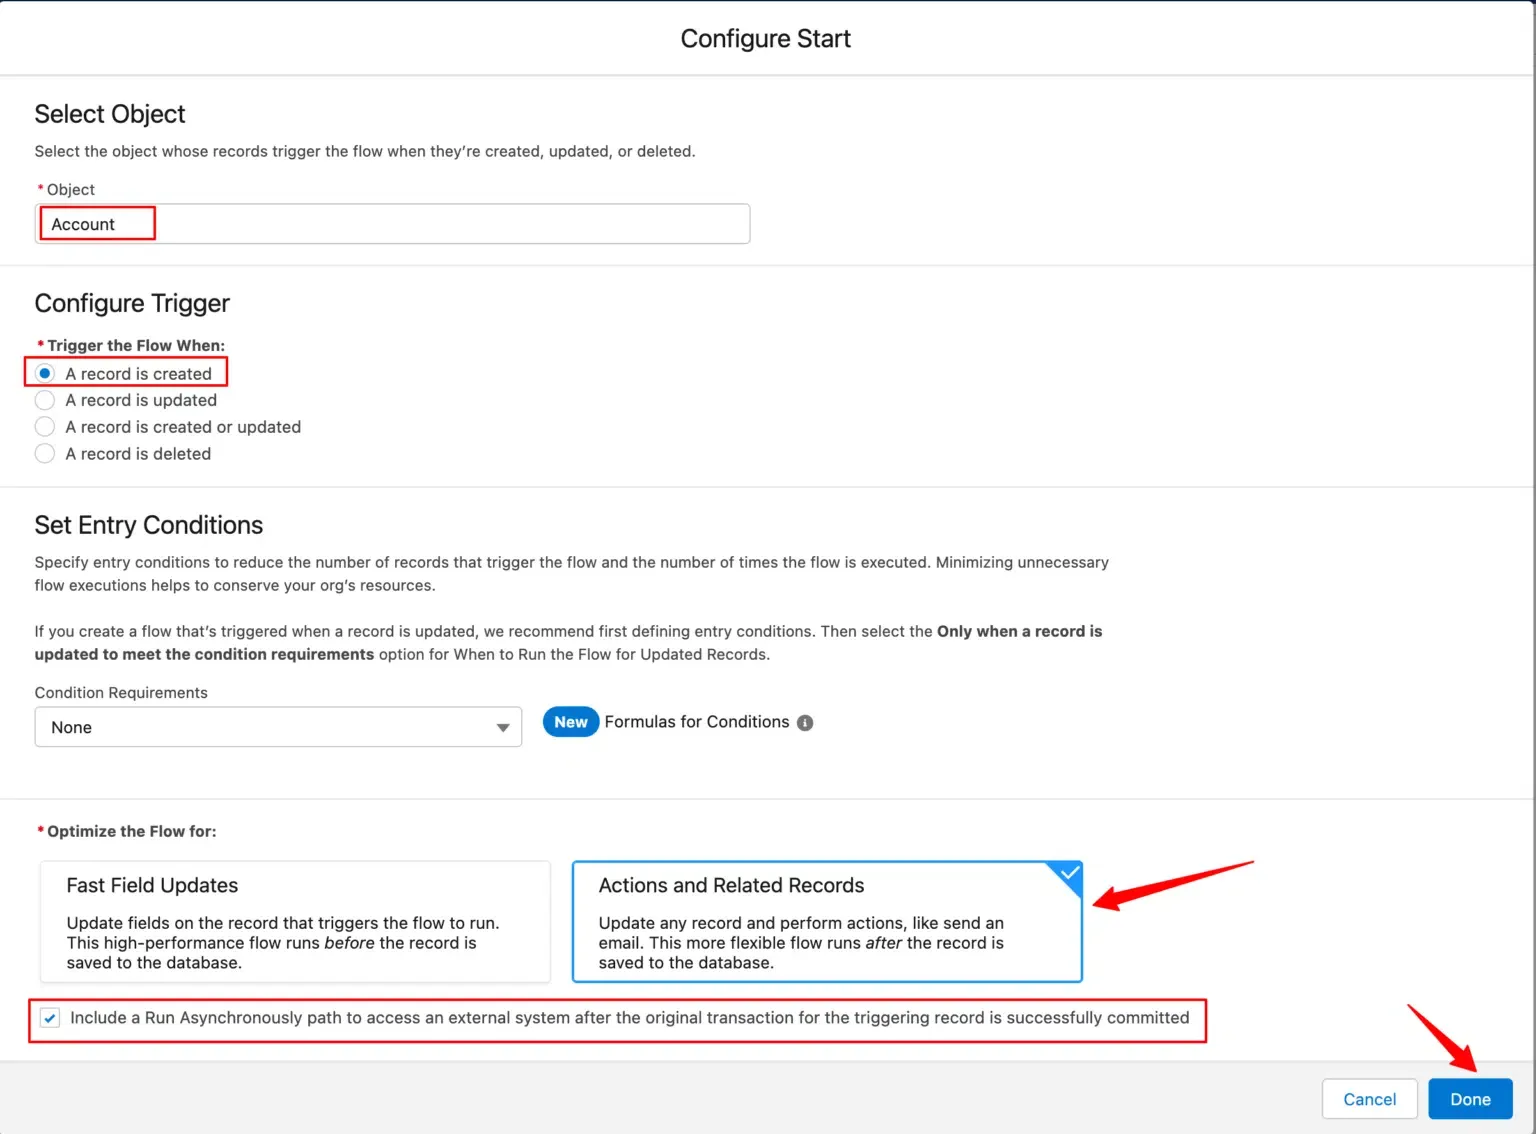
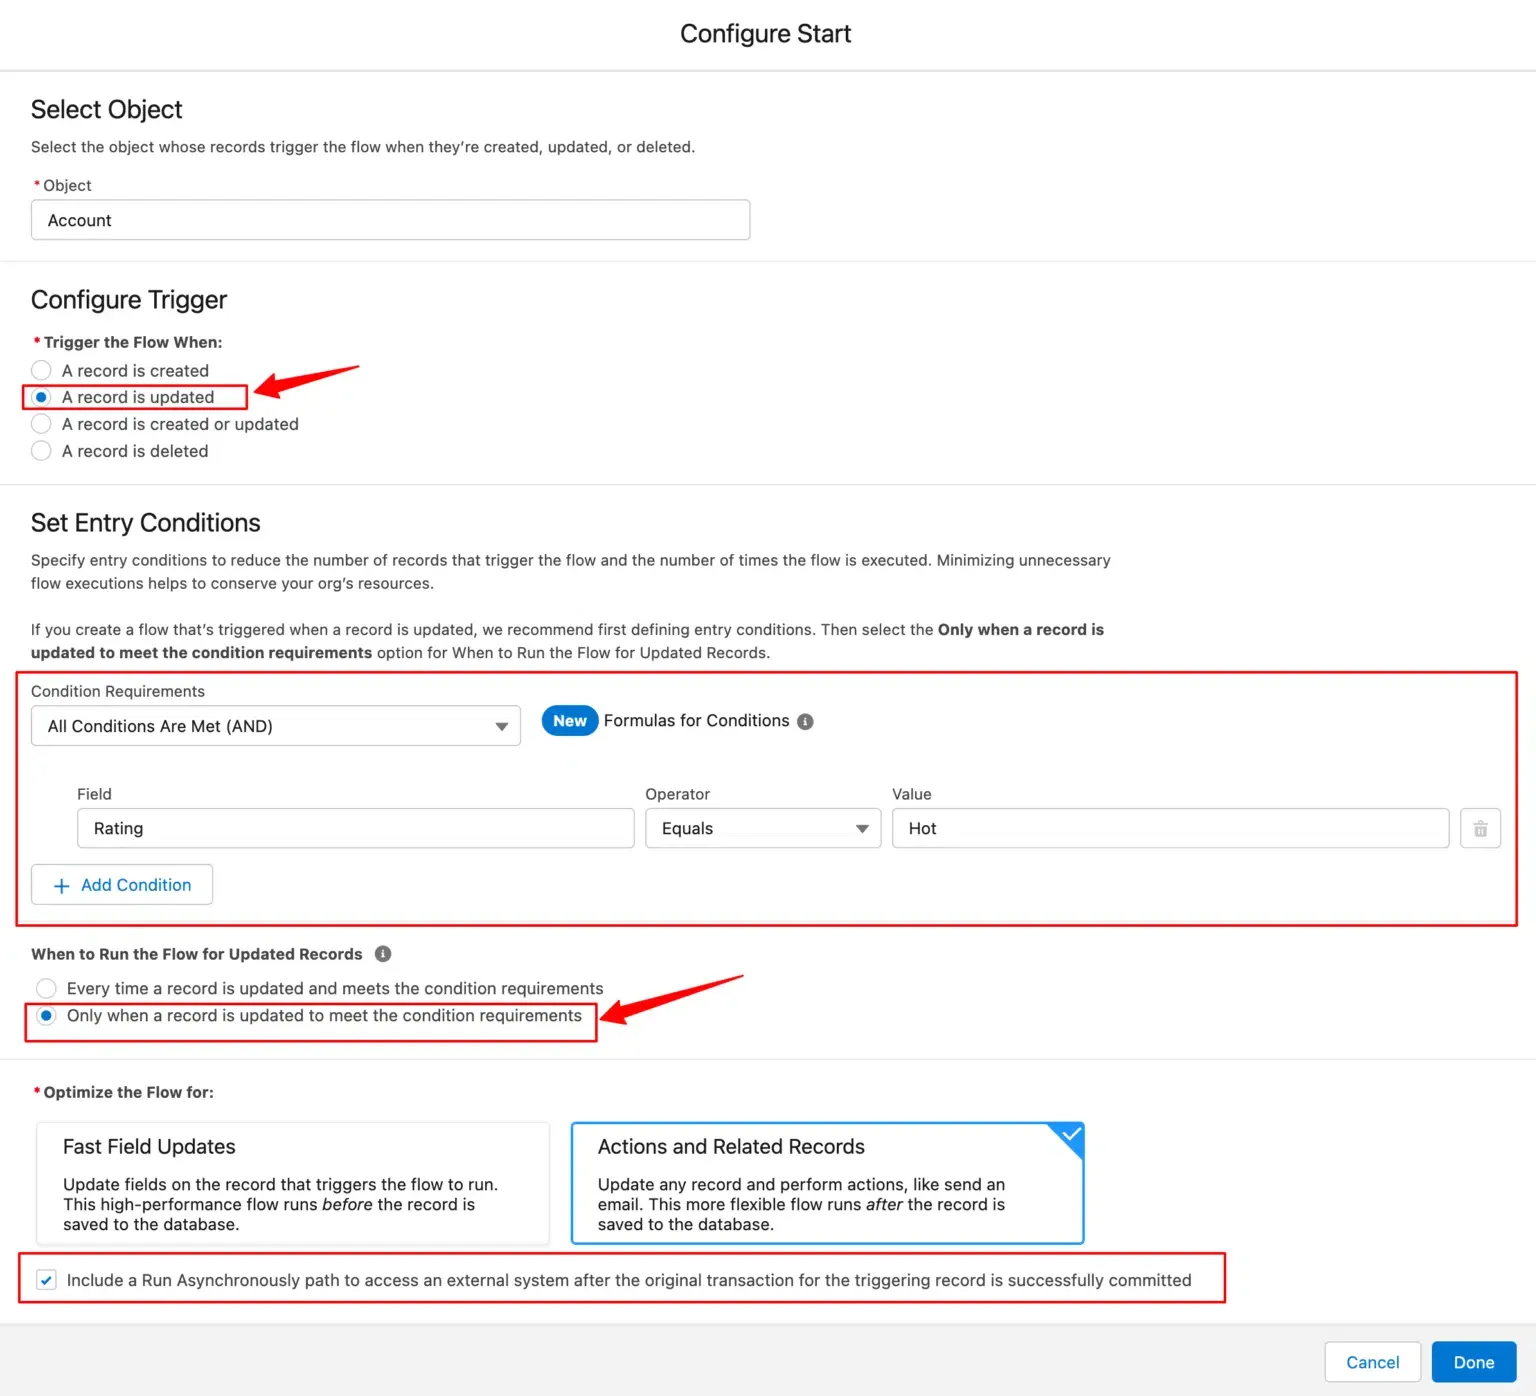
Configure the Trigger
Section titled “Configure the Trigger”Set the following values and click Done:
| Setting | Value |
|---|---|
| Object | Account |
| Trigger | A record is created |
| Entry Conditions | None (or as needed) |
| Optimize For | Actions and Related Records |
| Run Asynchronously | Enabled |
Add an Action
Section titled “Add an Action”-
Click + under Run Asynchronously.
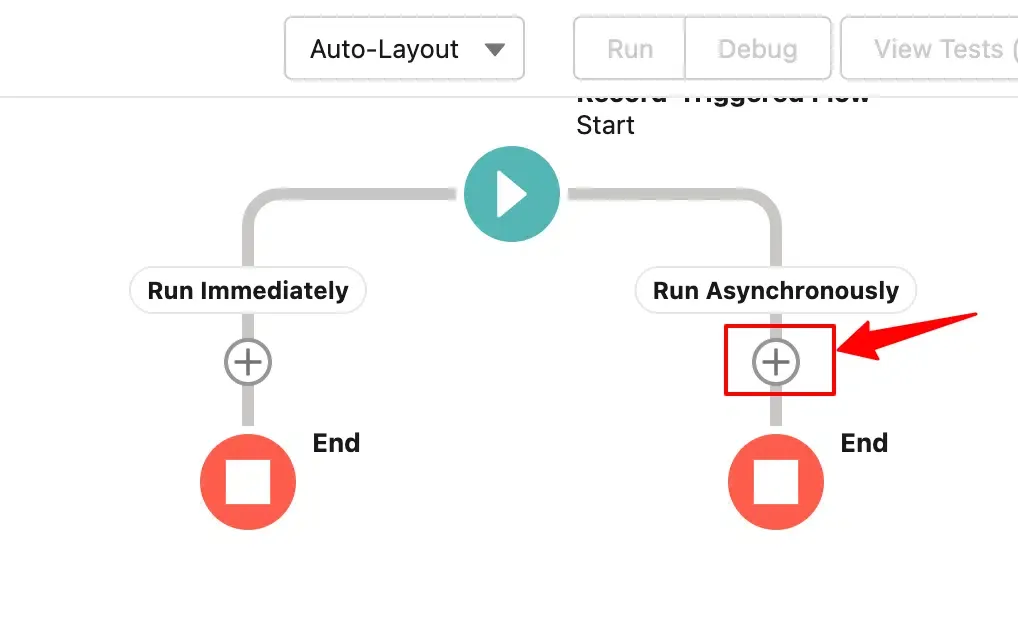
-
Select Action.
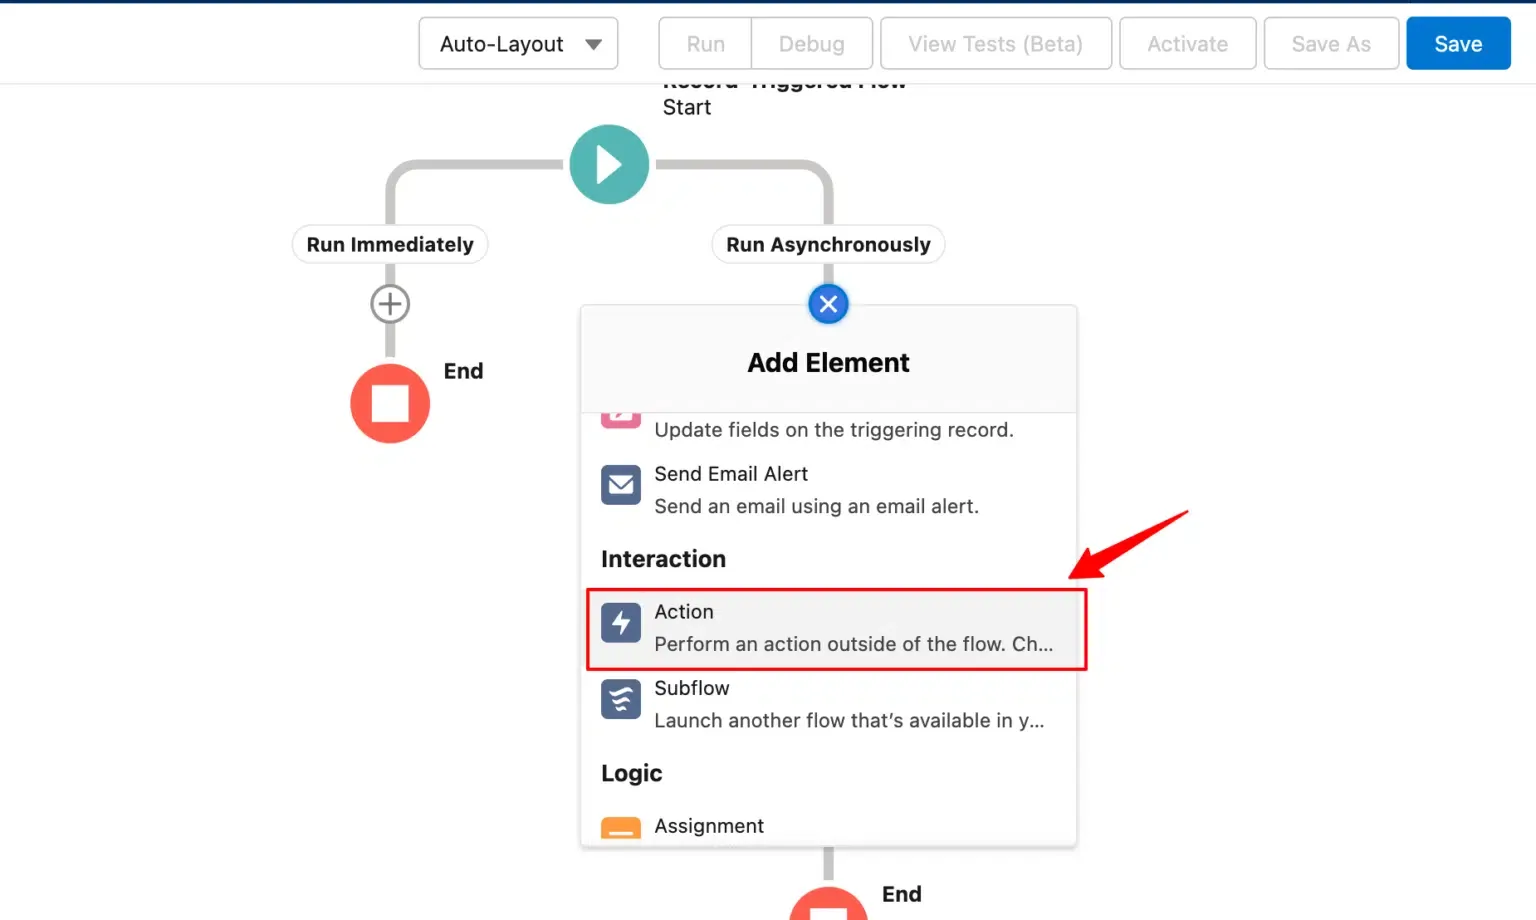
-
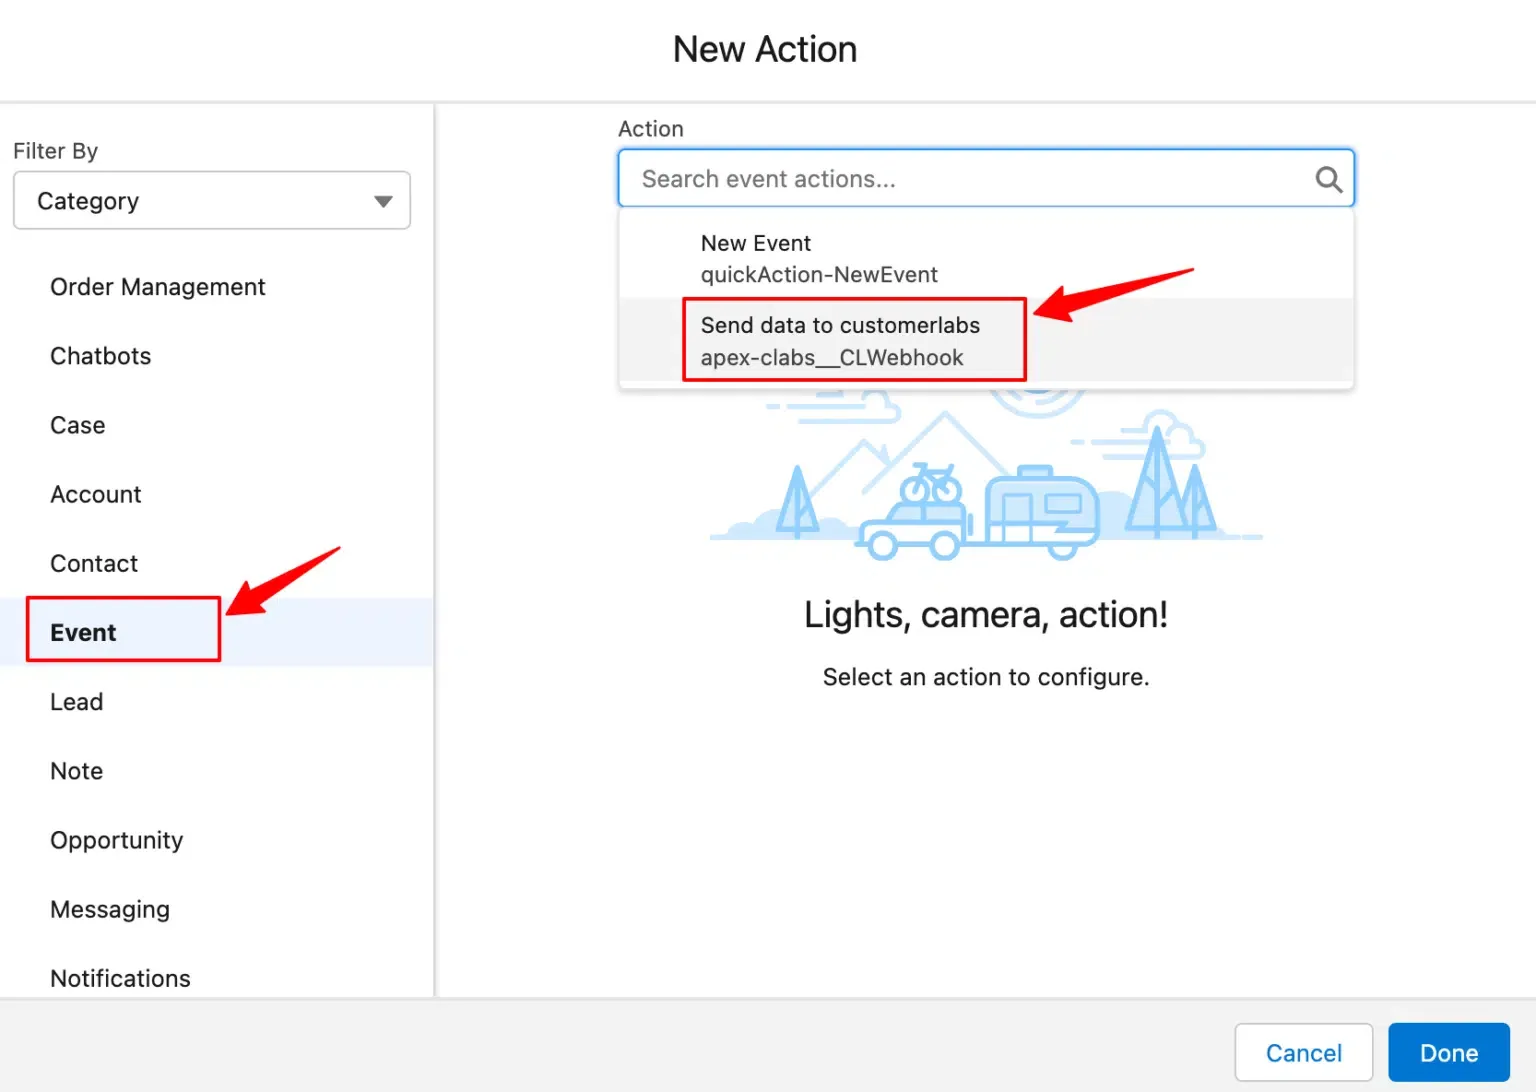
Set Category to Event and choose Send data to CustomerLabs as the action.
Configure the Action
Section titled “Configure the Action”-
Enter a Label (e.g.,
Account Created).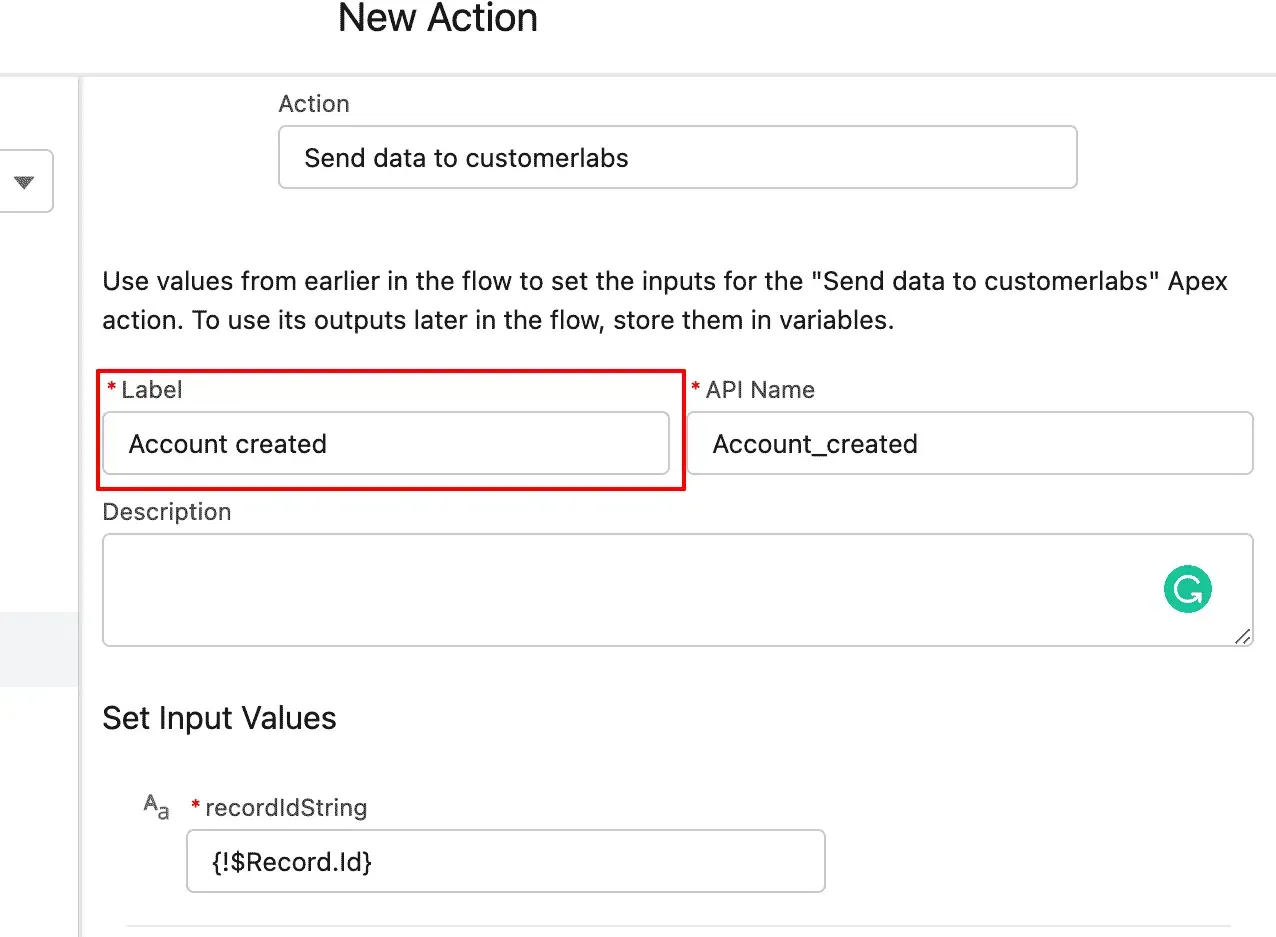
-
Under Set Input Values, add:
Field Value recordIdString Record → Account → ID 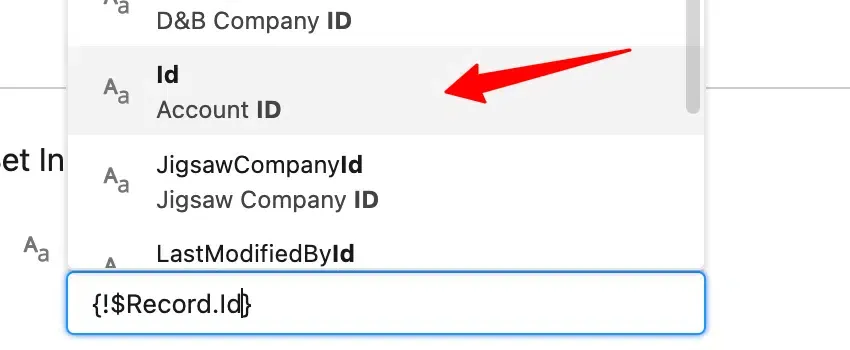
-
Click Done.
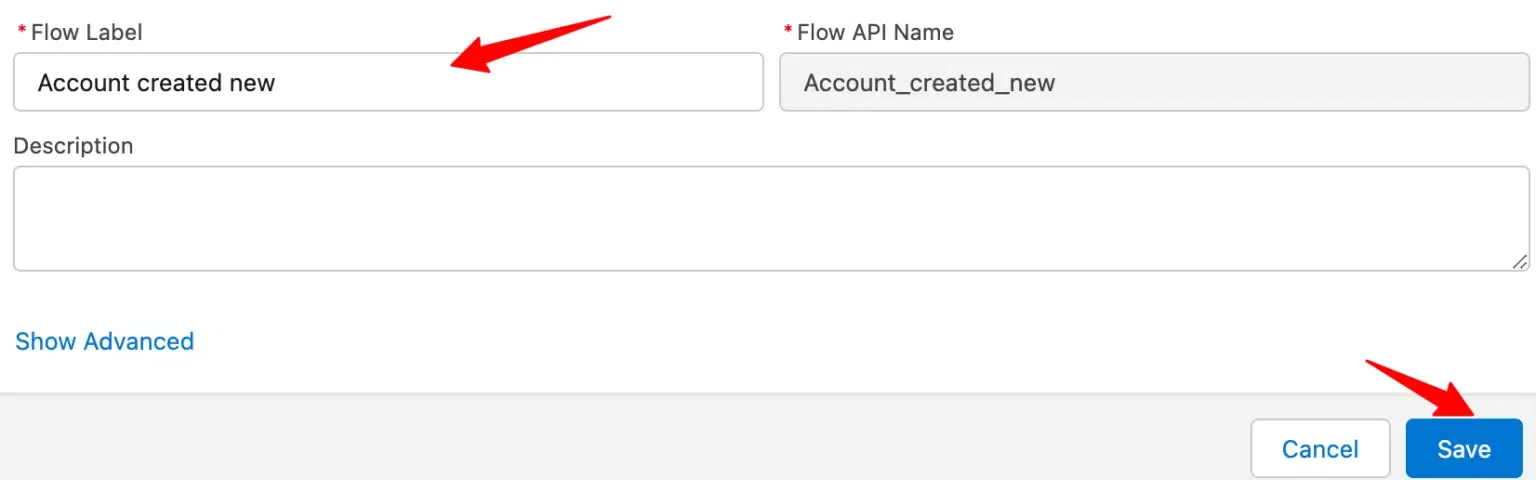
Save and Test
Section titled “Save and Test”-
Click Save, enter a Flow Name and Description, then click Save again.
-
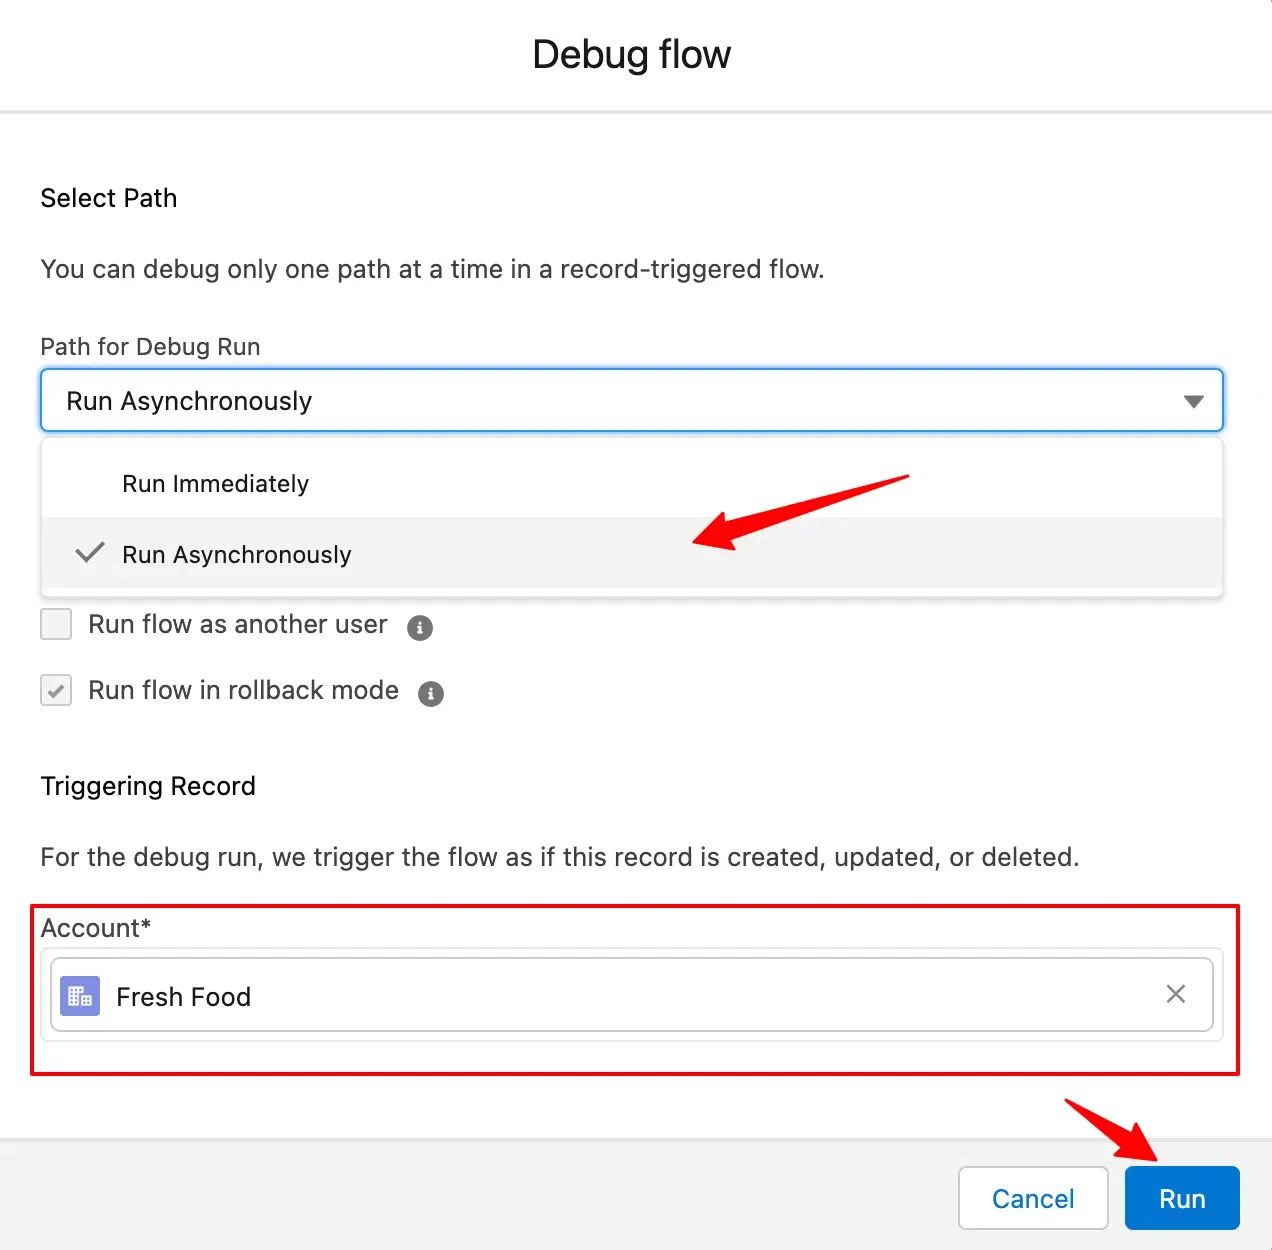
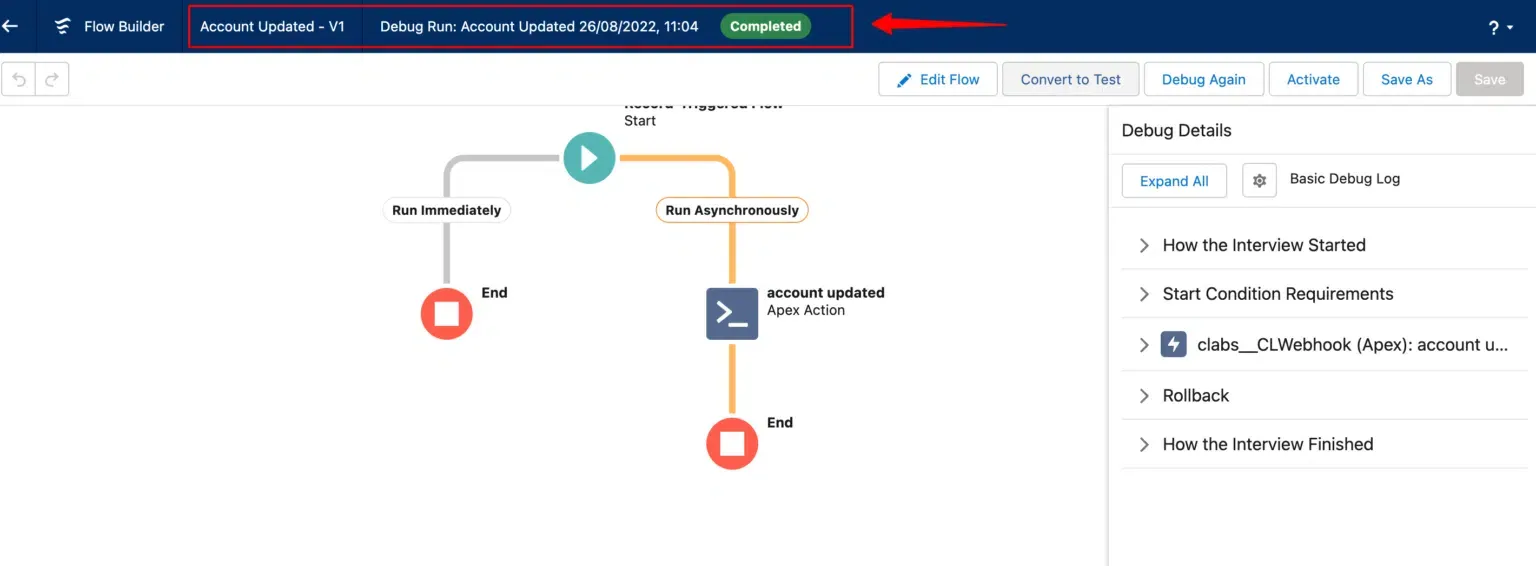
Click Debug and configure:
- Path: Run Asynchronously
- Record: a sample Account
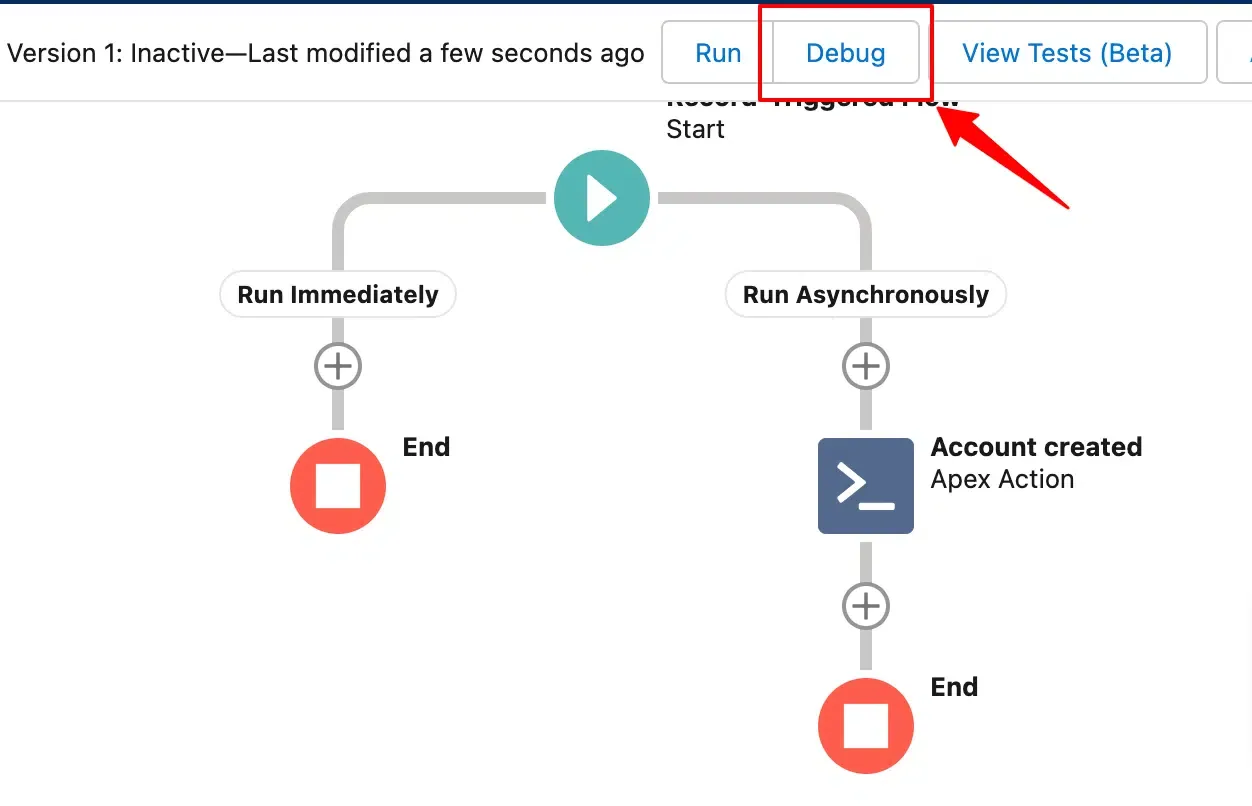
-
Click Run.
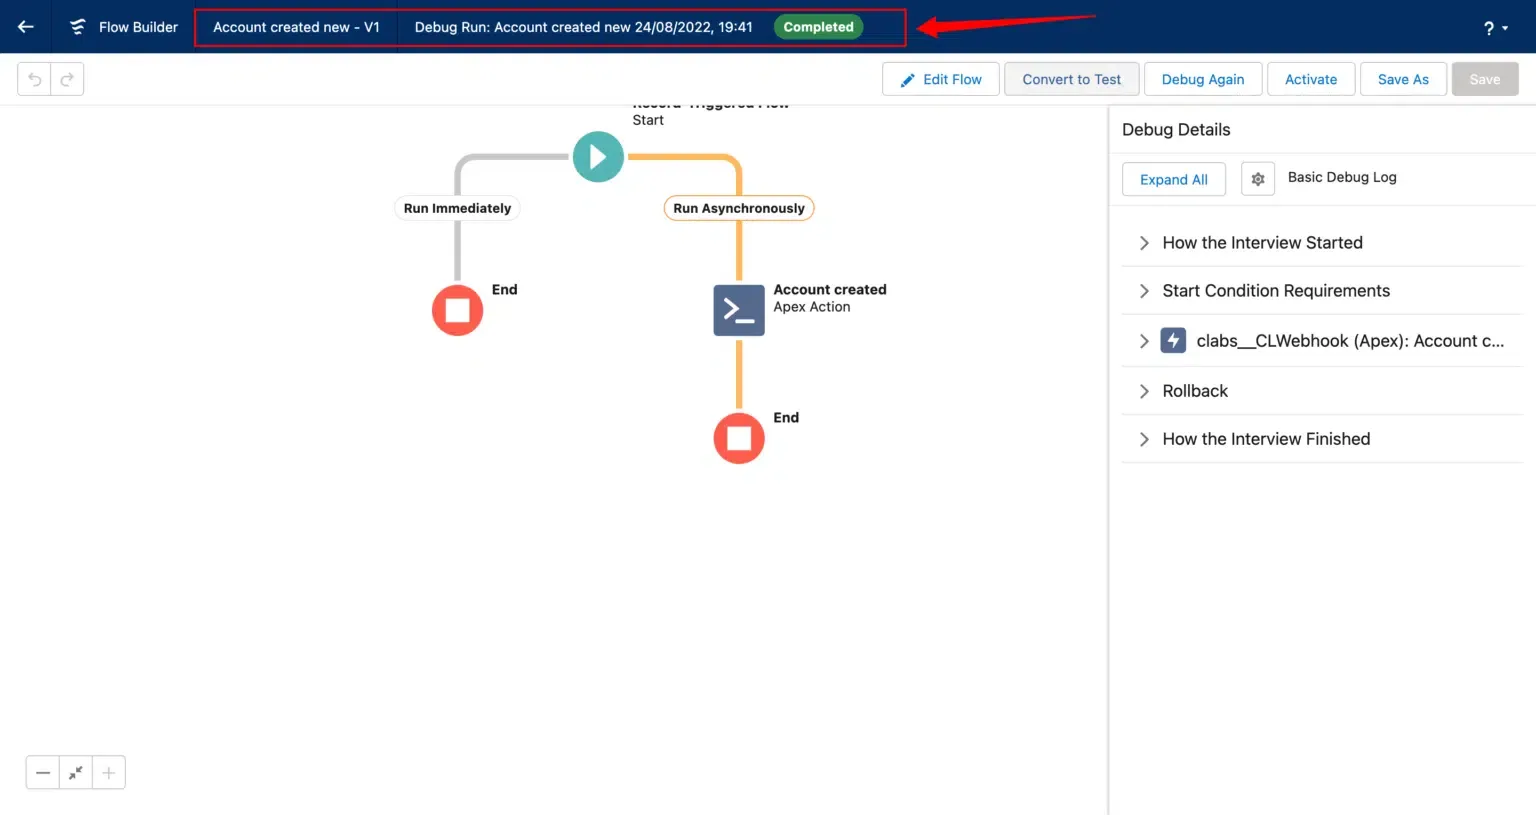
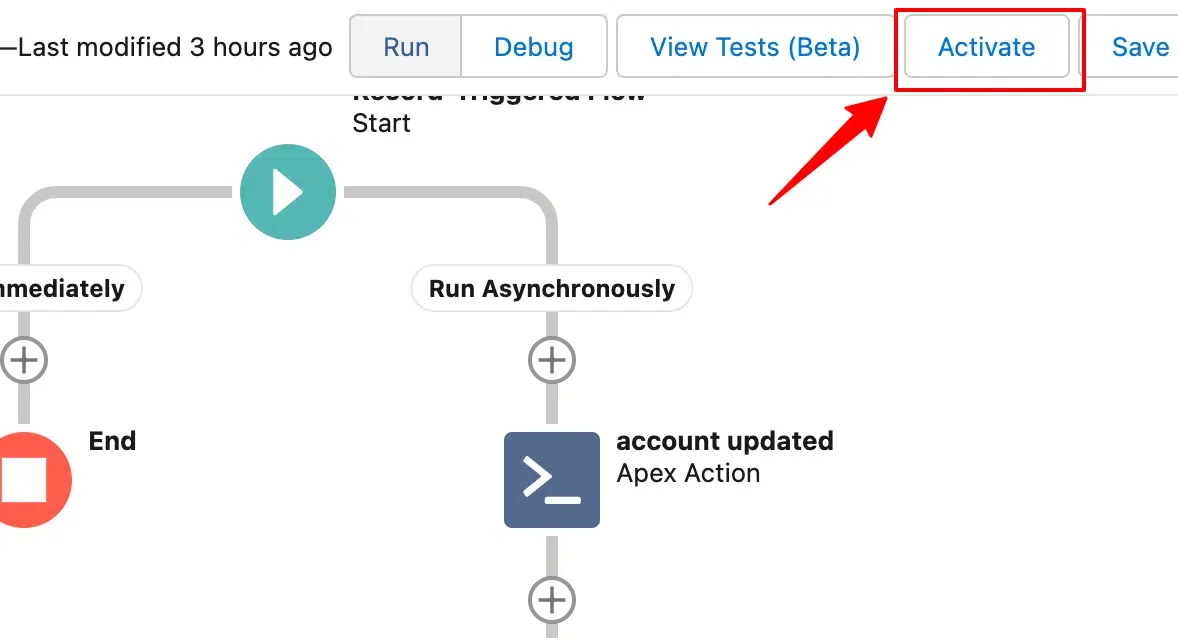
Activate the Flow
Section titled “Activate the Flow”Click Activate to start sending new account data to CustomerLabs.
Flow 2: Send Data When an Account Is Updated
Section titled “Flow 2: Send Data When an Account Is Updated”Create the Flow
Section titled “Create the Flow”-
Go to Setup → Flows → New Flow → Record-Triggered Flow → Create.
Configure the Trigger
Section titled “Configure the Trigger”Set the following values and click Done:
| Setting | Value |
|---|---|
| Object | Account |
| Trigger | A record is updated |
| Condition Requirement | Only when a record is updated to meet the condition requirements |
| Optimize For | Actions and Related Records |
| Run Asynchronously | Enabled |
Add and Configure the Action
Section titled “Add and Configure the Action”-
Click + under Run Asynchronously → Action.
-
Set Category to Event and choose Send data to CustomerLabs.
-
Enter a Label (e.g.,
Account Updated).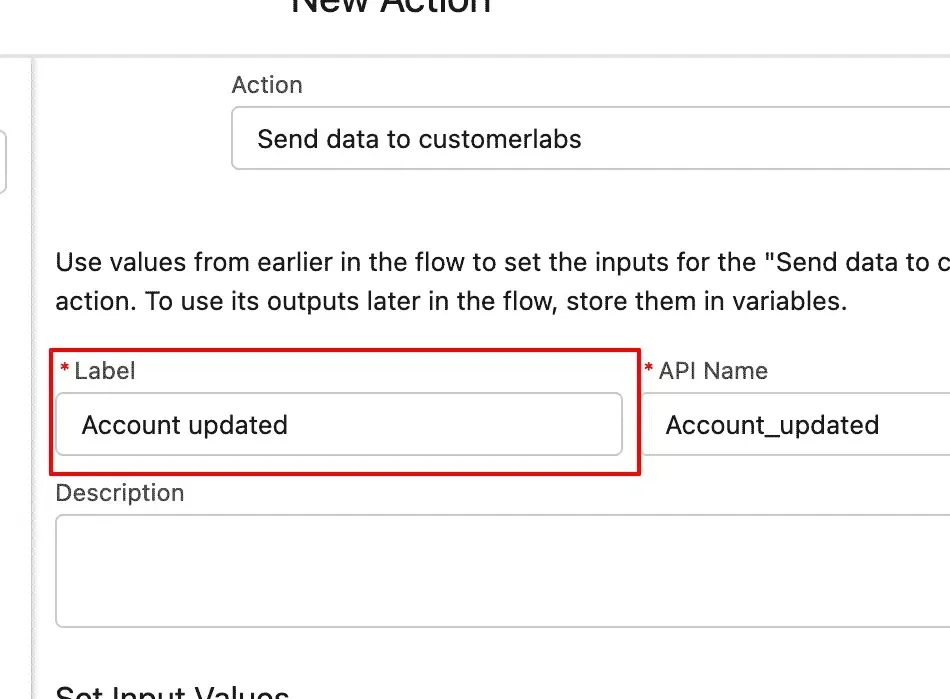
-
Under Set Input Values, set recordIdString to Record → Account → ID.
-
Click Done.
Save and Test
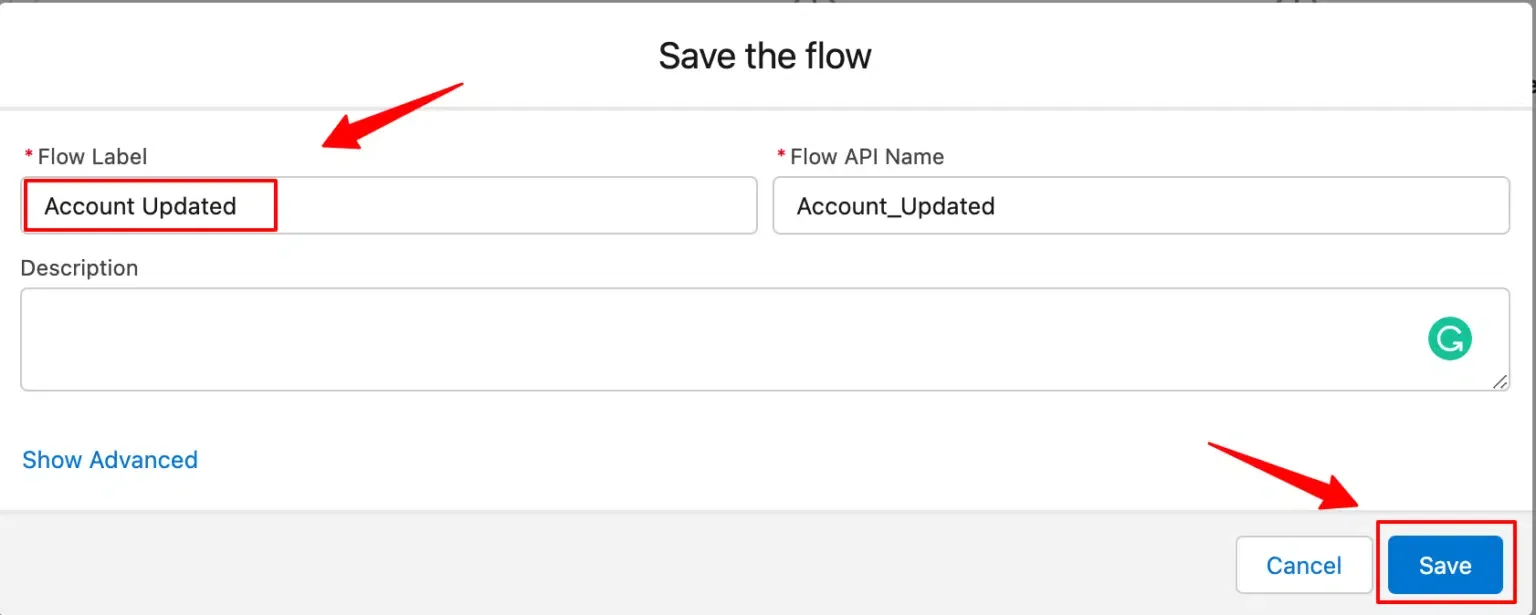
Section titled “Save and Test”- Click Save, add a Flow Name and Description.
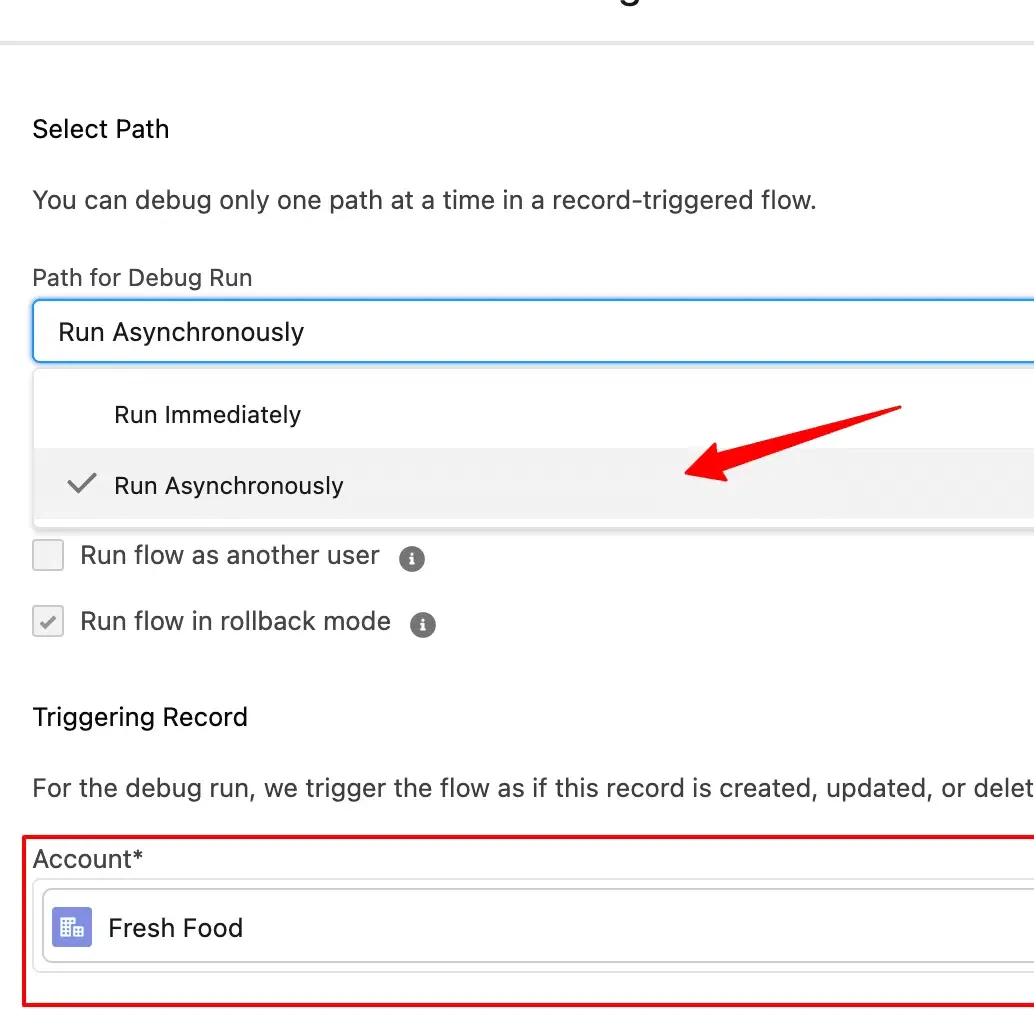
- Click Debug, select Path: Run Asynchronously and choose an Account record.
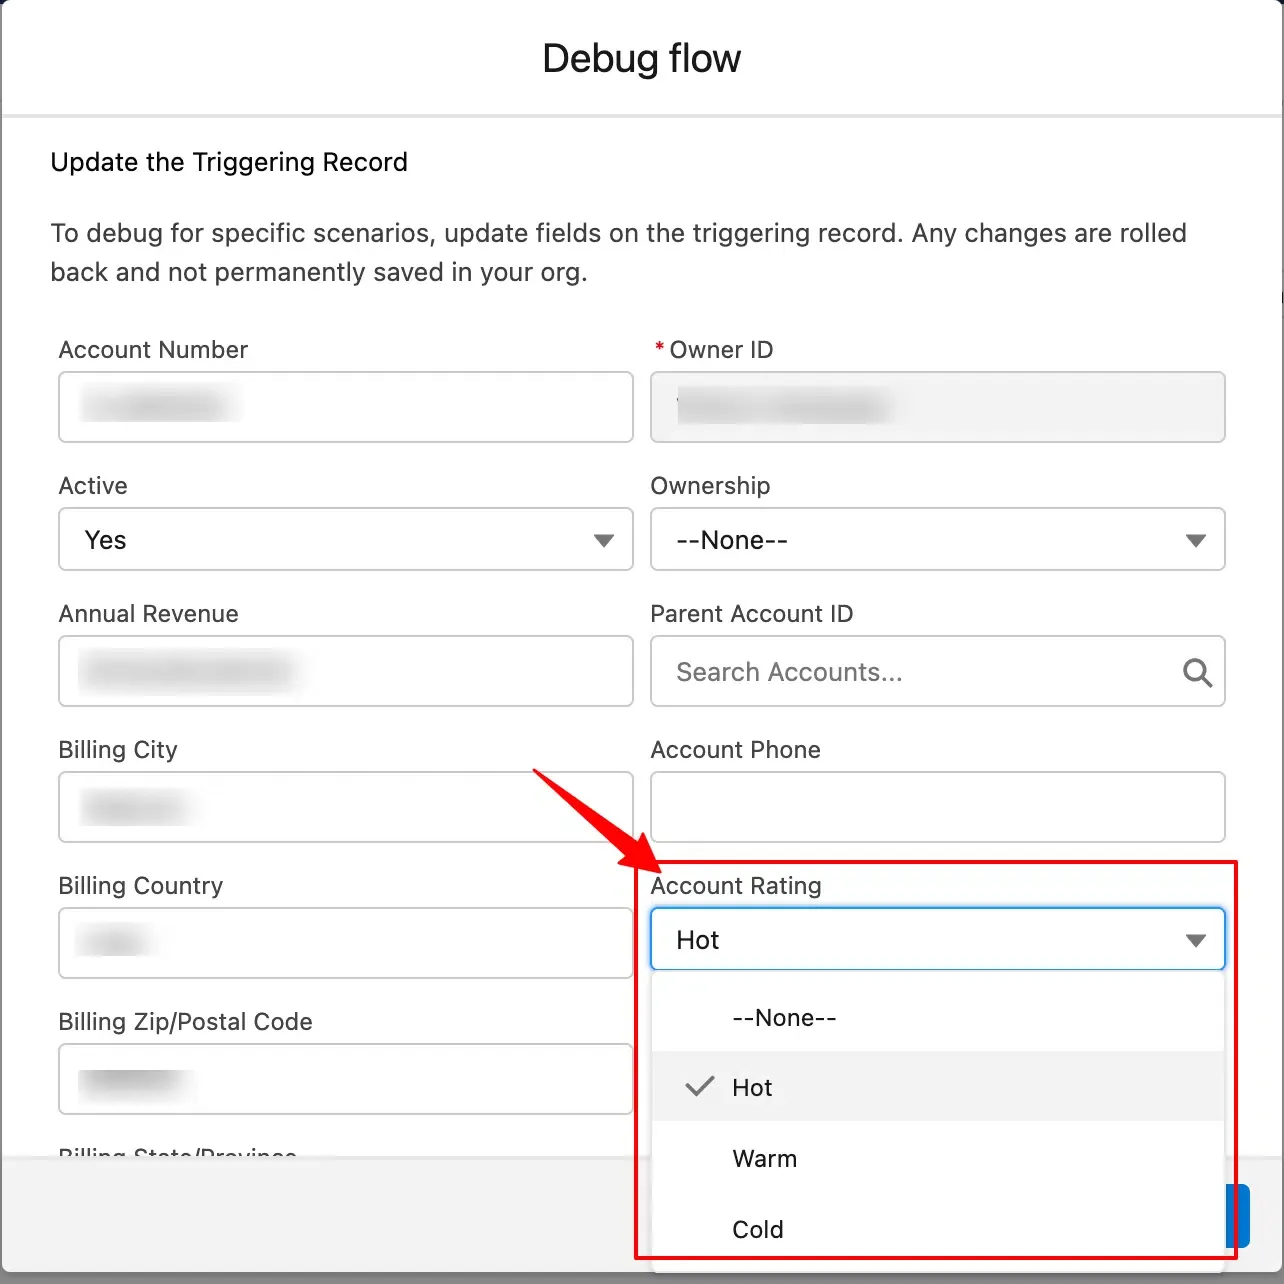
- Update a field (e.g., Rating → Hot) and click Run.
Activate the Flow
Section titled “Activate the Flow”Click Activate to start sending updated account data to CustomerLabs.
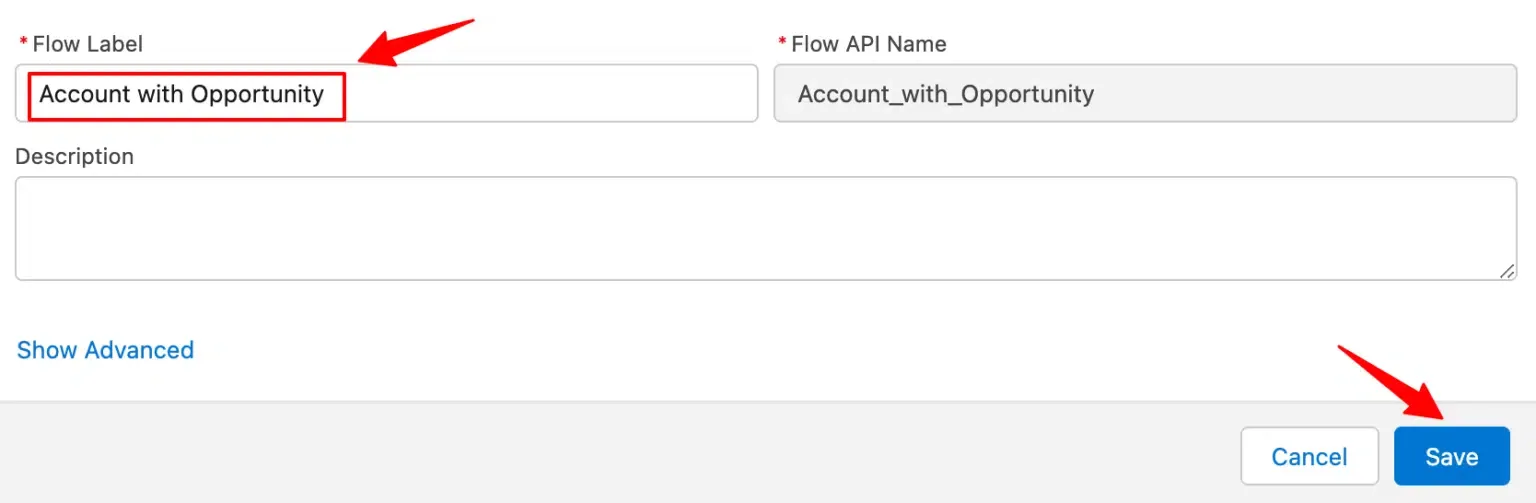
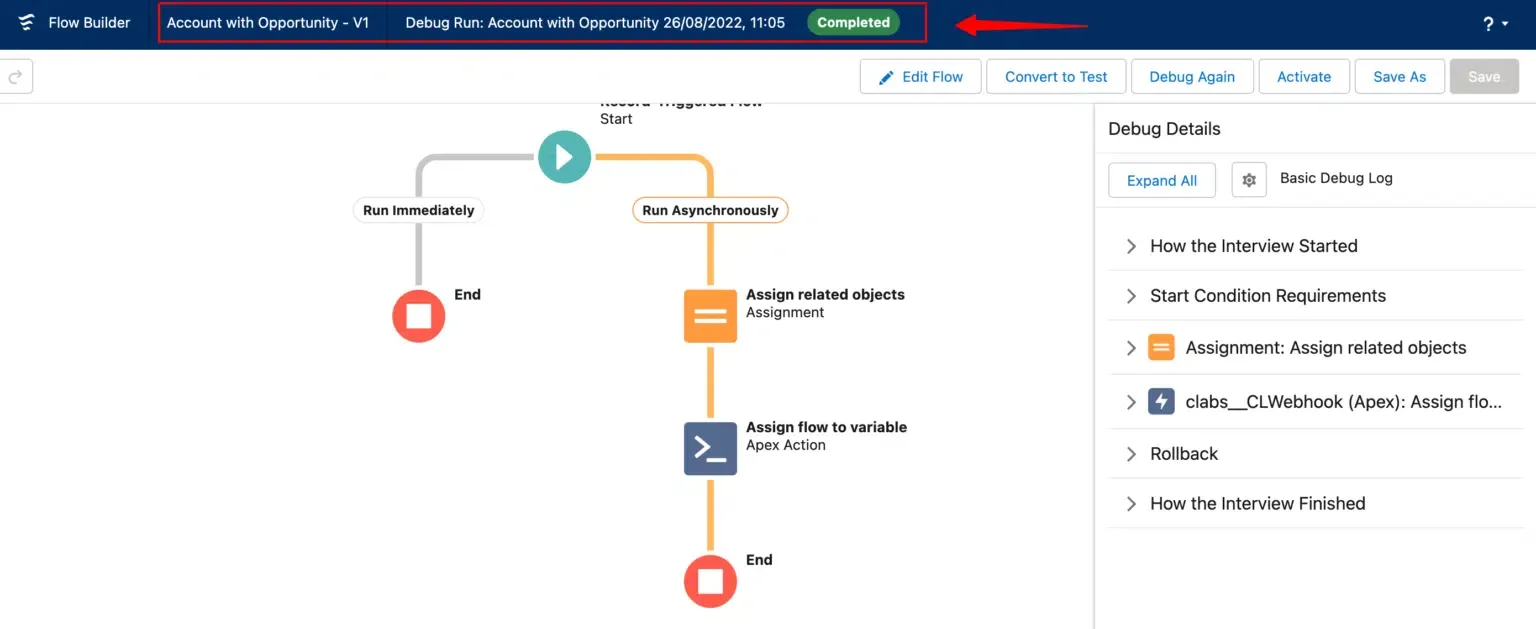
Flow 3: Send Data When an Account Is Created with Related Objects
Section titled “Flow 3: Send Data When an Account Is Created with Related Objects”This flow sends Account data together with related object data (e.g., Opportunities) to CustomerLabs in a single event.
Create the Flow
Section titled “Create the Flow”-
Go to Setup → Flows → New Flow → Record-Triggered Flow → Create.
-
Set Object to Account and Trigger to A record is created.
Configure the Flow
Section titled “Configure the Flow”Set the following and click Done:
| Setting | Value |
|---|---|
| Entry Conditions | Optional |
| Optimize For | Actions and Related Records |
| Run Asynchronously | Enabled |
Create a Variable for Related Objects
Section titled “Create a Variable for Related Objects”-
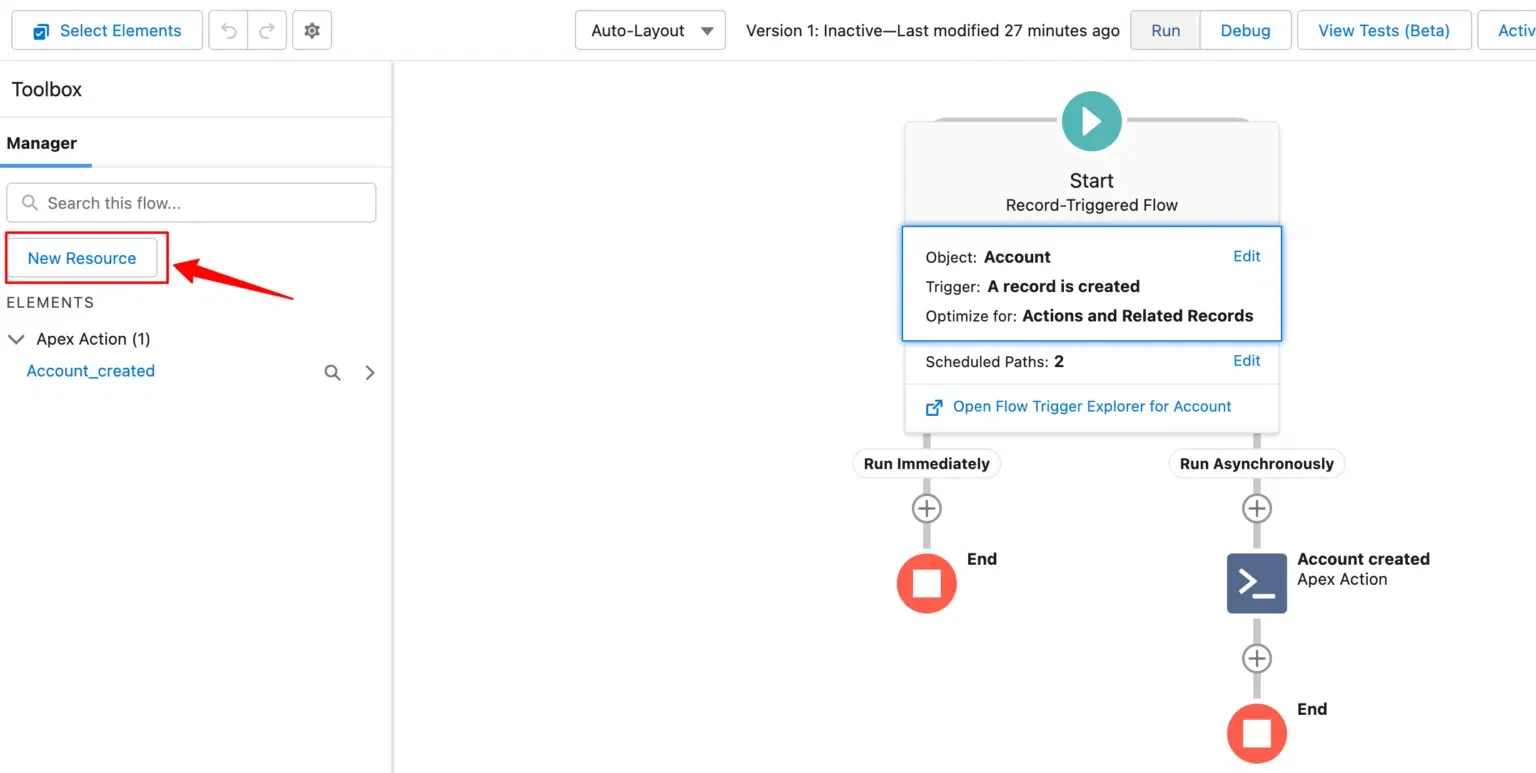
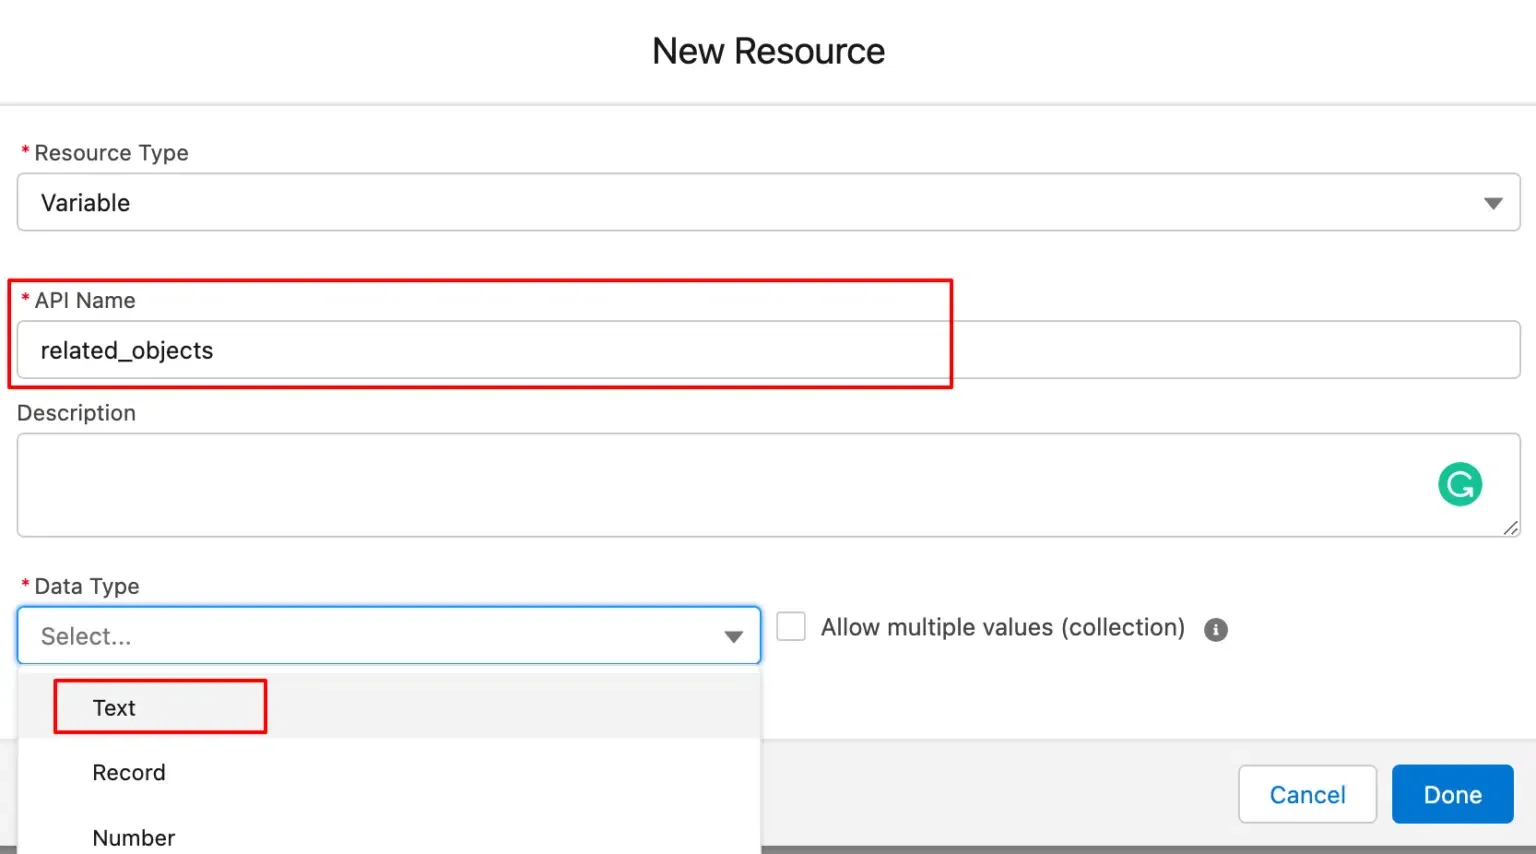
In the left panel, click New Resource.
-
Configure the variable:
Field Value Resource Type Variable Data Type Text Allow Multiple Values (Collection) Enabled Available for Input Enabled 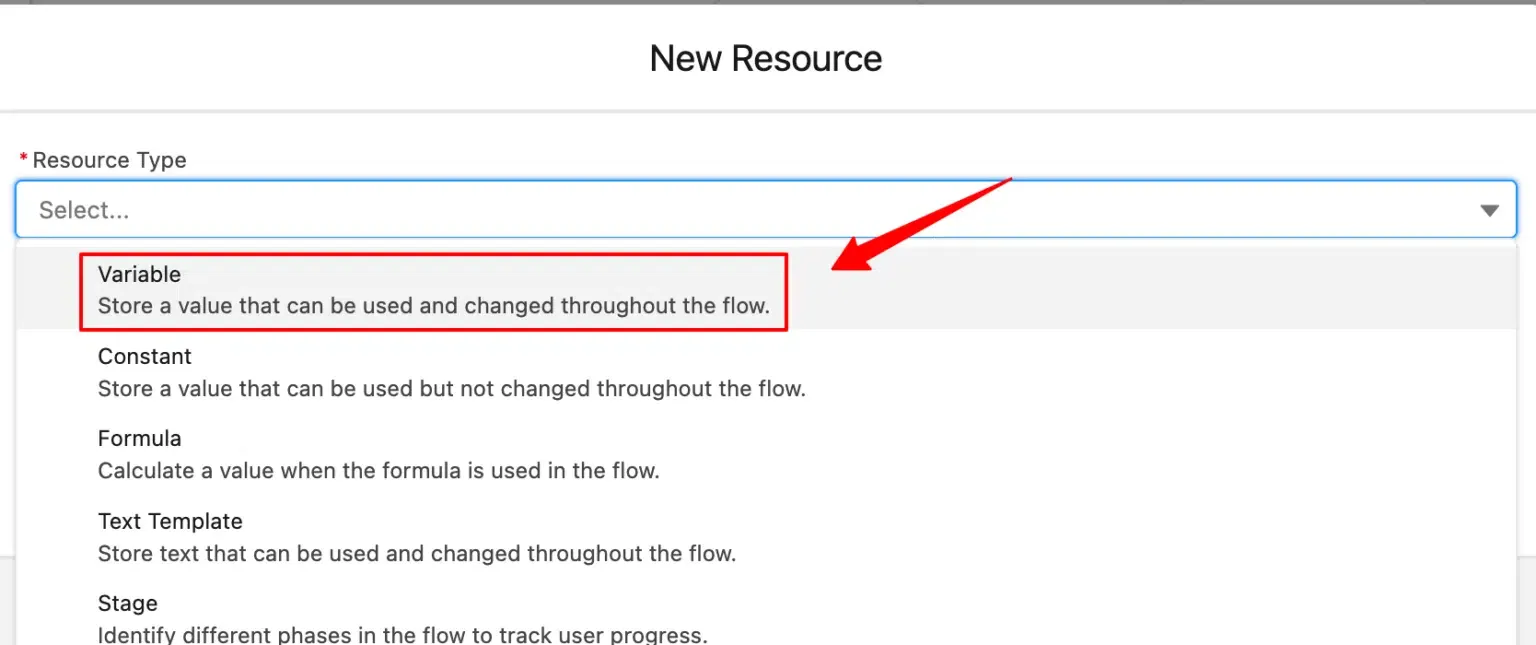
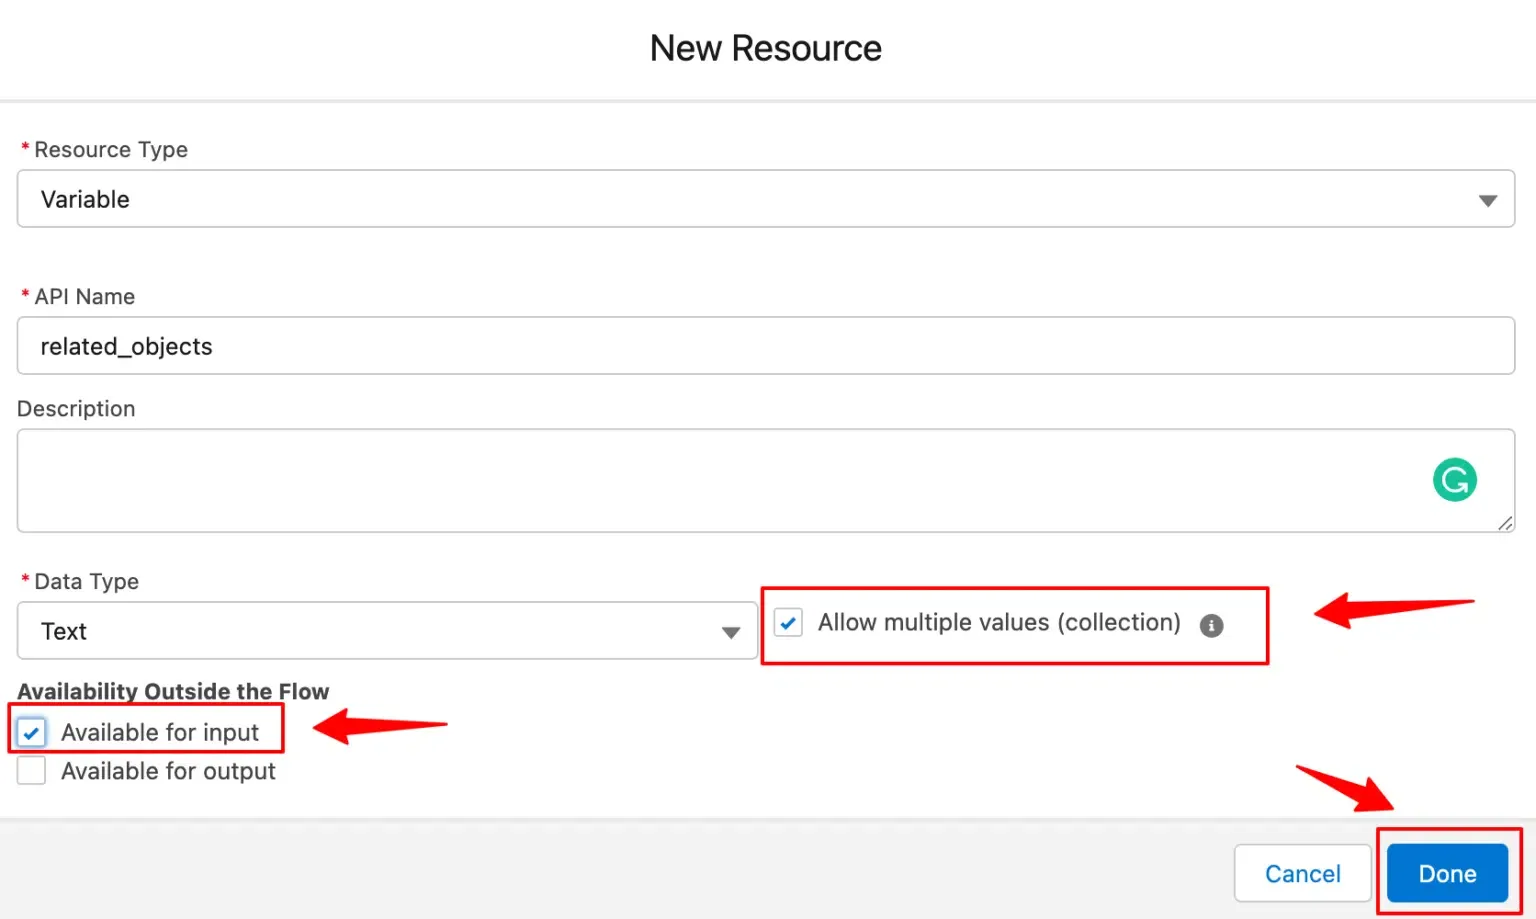
-
Click Done to save the variable.
Add Assignment Logic
Section titled “Add Assignment Logic”- Click + under Run Asynchronously → Assignment.
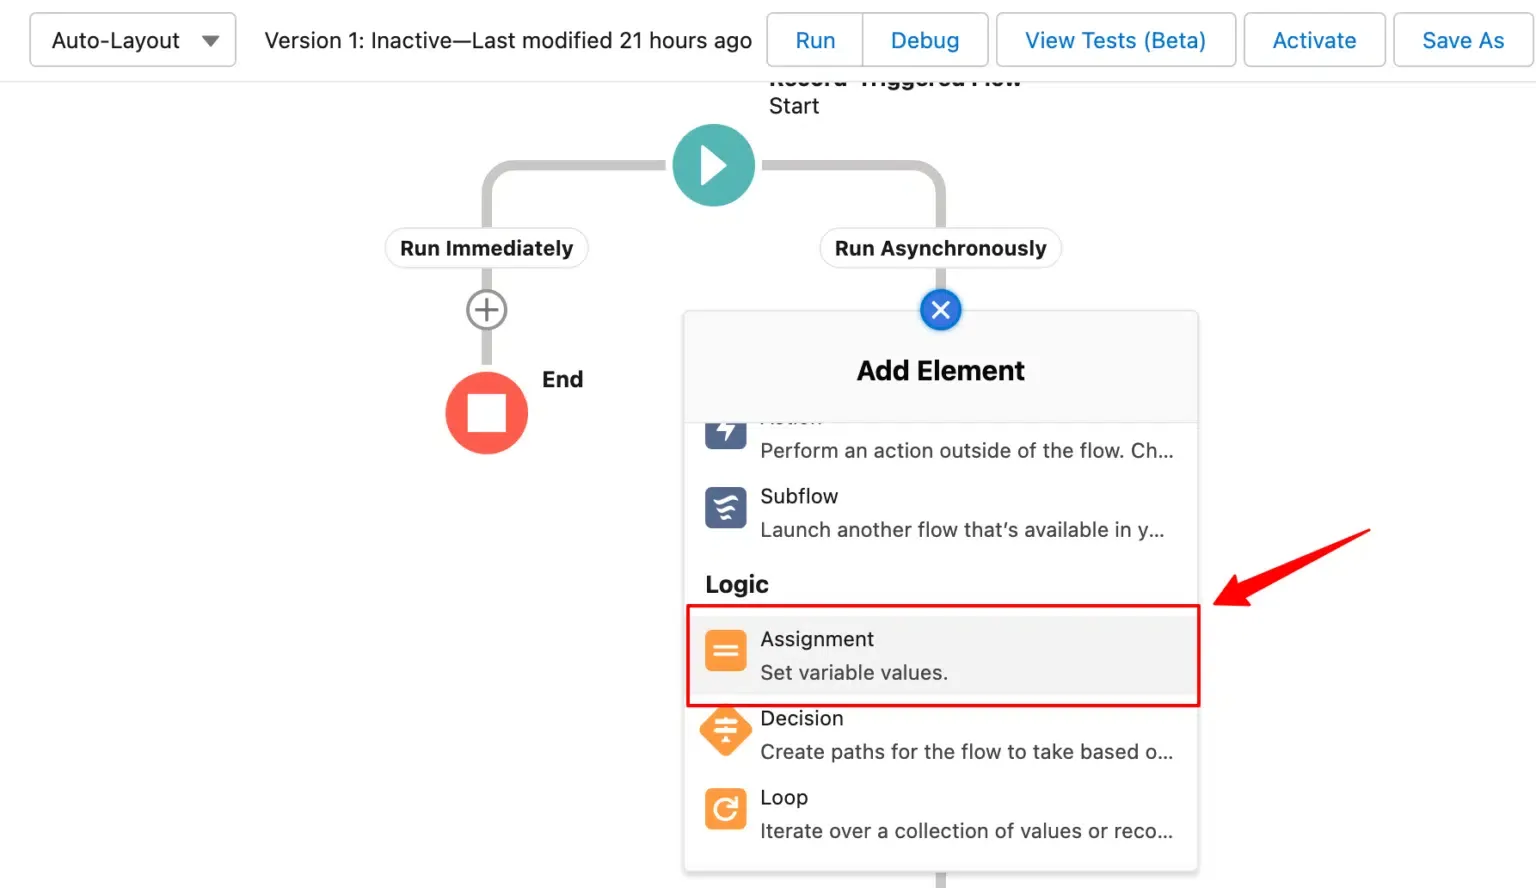
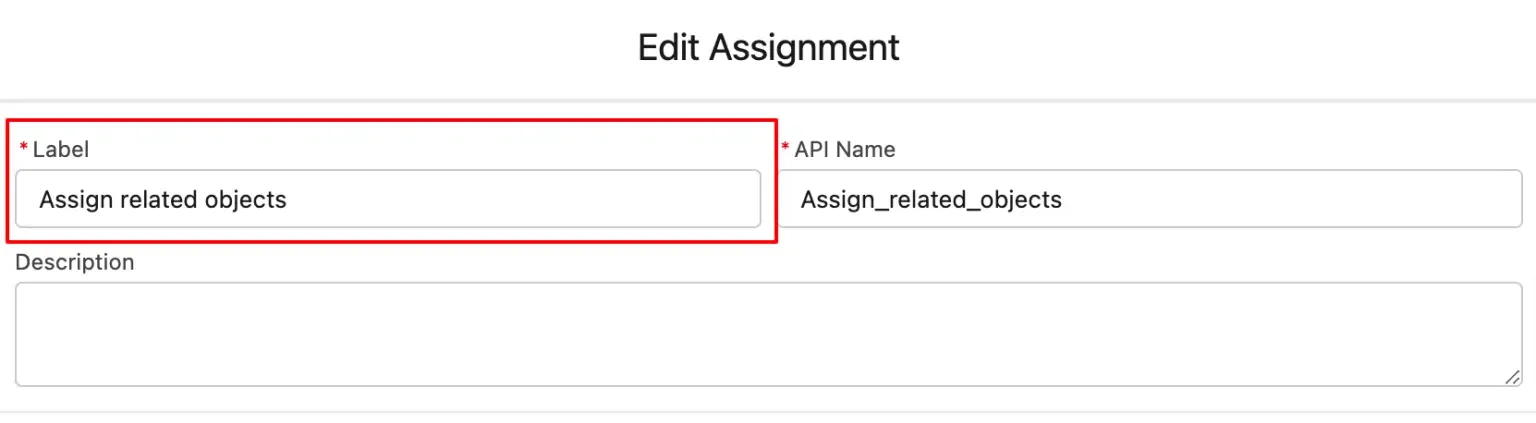
- Set the variable created above and assign the following values:
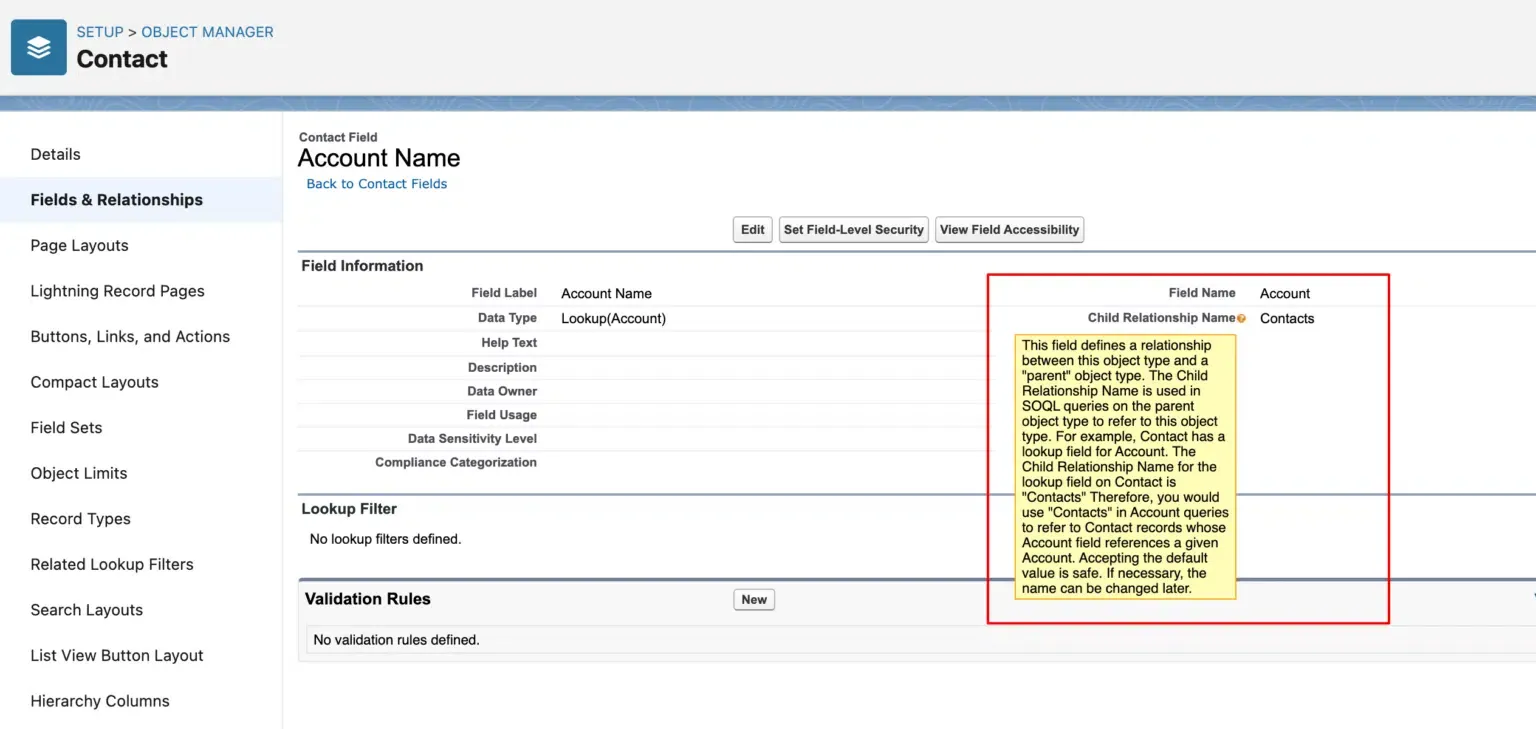
- AccountId
- Opportunities (the child relationship name)
These represent the parent-child relationships to include.
Add and Configure the Action
Section titled “Add and Configure the Action”- Click + after the Assignment → Action.
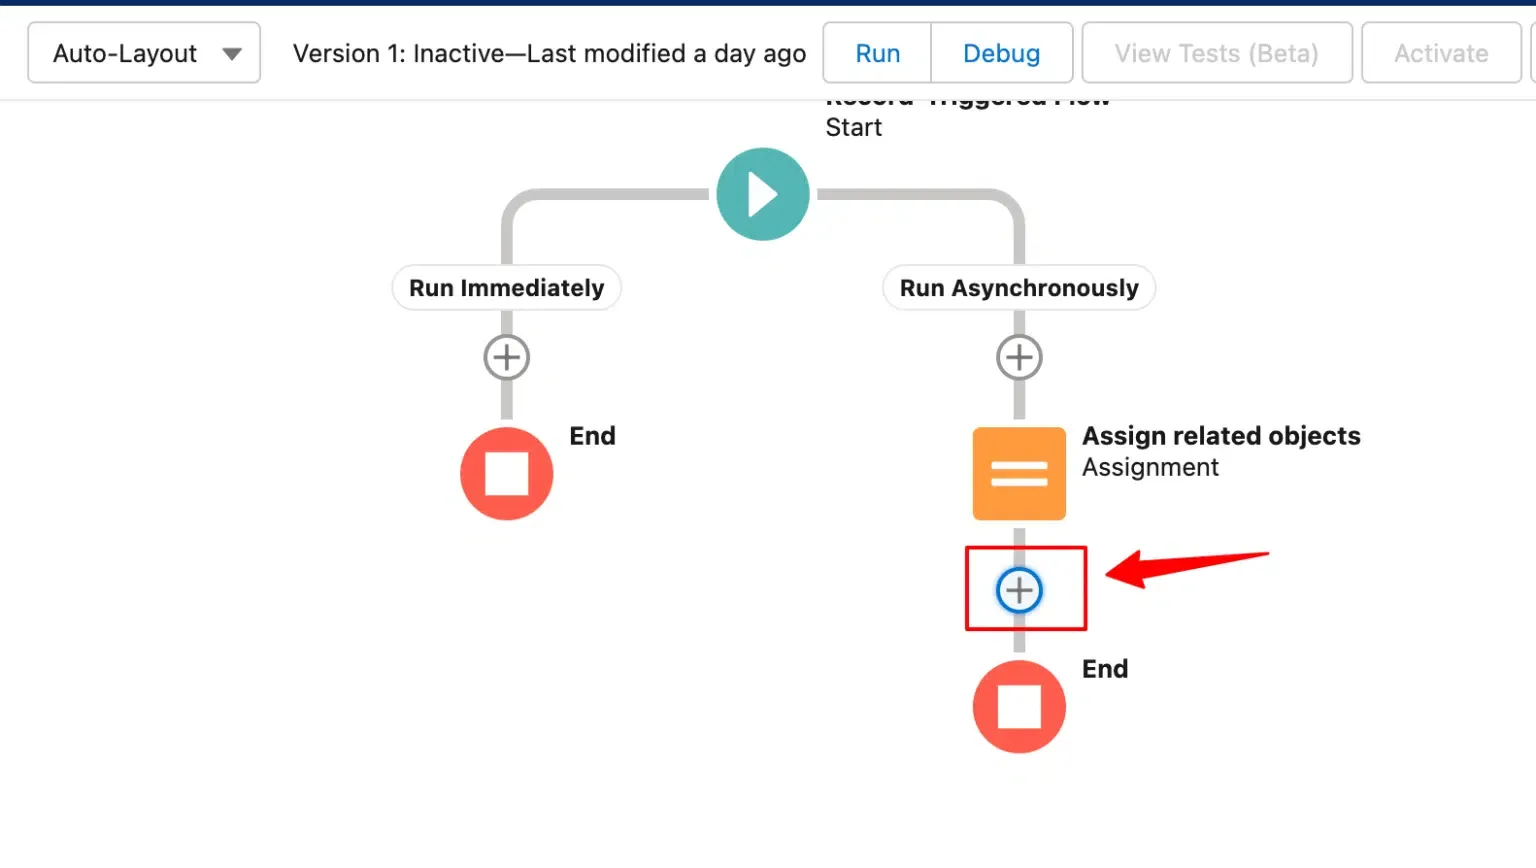
- Set Category to Event and choose Send data to CustomerLabs.
- Enter a Label.
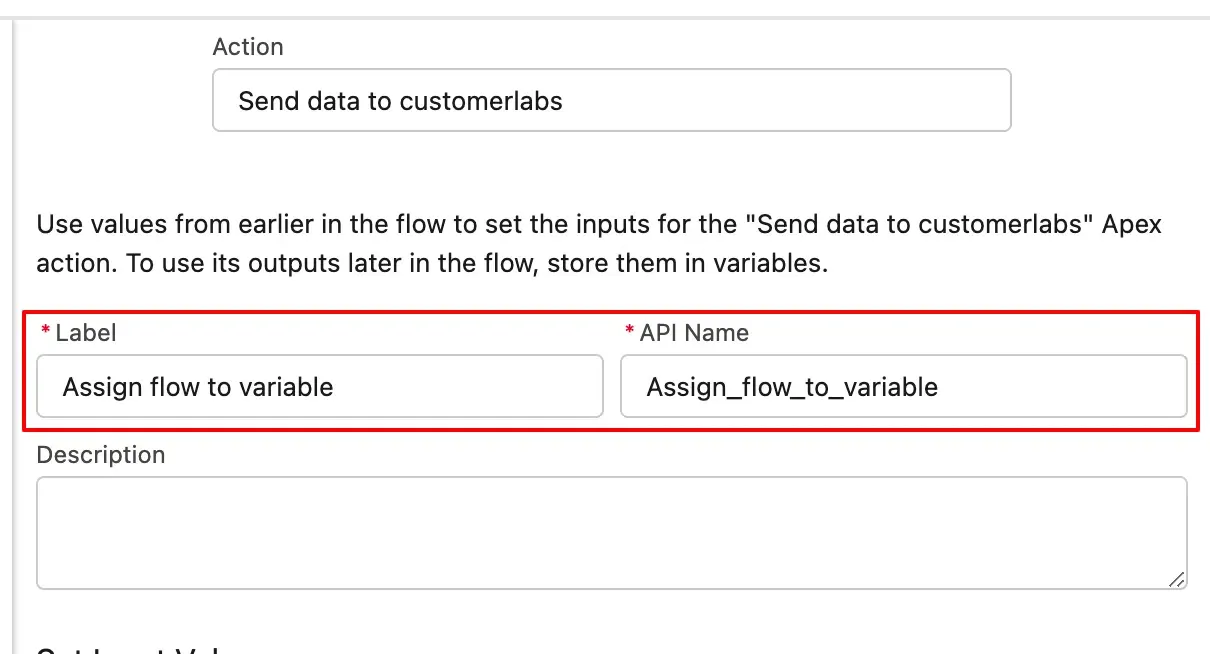
- Under Set Input Values, set recordIdString to Record → Account → ID.
- Enable Include Related Objects and select the variable created earlier.
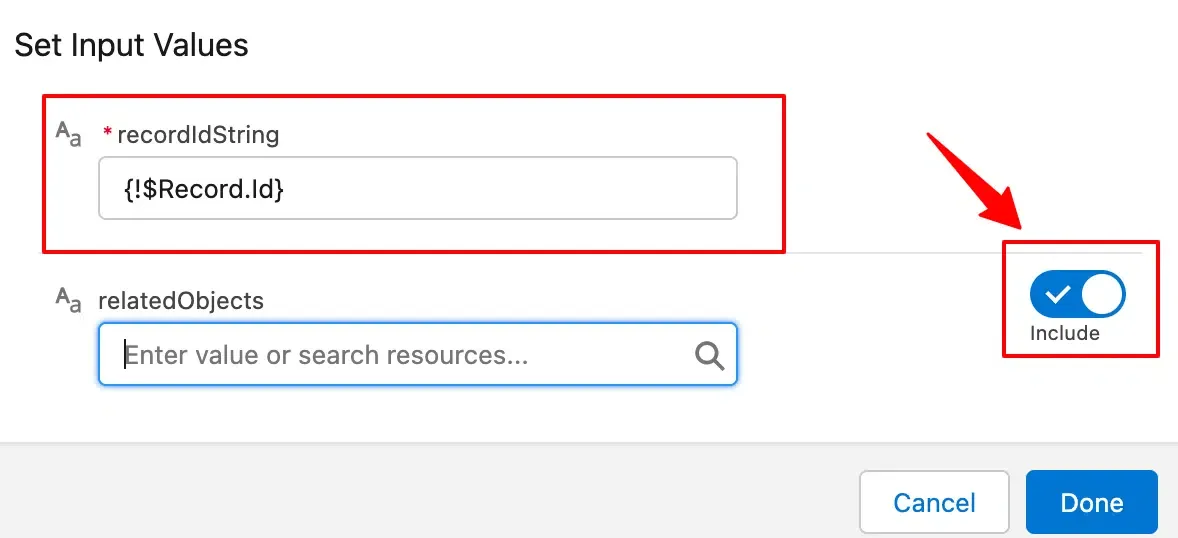
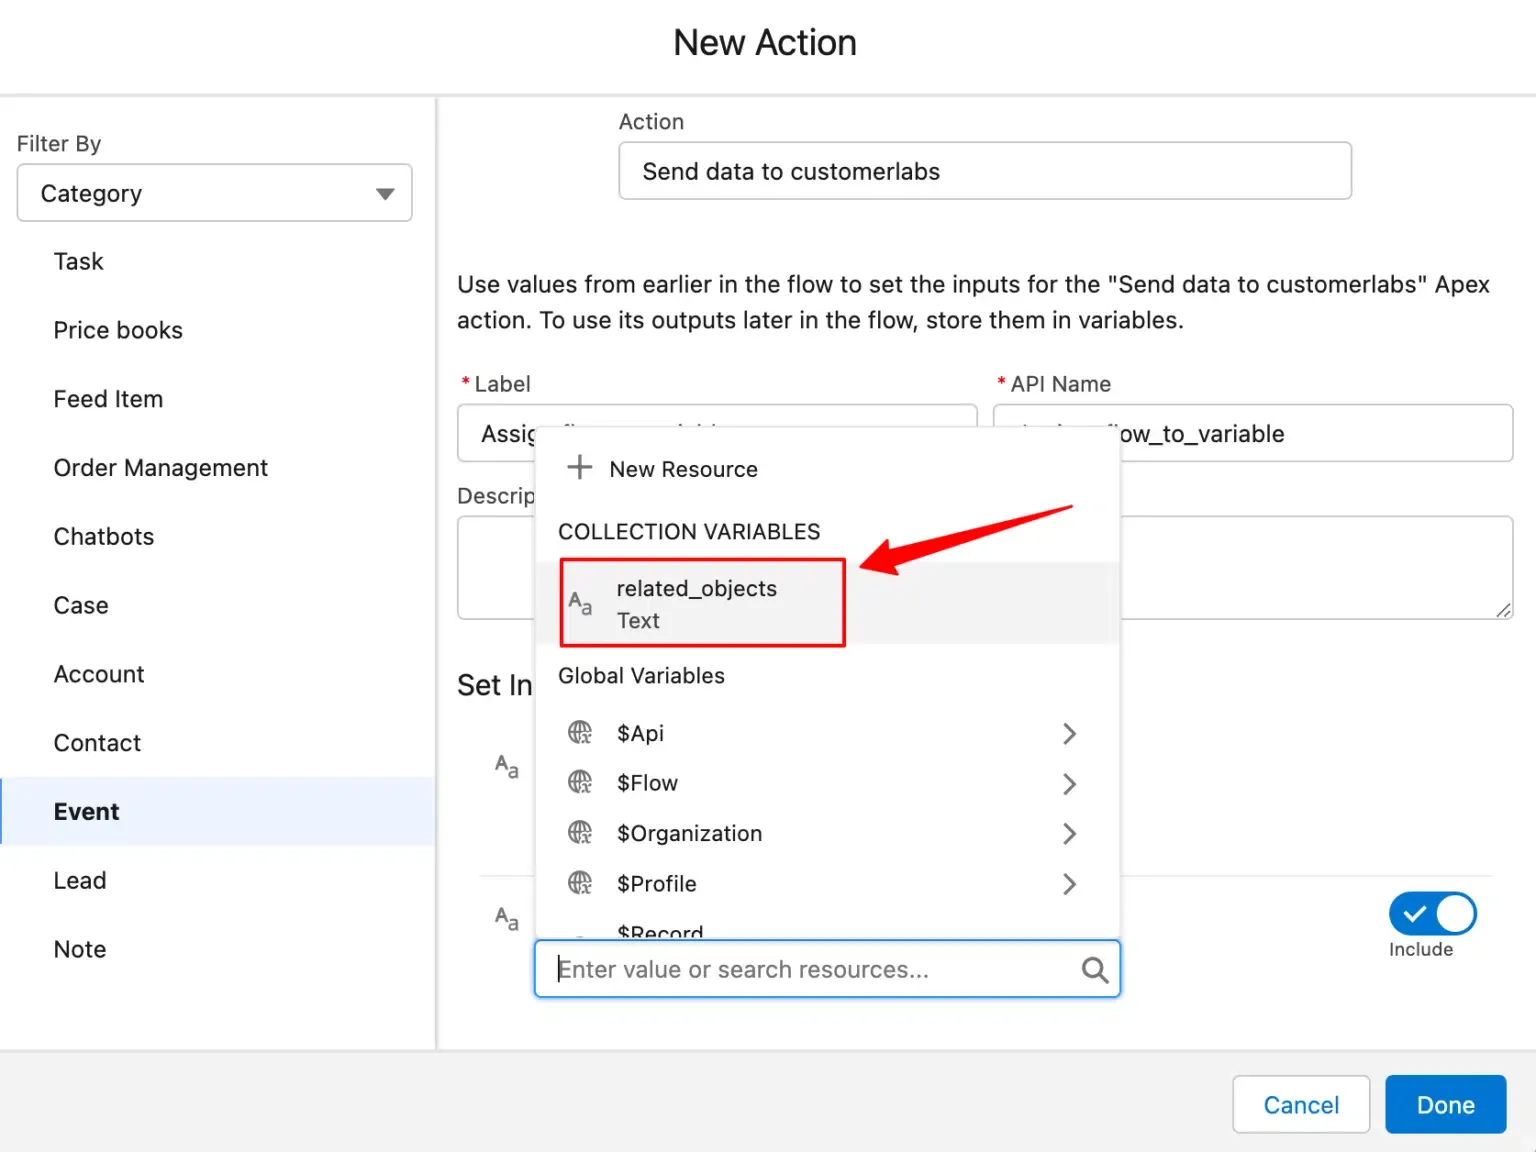
- Click Done.
Save and Test
Section titled “Save and Test”- Click Save, add a Flow Name and Description.
- Click Debug, select Path: Run Asynchronously and choose a sample Account.
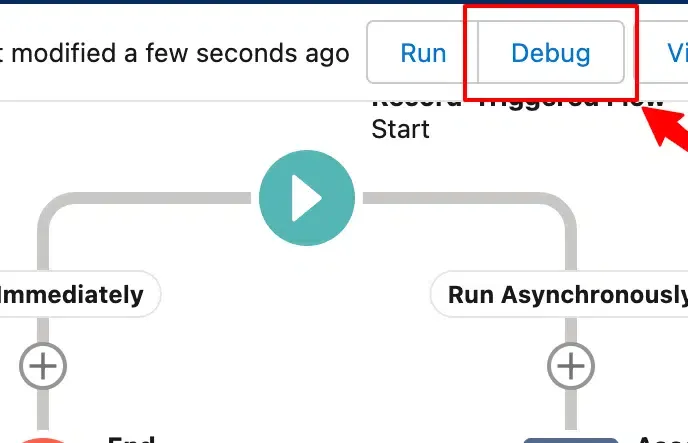
- Click Run.
Activate the Flow
Section titled “Activate the Flow”Click Activate to start sending Account data along with related objects.

3. Build Workflows in CustomerLabs
Section titled “3. Build Workflows in CustomerLabs”A Workflow in CustomerLabs transforms raw event data received from Salesforce into structured profiles. Set up one workflow per flow type — for new accounts, updates, and related objects.
With workflows you can:
- Capture events like Account, Contact, or Opportunity creation and updates
- Filter relevant data before processing
- Map incoming fields to structured user and account profiles
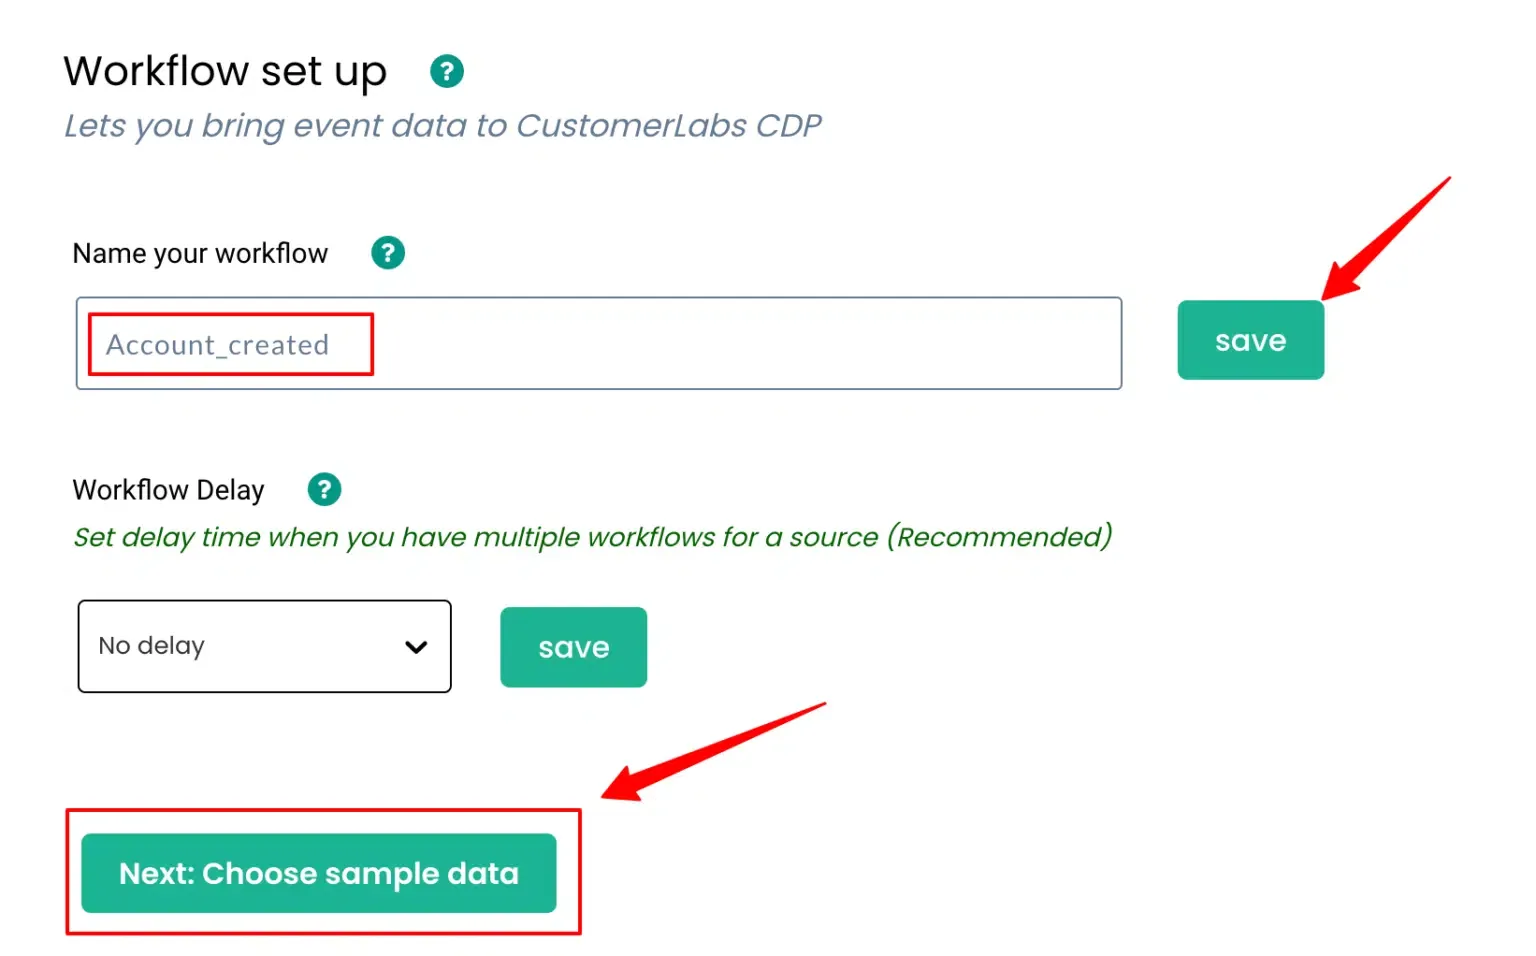
Workflow 1: New Account Created
Section titled “Workflow 1: New Account Created”This workflow captures newly created Account data from Salesforce.
Name Your Workflow
Section titled “Name Your Workflow”Assign a descriptive name (for internal reference only), for example: salesforce_account_created.
Choose Sample Data
Section titled “Choose Sample Data”- Create a test Account in Salesforce to trigger the flow.
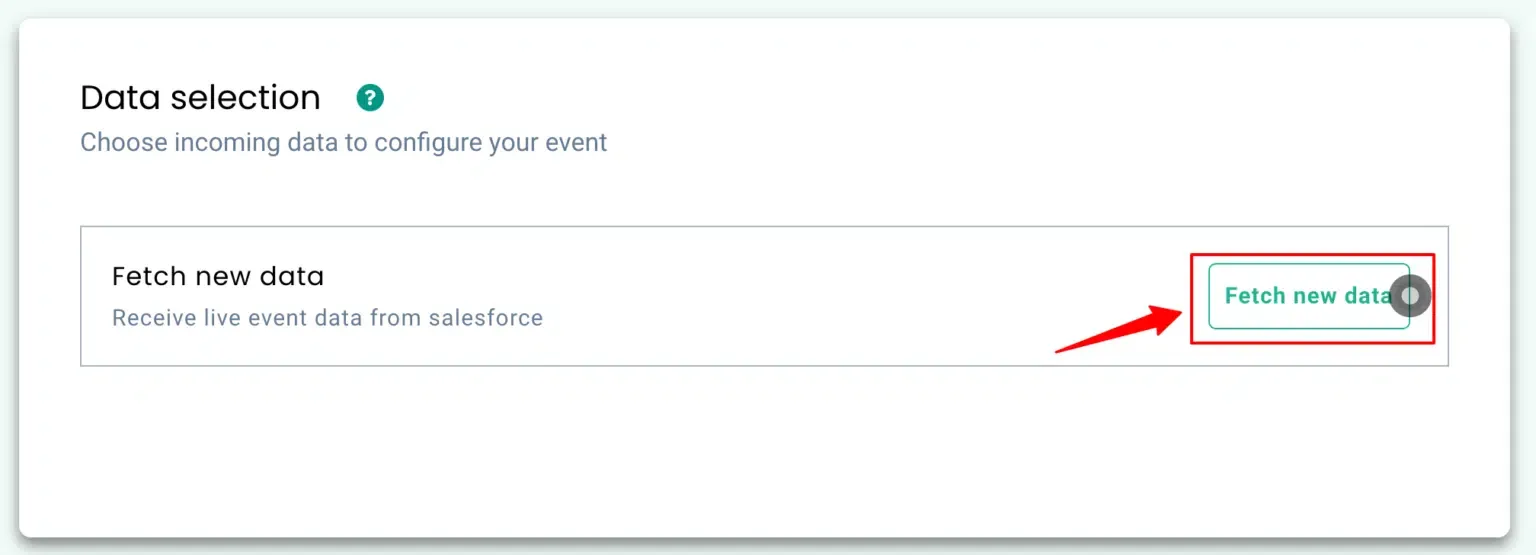
- Click Choose Sample Data, then click Fetch New Data.
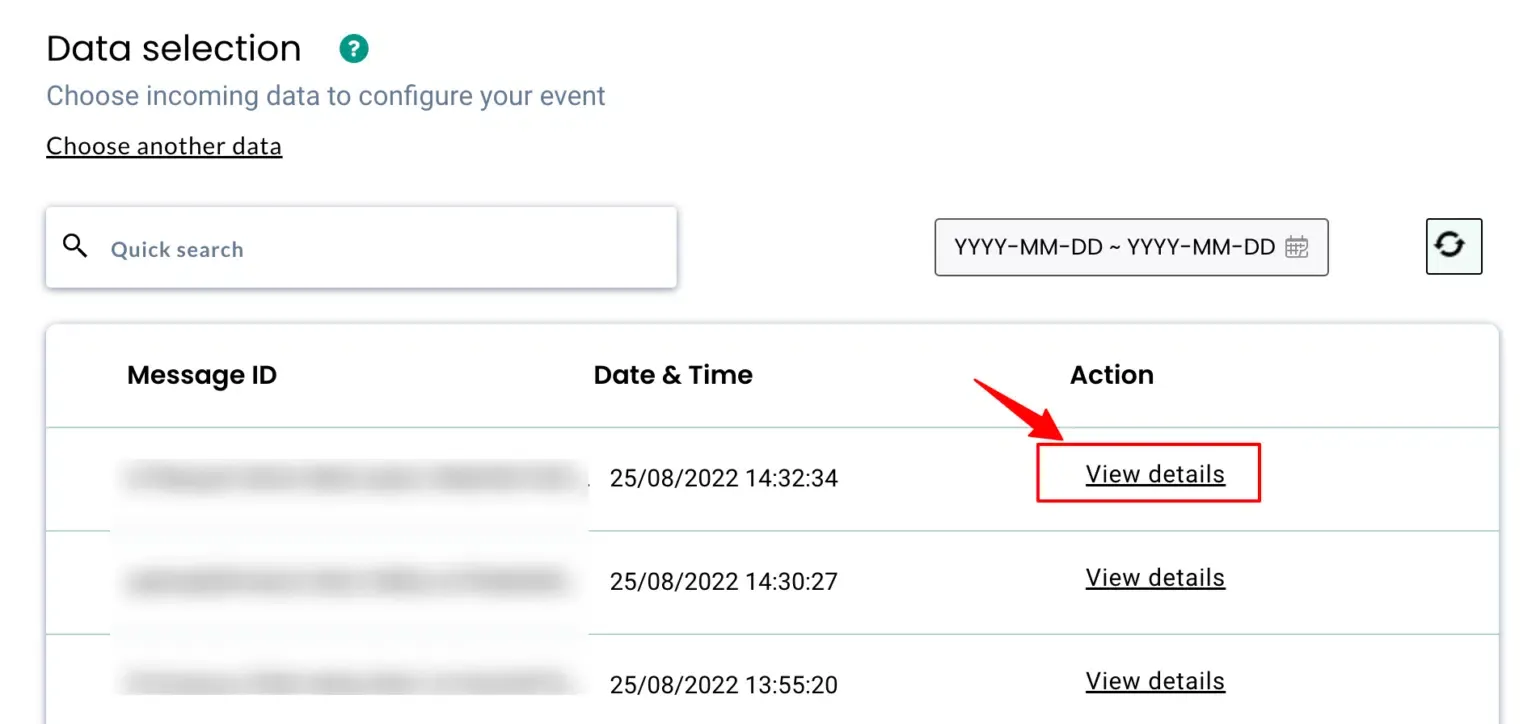
- Click View Details to inspect the incoming JSON structure.
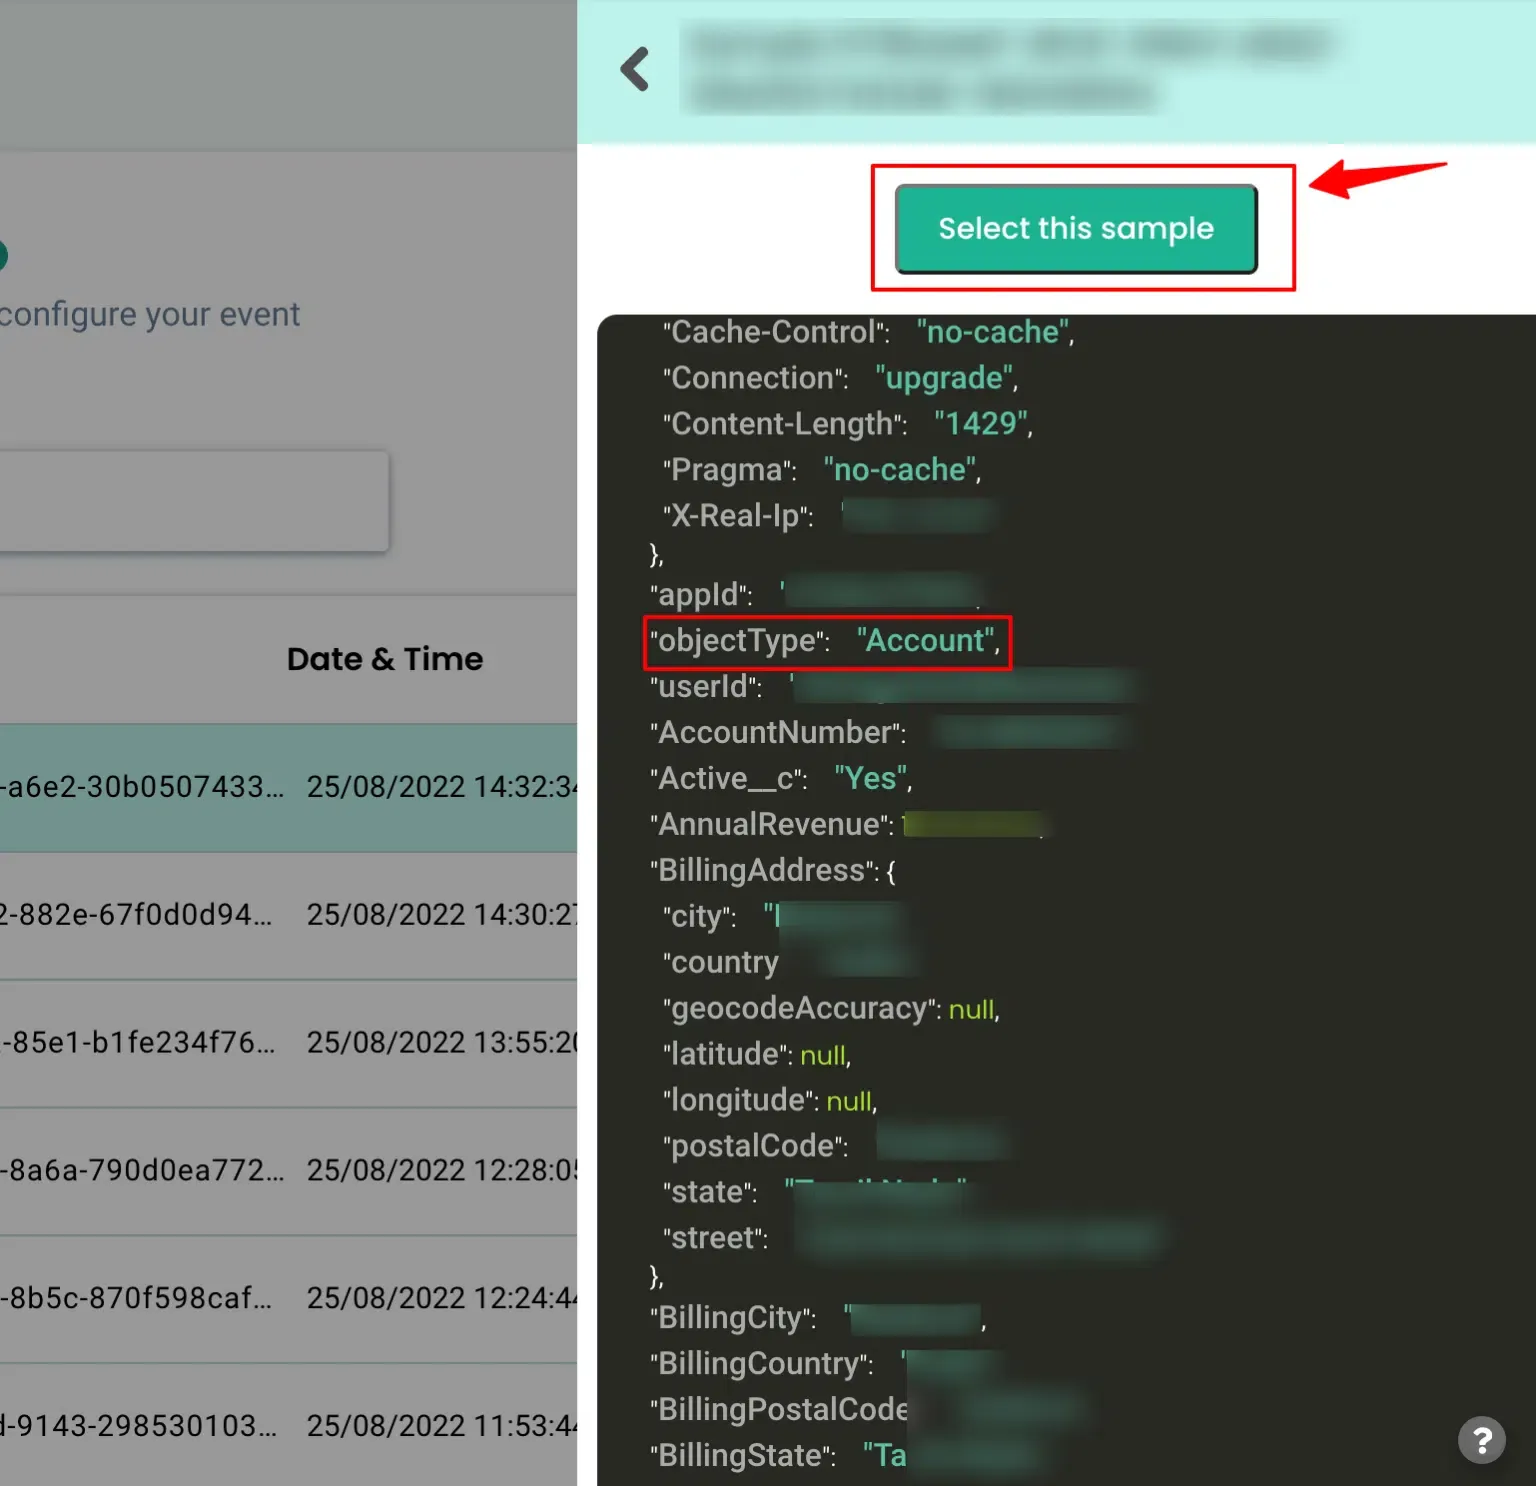
- Click Select this sample to proceed.
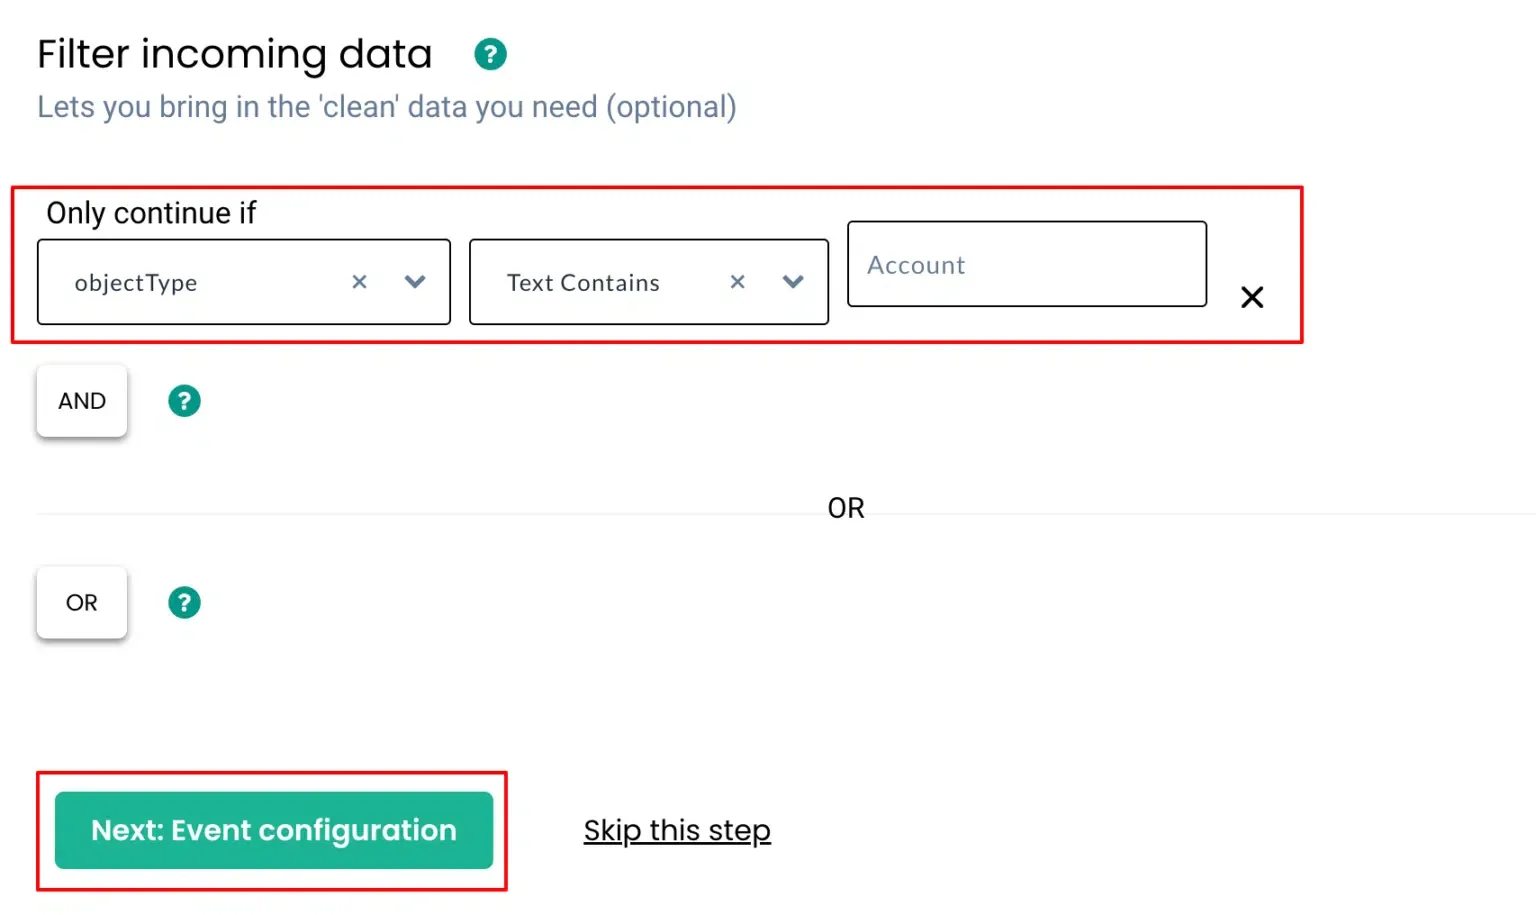
Apply Filters (Optional)
Section titled “Apply Filters (Optional)”Filter incoming data to process only the events you need.
Example condition: Object Type = Account
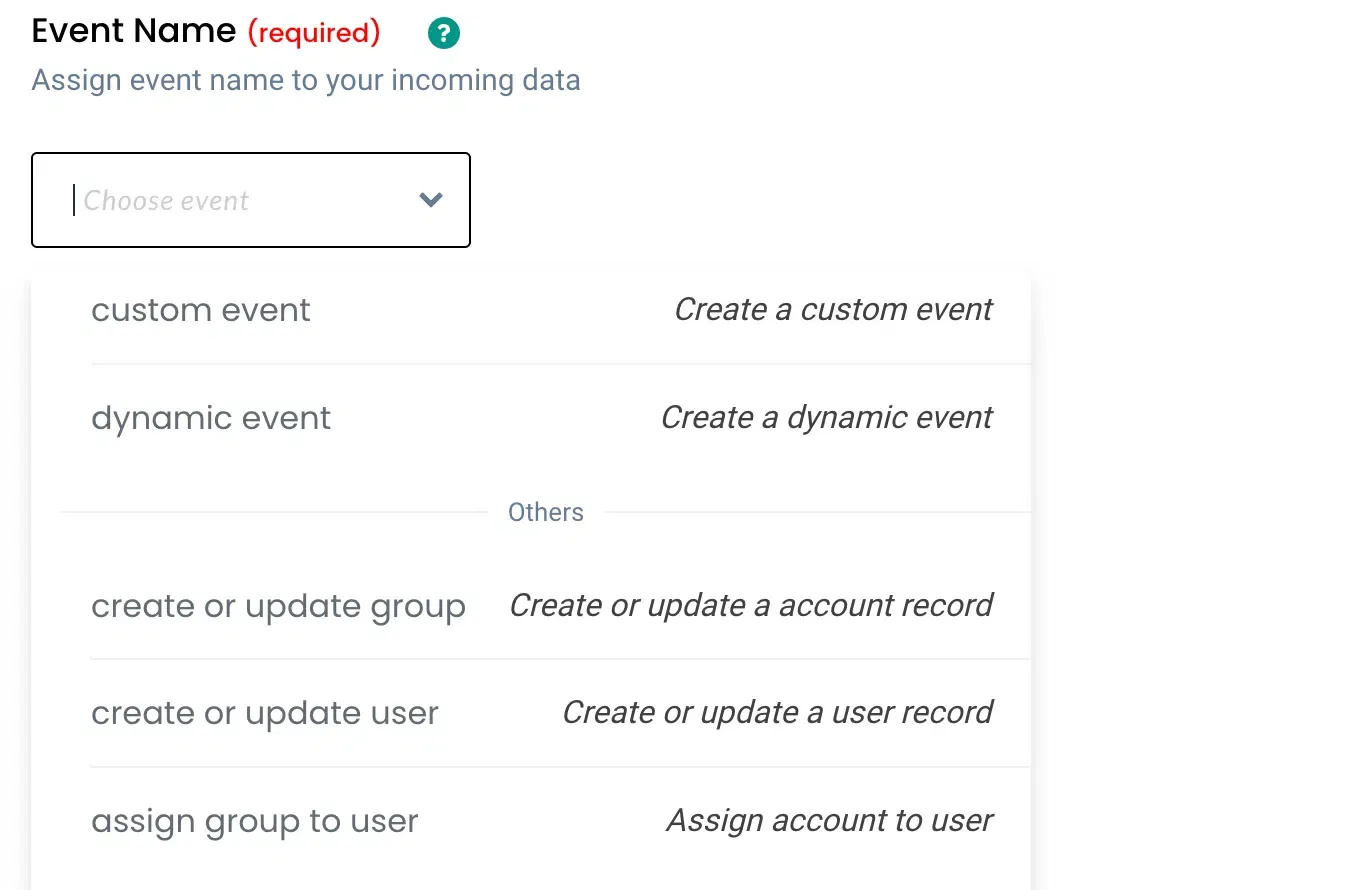
Configure the Event
Section titled “Configure the Event”- Choose Create or Update Group as the event type, or define a custom event name.
- Optionally use Dynamic Event Name to name events based on incoming data.
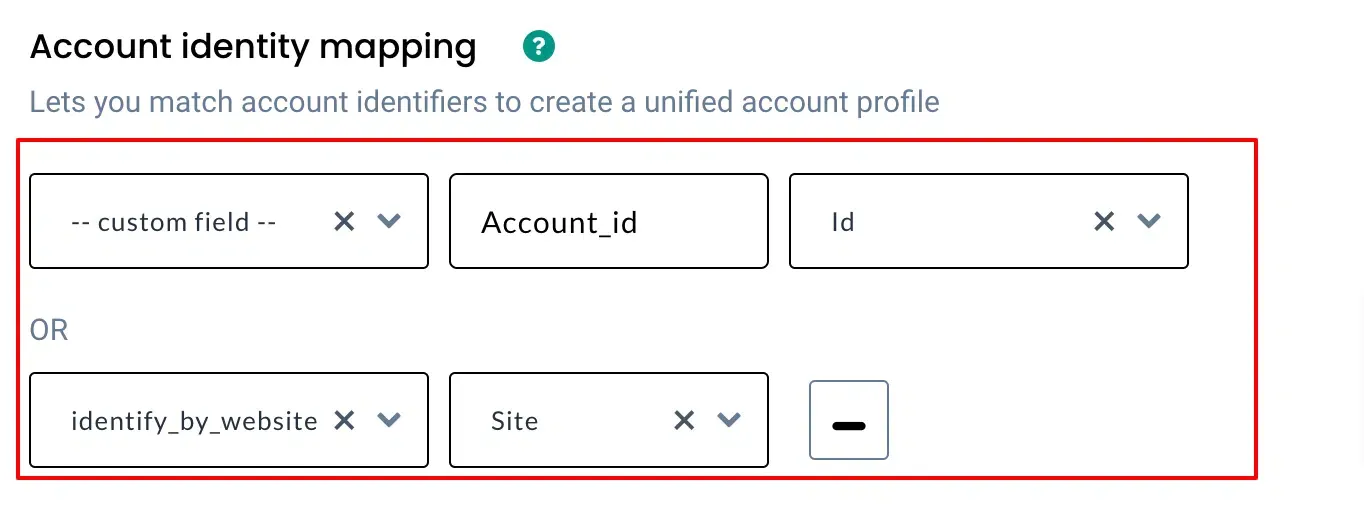
Account Identity Mapping
Section titled “Account Identity Mapping”Map identifiers to unify account data across sources. For example:
- Account ID
- Website
Attribute Mapping
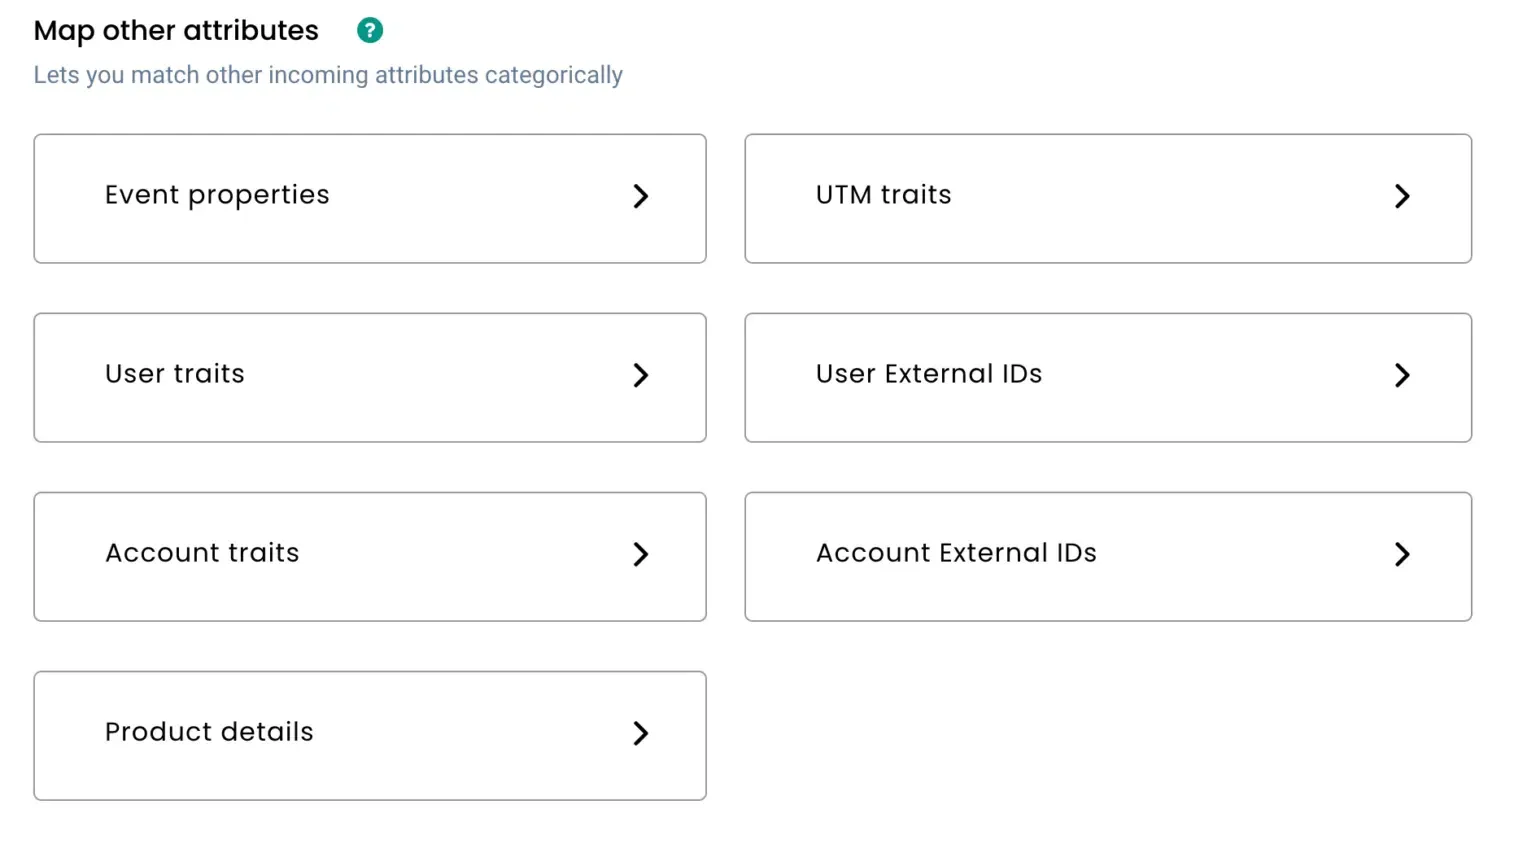
Section titled “Attribute Mapping”Map incoming Salesforce fields to Account Traits or Event Properties in CustomerLabs.
Workflow 2: Account Updated
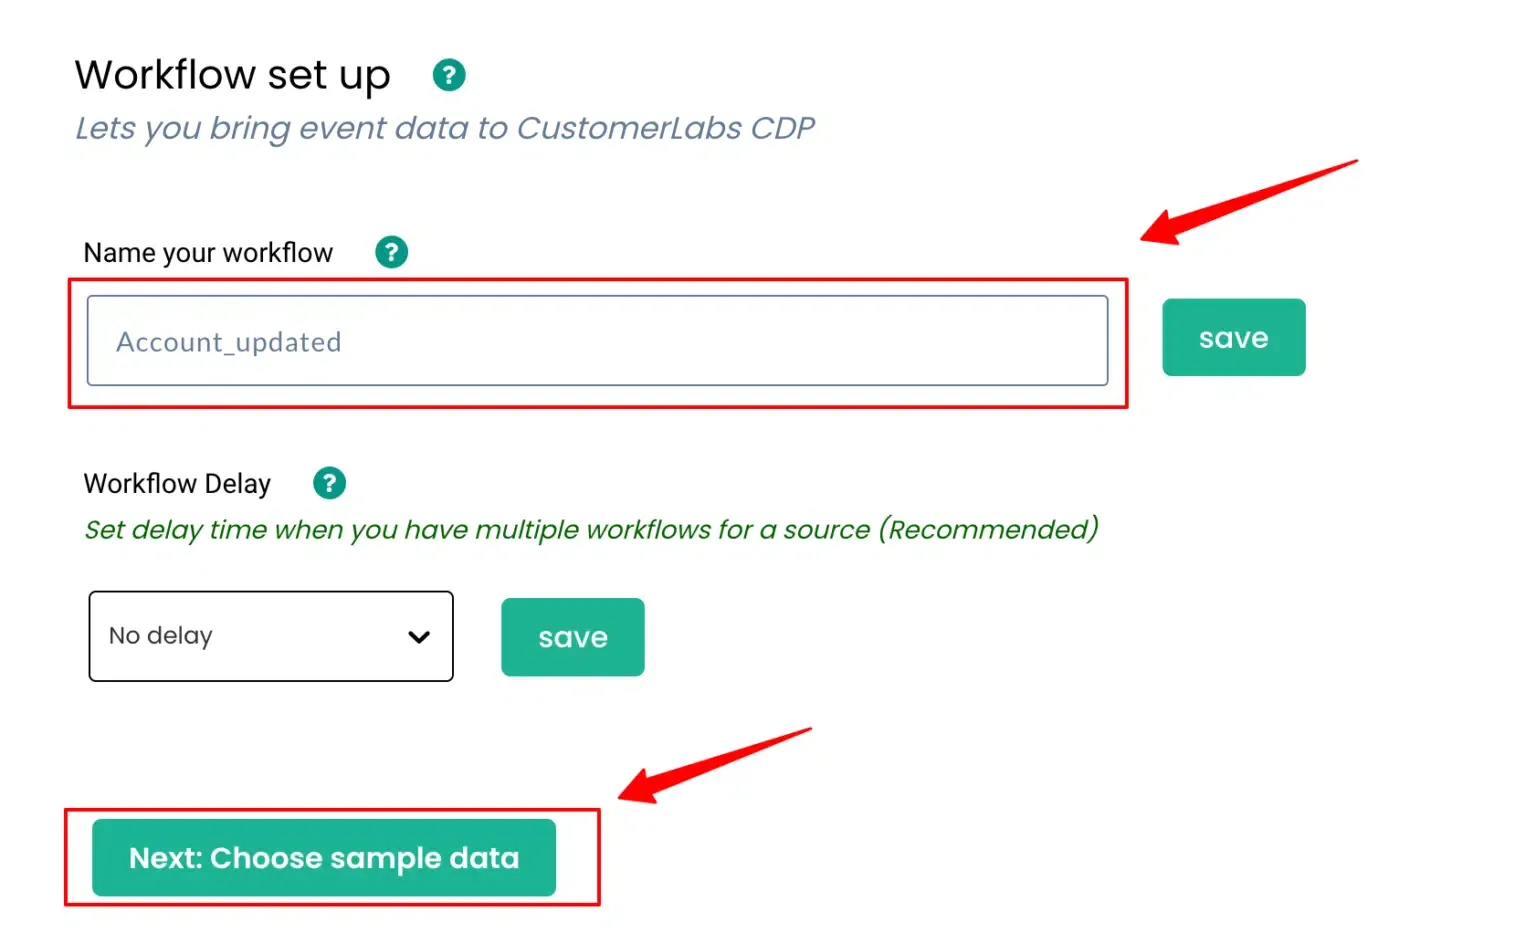
Section titled “Workflow 2: Account Updated”This workflow captures updates made to existing accounts in Salesforce.
Name Your Workflow
Section titled “Name Your Workflow”Assign a name (e.g., salesforce_account_updated) and set a Workflow Delay if you have multiple workflows on the same source.
Choose Sample Data
Section titled “Choose Sample Data”-
Update an Account field in Salesforce (e.g., change Rating to Hot) to trigger the flow.
-
Click Choose Sample Data, then Fetch New Data.
-
Click View Details to inspect the incoming data, then click Select this sample.
Apply Filters
Section titled “Apply Filters” Example condition: Object Type = Account
Configure the Event
Section titled “Configure the Event”Use Create or Update Group or define a custom event name.
Account Identity Mapping
Section titled “Account Identity Mapping”Map Account ID and Website as identifiers.
Attribute Mapping
Section titled “Attribute Mapping”Map updated fields to Account Traits. For example, map Rating to an account trait.
Workflow 3: Account with Related Objects (Account + Opportunity)
Section titled “Workflow 3: Account with Related Objects (Account + Opportunity)”This workflow captures Account data along with related Opportunity data sent from Flow 3.
Name Your Workflow
Section titled “Name Your Workflow”Assign a name (e.g., salesforce_account_with_opportunities) and set a Workflow Delay if needed.
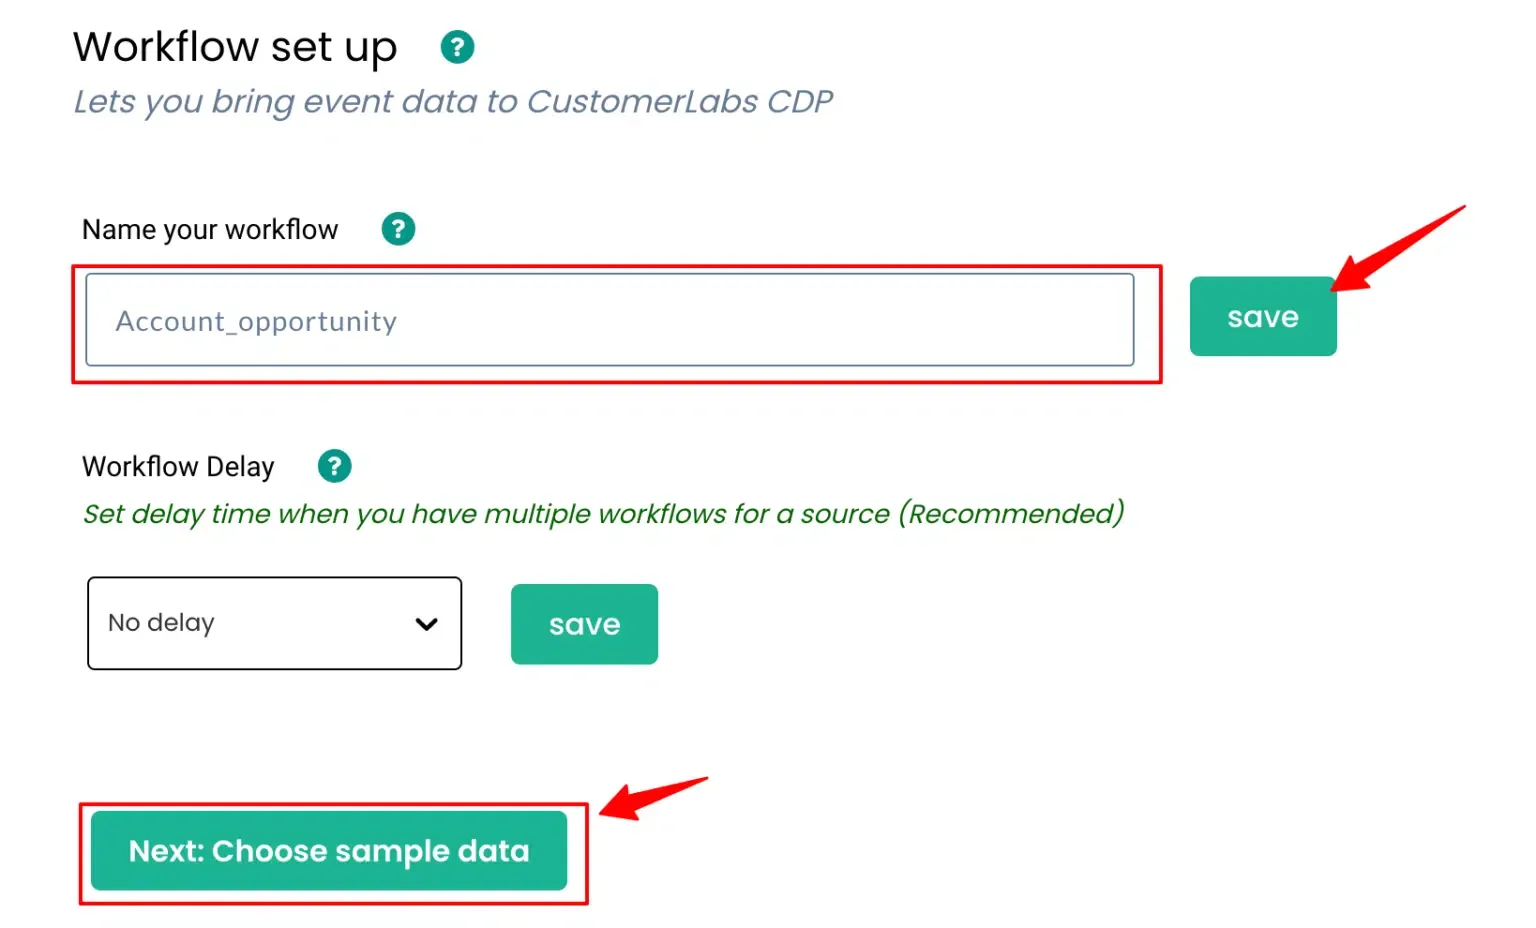
Choose Sample Data
Section titled “Choose Sample Data”-
Create a test Account with an associated Opportunity in Salesforce to trigger Flow 3.
-
Click Choose Sample Data, then Fetch New Data.
-
Click View Details to inspect the nested JSON structure (Account + Opportunities).
-
Click Select this sample to proceed.
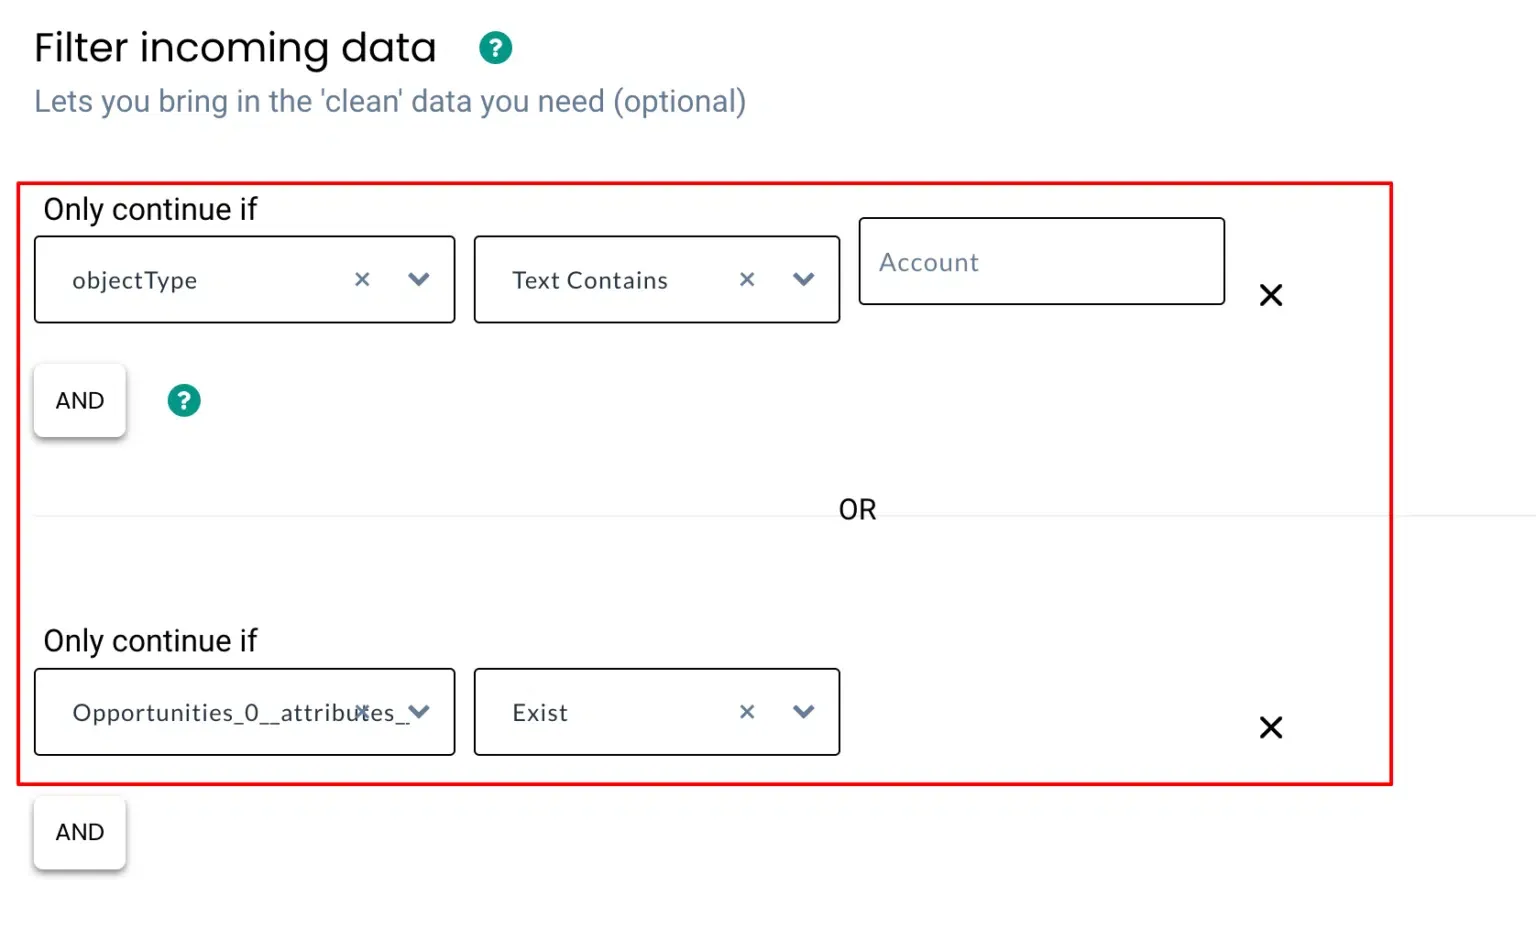
Apply Filters
Section titled “Apply Filters”Example conditions:
-
Object Type = Account
-
Opportunities data exists in the payload
Configure the Event
Section titled “Configure the Event”Use Create or Update Group or define a custom event name.
Account Identity Mapping
Section titled “Account Identity Mapping”Map Account ID and Website as identifiers.
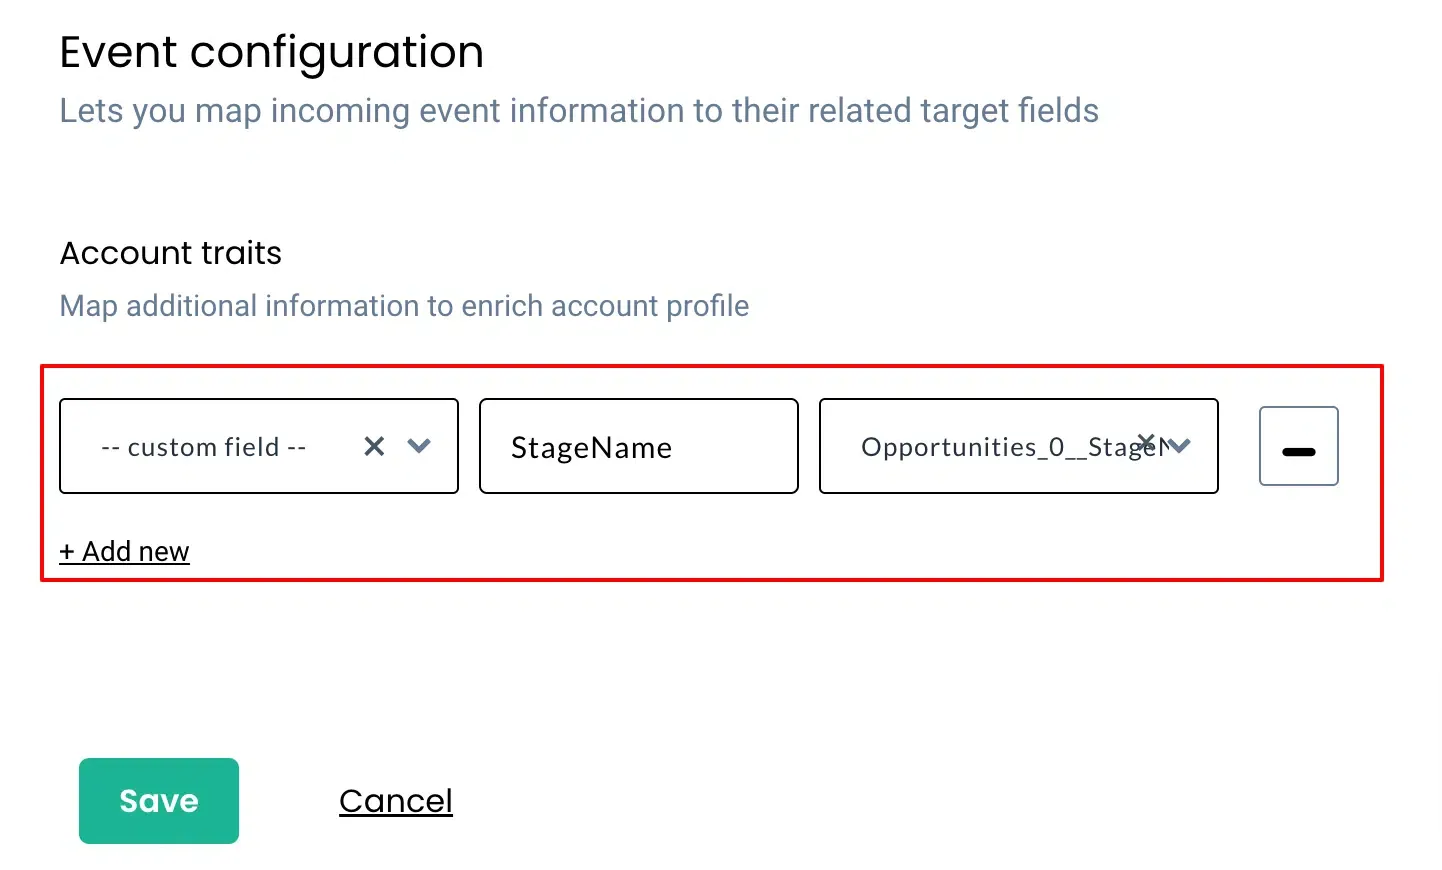
Attribute Mapping
Section titled “Attribute Mapping”Map Salesforce fields to Account Traits or Event Properties. For example, map Opportunity Stage to an account trait.
4. Destinations
Section titled “4. Destinations”Once your Salesforce data flows into CustomerLabs, you can send it to third-party apps and marketing platforms. Learn more about the supported destination integrations.