Klaviyo
Klaviyo is a marketing automation platform designed for sending personalized emails and SMS messages to engage and retain your targeted audience.
Integrate CustomerLabs 1PD Ops with Klaviyo to sync your unified customer behavior data — enabling you to target and convert high-intent audiences by sending personalized emails and SMS at the right time.
Authentication
Section titled “Authentication”Follow these steps to connect your Klaviyo account with CustomerLabs:
-
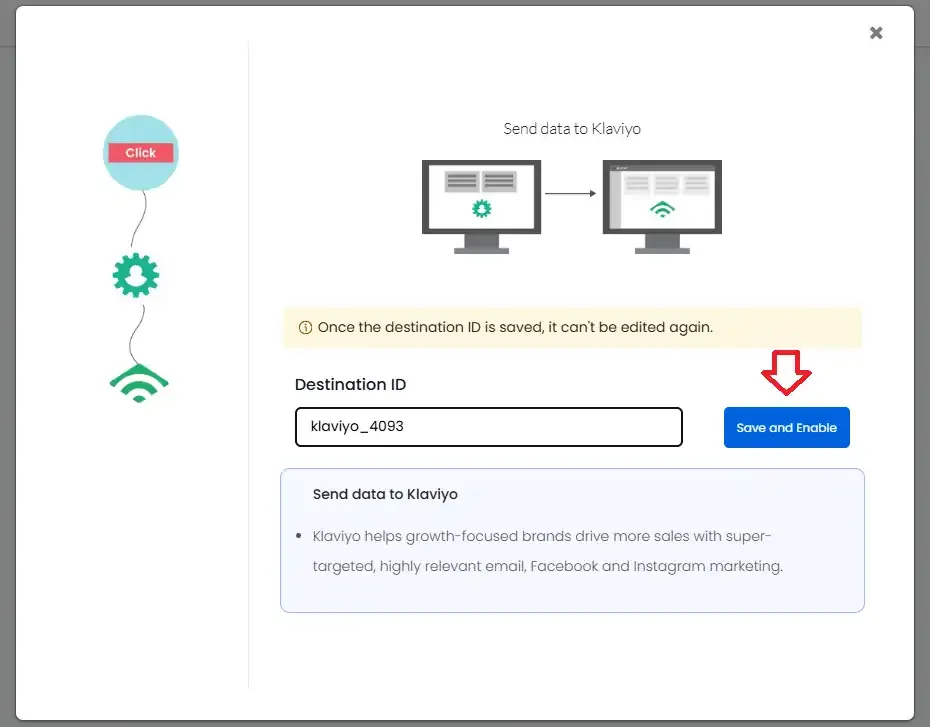
Log in to your CustomerLabs account and navigate to the Destinations page.

-
Search for and select Klaviyo from the list of available destinations.
-
Click Save and Enable to begin the configuration setup.
-
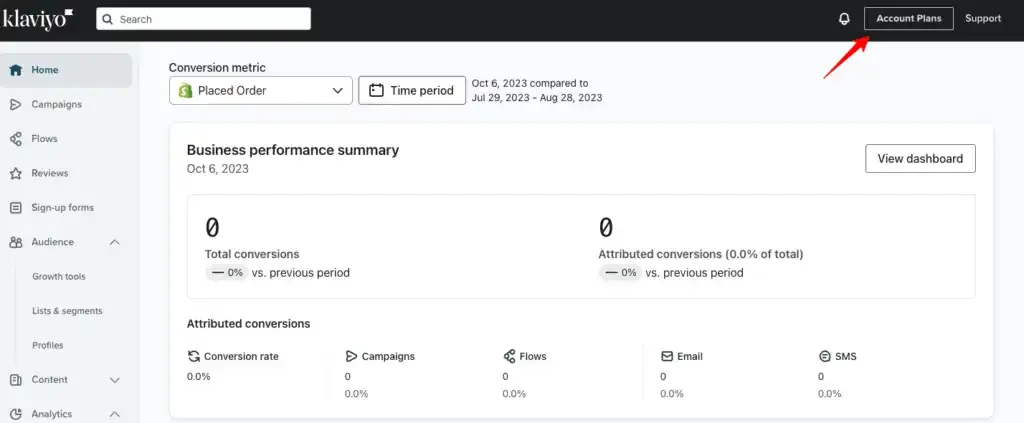
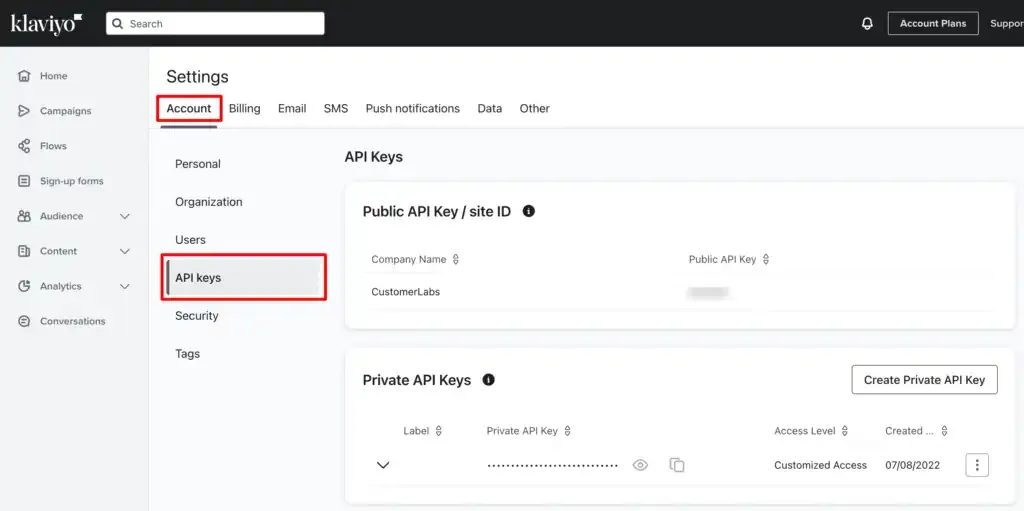
Log in to your Klaviyo account and go to Account Plans.
-
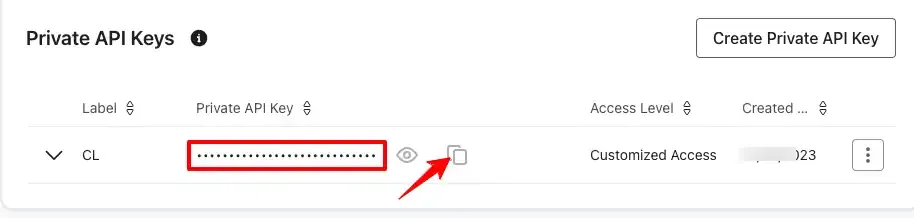
Navigate to Settings → Accounts → API Keys.
-
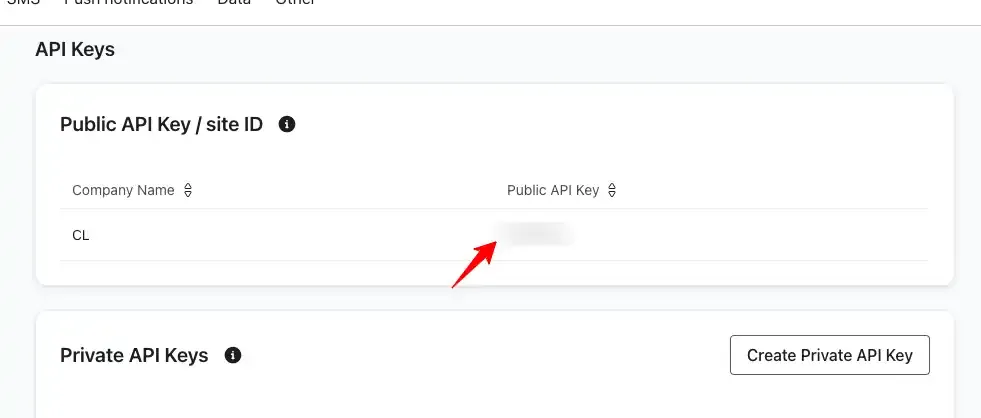
Copy the Public API Key (also referred to as Site ID).
-
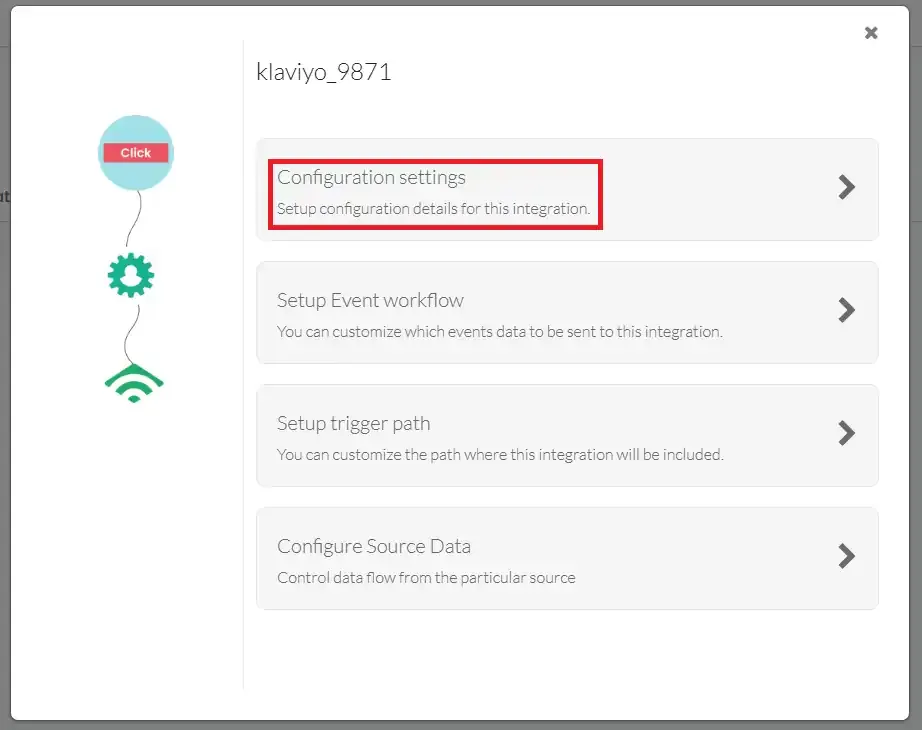
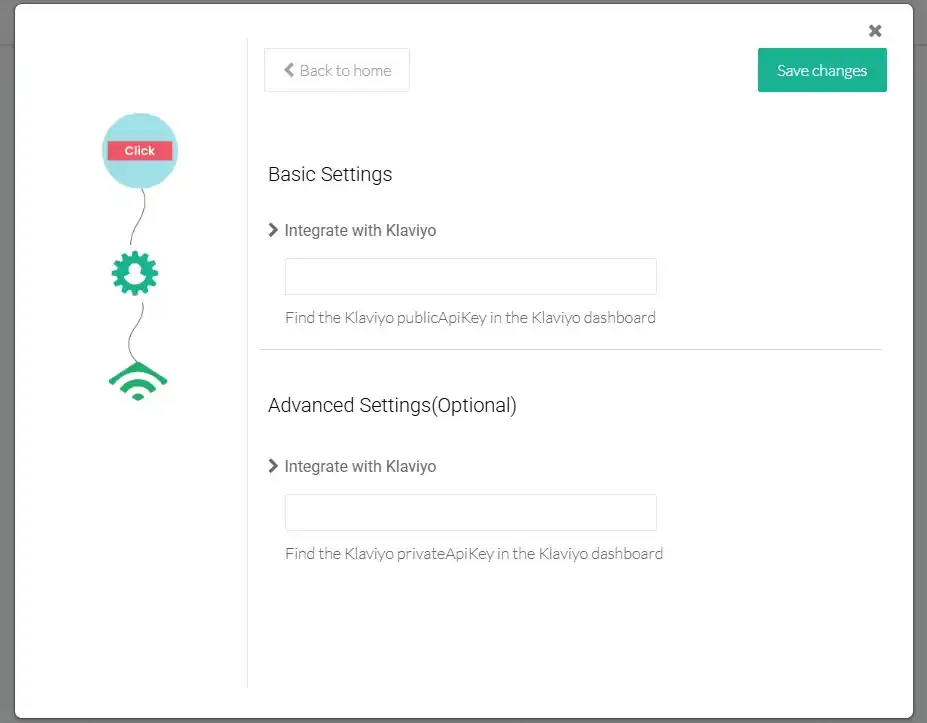
Go back to your CustomerLabs account → Destinations → Klaviyo → Configuration Settings.
-
Paste the Public API Key under Basic Settings field.
-
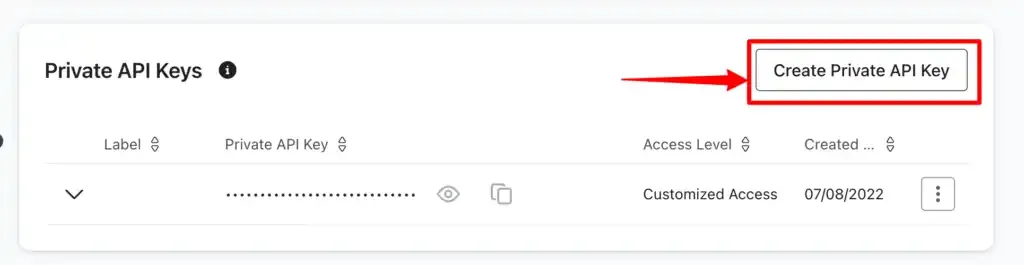
Return to your Klaviyo account → Settings → API Keys.
-
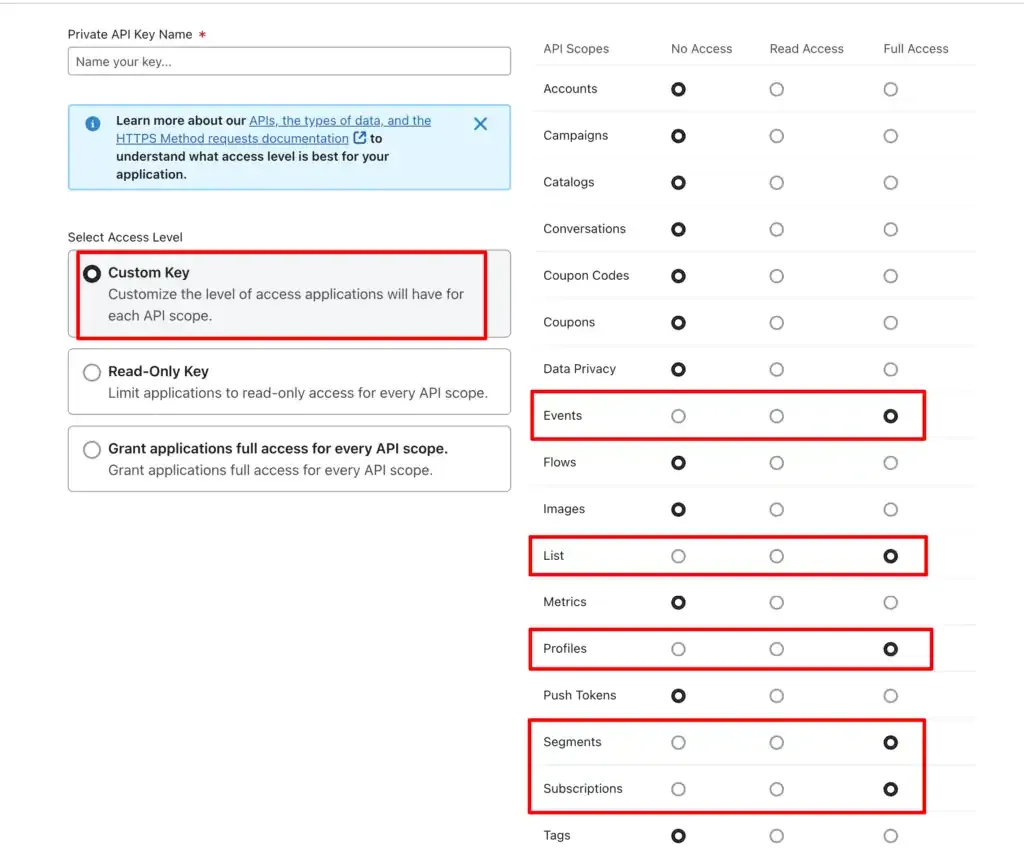
Create a Private API Key if you do not already have one.
-
Copy the Private API Key.
-
Go to your CustomerLabs account → Destinations → Klaviyo → Configuration Settings.
-
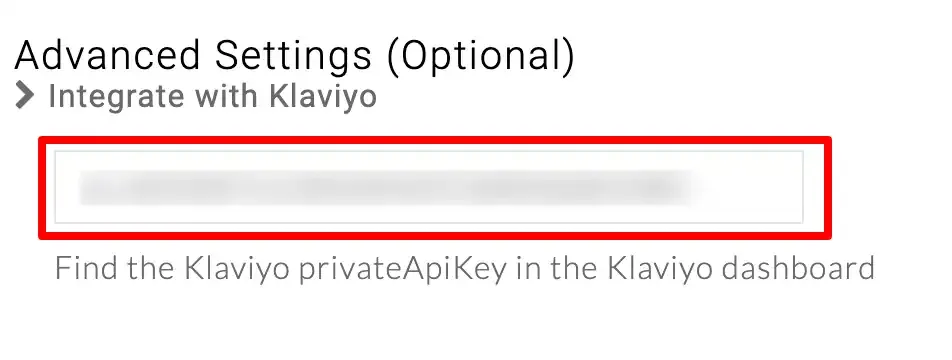
Paste the Private API Key in the Advanced Settings field.
-
Click Save Changes.
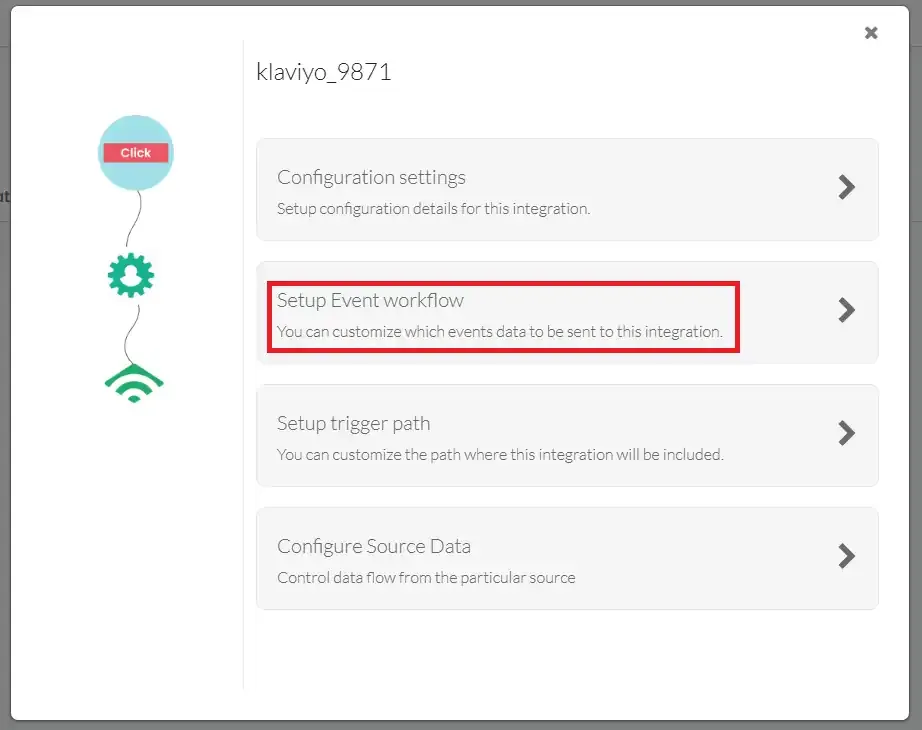
Event Workflow Setup
Section titled “Event Workflow Setup”Configure which events are sent from CustomerLabs to Klaviyo:
-
Navigate to Setup Event Workflow within the Klaviyo destination settings.
-
Turn ON the toggle for each event you want to send. Choose either Client-side or Server-side — do not enable both for the same event to avoid duplication.
-
Click Save Changes.
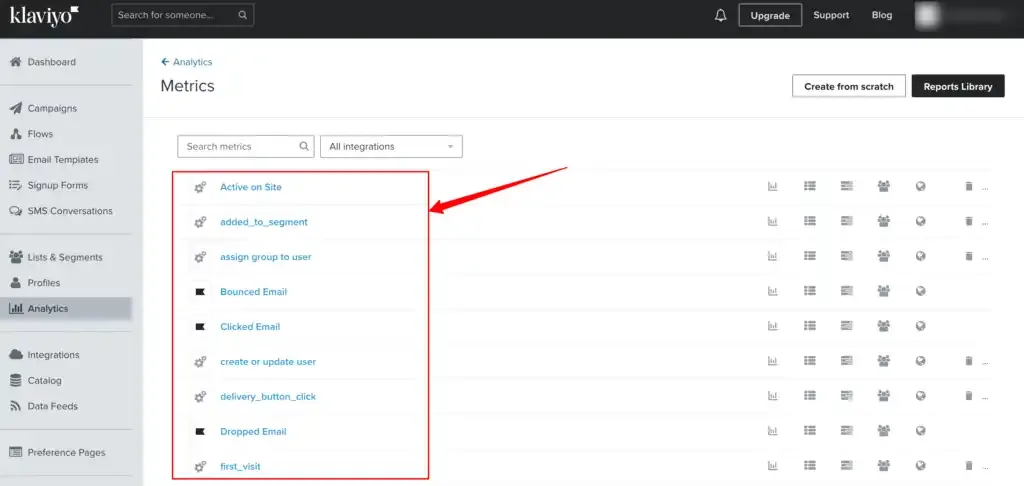
Verify Events in Klaviyo
Section titled “Verify Events in Klaviyo”To confirm that events are being received:
-
Go to your Klaviyo account → Analytics → Metrics.
-
You will see the events received from CustomerLabs listed here.
Sync Audiences with Klaviyo
Section titled “Sync Audiences with Klaviyo”You can sync audience segments created in CustomerLabs with Klaviyo as customer lists. Create an audience segment in CustomerLabs and sync it with either an existing list or a new list in Klaviyo.
Key Concepts Before Syncing
Section titled “Key Concepts Before Syncing”1. Subscription Type
Section titled “1. Subscription Type”The Subscription Type option determines which channel (Email and/or SMS) users in the audience list are subscribed to.
2. Opt-in Process
Section titled “2. Opt-in Process”By default, new lists use Double Opt-in — users must confirm their subscription before being added. To switch to Single Opt-in, navigate to Klaviyo → find the list → update the Opt-in process setting.
Learn more about Opt-in process3. Consent Status
Section titled “3. Consent Status”Consent status indicates whether users have subscribed, unsubscribed, or never subscribed to receive SMS and/or Email communications. The user profiles are updated in Klaviyo based on the consent status you select.
| Consent Status | Description |
|---|---|
| Subscribed | Users are added to the Email and/or SMS subscription. If Double Opt-in is enabled, users receive a confirmation notification first. If Single Opt-in is enabled, users are added directly and their status shows as “Subscribed”. |
| Never Subscribed | Applies only to the Email subscription type. Users who provided their email (e.g., at checkout) but did not explicitly opt in to marketing messages are tagged as “Never Subscribed”. These users are added to the list in Klaviyo directly. Learn more |
| Unsubscribed | Users in the list are unsubscribed from SMS and/or Email communications. |
4. Syncing Anonymous Users
Section titled “4. Syncing Anonymous Users”-
Enabling this option syncs anonymous users (users without an email, name, or phone number) with Klaviyo, creating a new user profile for each.
-
Since Klaviyo’s pricing is based on the number of active user profiles, enable anonymous user sync only if required.
-
Profile duplication risk: Duplicate profiles can be created in Klaviyo despite matching Email or Phone Number. This occurs because Klaviyo uses the following identifier priority (highest to lowest):
Priority Identifier 1 External ID 2 Email 3 Phone Number 4 Other identifiers
If different External IDs exist for the same Email or Phone Number, new profiles are created — leading to duplication.
Steps to Sync Audience with Klaviyo
Section titled “Steps to Sync Audience with Klaviyo”-
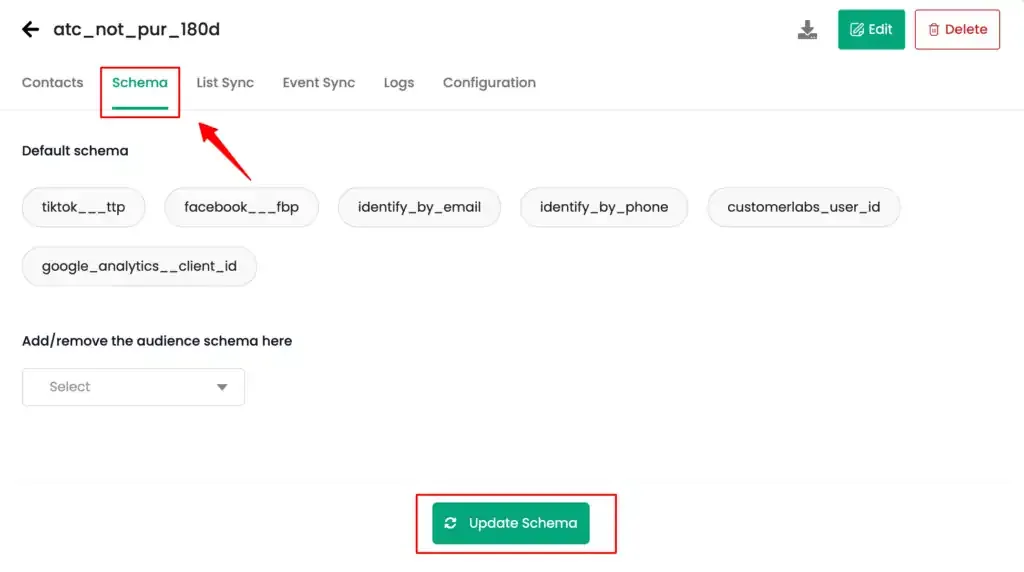
Create a segment — In CustomerLabs, create a new segment with the desired events or user traits. Go to the Schema tab of the segment.
-
Configure the Segment Schema as needed for the customer list to be created or synced in Klaviyo.
-
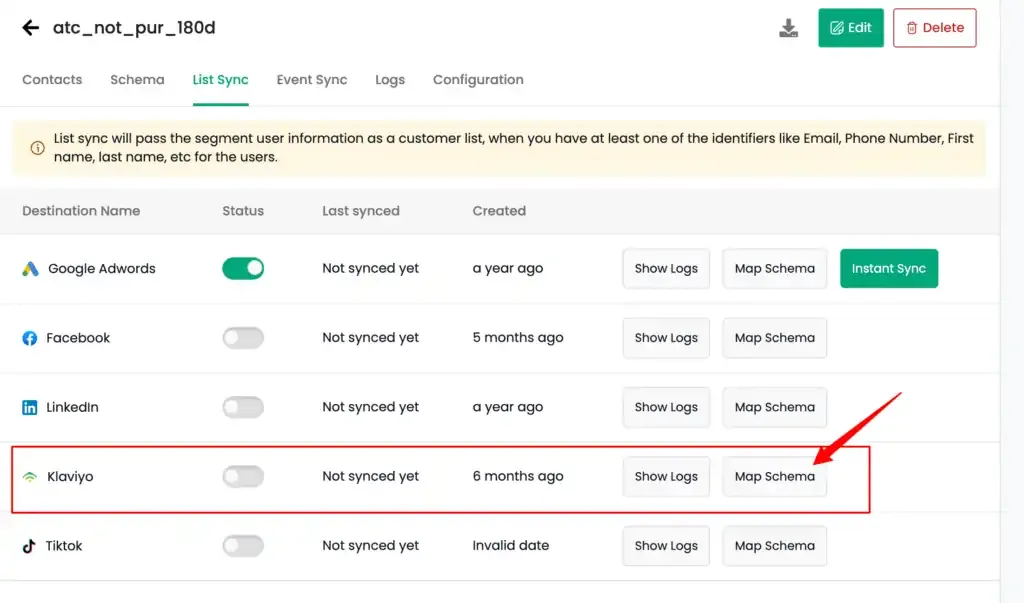
Go to the Destinations tab and click Map Schema for Klaviyo.
-
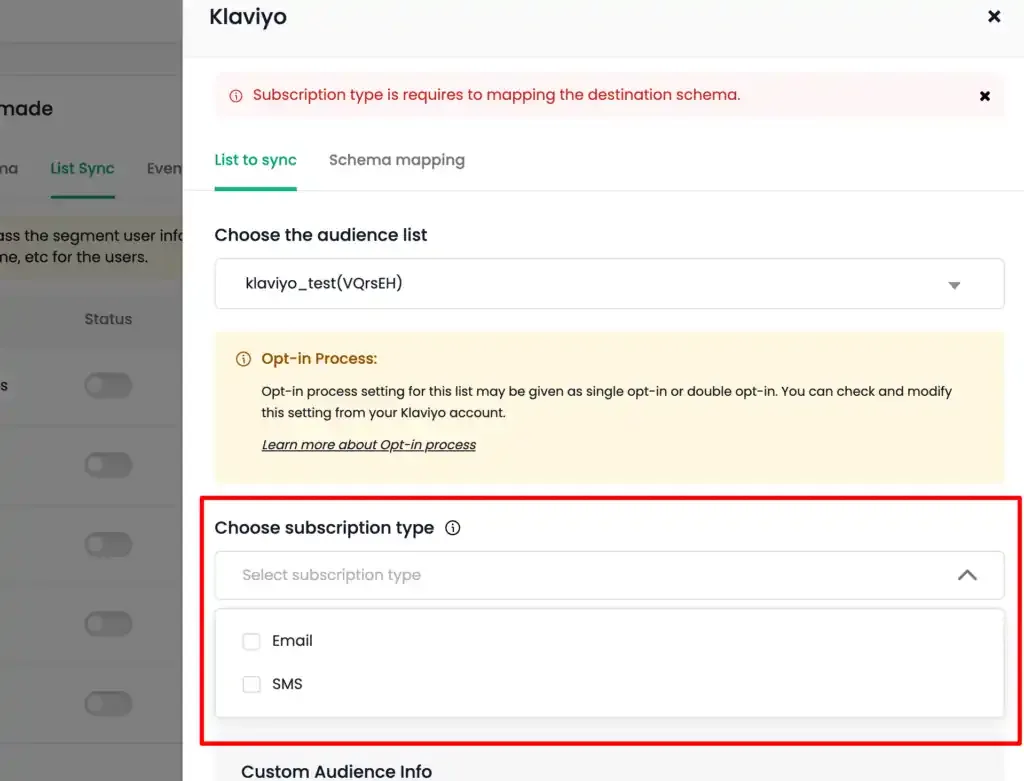
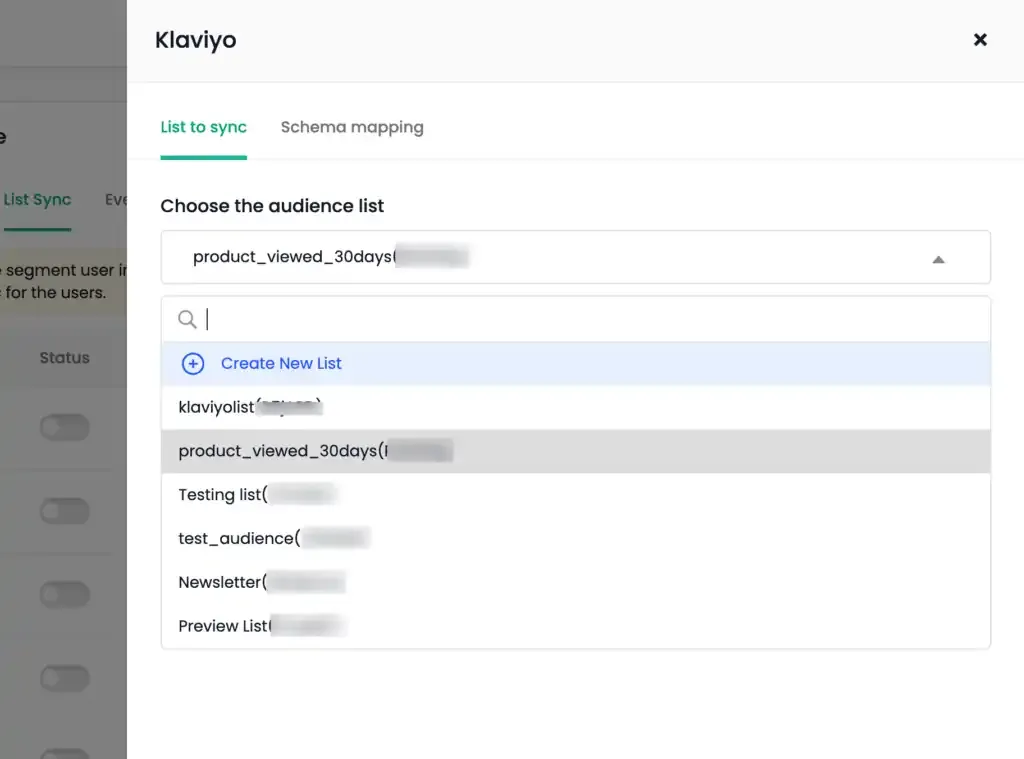
In the List to Sync tab:
- Select an existing audience list from your Klaviyo account, or
- Choose Create New List and enter a name for the new list.
-
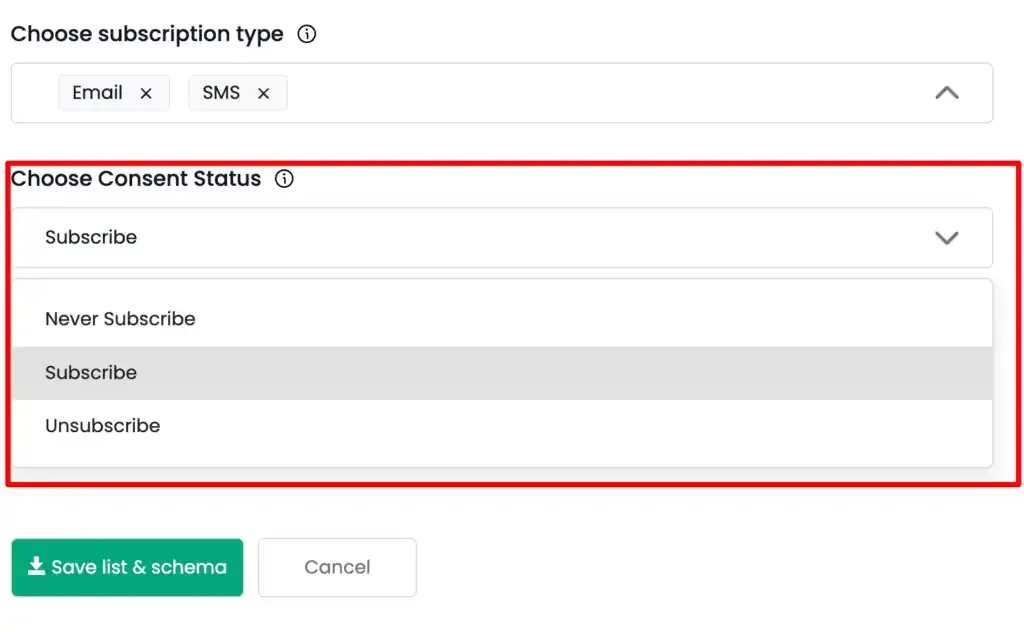
For both new and existing lists, select the Subscription Type (Email and/or SMS) from the drop-down menu.
-
Select the Consent Status (Subscribed, Never Subscribed, or Unsubscribed) from the drop-down menu. User profiles are updated in Klaviyo based on the option you choose.
-
Once the audience list is selected or created, the Custom Audience Info will be displayed.
-
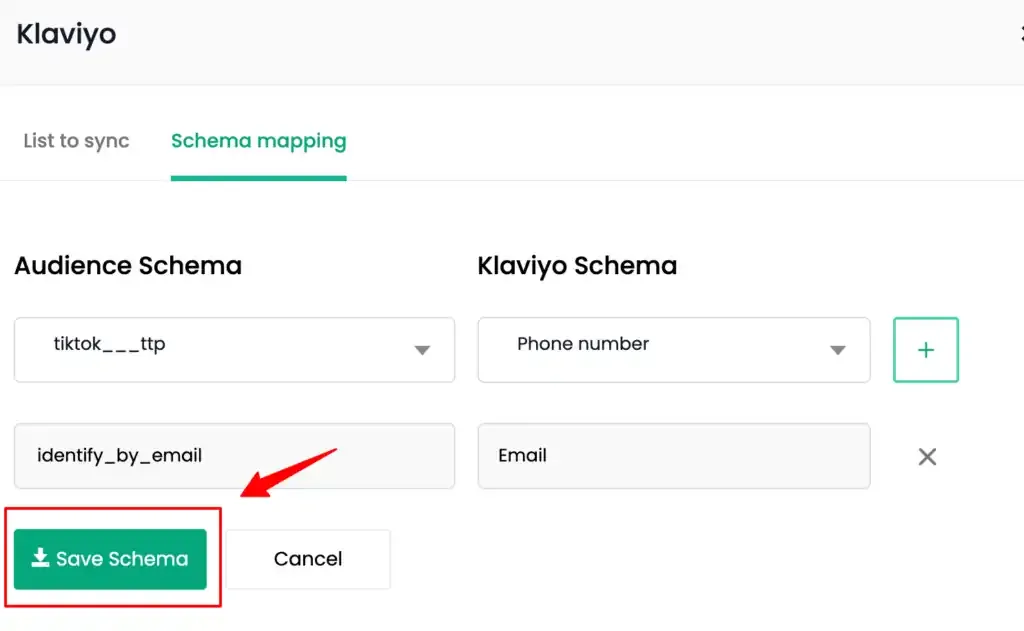
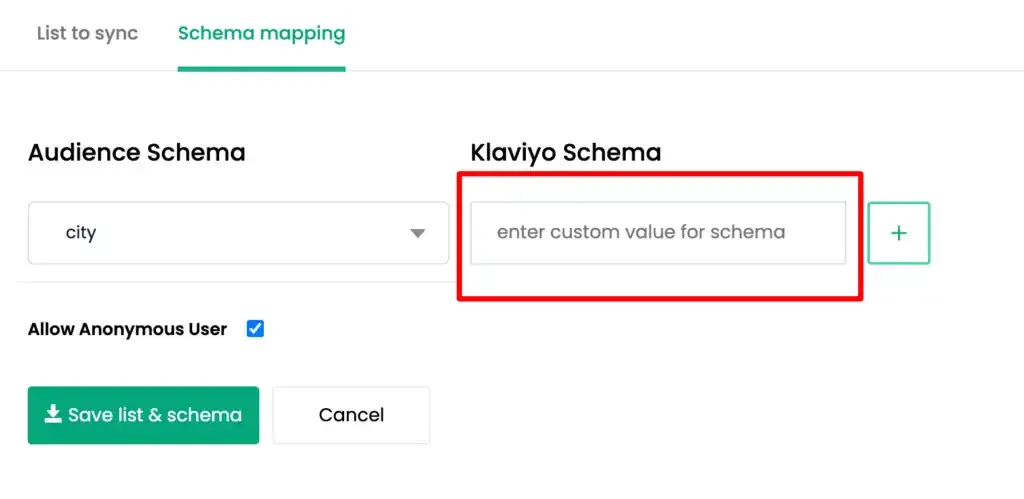
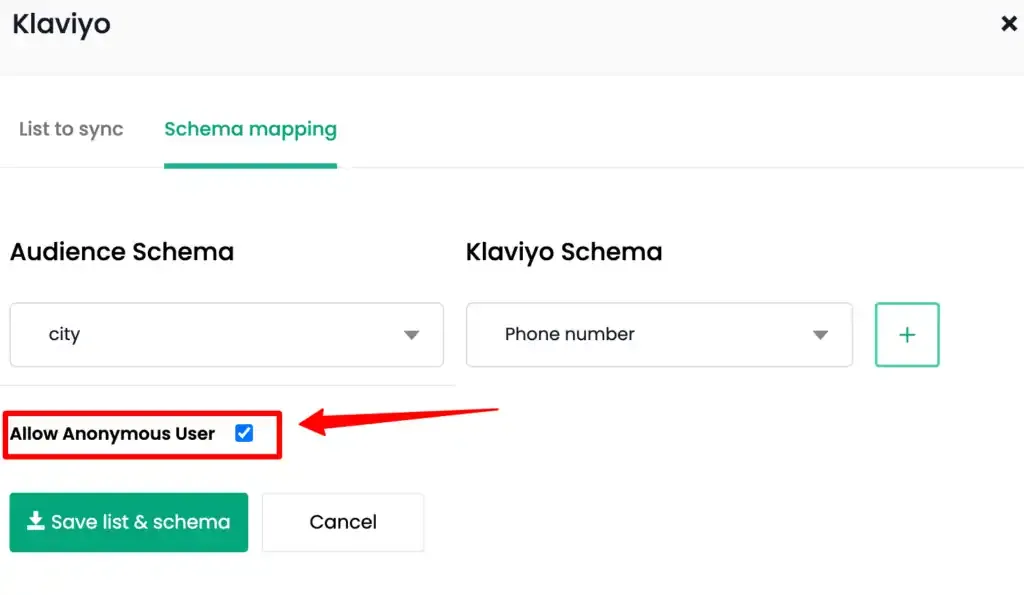
Go to the Schema Mapping tab. Map the audience schema fields to the corresponding Klaviyo schema fields for identifiers and user traits configured in Step 2. Use the ”+” button to add each field mapping. You can also add custom Klaviyo schema fields.
-
To include anonymous users, check the “Allow Anonymous User” checkbox.
Handling Profile Duplication — Exclude External ID
Section titled “Handling Profile Duplication — Exclude External ID”To prevent duplicate profiles caused by conflicting External IDs, CustomerLabs supports an Exclude External ID option when syncing audience data to Klaviyo.
When enabled, the External ID is omitted from the profile import payload sent via Klaviyo’s bulk import API. Without an External ID, Klaviyo falls back to matching profiles using Email and Phone Number, effectively preventing duplicate profile creation.
How to enable:
-
In the CustomerLabs Klaviyo destination configuration, enable the Exclude External ID field before syncing.
-
The External ID will be omitted from profiles sent to Klaviyo, and the audience sync proceeds as usual.
-
Click Save Schema.
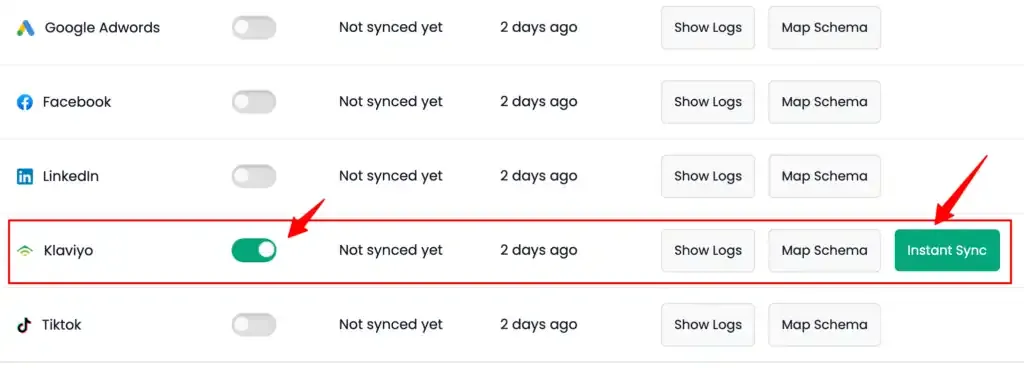
-
Switch ON the toggle under Status for Klaviyo.
-
Click Instant Sync to sync the list immediately.
-
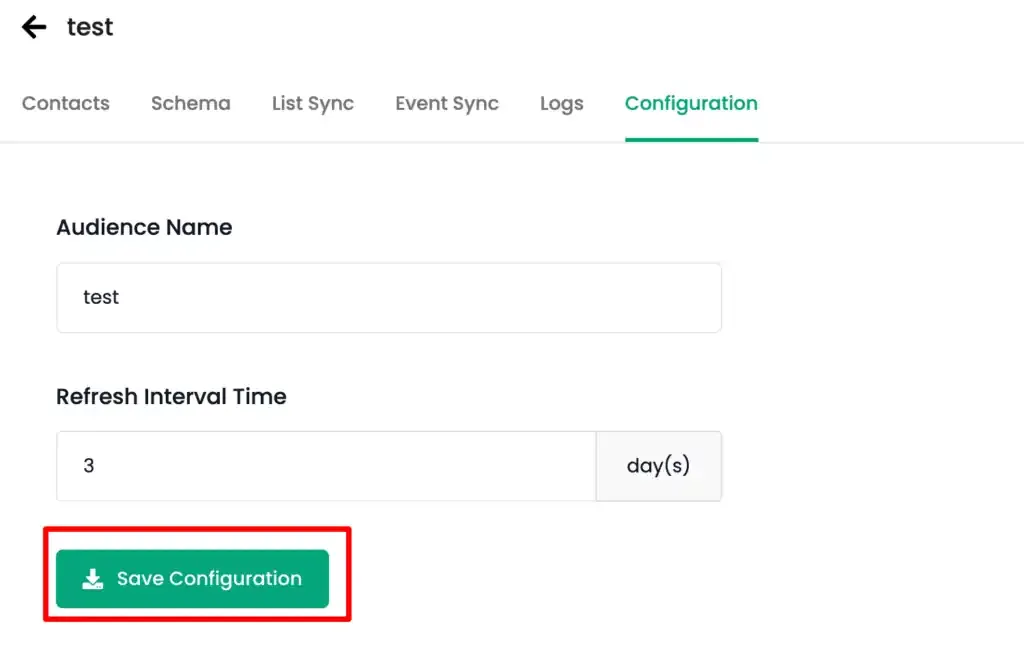
Go to the Configuration tab, set the Refresh Interval as required, and click Save Configuration.
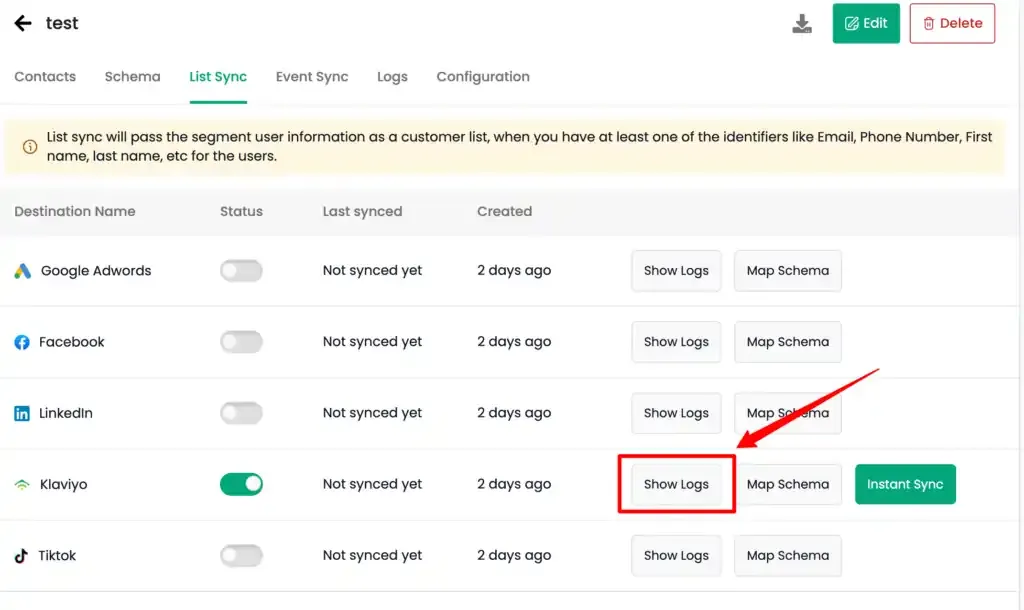
-
You can review sync activity from the Logs tab. You can also check Klaviyo-specific logs by going to Destinations → Klaviyo → Show Logs for the latest sync event.
Verify Audience Sync in Klaviyo
Section titled “Verify Audience Sync in Klaviyo”You can verify whether the audience list has been created or synced within 10–15 minutes if Instant Sync is enabled, or after the configured refresh interval.
-
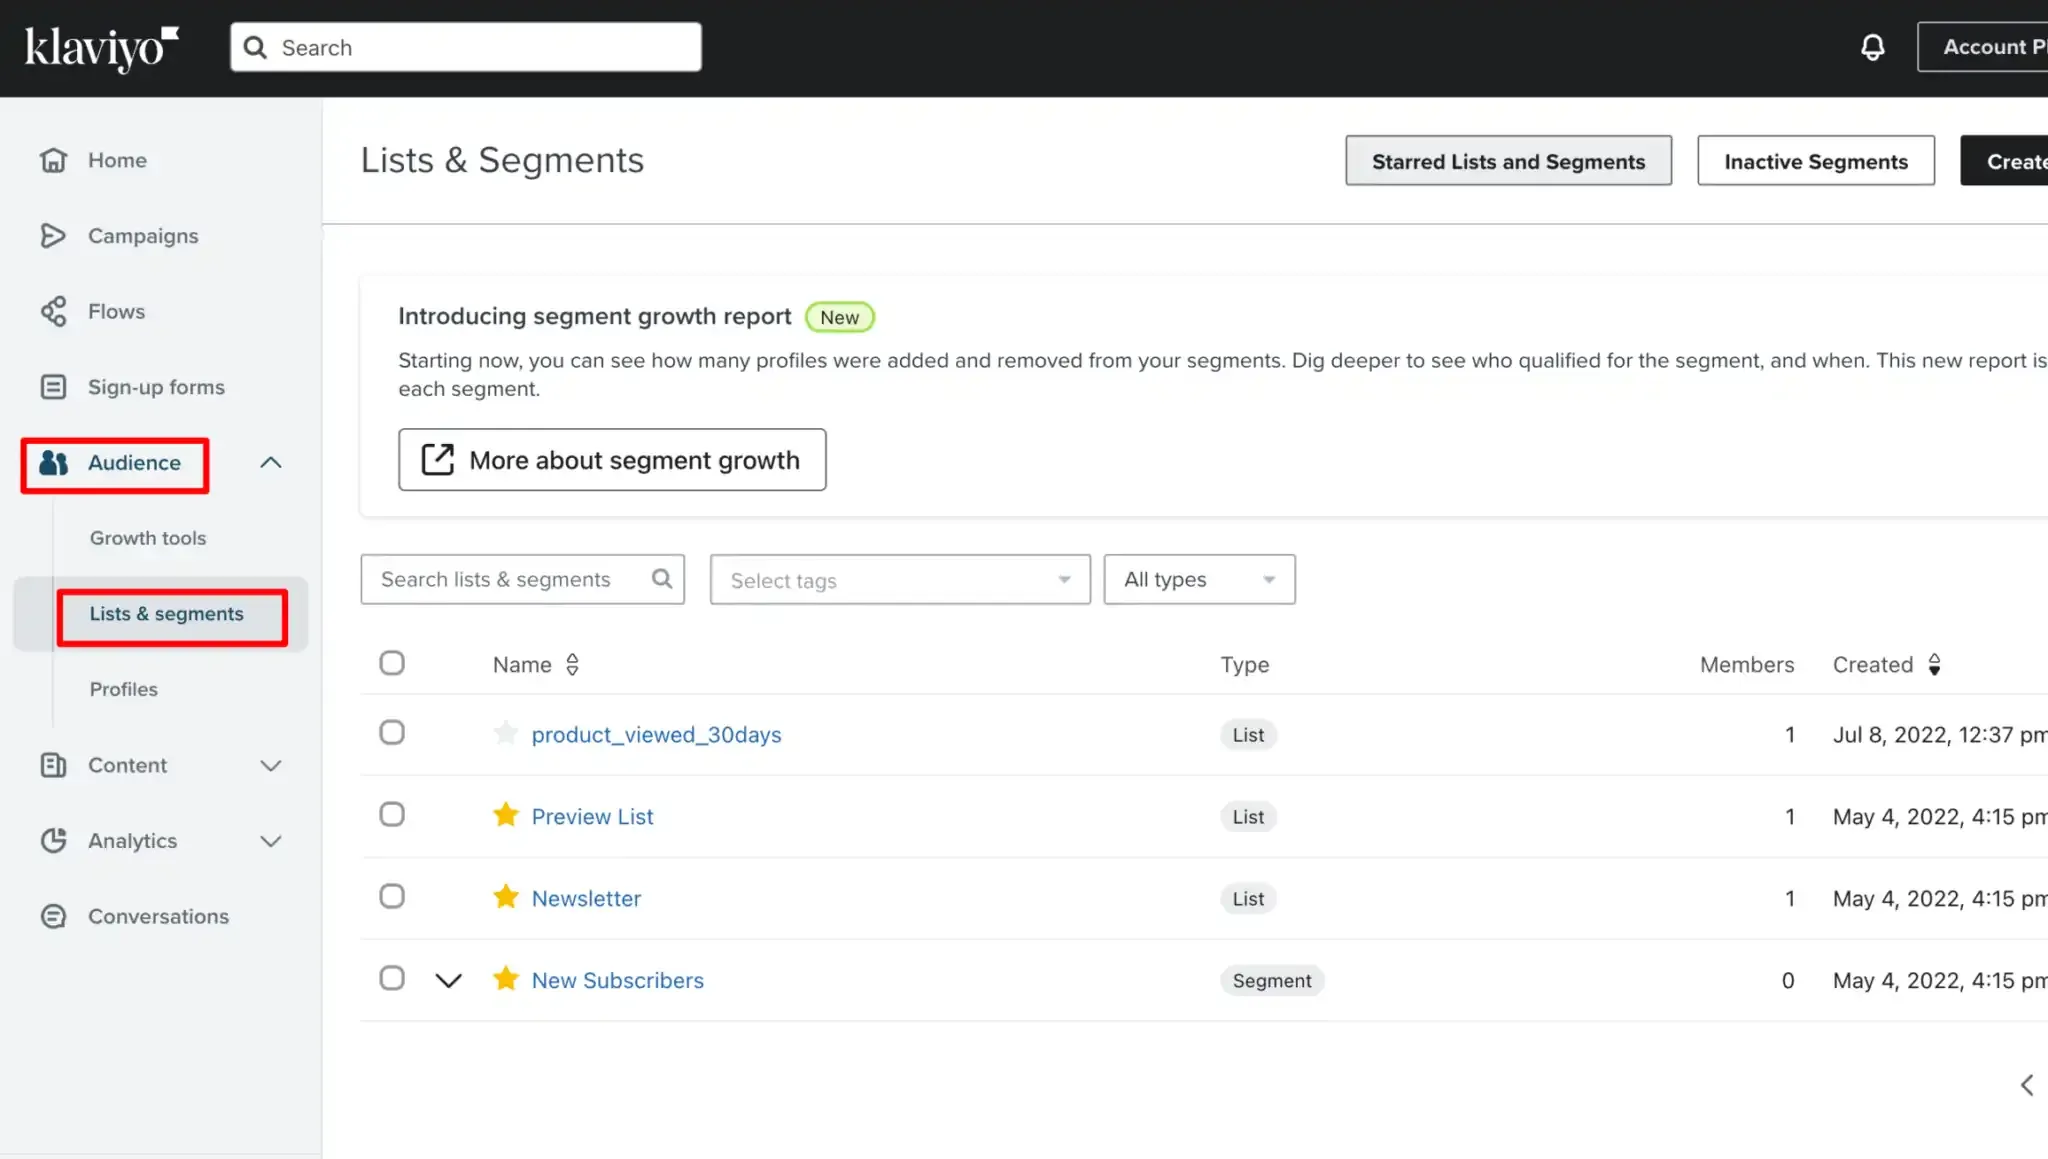
In Klaviyo, go to Audiences → Lists & Segments.
-
Confirm that the audience list appears with the same name you specified in CustomerLabs, or verify that the existing list has been updated.