Sync CustomerLabs Audience with Meta (Facebook) Ads
Audiences created in CustomerLabs can be synced with Facebook in two ways:
- Event Sync (through website custom audience)
- List Sync (as a customer list)
Prerequisites
Section titled “Prerequisites”Before syncing audiences, ensure you have:
- Integrated Facebook with CustomerLabs by authenticating your Facebook account.
- Audience should be created and active
Event Sync (Recommended)
Section titled “Event Sync (Recommended)”You can sync the segment as an event for both anonymous and known users, depending on the availability of external IDs (e.g., Facebook FBP ID). By syncing the segment, a new custom audience is created in Facebook, which updates regularly based on the refresh interval.
Steps to sync an audience via Event Sync:
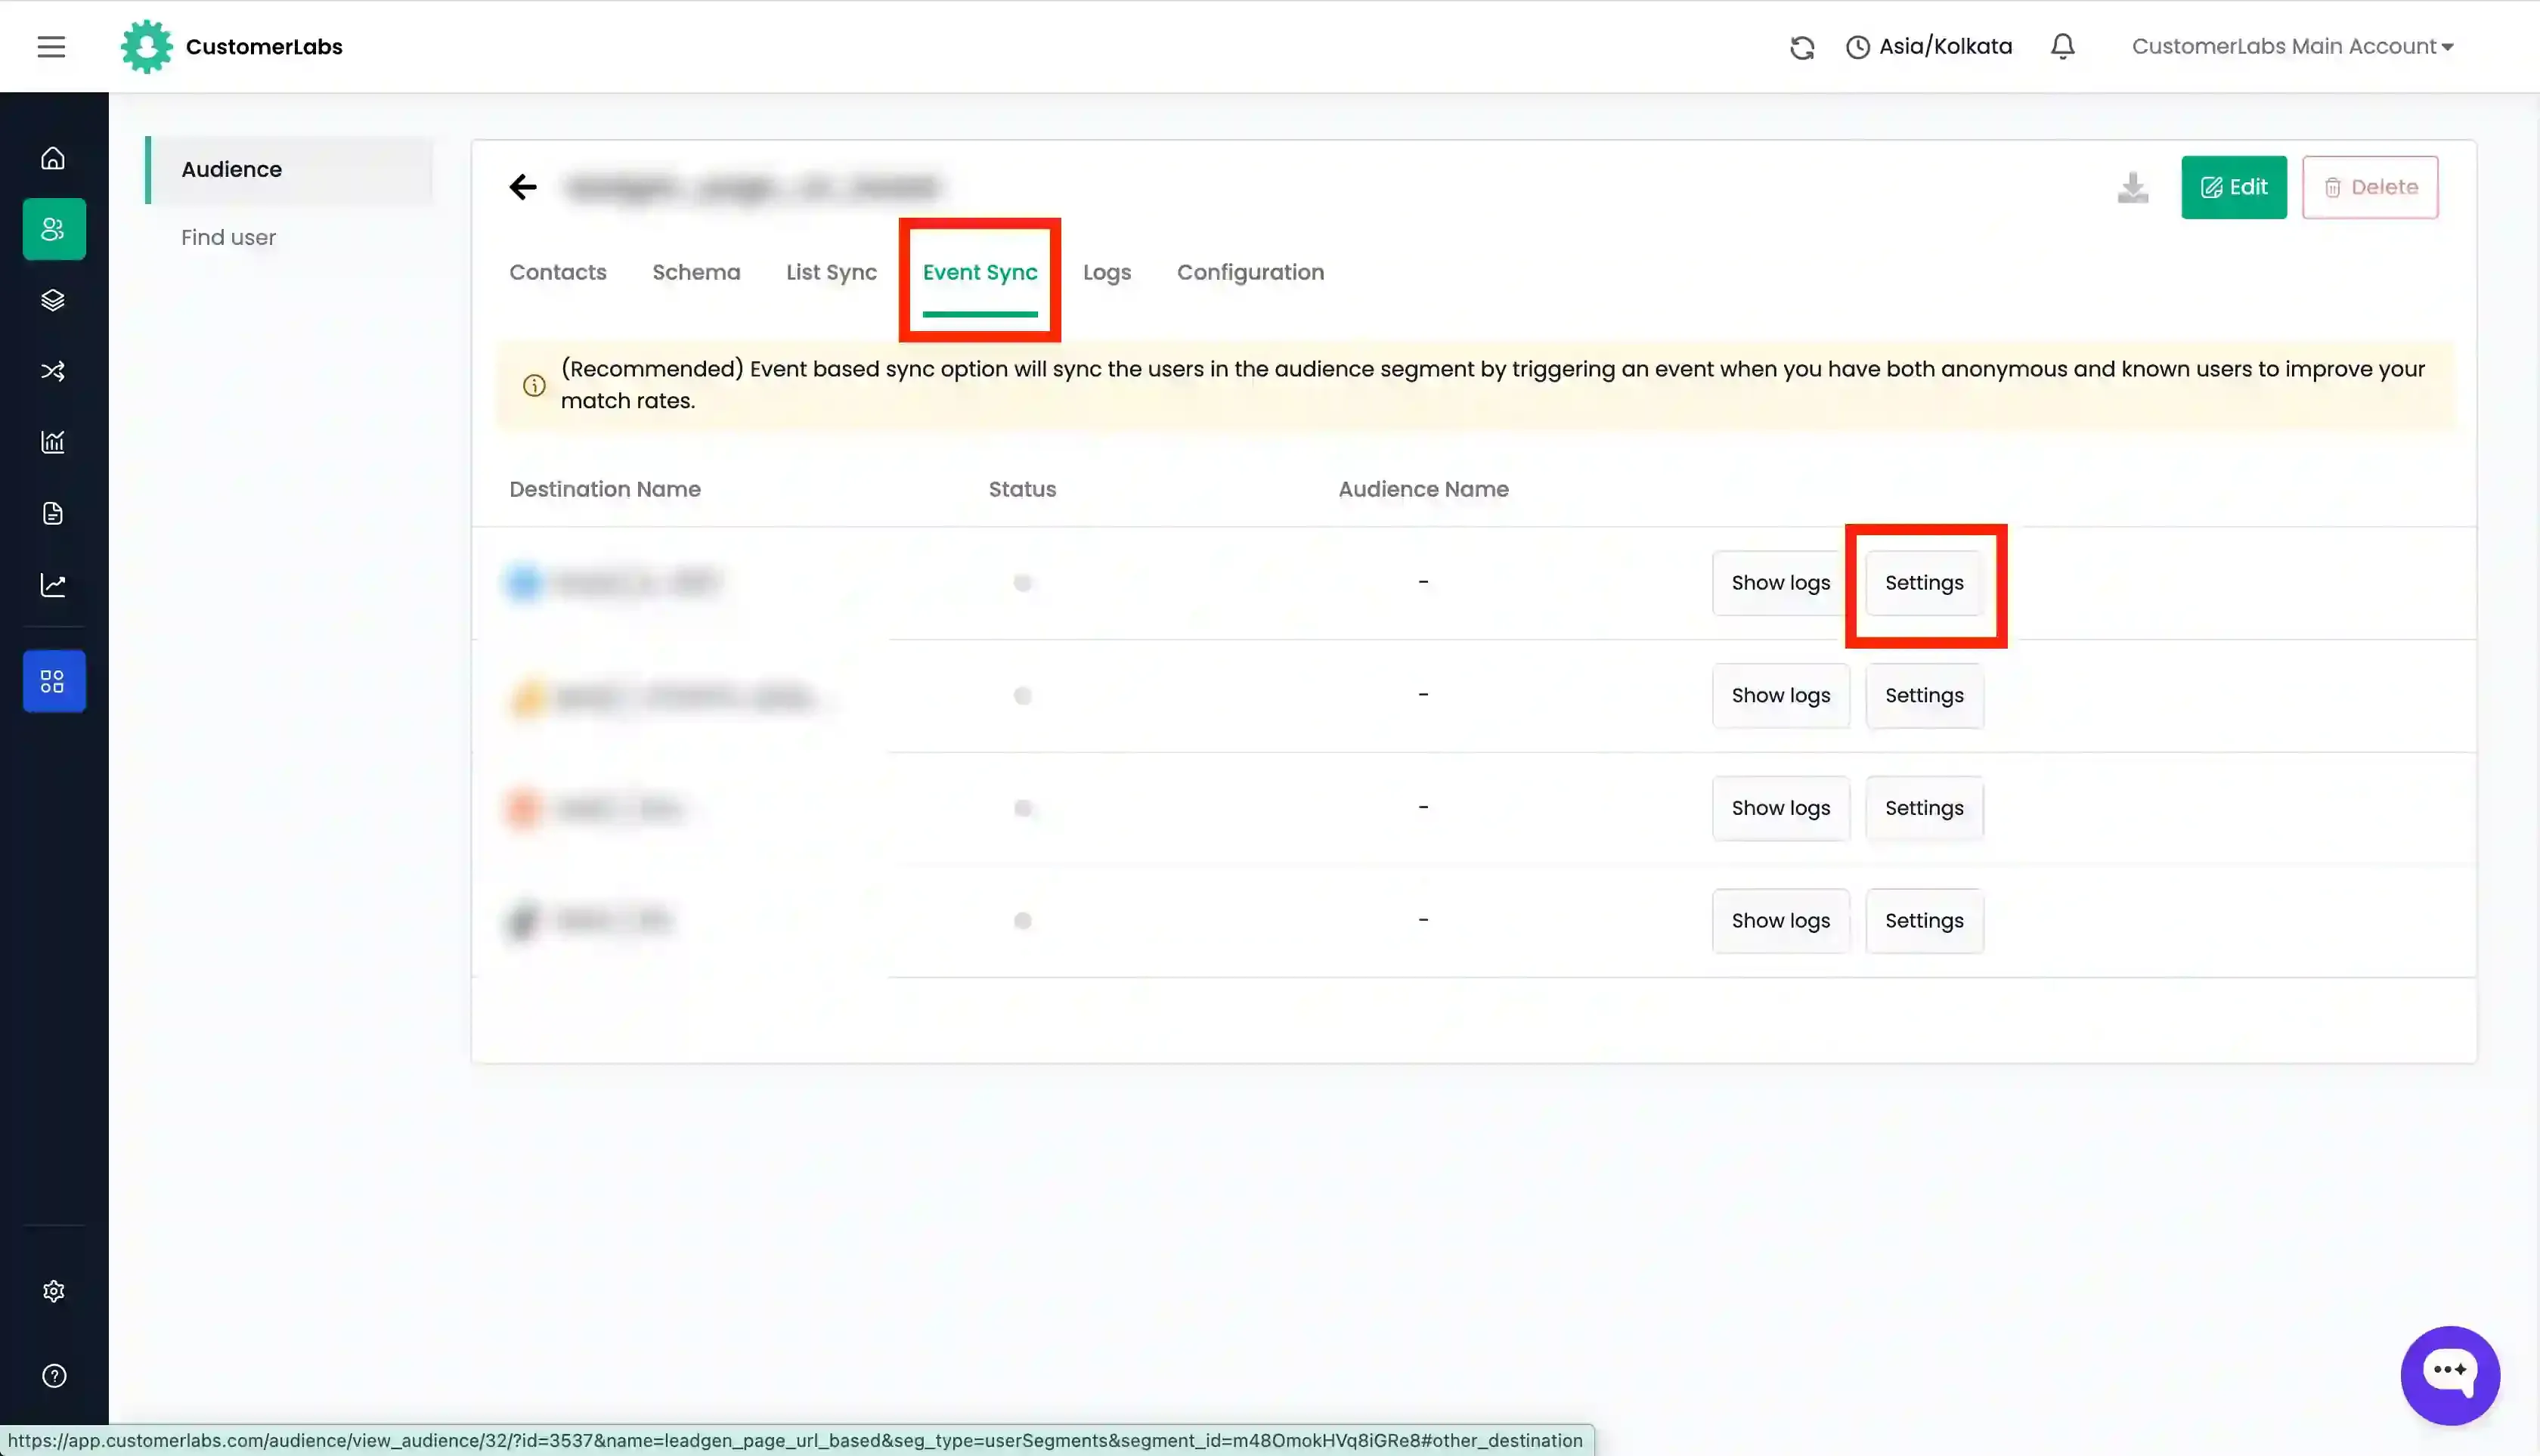
Section titled “Steps to sync an audience via Event Sync:”- Navigate to the segment created in CustomerLabs that you want to sync.
- Go to the Event Sync tab.
- Click on Settings.
- Configure the Audience Name by selecting one of the following from the dropdown:
Segment name: The audience name created in CustomerLabs.Segment ID: A unique identifier automatically generated for the audience.Custom: A custom name to identify the audience on Facebook.
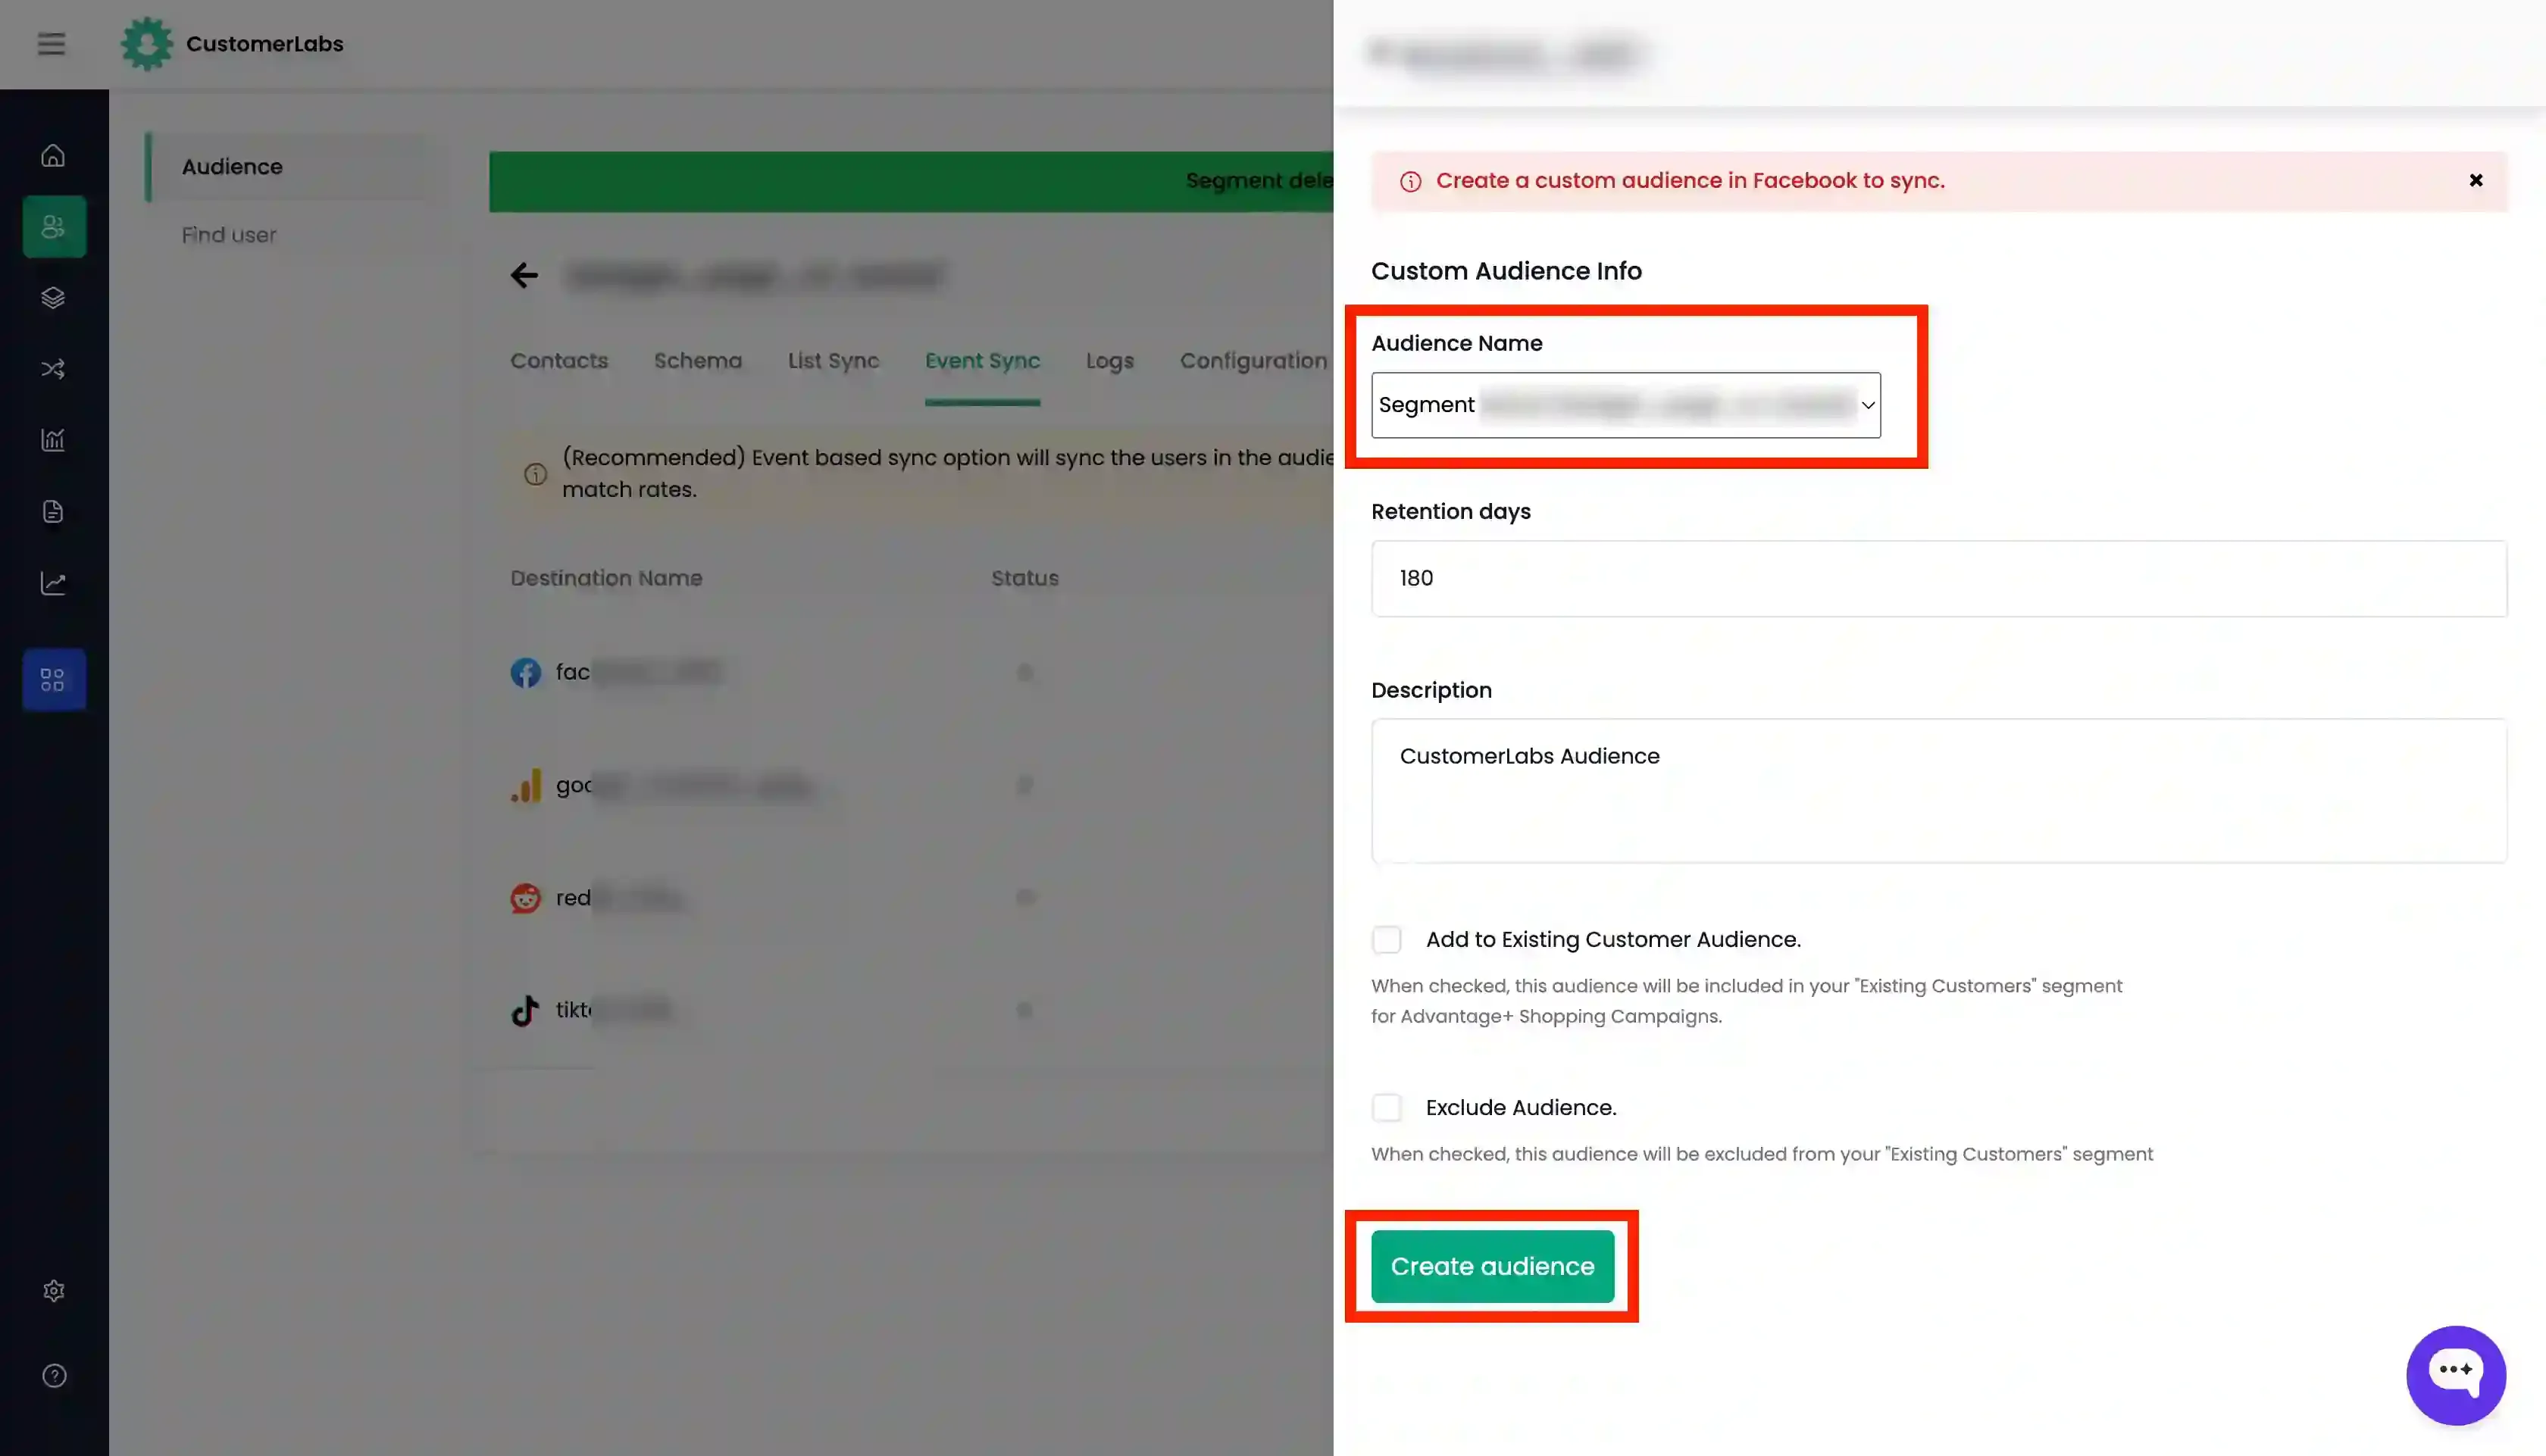
- Add Retention days and Description as needed.
- Retention days: The number of days the audience will be retained by Facebook after the last refresh. If audience is refreshed continuously, the retention days will be updated and keep extending set days from the last refresh.
- Description: You can added description to the audience to identify it in Facebook.
-
If this audience is a segment of your existing audience (who are converted), and you intend to add this under “existing customer” segment in Facebook for use in Advantage+ Sales Campaigns, you can check the box Add to Existing Customer Audience.
-
Click Exclude Audience to exclude this specific audience when creating Facebook custom audiences.
-
Click Create Audience.
-
Verify the sync status:
- Look for the green toggle under the Status column to confirm the audience is active.
- Check the Logs tab (or Event Sync → Facebook → Show Logs) to view the latest sync updates.
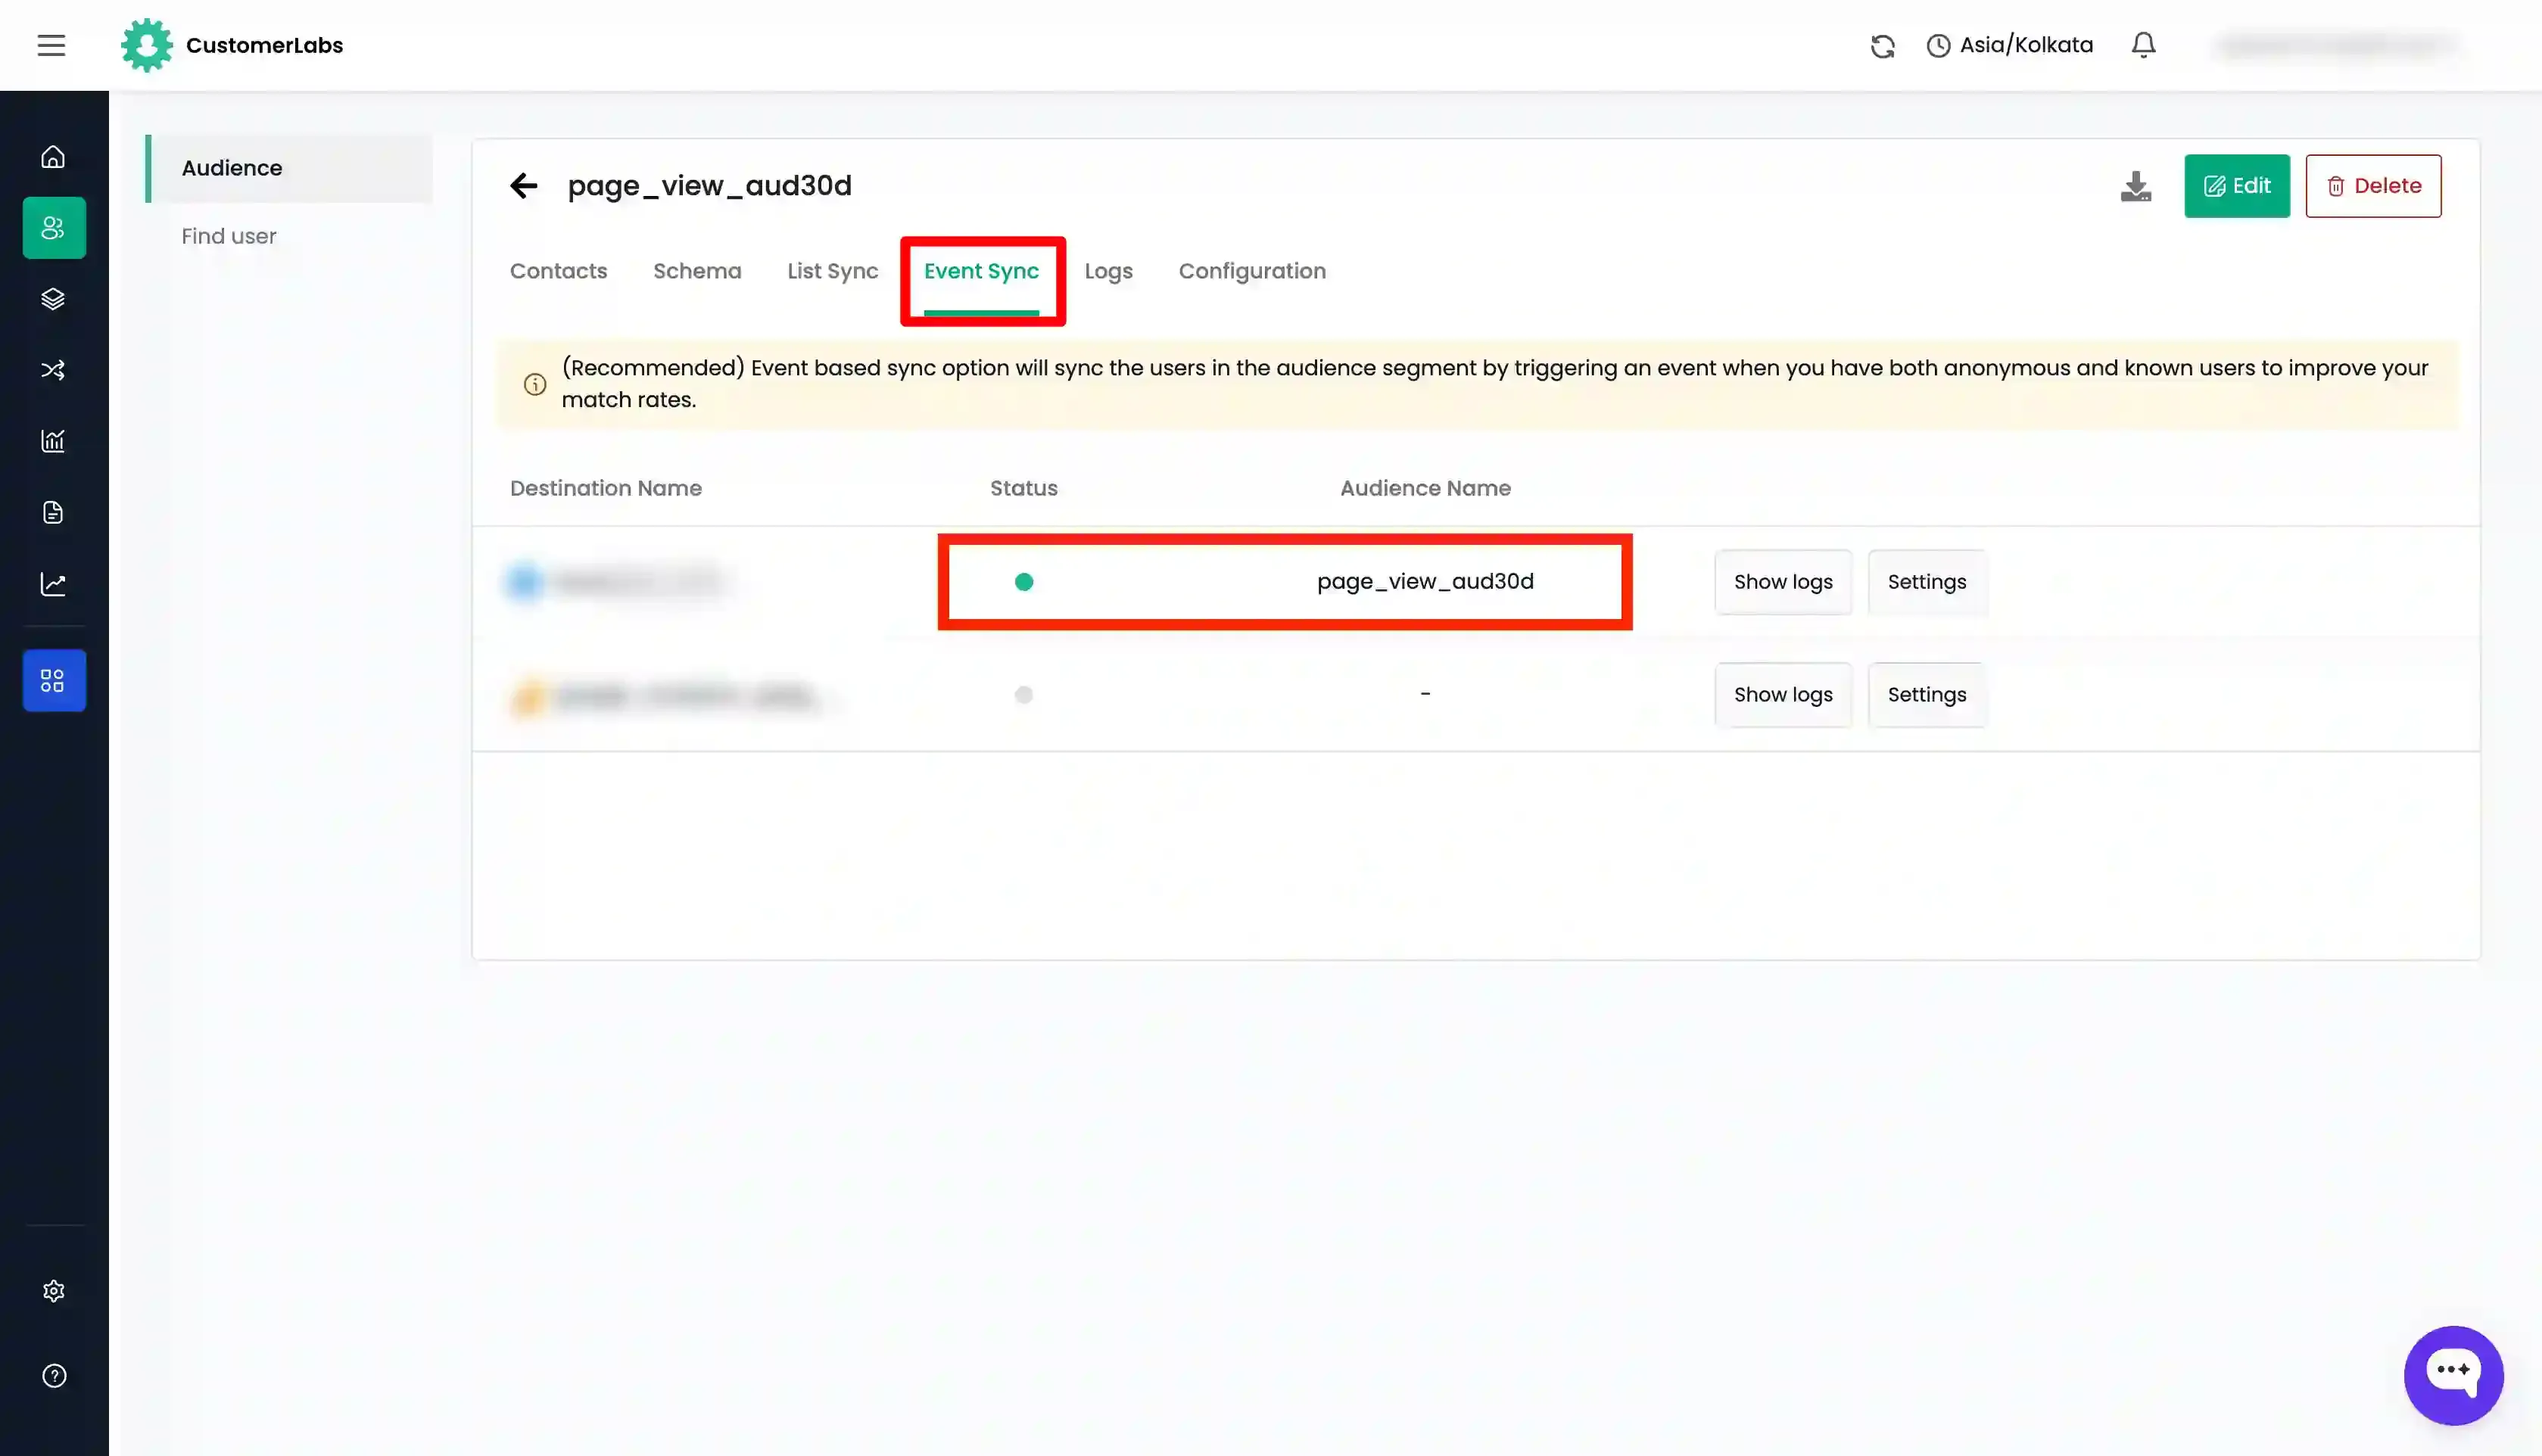
- The custom audience will be created in Meta Ads Manager → Audiences.
Unlinking or Deleting an Audience
Section titled “Unlinking or Deleting an Audience”You can manage your synced audiences directly from the interface.
Unlink an Audience
Section titled “Unlink an Audience”Unlinking stops the regular refresh from CustomerLabs but keeps the audience on Facebook.
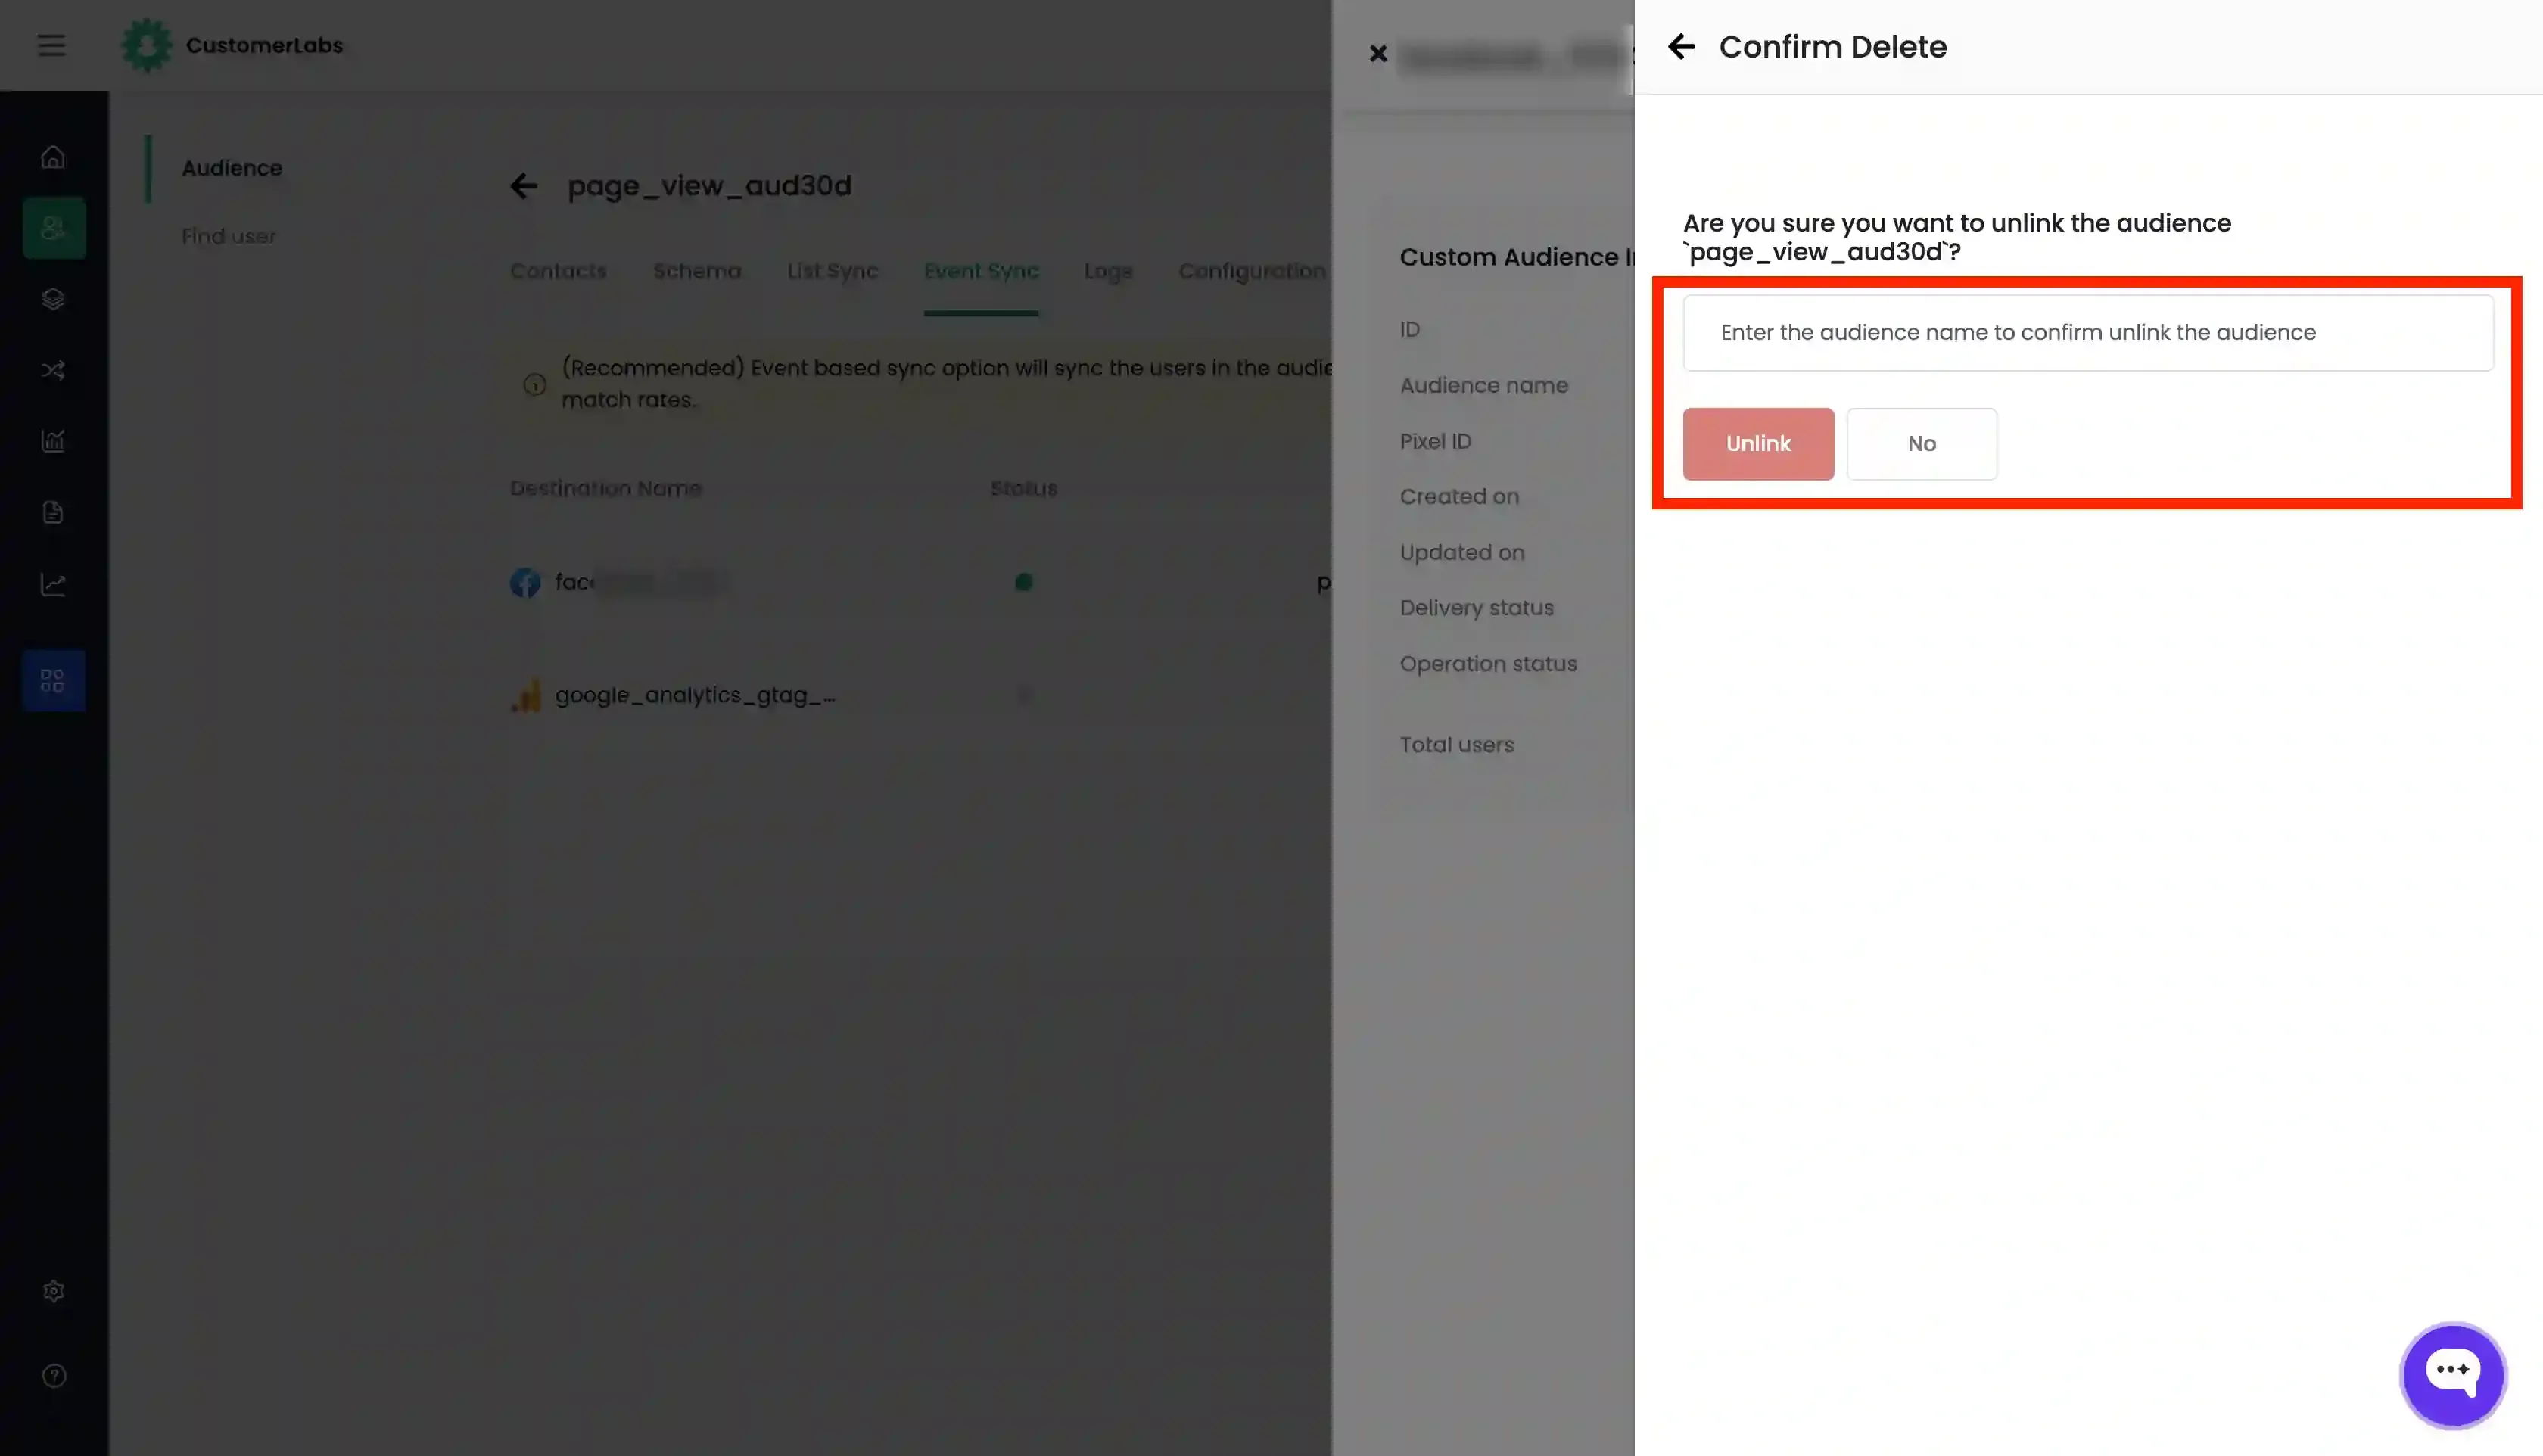
- Go to the Events Sync tab → Click Settings button across that Facebook Destination name.
- Click the Unlink icon in the top right corner of the custom audience.

- You will be prompted to enter the name of the custom audience for confirmation. Enter the audience name and click Unlink.
Delete an Audience
Section titled “Delete an Audience”Deleting removes the custom audience from Facebook entirely.
- Click the Delete icon in the top right corner of the custom audience.
- Enter the name of the custom audience to confirm.
- Click Delete.
List Sync (Customer List)
Section titled “List Sync (Customer List)”Syncing as a customer list is recommended when you have basic user details (name, email, phone) but lack external IDs (e.g., FBP ID). There are two types of list syncs:
- Normal customer list
- Value-based customer list
Normal Customer List
Section titled “Normal Customer List”This method requires at least one main identifier but no value parameter.
-
Navigate to your audience in CustomerLabs and go to the Schema tab.
-
Add the user traits (schema) to be synced. Only added traits can be mapped. Required Identifiers (at least one):
EmailPhone numberMobile Advertiser IDFacebook App User IDFacebook Page User IDFirst NameLast Name
-
Click Update schema.
-
Go to the List Sync tab, locate Facebook, and click Map Schema.
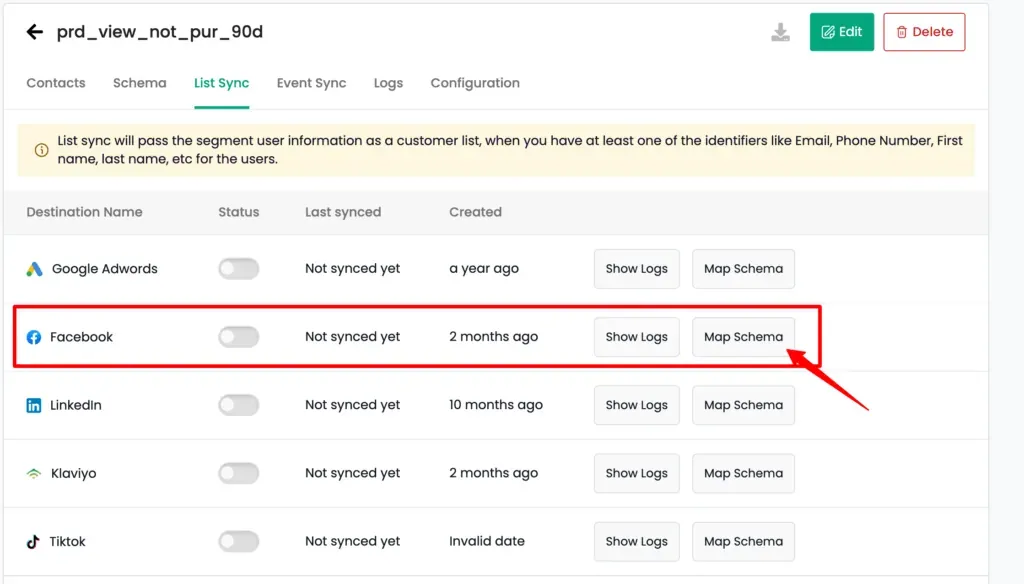
-
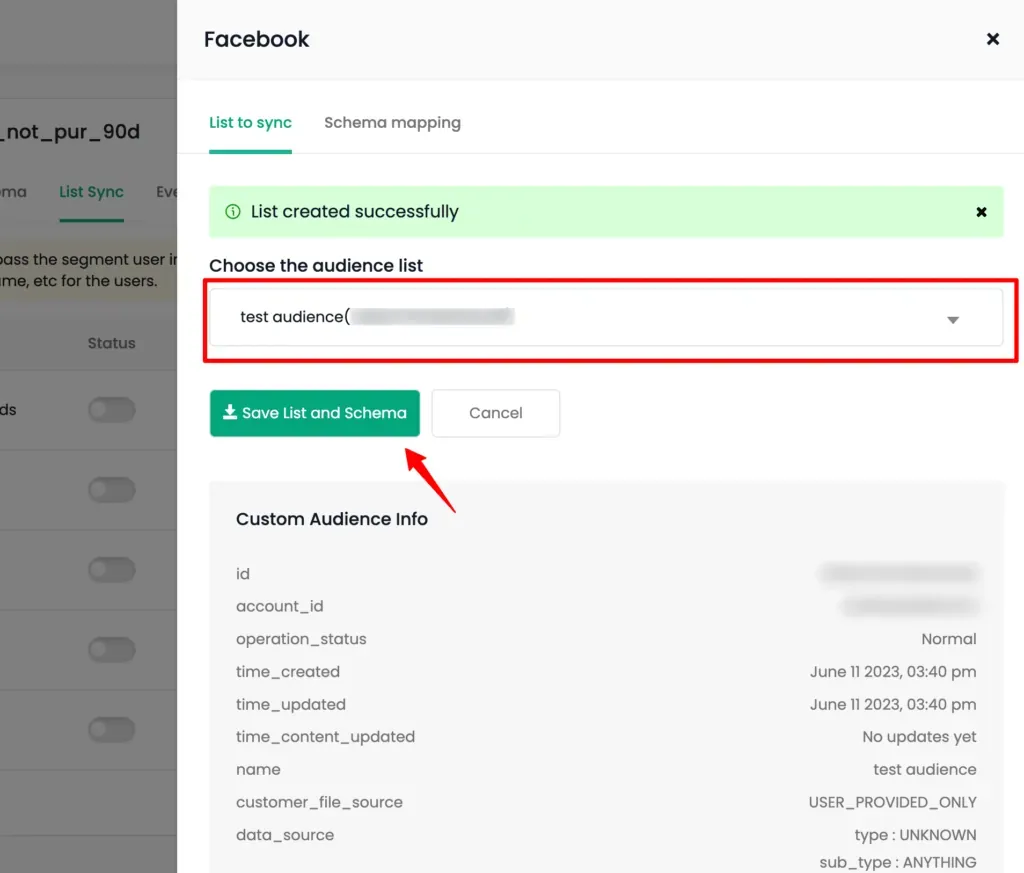
In the List to sync tab:
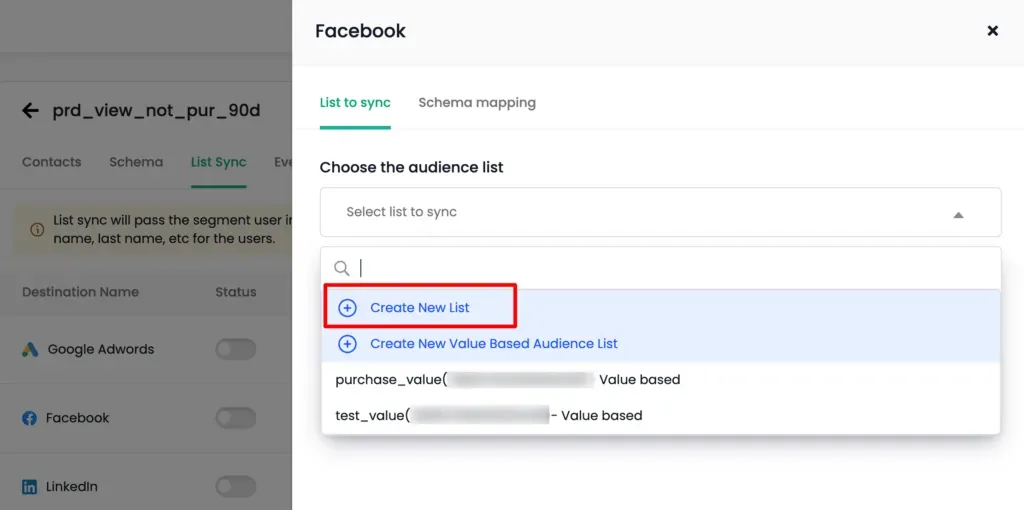
- Choose an existing audience list, OR
- Select
+Create New List and enter a name.
-
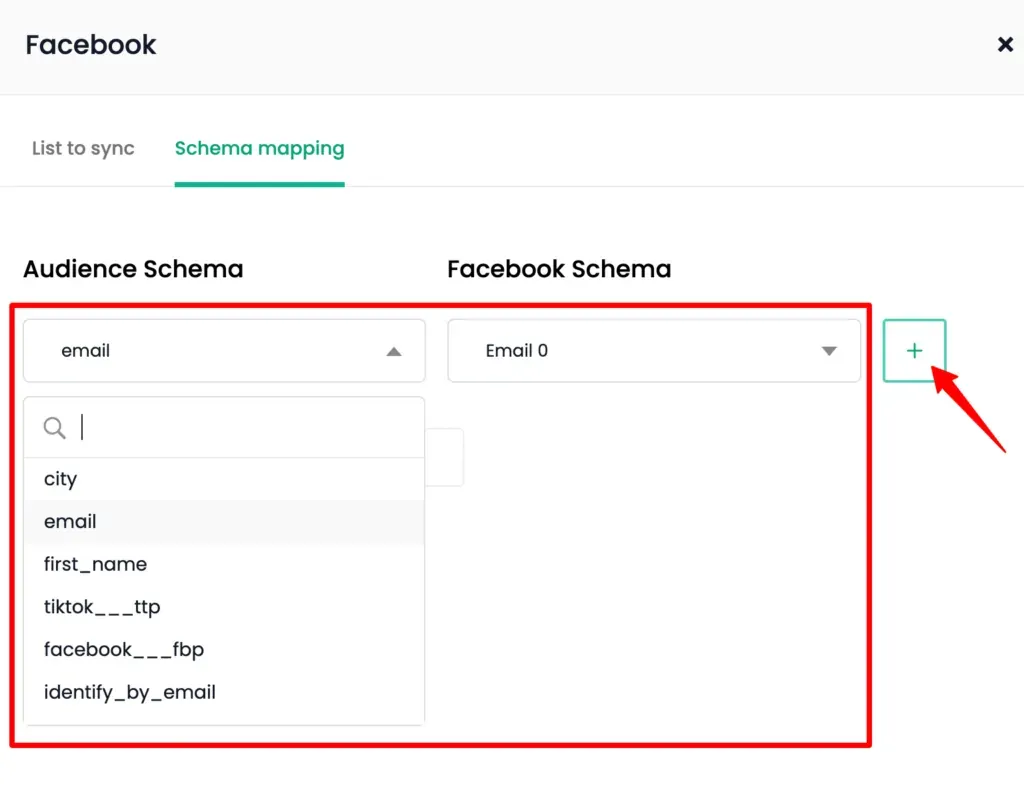
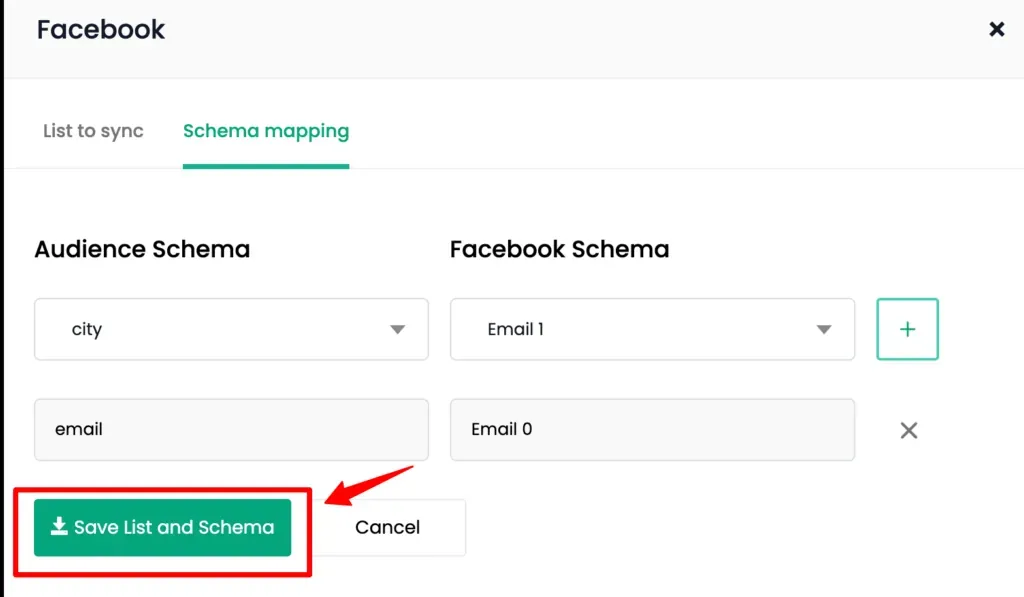
Go to the Schema Mapping tab and map your CustomerLabs schema to the Facebook schema using the + icon.
-
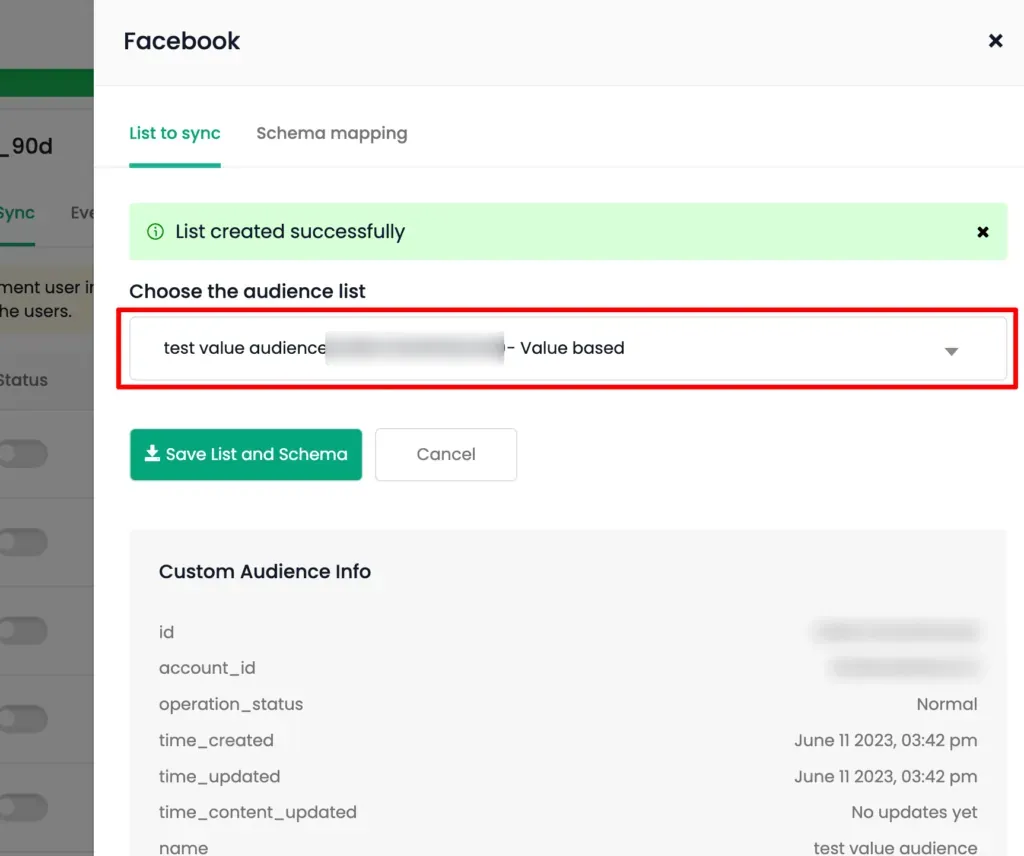
Click Save List and Schema in Schema Mapping and List to sync tabs.
-
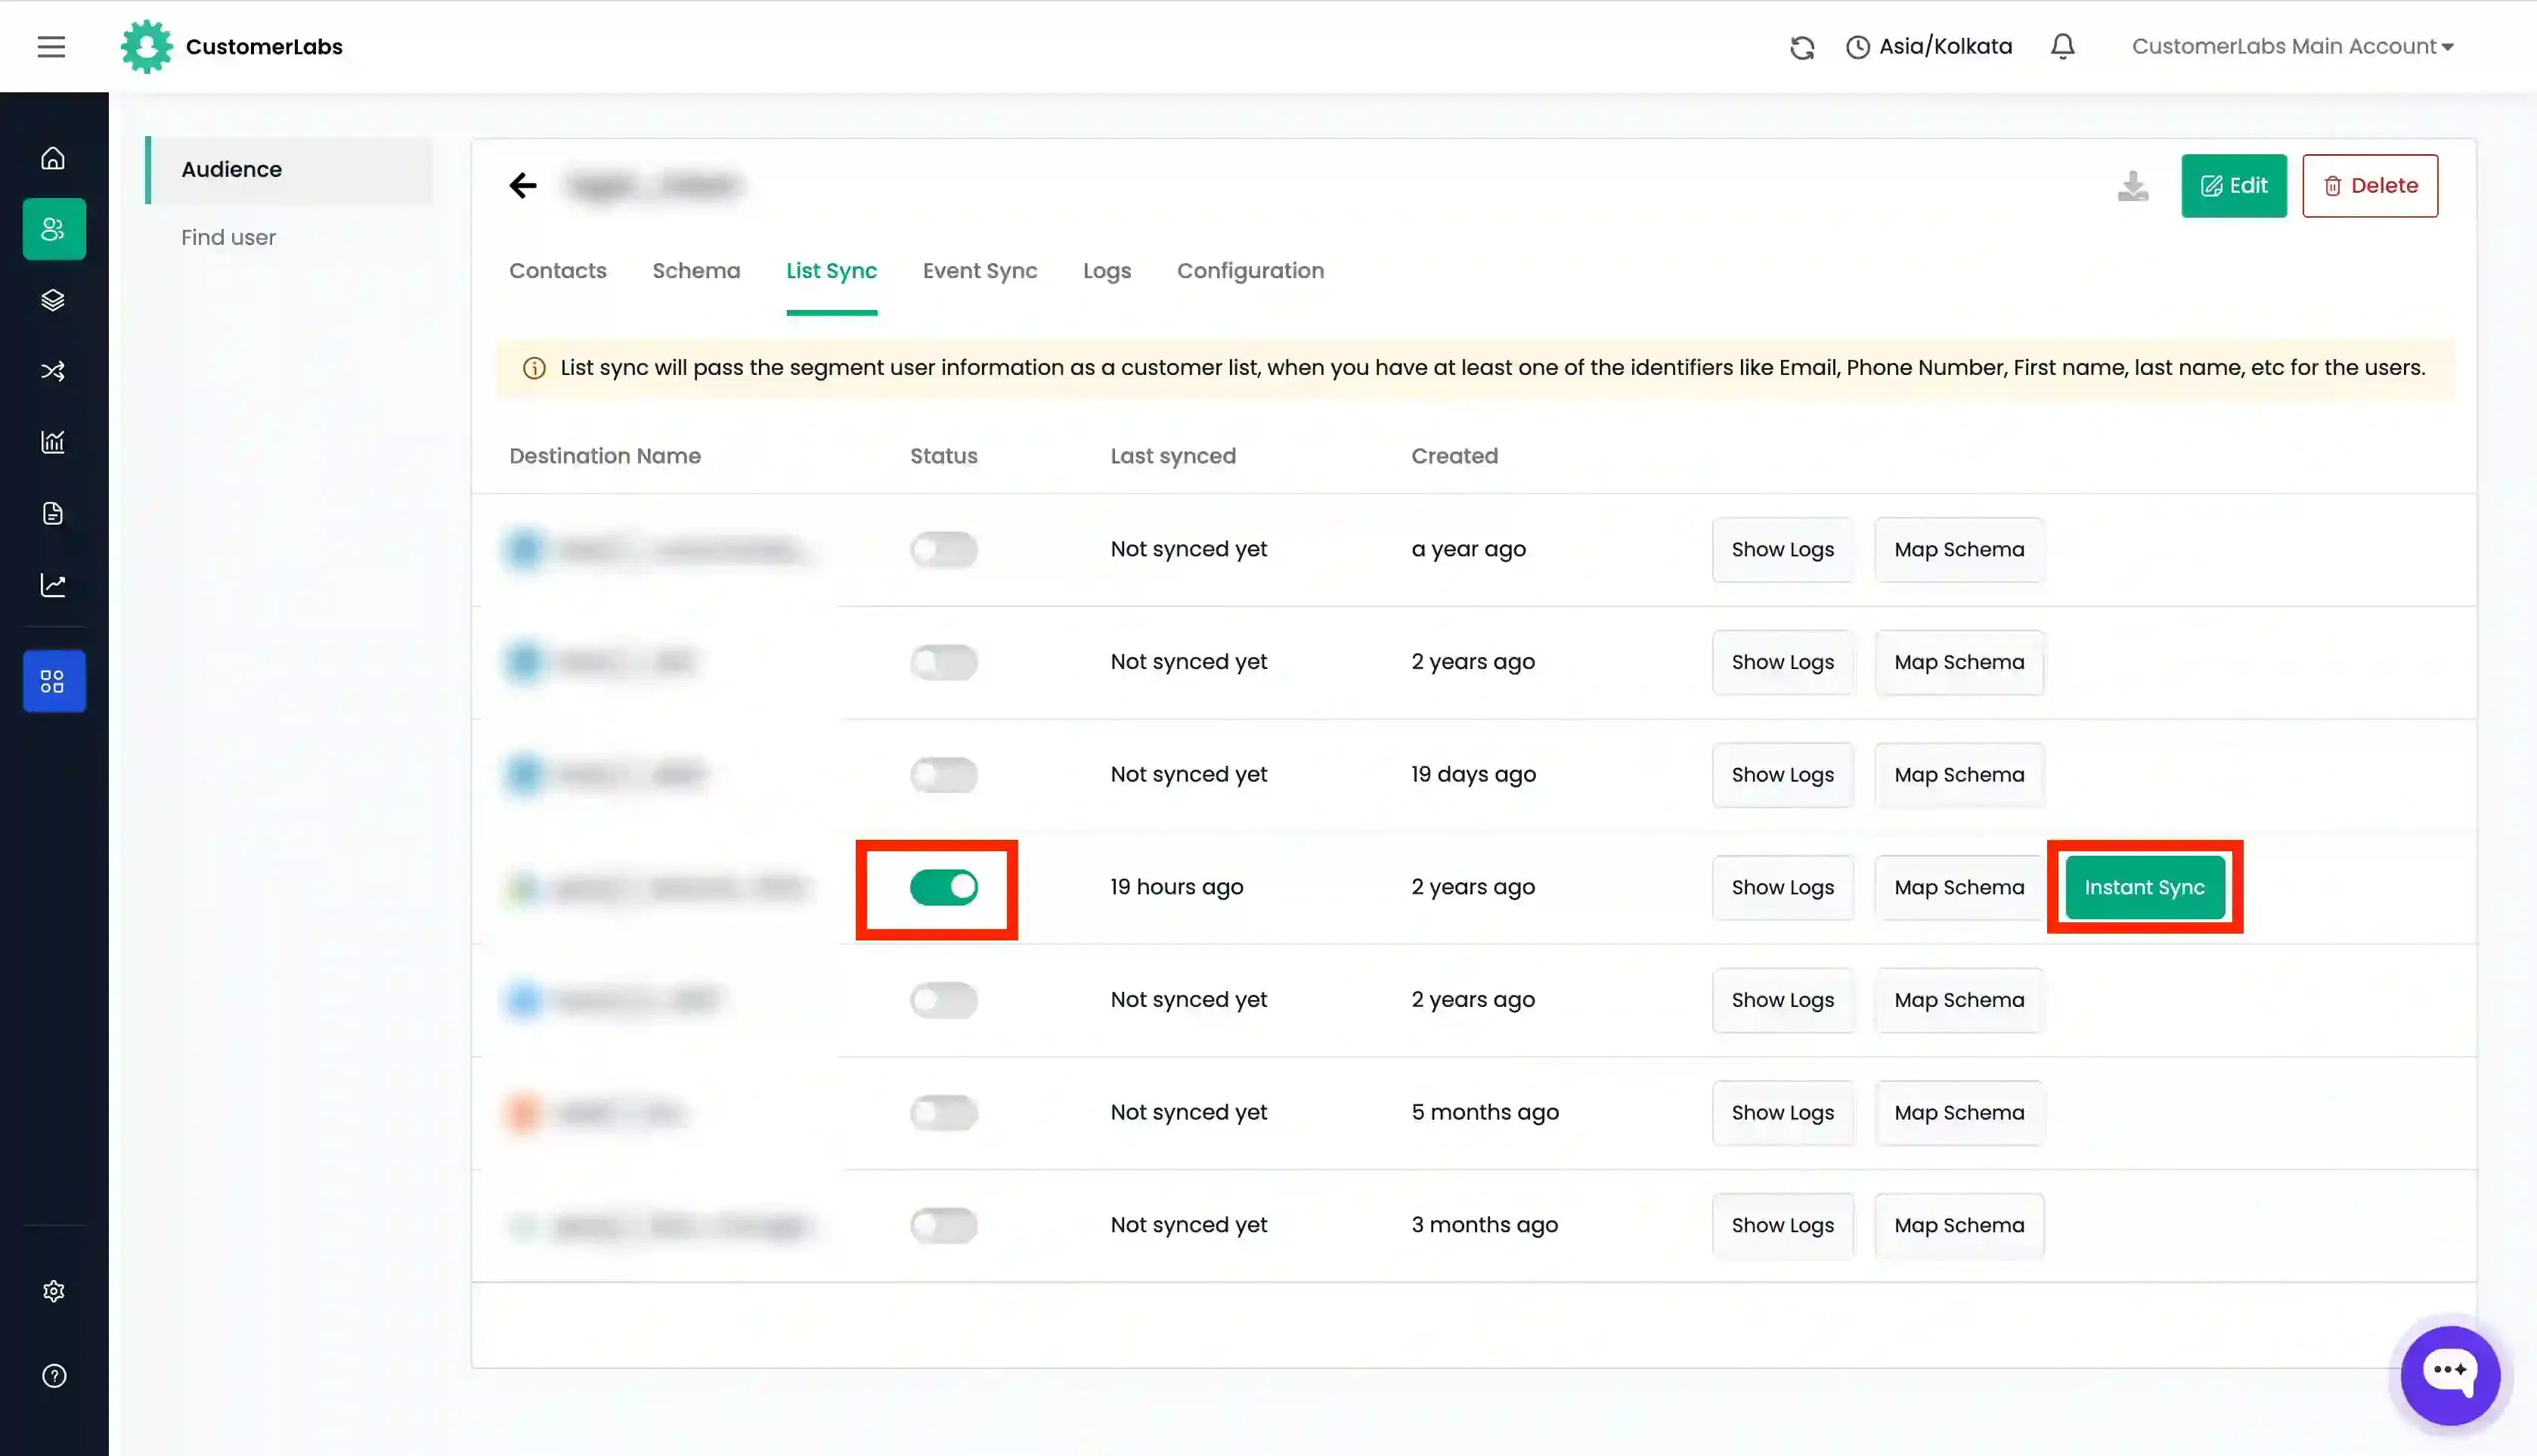
Turn on the Status toggle for Facebook.
-
Click Instant Sync to sync immediately, or wait for the refresh interval.
-
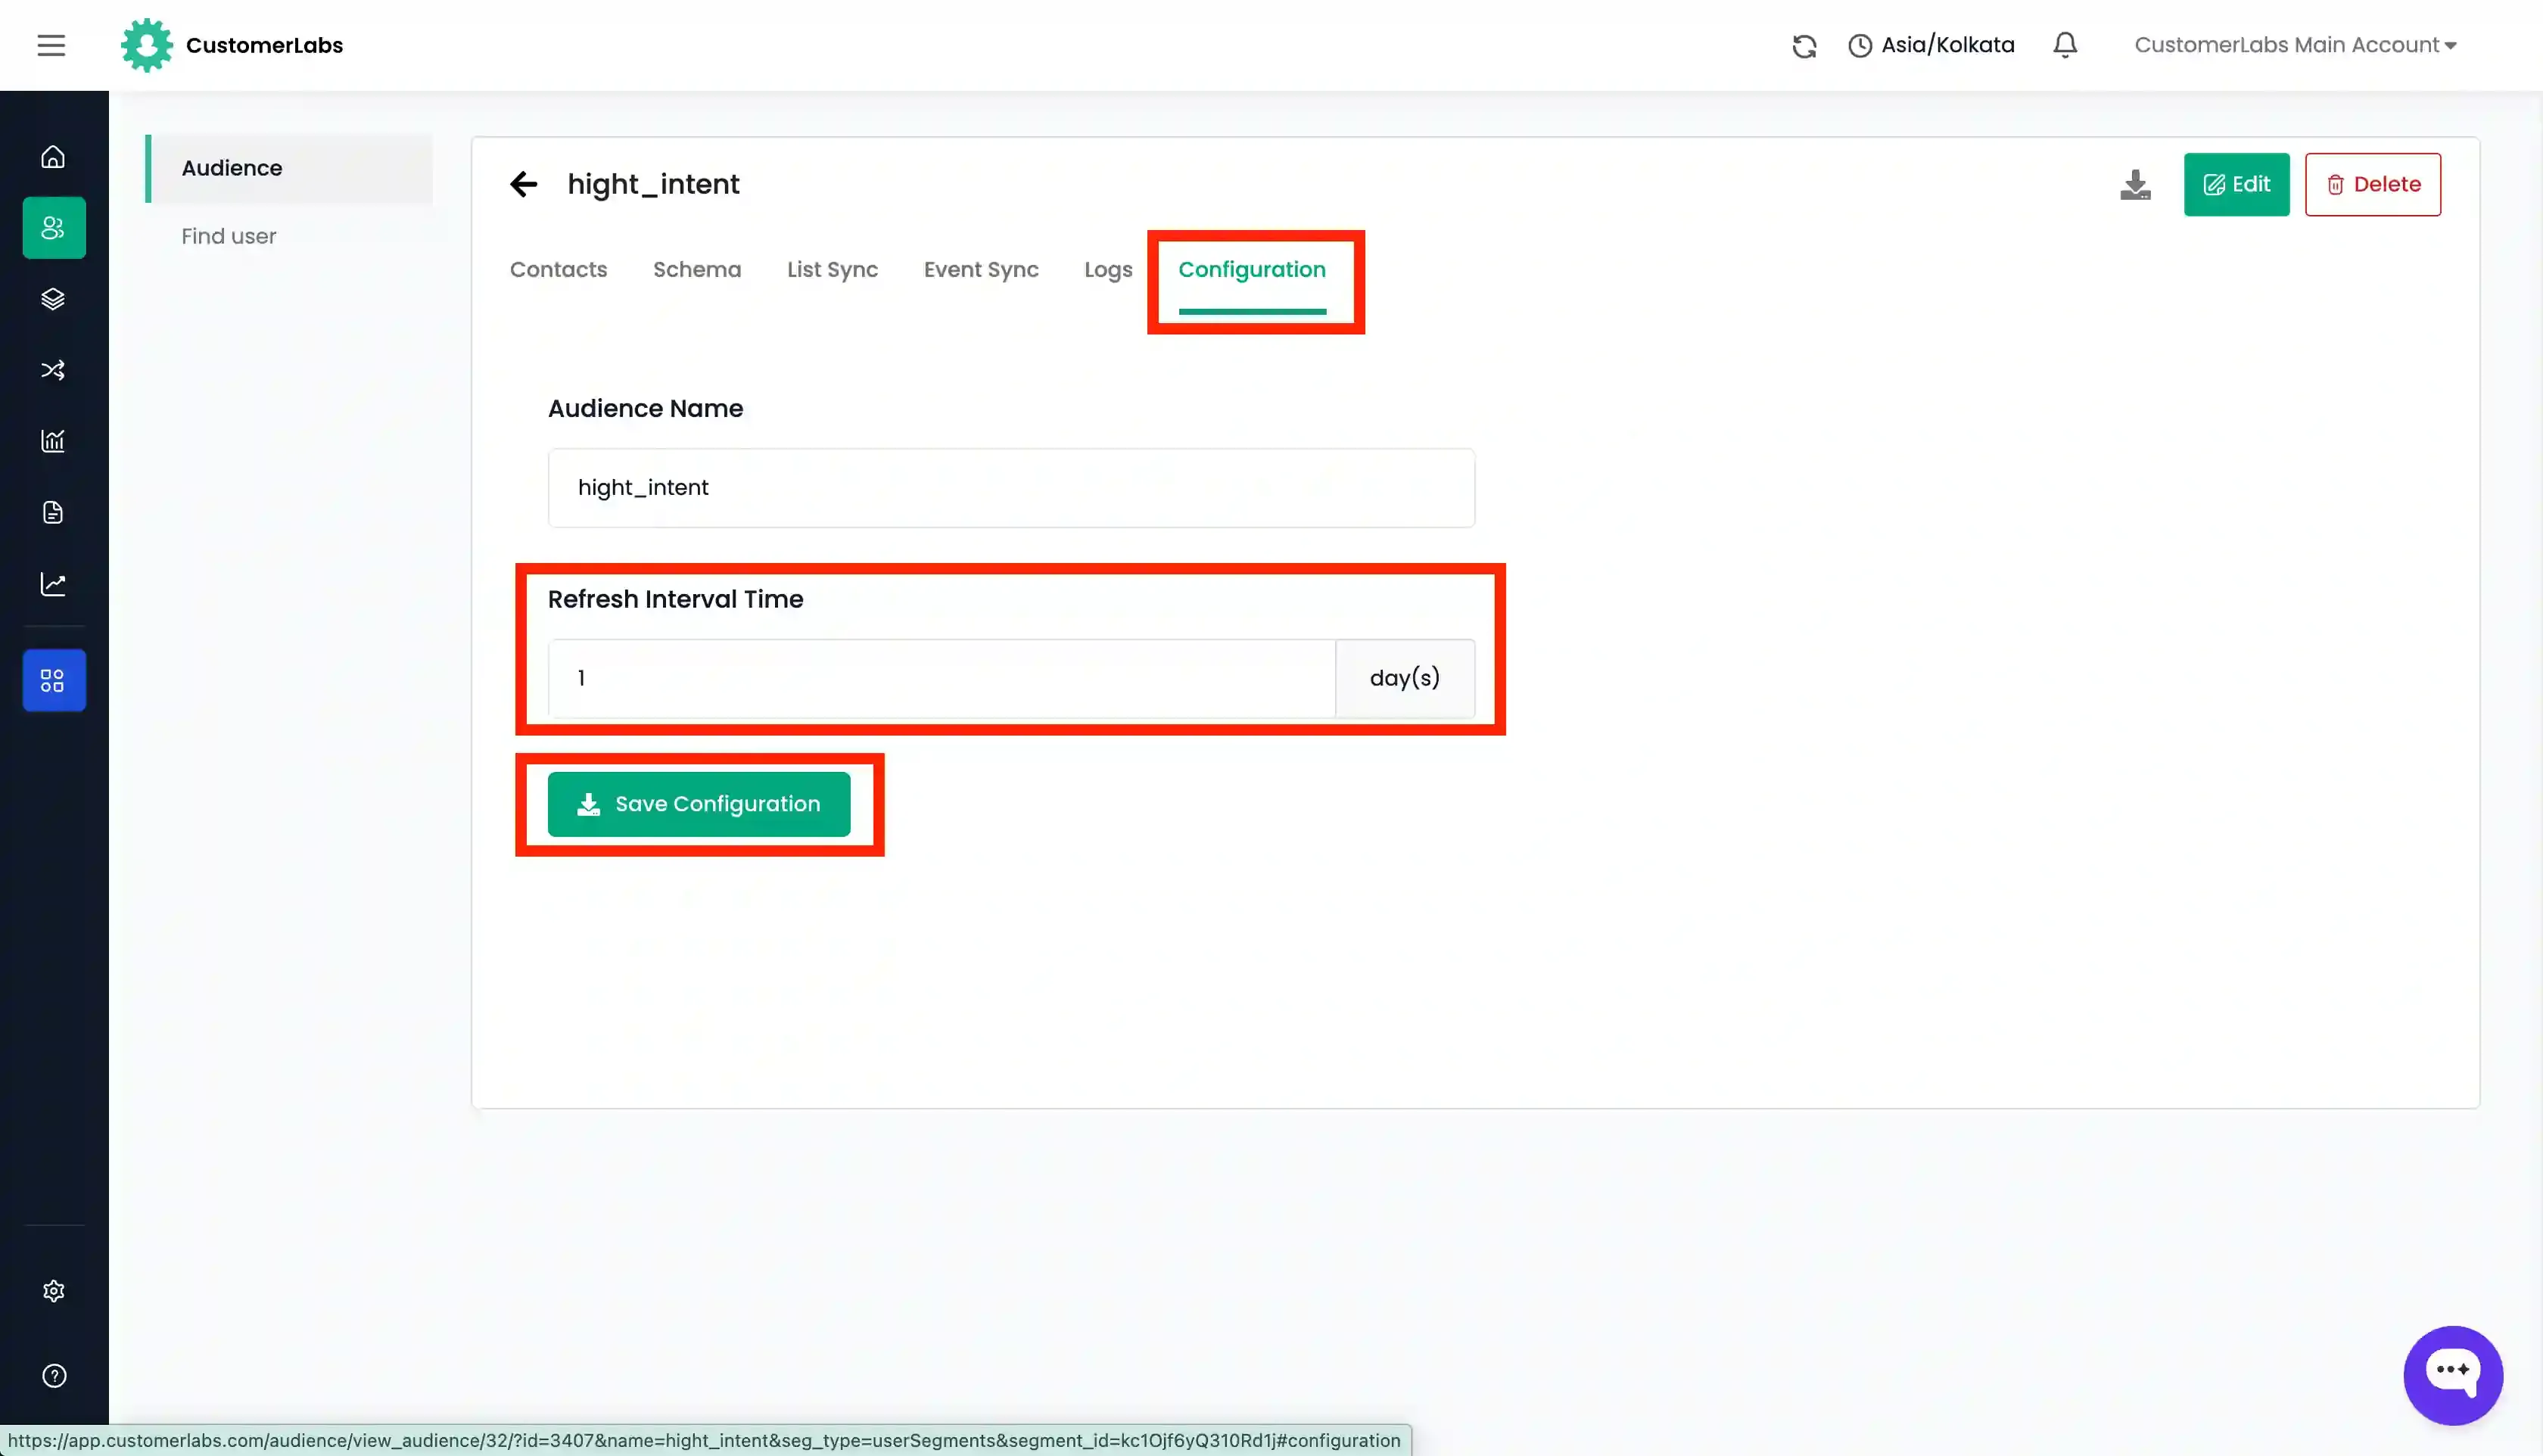
Configure the Refresh interval in the Configuration tab, if required.
Value-based Customer List
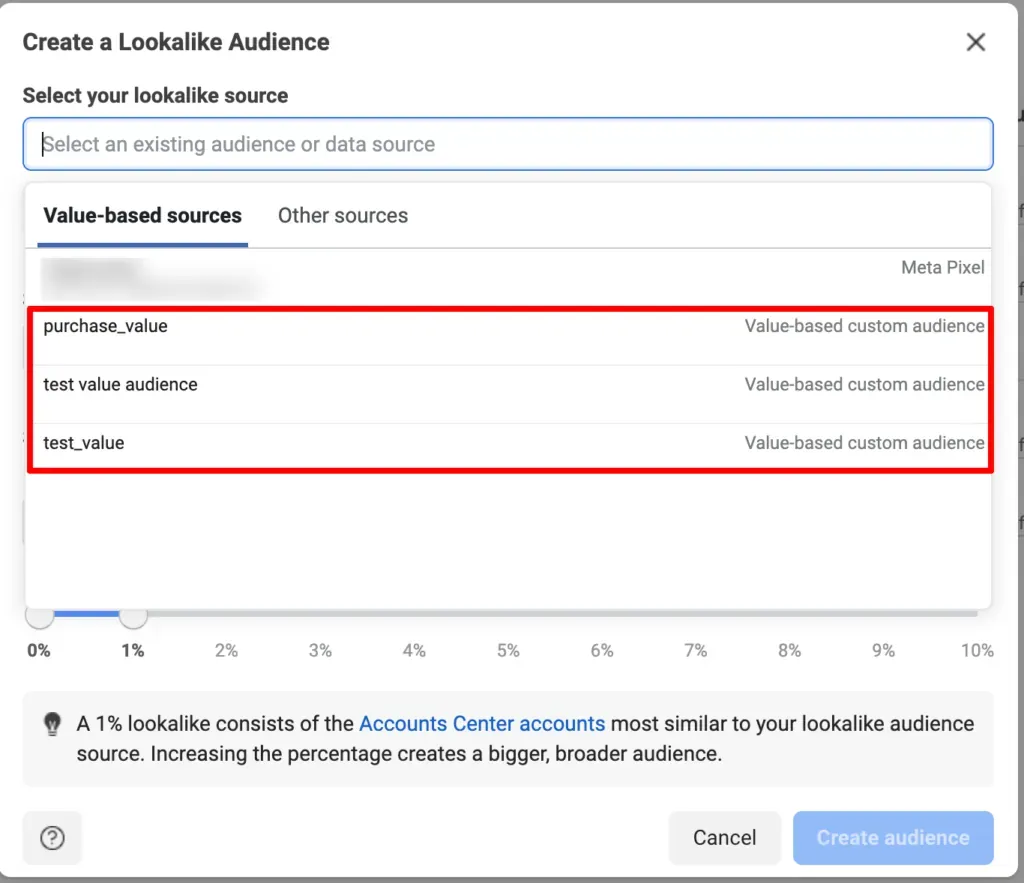
Section titled “Value-based Customer List”This method syncs a customer list with an associated value (e.g., LTV, purchase value) to create Value-Based Audiences with which look-alike audiences can be created in Meta.
- Ensure your audience source includes a known value field for all users.
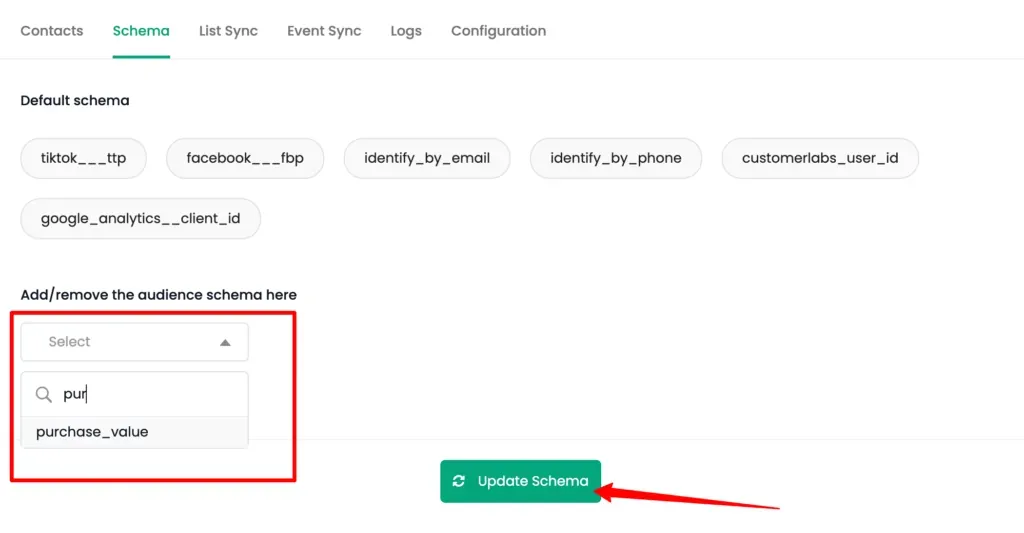
- Navigate to the Schema tab.
- Add the required identifiers (e.g.,
Email,Phone). - Add the Value schema to map it with Facebook’s value schema.
- Click Update schema.
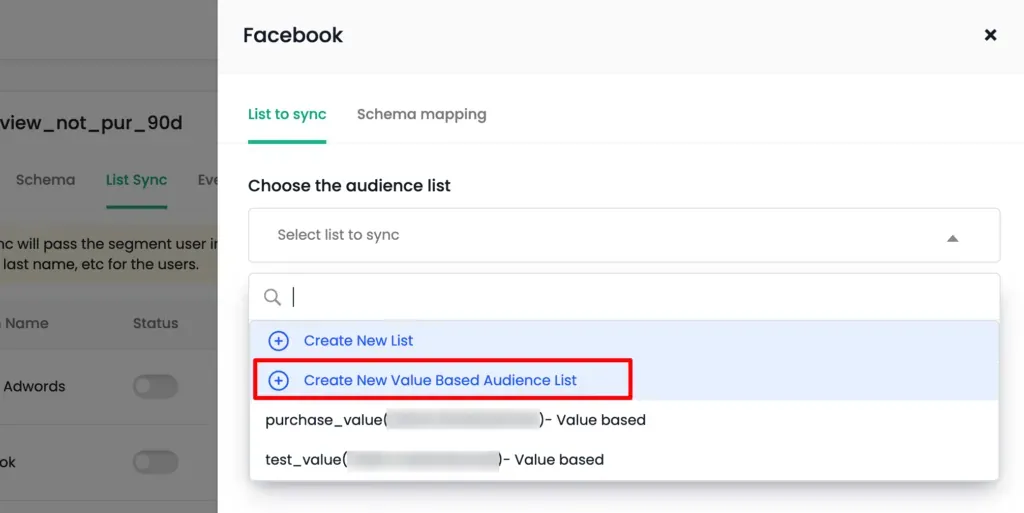
- Go to the List Sync tab and click Map Schema for Facebook.
- In List to sync, select an existing value-based list or +Create New Value Based Audience List.
- In Schema Mapping, map the Value schema and other identifiers.
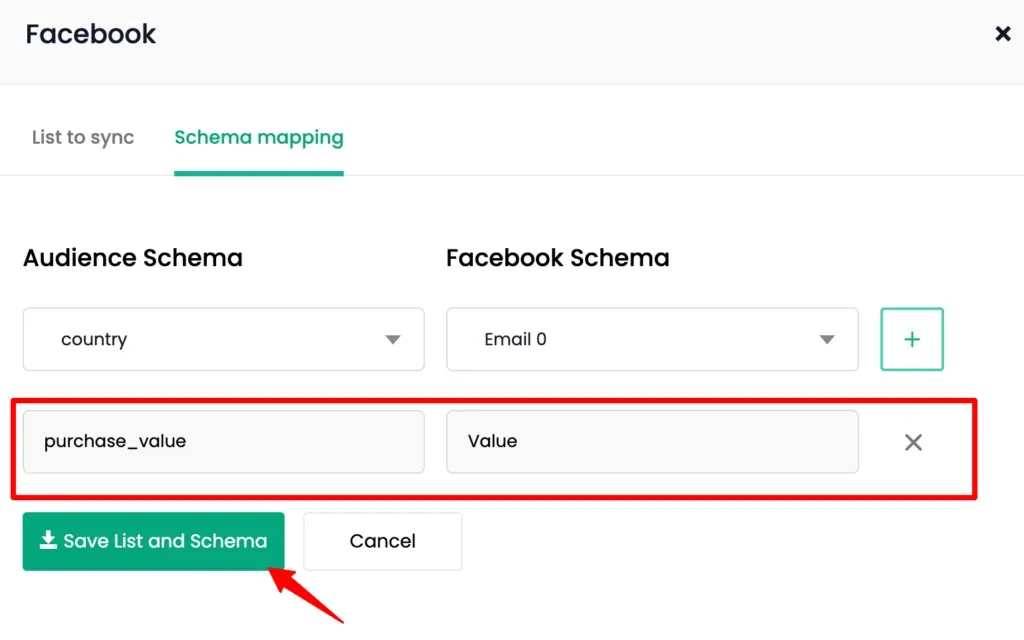
- Click Save List and Schema.
- Turn on the Status toggle and click Instant Sync.
- You can view the audience in Meta under “Value based sources” while creating lookalike audiences.
- Configure the Refresh interval in the Configuration tab, if required.