Customerlabs CDP Documentation
CustomerLabs + Google Analytics (GA4) Integration
Google Analytics helps you to identify patterns and trends in how visitors engage with your website. With CustomerLabs integration, you can use the details to understand goal conversions, funnel, and attribution and to build your audience and plan your campaigns.
Browser Side
1. Log in to your Google Analytics Account
2. Select the account to be integrated
3. Under Admin in the account, Create new Property

4. After creating new Property, click “Data Stream” under that
5. Click “Add stream” -> Select “Web”

6. Open the recently added Data stream & Copy the “Measurement ID”

7. Log in to your CustomerLabs Account
8. Navigate to the “Destinations” page from the Menu
9. Search and select Google Analytics gtag
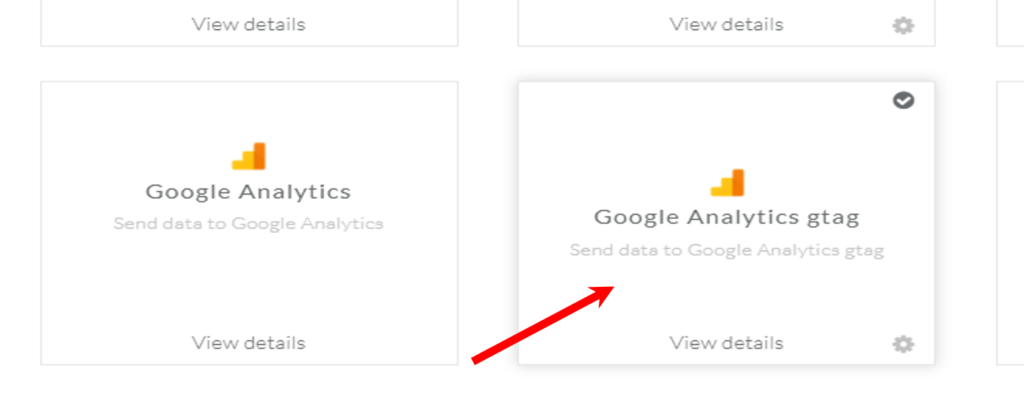
10. Click on “Subscribe” and then on “Configuration Settings”
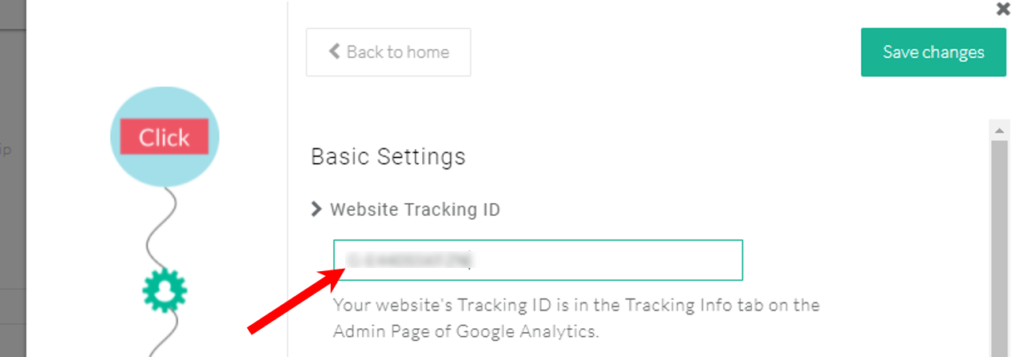
11. Paste the “Measurement ID” copied in the “Website Tracking ID” box
Server Side
1. In your Google Analytics account, Click the new Data stream and then Go to “Measurement Protocol API Secrets” screen
2. Create a secret by clicking on the “Create” button and give a nickname to it
3. Copy the “Secret value” generated

4. Go to your CustomerLabs Account
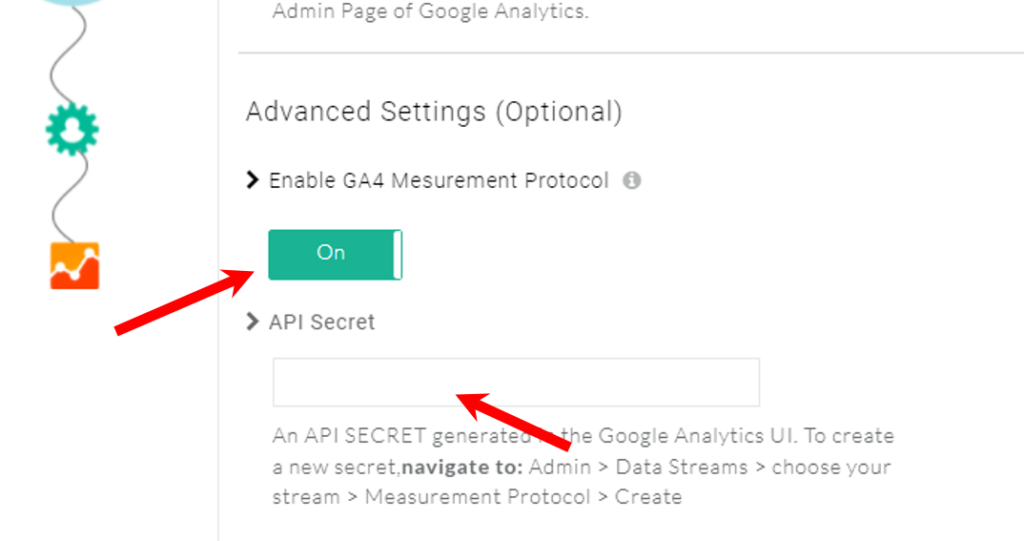
5. Turn on the toggle for “Enable GA4 Measurement Protocol” under Advanced Settings in the GA4 configuration settings
6. Paste the secret value copied in the “API Secret” box below
To measure and send the custom conversion events on reporting
To track and measure custom events effectively, you need to configure custom metrics within your analytics platform. Here’s a general guide on how to do this
Step 1: Access Admin Settings
- Log in to your GA4 account.
- Navigate to the Admin section.
Step 2 :
Navigate to the “Data Display” section within the Admin settings.
Step 3 :
Once you’ve selected “Data Display,” you’ll see a menu. Choose “Custom Definition” from the options.
Step 4 :
- After clicking “Custom Definition,” a new window will open where you can configure your custom metric.
Step 5 :
To create a new custom metric for your custom event, click the “Create Custom Metric” button.
Step 6 :
Before creating a custom metric, ensure the data is sending the correct parameter for the total purchase value. In my case, it appears to be “ecomm_totalvalue” or “value” with a unit of measurement “Currency.”
Important Note: You can adjust the unit of measurement to align with your specific requirements.
Additional Considerations:
- Custom Event Definition: Confirm that the custom event you’re tracking is accurately capturing revenue data.
- Data: Verify the data structure to ensure the “ecomm_totalvalue” or “value” parameter is being passed correctly, In he same way if you want to measure the lead price you can assign a value for the event and push it to the GA4
After configuring the parameter, unit, and data type, save the custom metric settings.
Step 7 :
To view and analyze your custom metric in your reportings, navigate to the “Reports” section in GA4. From there, select “Engagement,” followed by “Events.”
Step 8 :
After creating the custom metric, navigate to the “Reports” section. Locate the “Events” report and click the edit pencil icon to modify it.
Step 9 :
Now, edit the report on the report, under the customize report you will find the “Metrics” button.
Step 10 :
To add your custom metric to the report, click on the “Metrics” section. You’ll find an option to “Add Metric.” Click this button to proceed.
Step 11 :
The created custom metric will be available in the drop down menu. You can add that to your events report and save the current changes to the report or you can create a new report with the metric.
Step 12 :
Now, the custom metric which is created in the GA4 starts to show the value. However, sometimes GA4 takes a day or two to populate the value in the custom metric.
Consent Mode V2
Google has updated the consent mode (V2) settings to help advertisers adhere to EU consent policy for use in ad personalization.
You can view the consent mode status in your Google Analytics (GA4) account → Data Streams → Click on the data stream → Consent settings
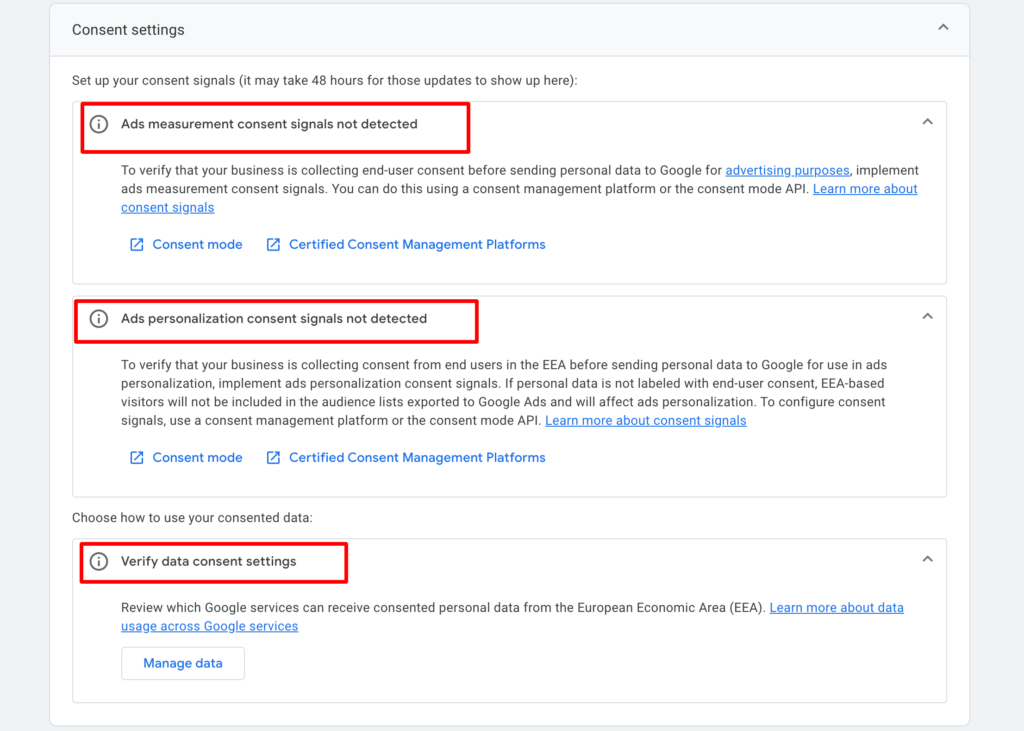
If you’re receiving the consent details, this will be displayed as shown below
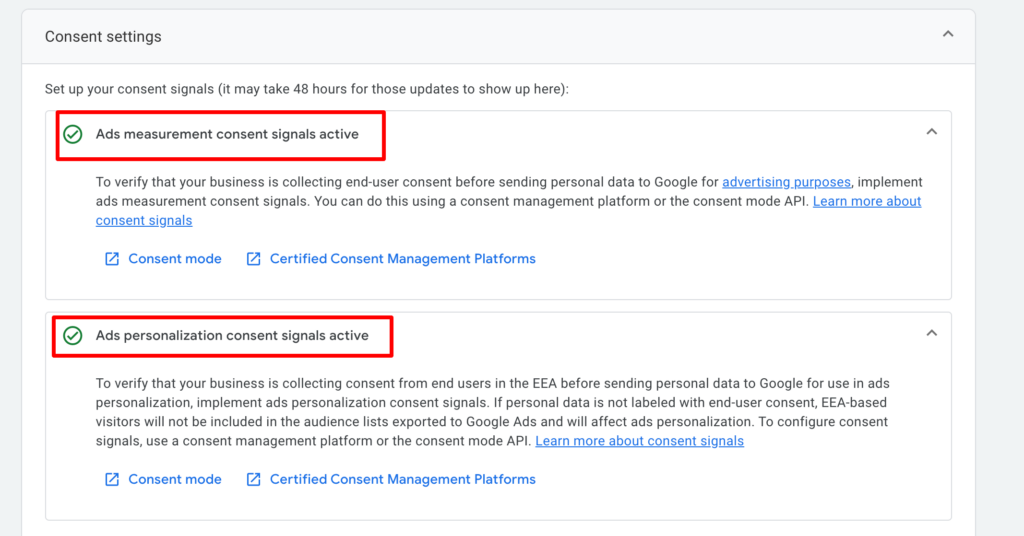
If your users are from the European Economic Area, you have to pass the end-user consent choices to Google.
Based on the consent choices provided by the users, Google dynamically adjusts the storage and usage of the user’s data for ads, analytics or modeling.
We have given an update to our Google Analytics integration where you can easily set up this Advanced consent mode within a few simple steps.
Consent Mode setup in CustomerLabs
Here are the steps to set up consent mode for Google Analytics:
1. Navigate to Destinations → Google Analytics gtag → Configuration Settings → Consent mode Configuration
2. Turn on the toggle below that.

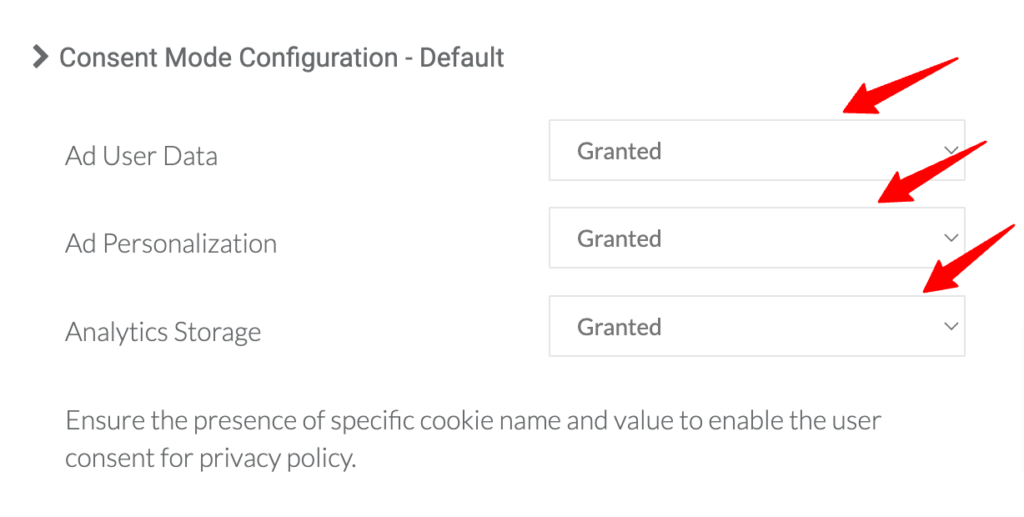
3. For Google Analytics, you have to pass the consent received from the user through three parameters based on the purpose of usage. They are
- Analytics storage
- Ad user data
- Ad personalization
Learn more about consent mode parameters and their definitions
4. If the user has not initially chosen their consent preferences through the banner displayed, Google recommends setting default values for each of the consent parameters.
For this, you have to set the default values to be stored and/or sent using the drop-down as shown.
5. a. If you’re using a Google-certified Consent Management Platform (CMP), the default values initialization for the consent parameters are taken care of by the CMP.
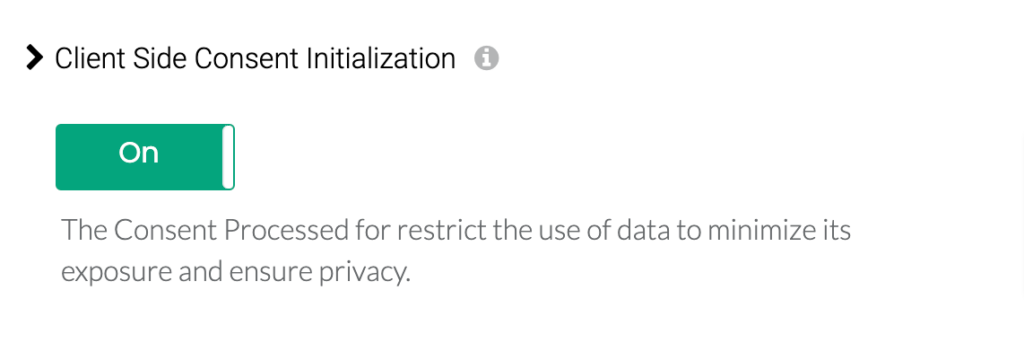
5. b. If you’re not using a CMP, you should turn on the toggle for “Client Side Consent Initialization” for CustomerLabs to initialize default values for the consent parameters as described in step 4.
Note: If you’re using a CMP and still want to initialize default values from the CustomerLabs side, you can still turn on the toggle
6. After setting all this up, click “Save Changes”
Update the Consent preferences of your users
For collecting the consent preferences from your user, you might use a cookie banner supported by a Consent Management Platform (CMP) or a banner that was built by you.
When a user updates the consent preferences through your banner, the information is stored and this information should be passed onto CustomerLabs to update the consent preferences in our system.
If you’re using Google Certified CMP and the CMP pushes the details to dataLayer, you can pass on these parameters through GTM (Google Tag Manager). Refer to the documentation here.
This updation is important to store and transfer the consent preferences of your users (first-party data) while sending the data on the server-side (Google Measurement Protocol).
To update the consent preferences, you have to call the function _cl.trackConsent ()
Function Params

    /**
     *
     *
     * This function is available for end users to send consent params to update the consent
     * @function trackConsent
     * @param {object} params consent params
     */

    "ad_user_data": "granted/denied" //granted or denied consent based on specific needs

Function example

_cl.trackConsent({
    "ad_user_data": "granted",
    "ad_personalization": "granted",
    "analytics_storage": "denied"
});

list //Other params that can be added for consent

{
    "ad_user_data": "granted",
    "analytics_storage": "granted",
    "ad_personalization": "granted",
    "ad_storage": "granted",
    "functionality_storage": "granted",
    "personalization_storage": "granted",
    "security_storage": "granted"
}
If you have difficulty setting this up using your CMP or on your self-developed banner, you can contact our support team ([email protected]) for help.
User ID Tracking
1. To enable CustomerLabs to assign User ID for all the users which helps to unify the details of the user, Turn on the toggle for “Enable User-ID Tracking for anonymous users” in the Advanced Settings for GA4 Configuration
2. Set “Default” under “User Identify ID”
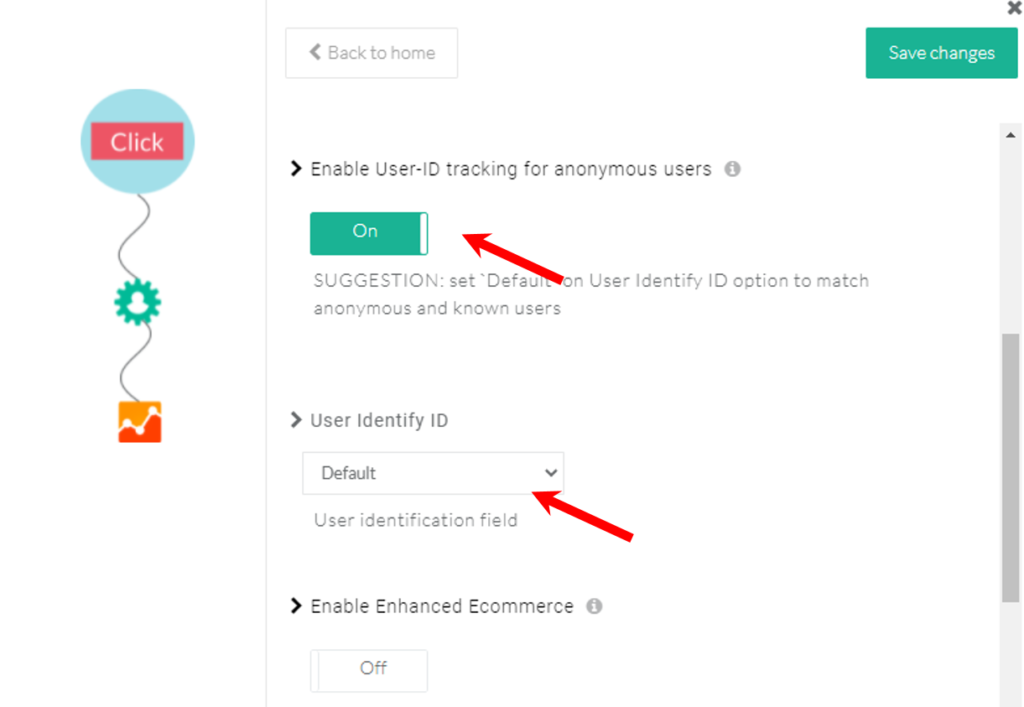
3. Click on “Save Changes” and then return back to Google Analytics gtag Customization screen
Enhanced Ecommerce
Enabling Enhanced Ecommerce lets you sync additional information for default e-commerce events on GA4 to generate detailed reports and gain valuable insights.

Note: You have to enable this initially while authenticating your GA4 account. If you want to enable this at a later stage, you need to re-authenticate your GA4 account and then turn this toggle on.
Event Workflow Setup
1. Click “Setup Event Workflow” from the Google Analytics gtag Customization screen
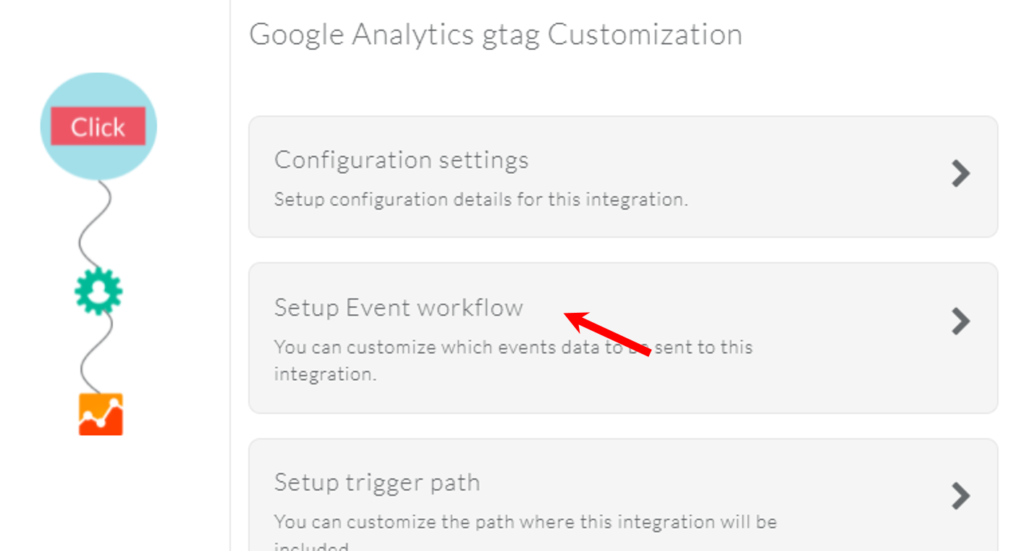
2. Turn on the toggle for all the “added_to_segment” events in the server-side callbacks.
Note: Make sure you don’t turn on the toggle for any event on both Server-side and Client-side callbacks since Google does not de-duplicate the data.

3. Once “added_to_segment” is switched on, this event is refreshed in Google Analytics every time the audience created in CustomerLabs refreshes.
4. Click on “Save Changes” once you are done.
5. You have now integrated Google Analytics with your CustomerLabs account.
Send Consent Signals without Consent banner
No Consent Banner? No problem. Send Consent Signals to GA4. Click here…
Need Assistance?– Happy to help!


