Creating Audiences
Build targeted audience segments based on user behavior and traits.
What are Audiences?
Section titled “What are Audiences?”Audiences (also called segments) are groups of users who share common characteristics or behaviors. Audiences can be used to:
- Target specific user groups in advertising campaigns
- Personalize user experiences
- Analyze cohort behavior
- Trigger automated workflows
Pre-requisites for creating the Audience
Section titled “Pre-requisites for creating the Audience”-
Segmentation logic & criteria
-
Static or Dynamic audiences
-
Time-frame for segment creation
-
How frequent the audience needs to be refreshed to the destinations
Audience Dashboard
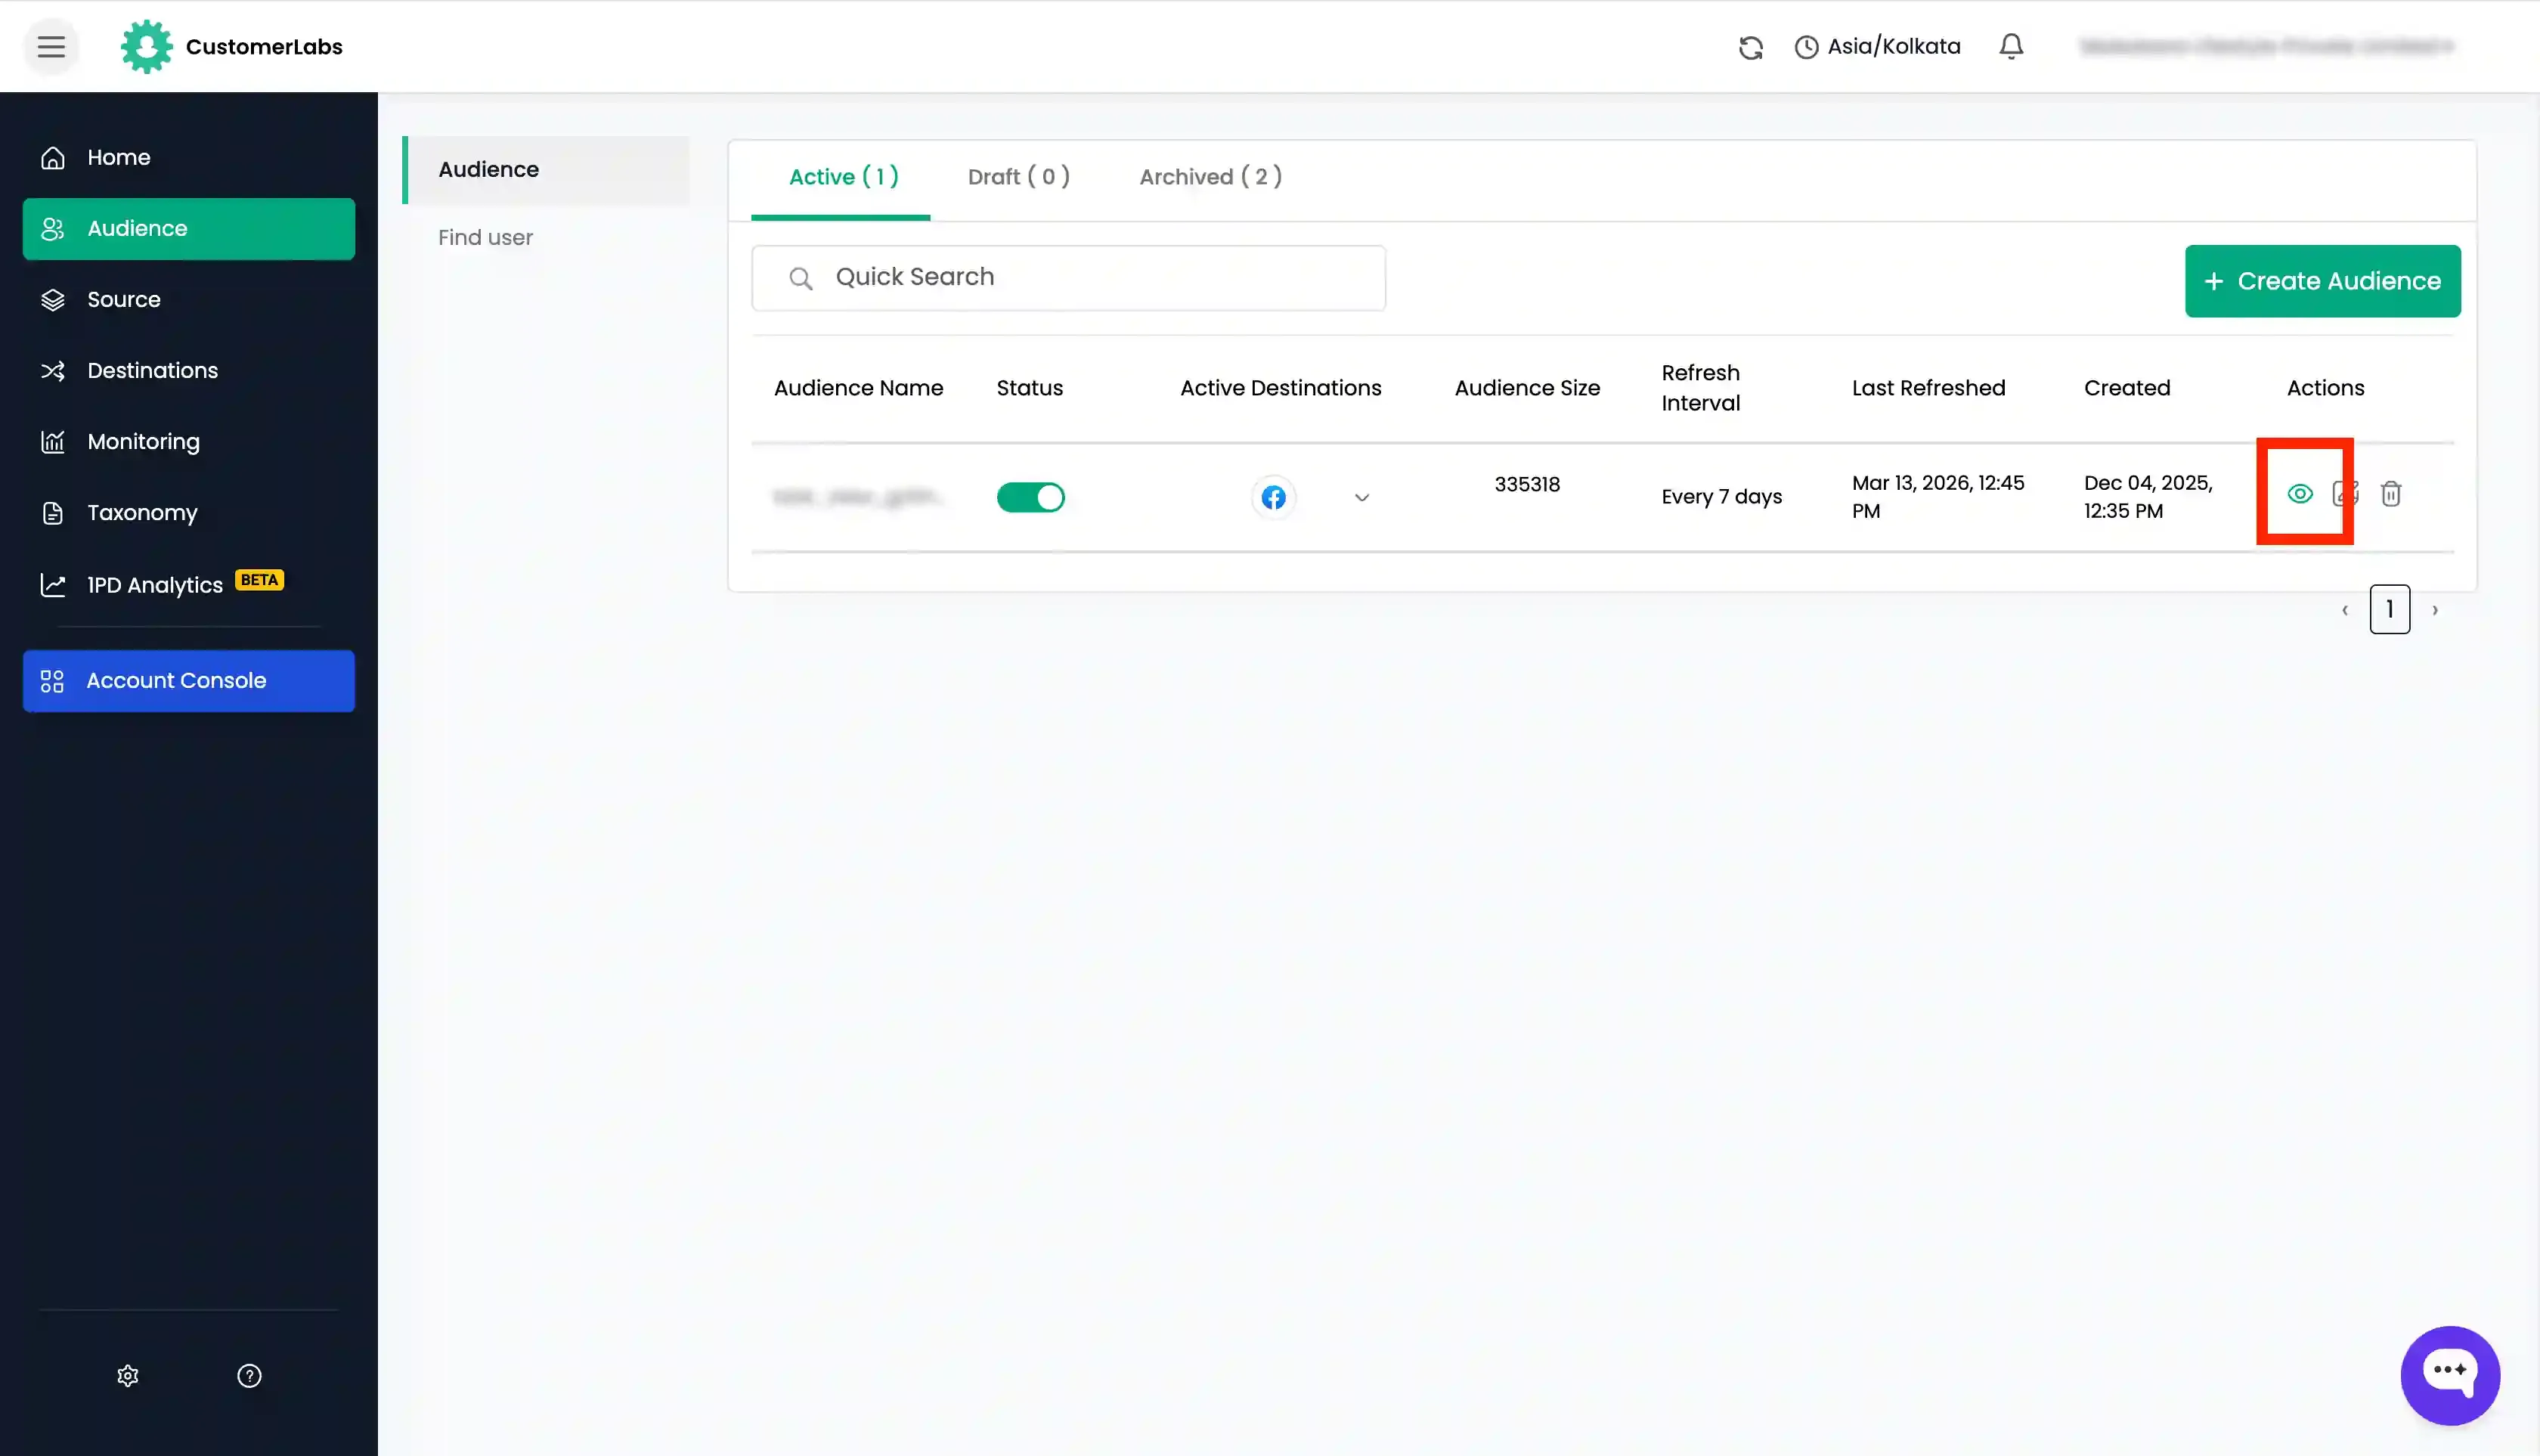
Section titled “Audience Dashboard”You can have an overall view of all your saved audiences in the Audience Dashboard on the “Audience” page. The audience dashboard displays the list of active, draft, & archived audiences along with their active destinations and other action buttons.
In this dashboard, you have 3 tabs – Active, Draft & Archived.

Active
Section titled “Active”-
You can see all the Active audiences under the Active tab. In case you want to deactivate any audience, you can turn off the toggle under the Status column and the audience will be deactivated and moved to the Archived tab.
-
In the Active Destinations column, you can see the status of the audience sync with the destinations you have connected.
-
You can see the green indicator next to the destination to which you’ve synced the audience. If the audience is not synced, it would show in grey.
-
Under “Audience Size,” you can see the size of the particular audience i.e. number of users in the audience segment. This audience size is updated when it is last refreshed.
-
“Refresh Interval”, “Created date”, “Last refreshed date” is also visible.
-
Under “Actions” you can able to
view,editanddeletethe audience.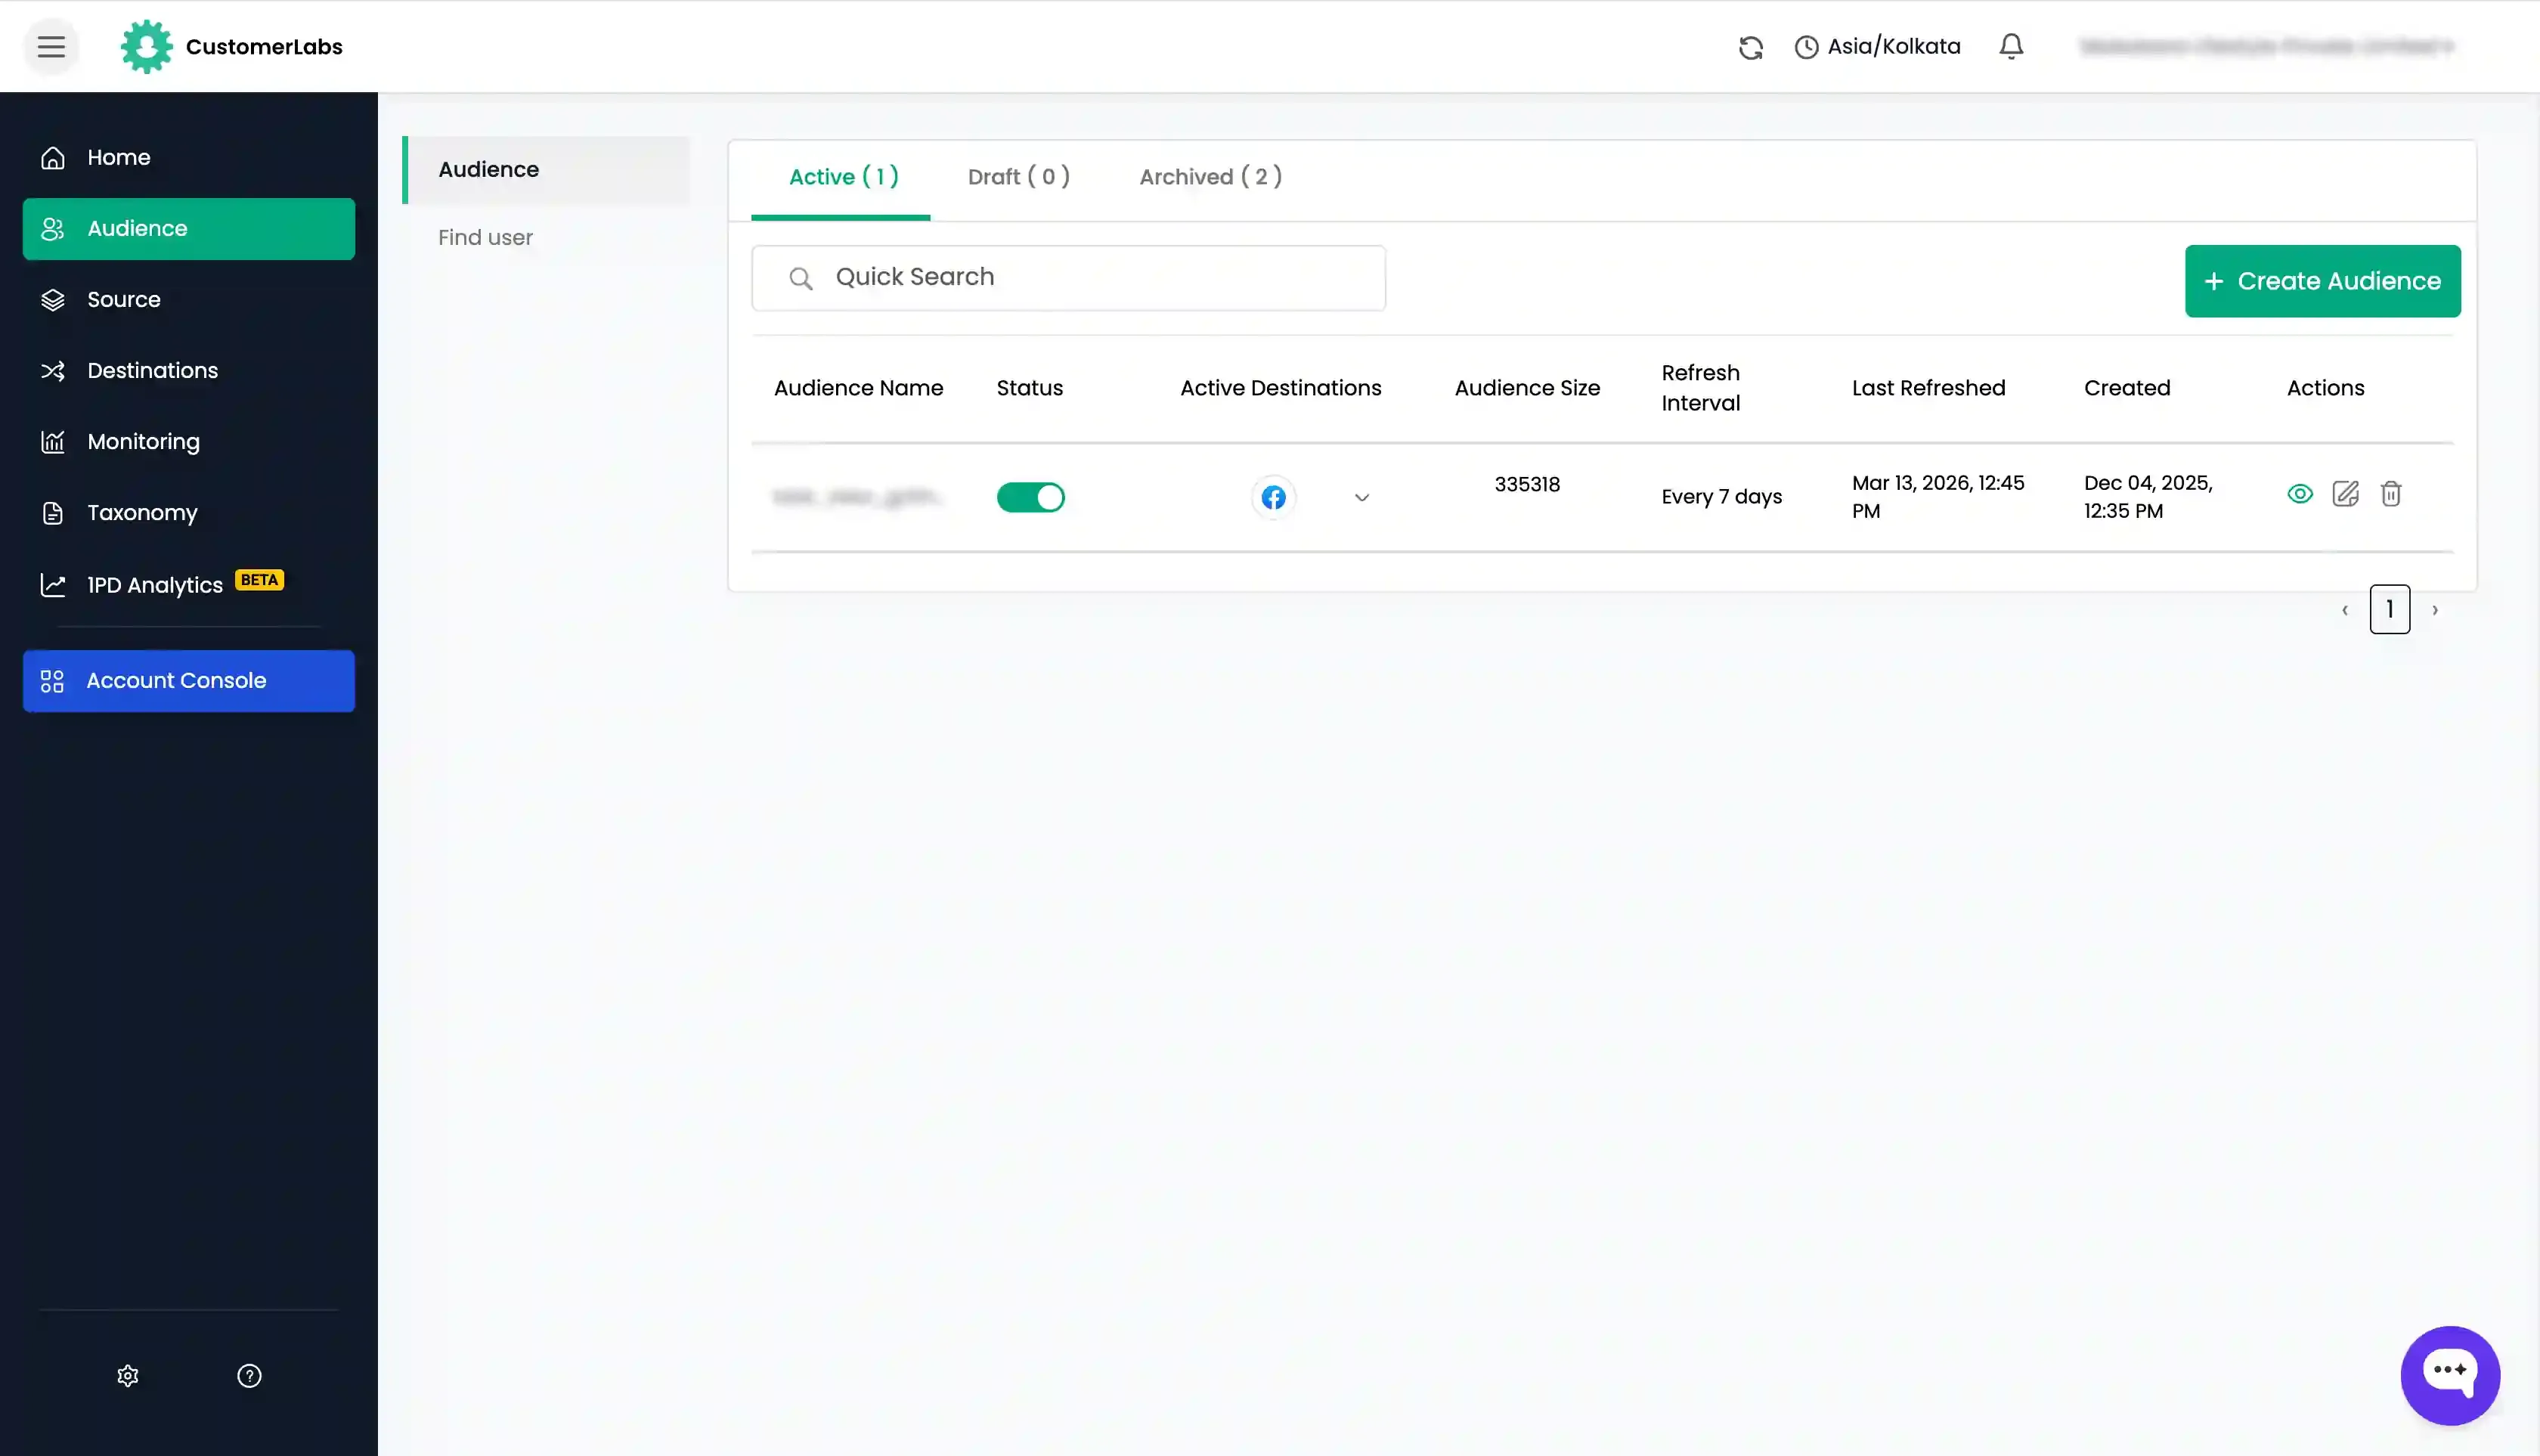
- In the Draft tab, you can see all the audiences that you saved as drafts. Drafts are just to save the queries and activate them later.
- You can re-activate the audience at any time by clicking on the audience/edit icon → Update the query as you want → Click Run Query → Click Save & Active.
- You can also update the draft by clicking on the audience/edit icon → Update the query as you want → Click Run Query → Click Update draft.
Archived
Section titled “Archived”- Under “Archived”, you can see all the inactive audiences.
- You can re-activate the Archived audience by clicking on the audience/edit icon → Update the query as required → Click Run Query → Click Save & Active.
Creating an Audience Segment
Section titled “Creating an Audience Segment”Once the events have started populating, you can create a segment of users based on their activity on your website or app. Before creating the audience, decide the time-frame and logic for which you want to create the audience.
After creating an audience segment, it starts accumulating the users who match the given criteria which can be synced with the ad platforms like Facebook, Google, TikTok, etc.
To create an audience segmentation, navigate to the “Audience” in the left sidebar and click on “Audience”.
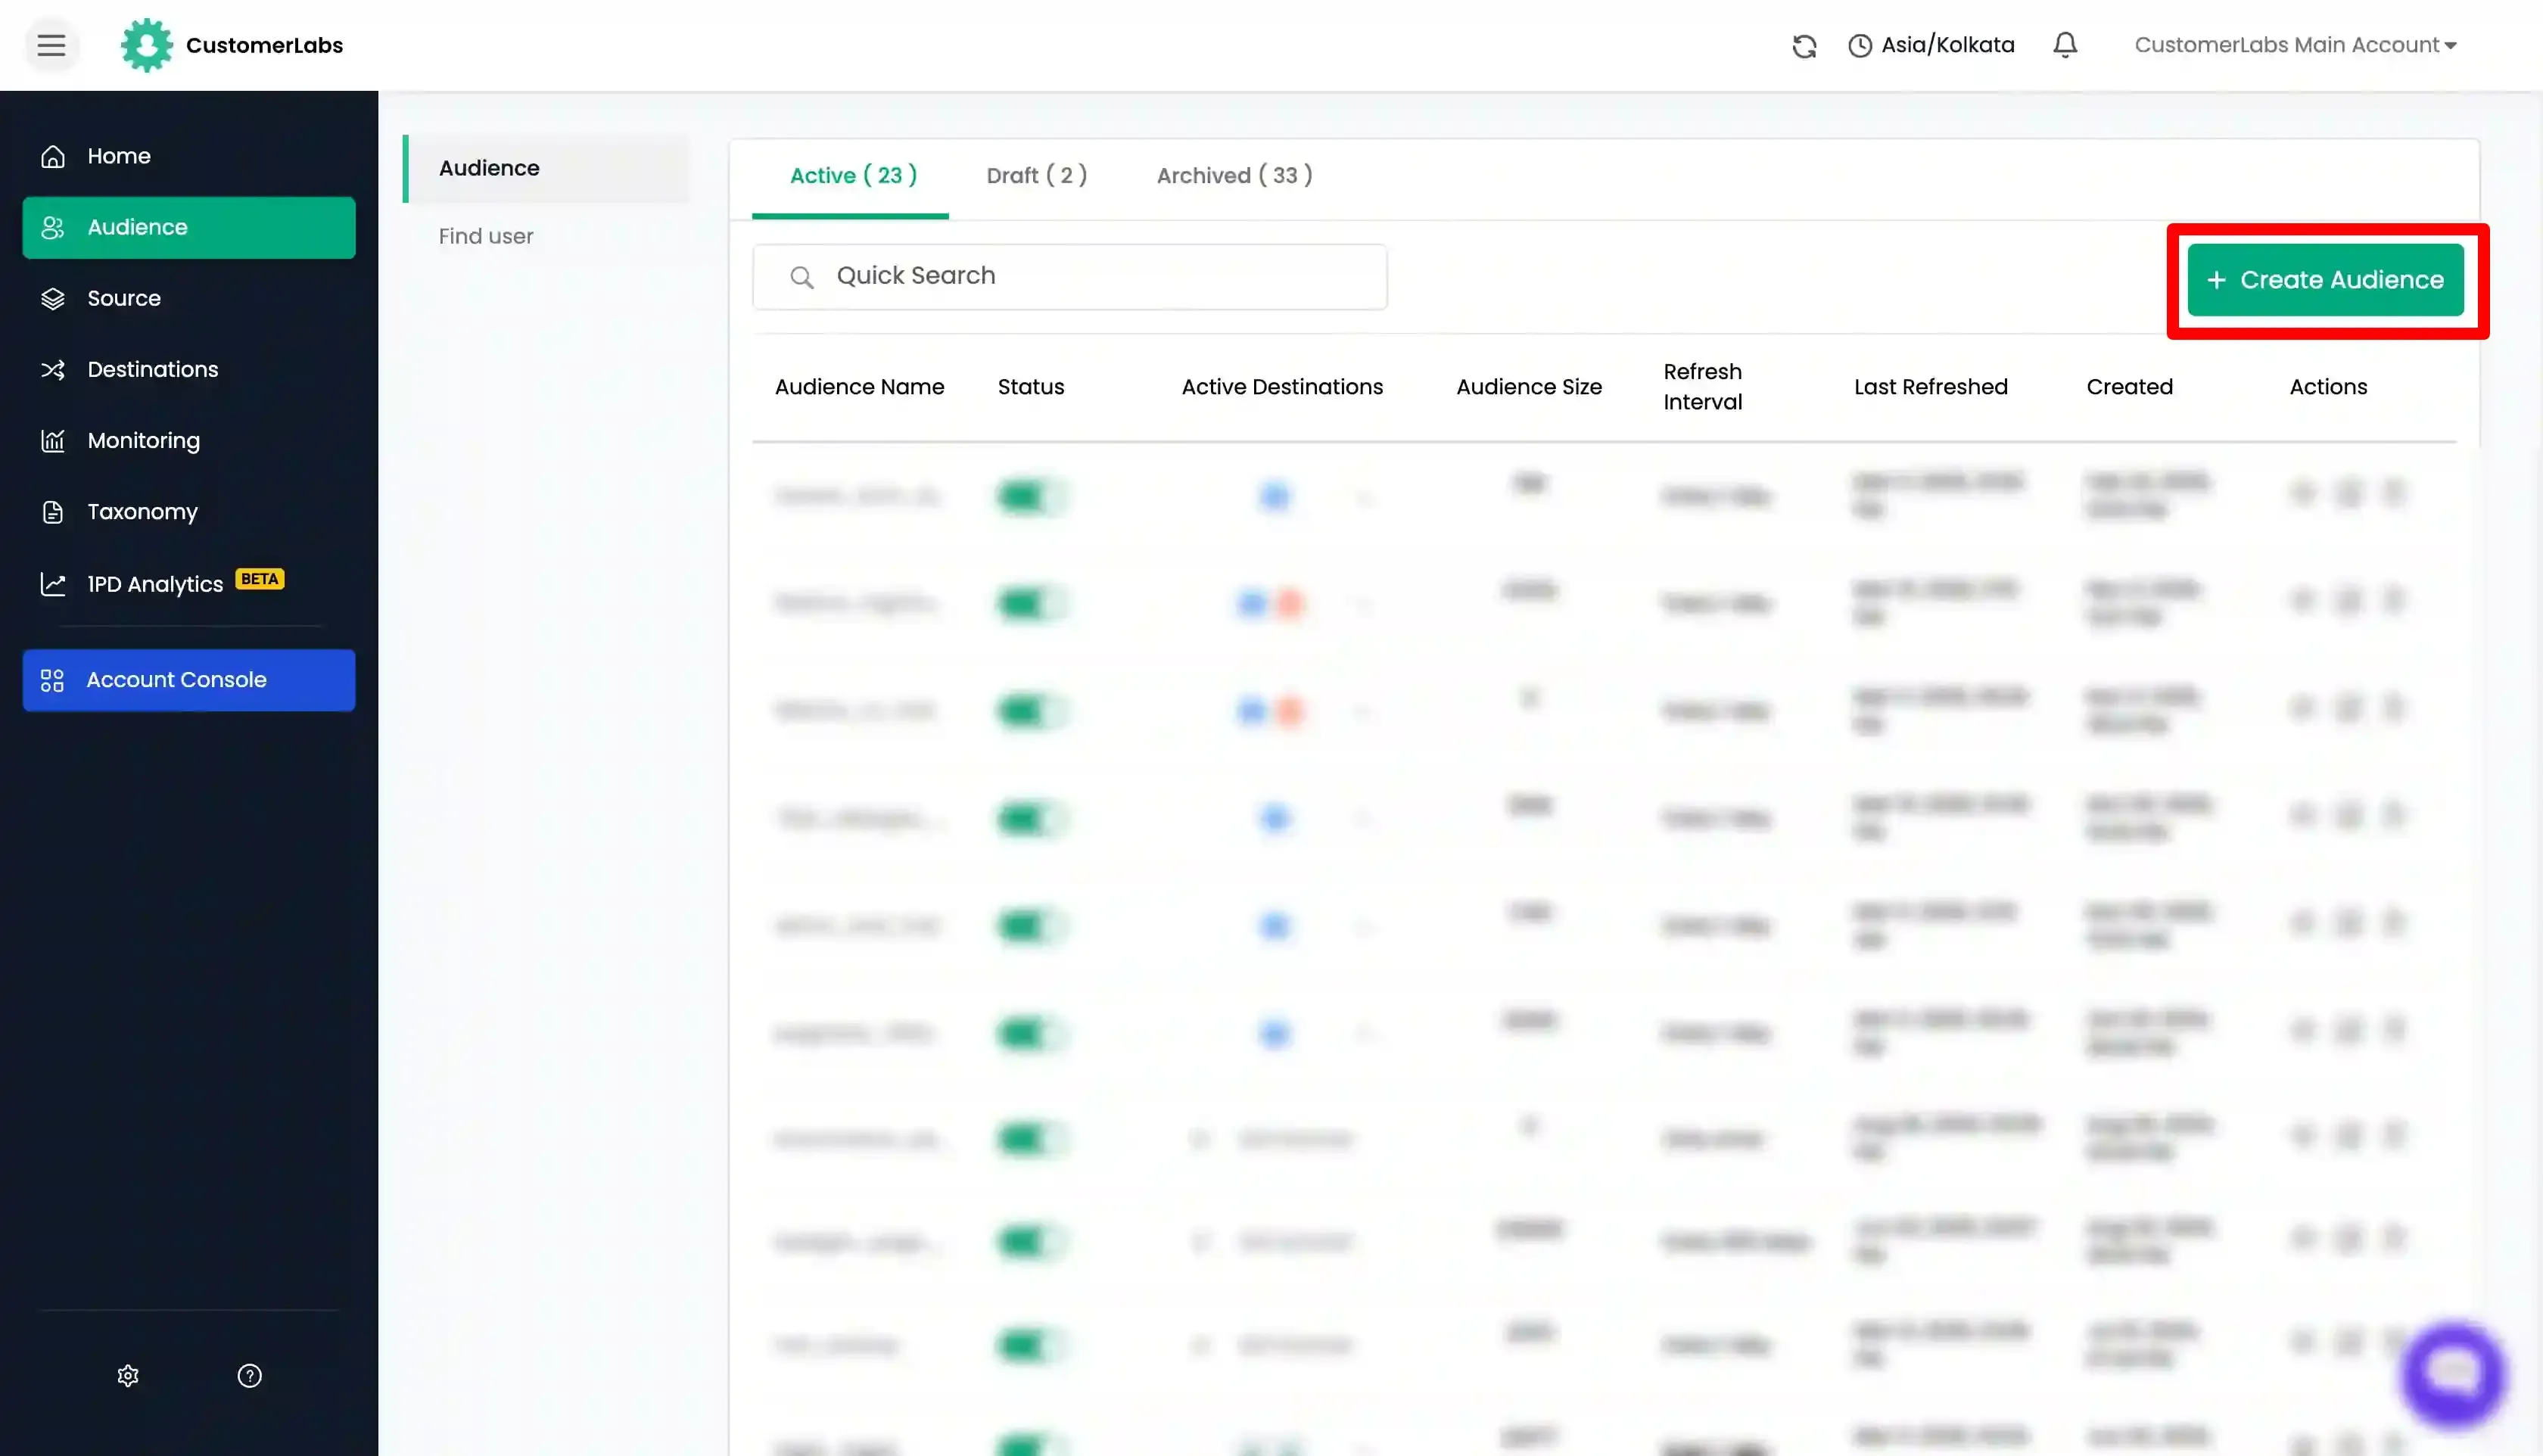
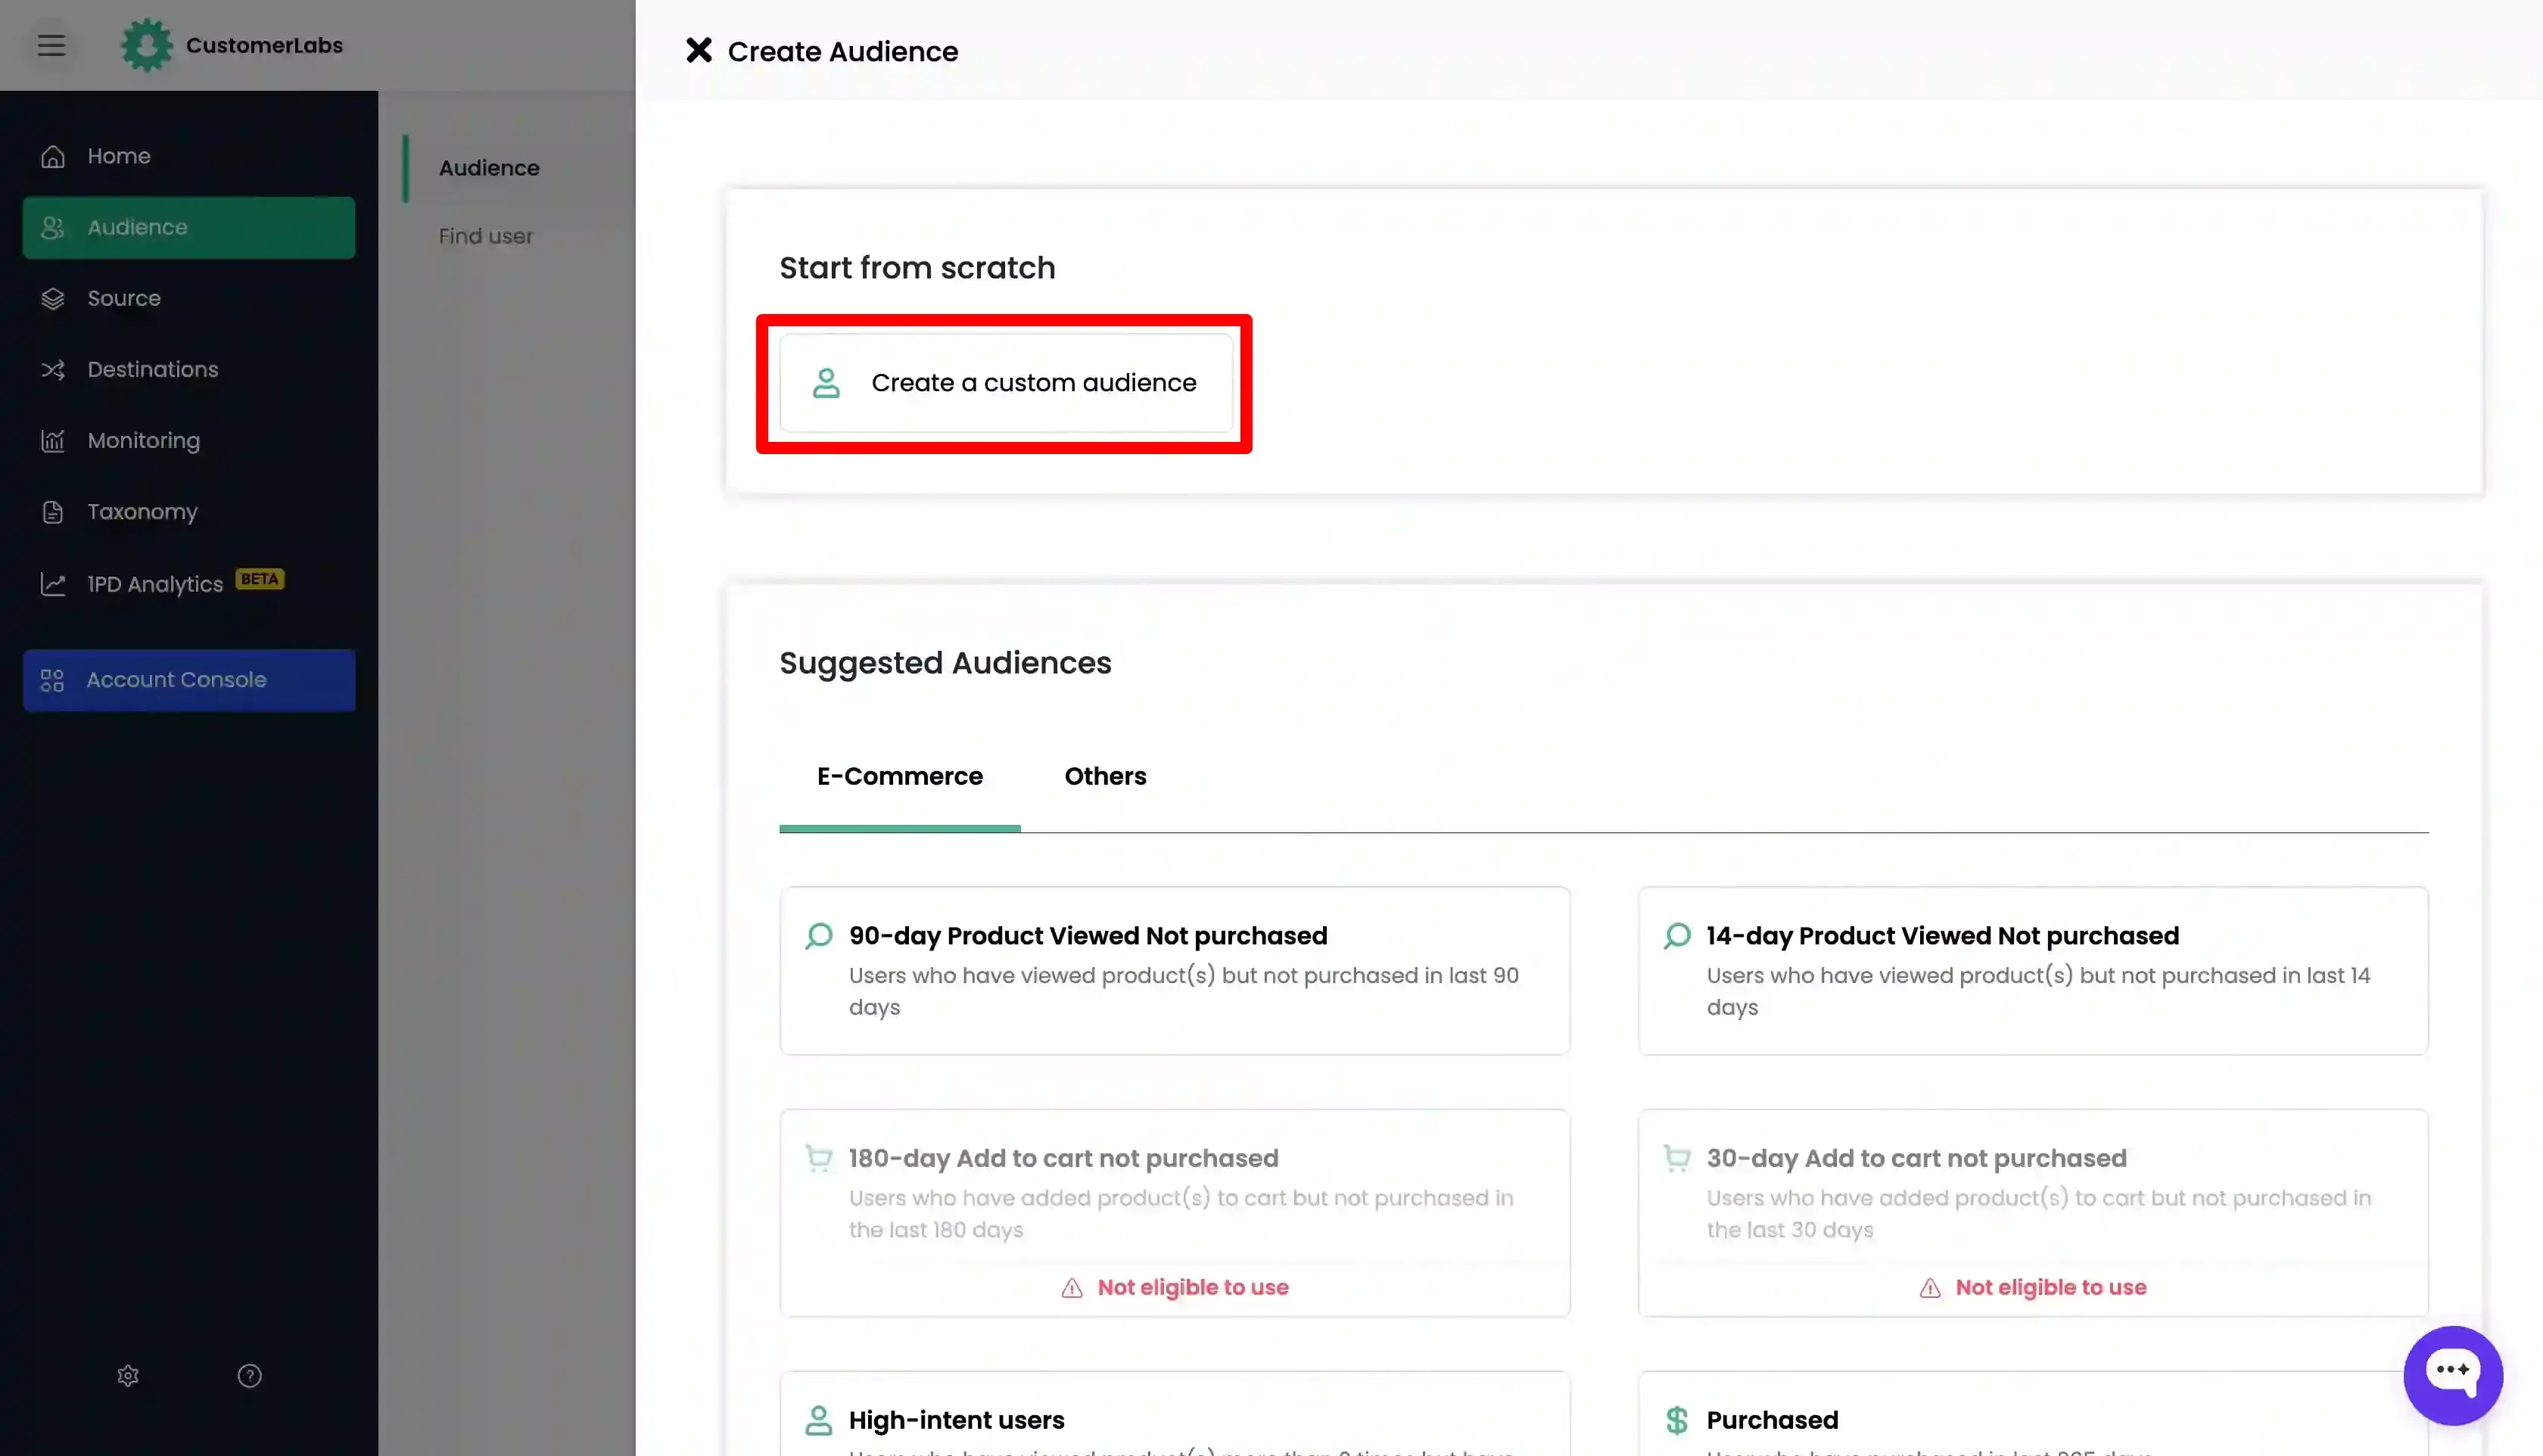
You have two options to create an audience:
- Create a new custom audience
- Use Suggested audiences

Create a new custom audience
Section titled “Create a new custom audience”-
Now, create a custom audience segment by clicking on “Create a custom audience”.
-
Here, you can filter a segment of users by adding conditions manually.
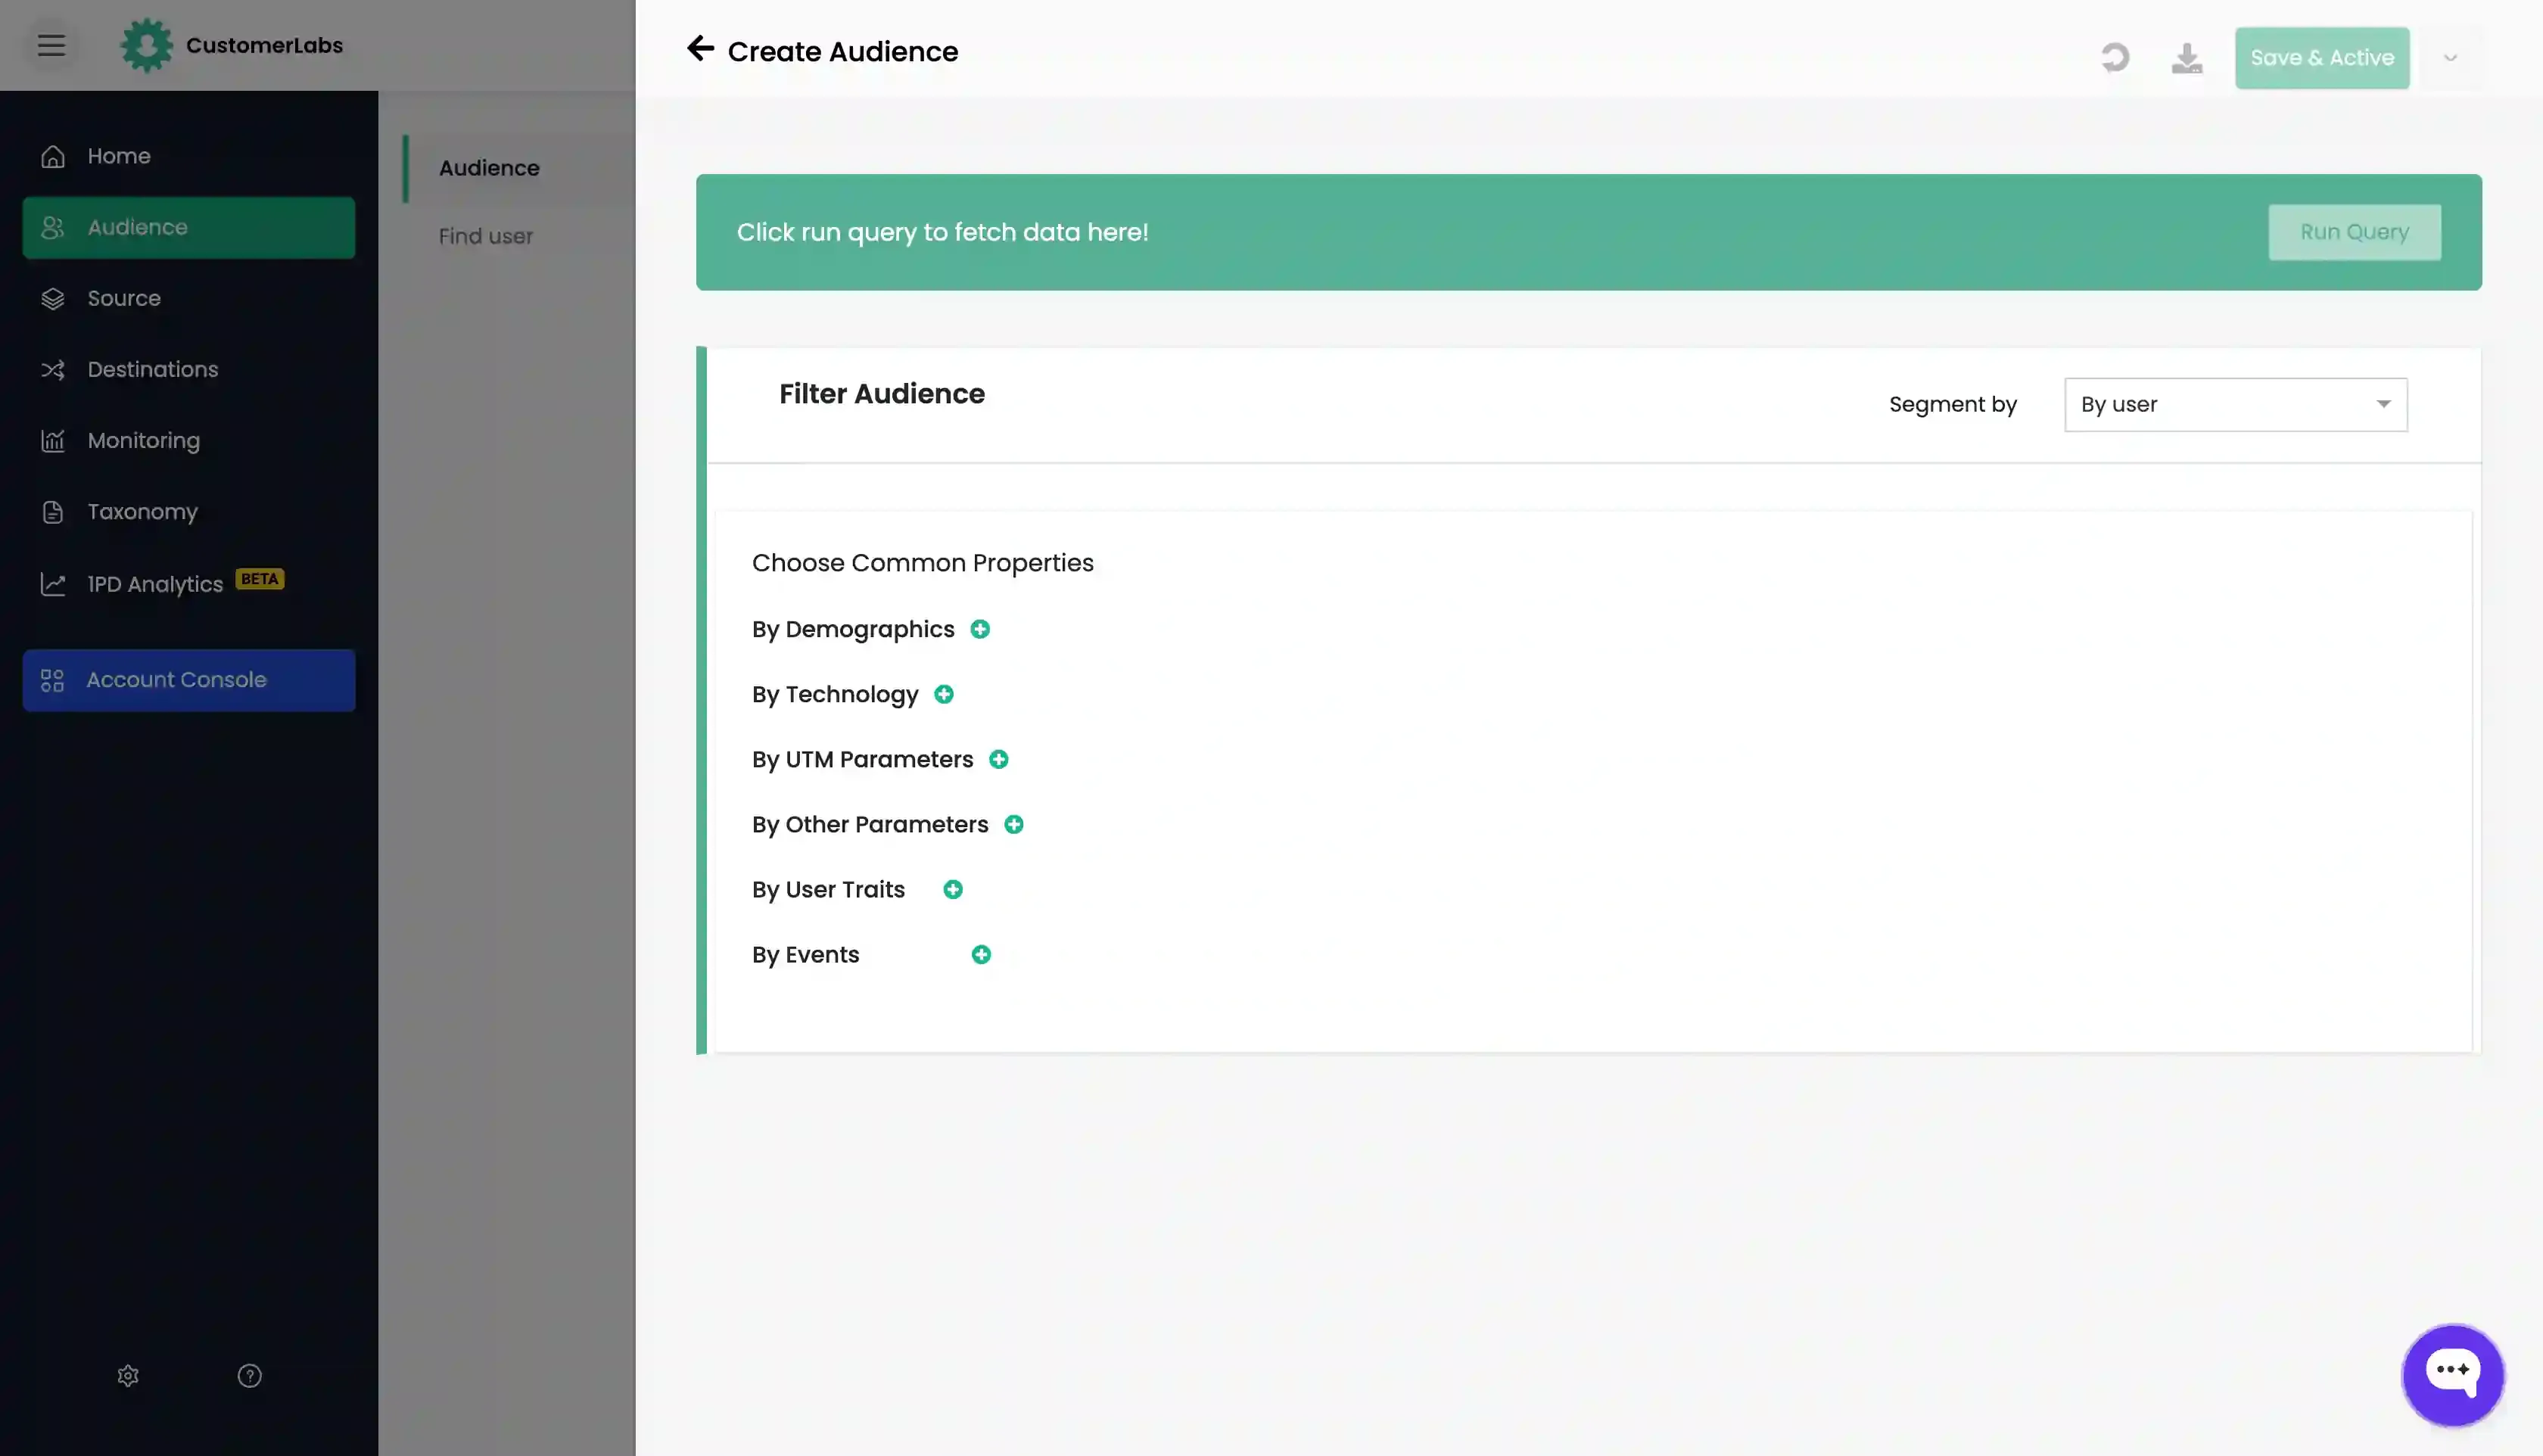
-
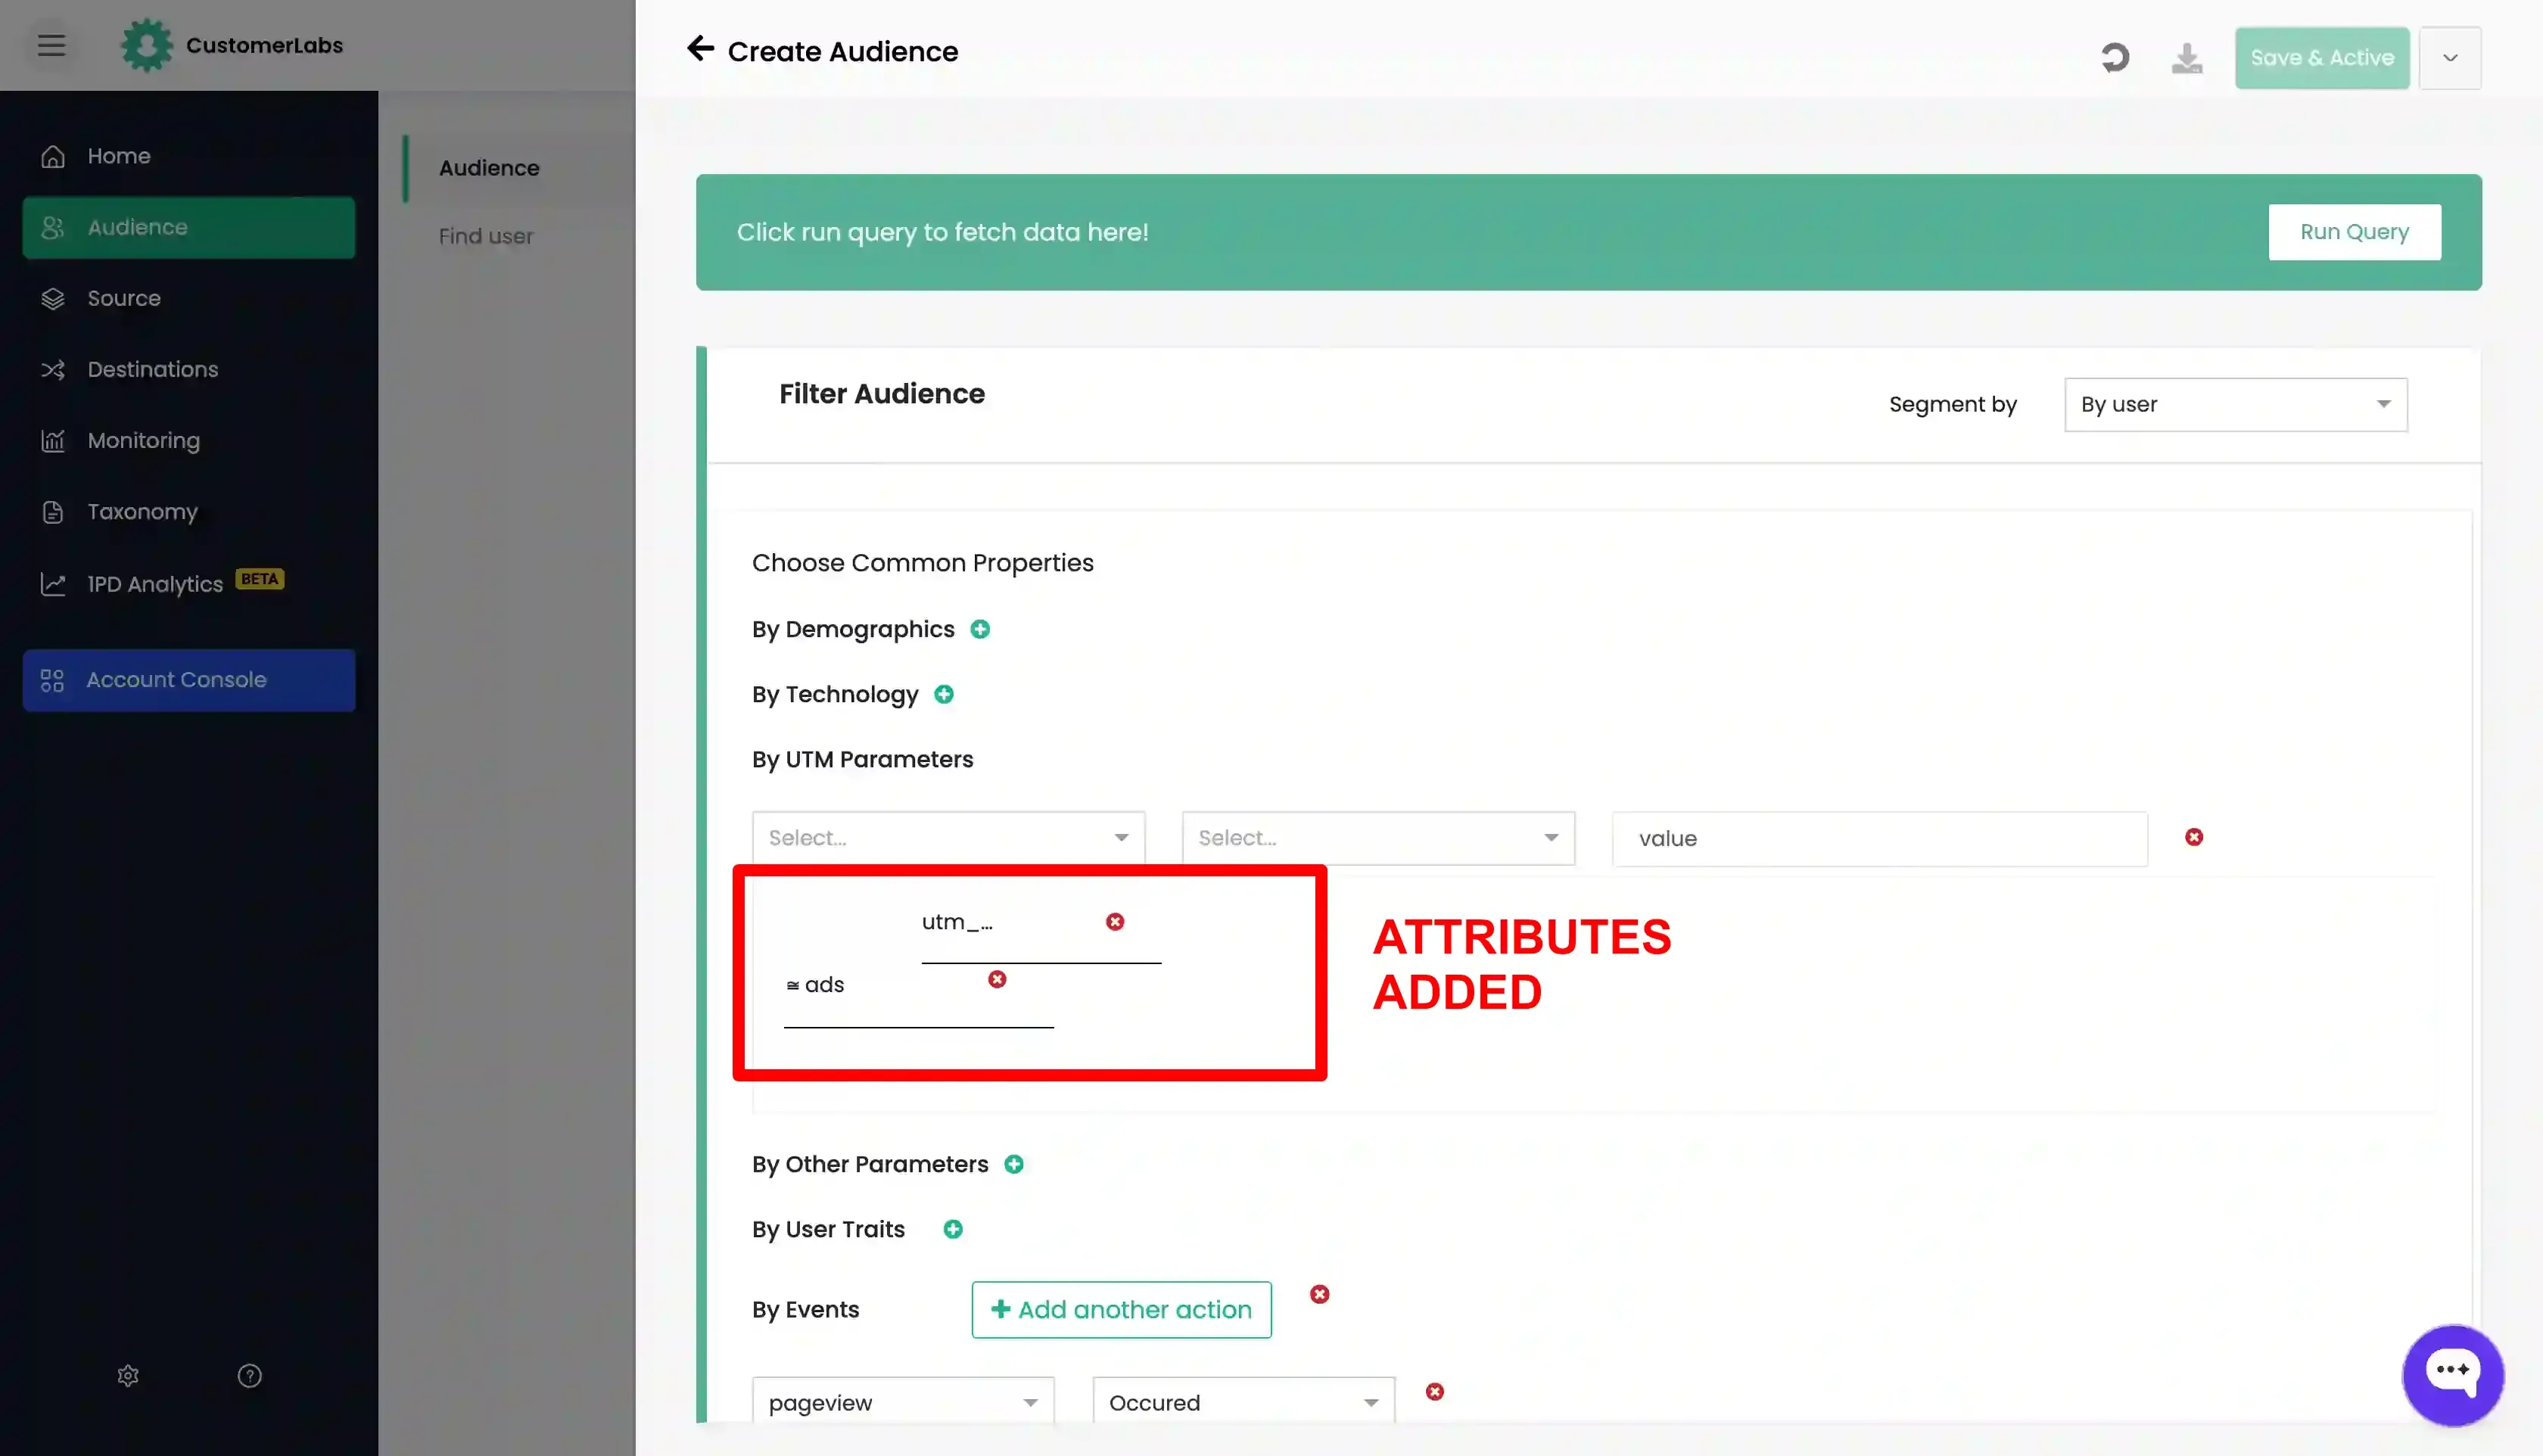
Apply the conditions based on your requirements. Add any attributes if needed by clicking on the “Add Attribute” button.
-
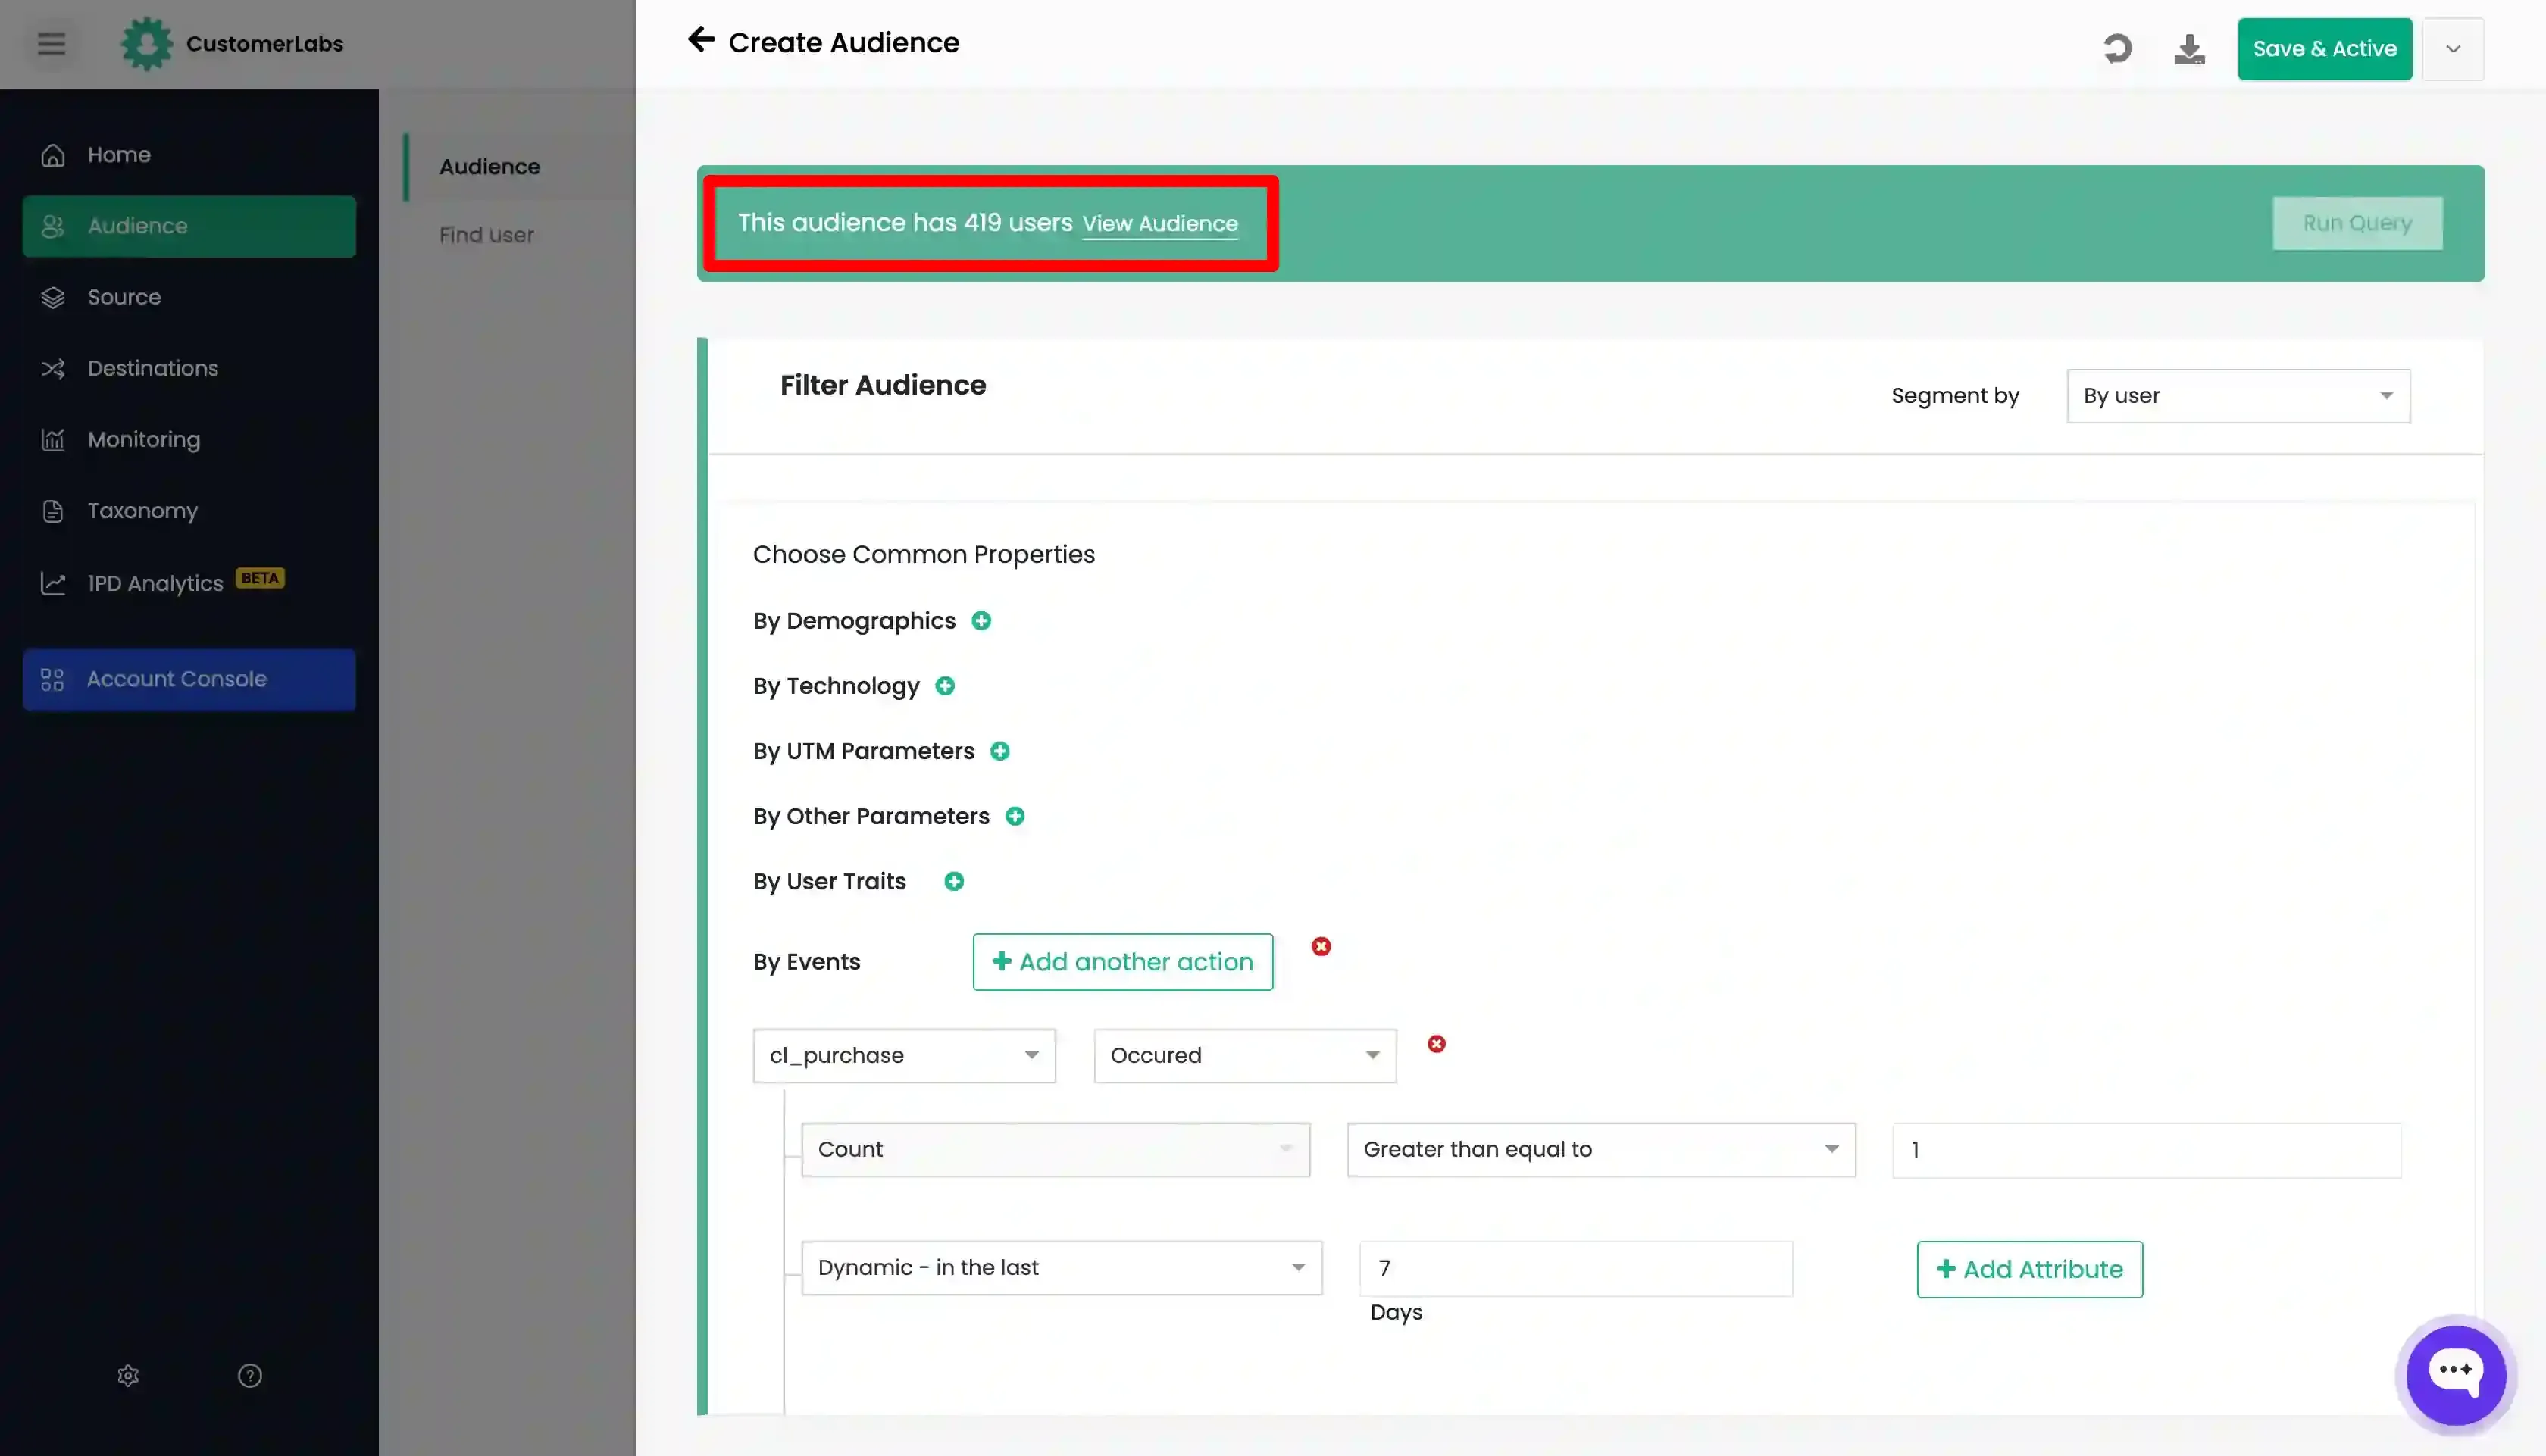
Click Run Query to view the audience count.
-
Click “Save & Active”
-
Enter the Audience Name and Refresh interval. Check “Agree & Continue” box and click on “Save & Active”.

Use Suggested audiences
Section titled “Use Suggested audiences”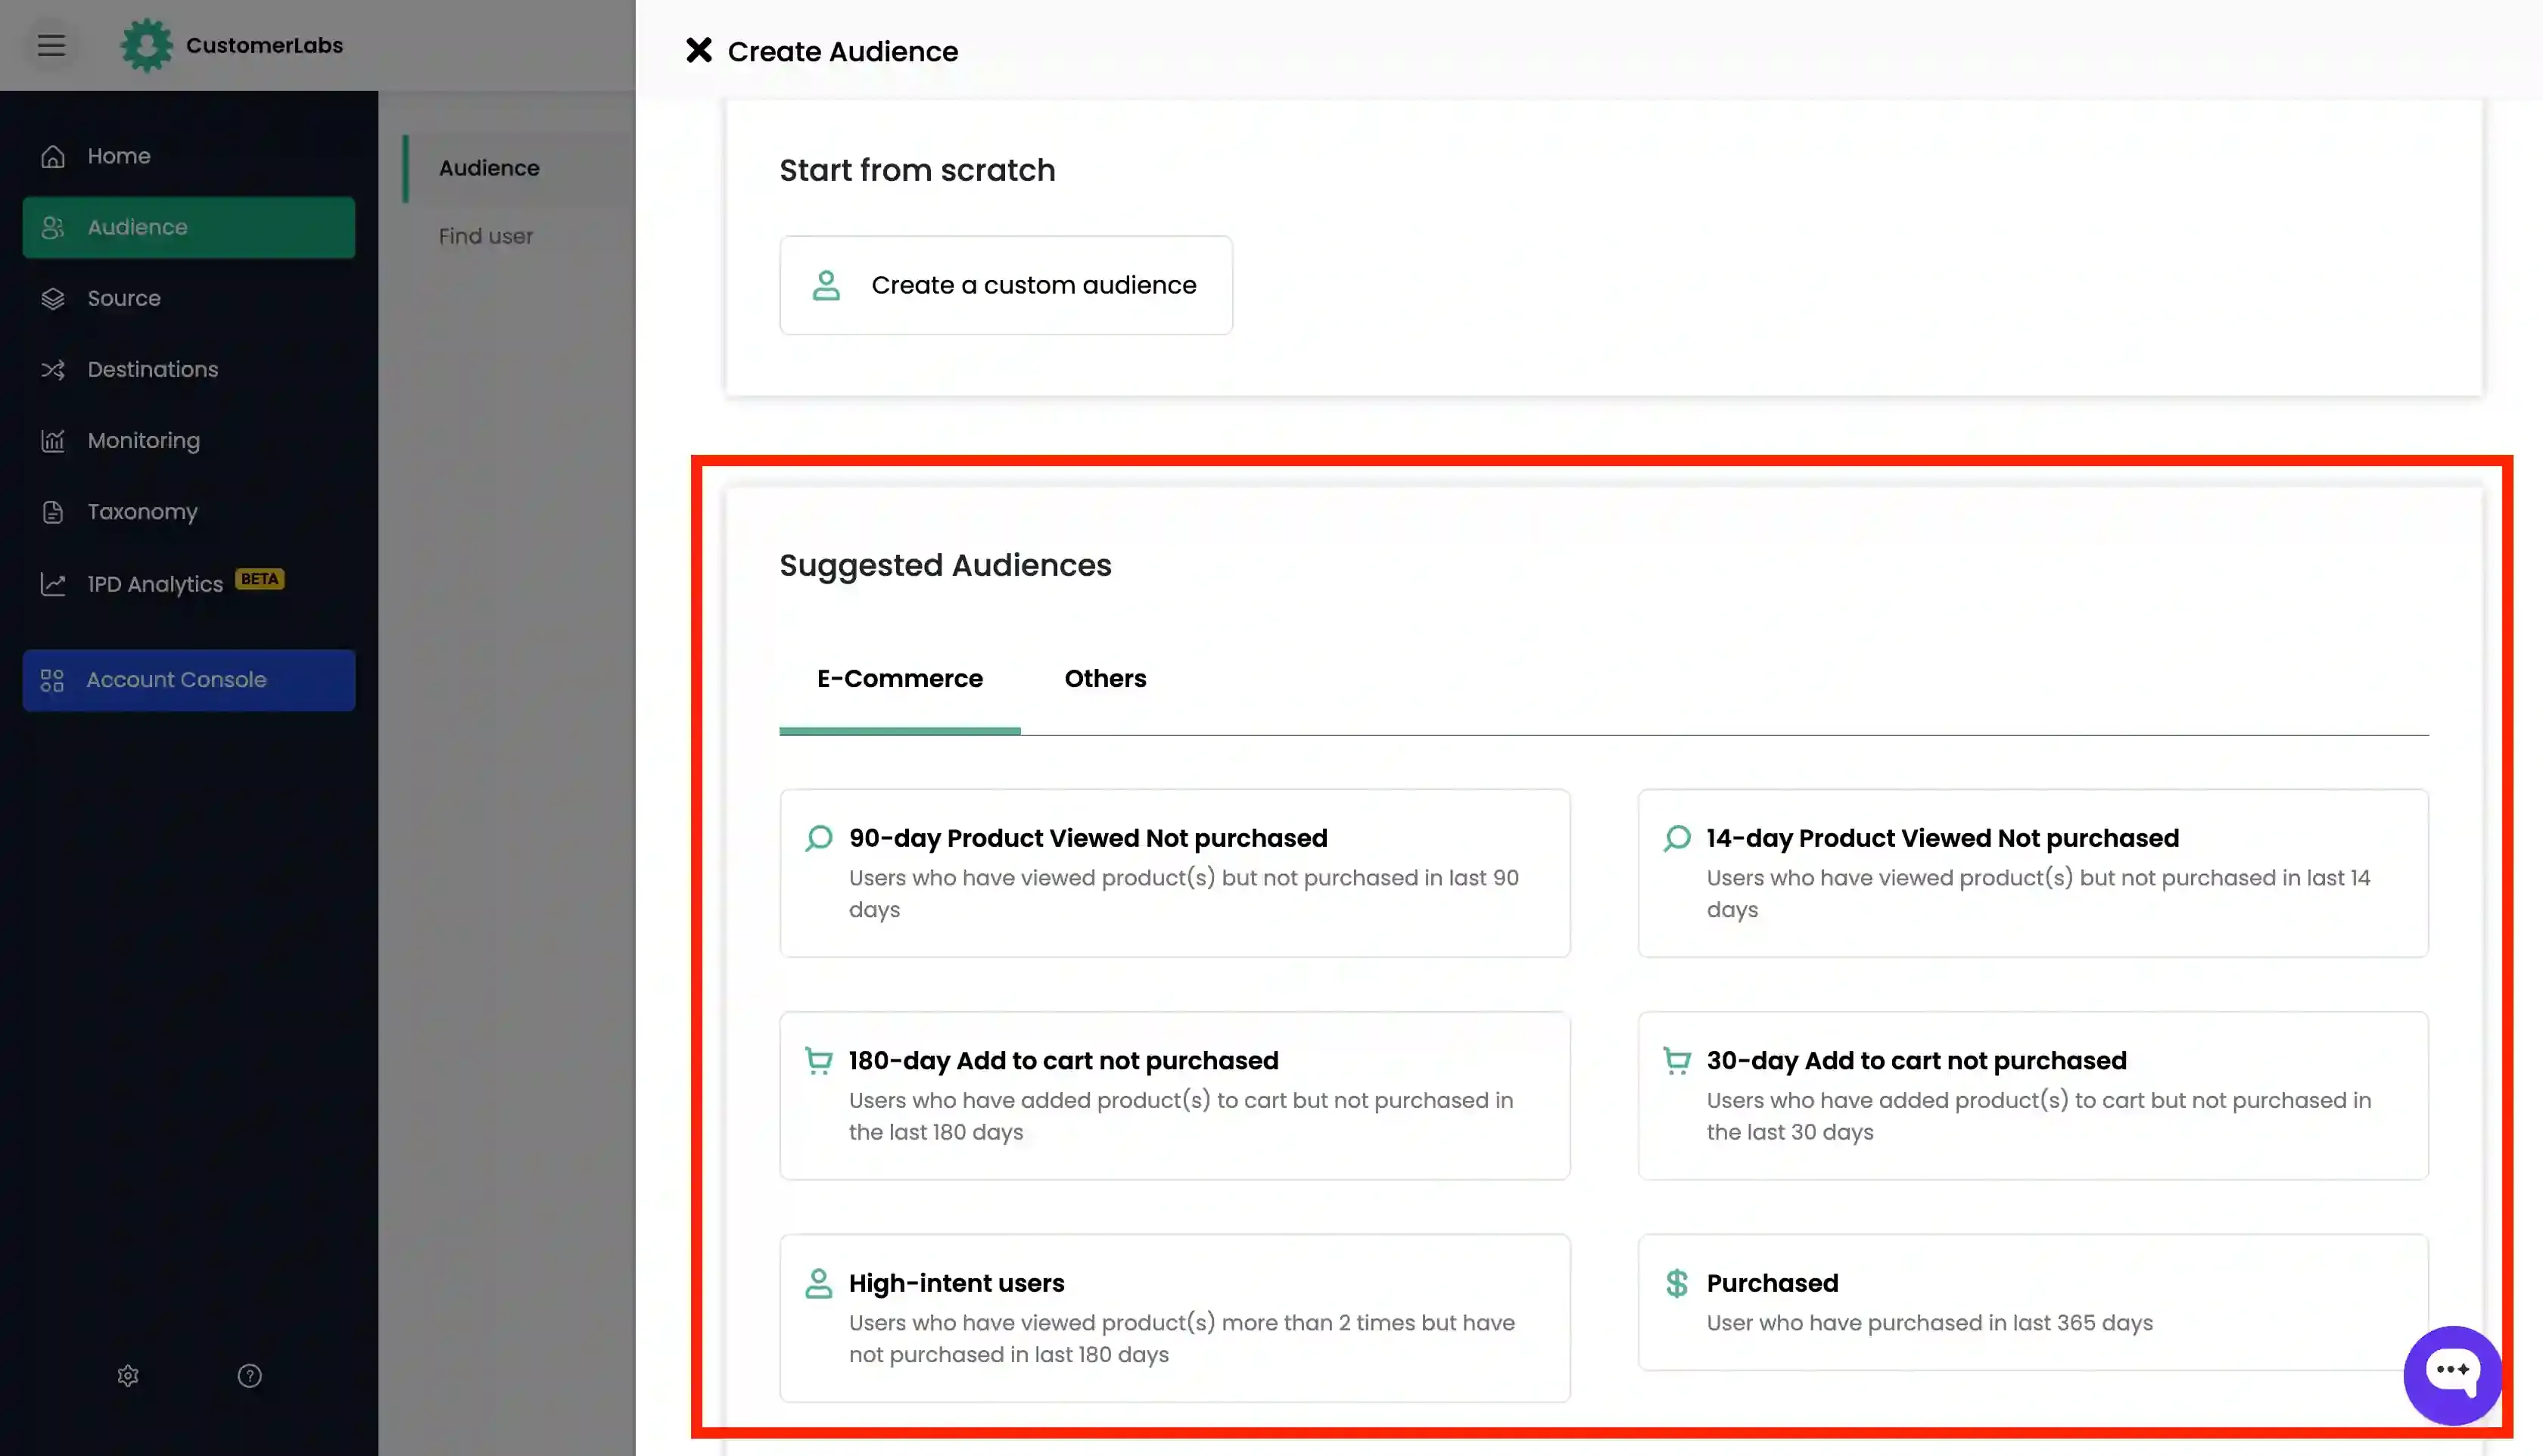
We have pre-configured a few audiences that are frequently used by marketers, which helps you easily segment the audience without adding any conditions.
For example, if you want to create an audience who has viewed a product but not purchased it in the last 90 days,
-
You simply click on the suggested audience
-
This automatically applies the filters for the audience
-
Then click on “Run Query” to view the audience count
-
Finally, click on “Save & Active” to save the audience
Ways to filter the data
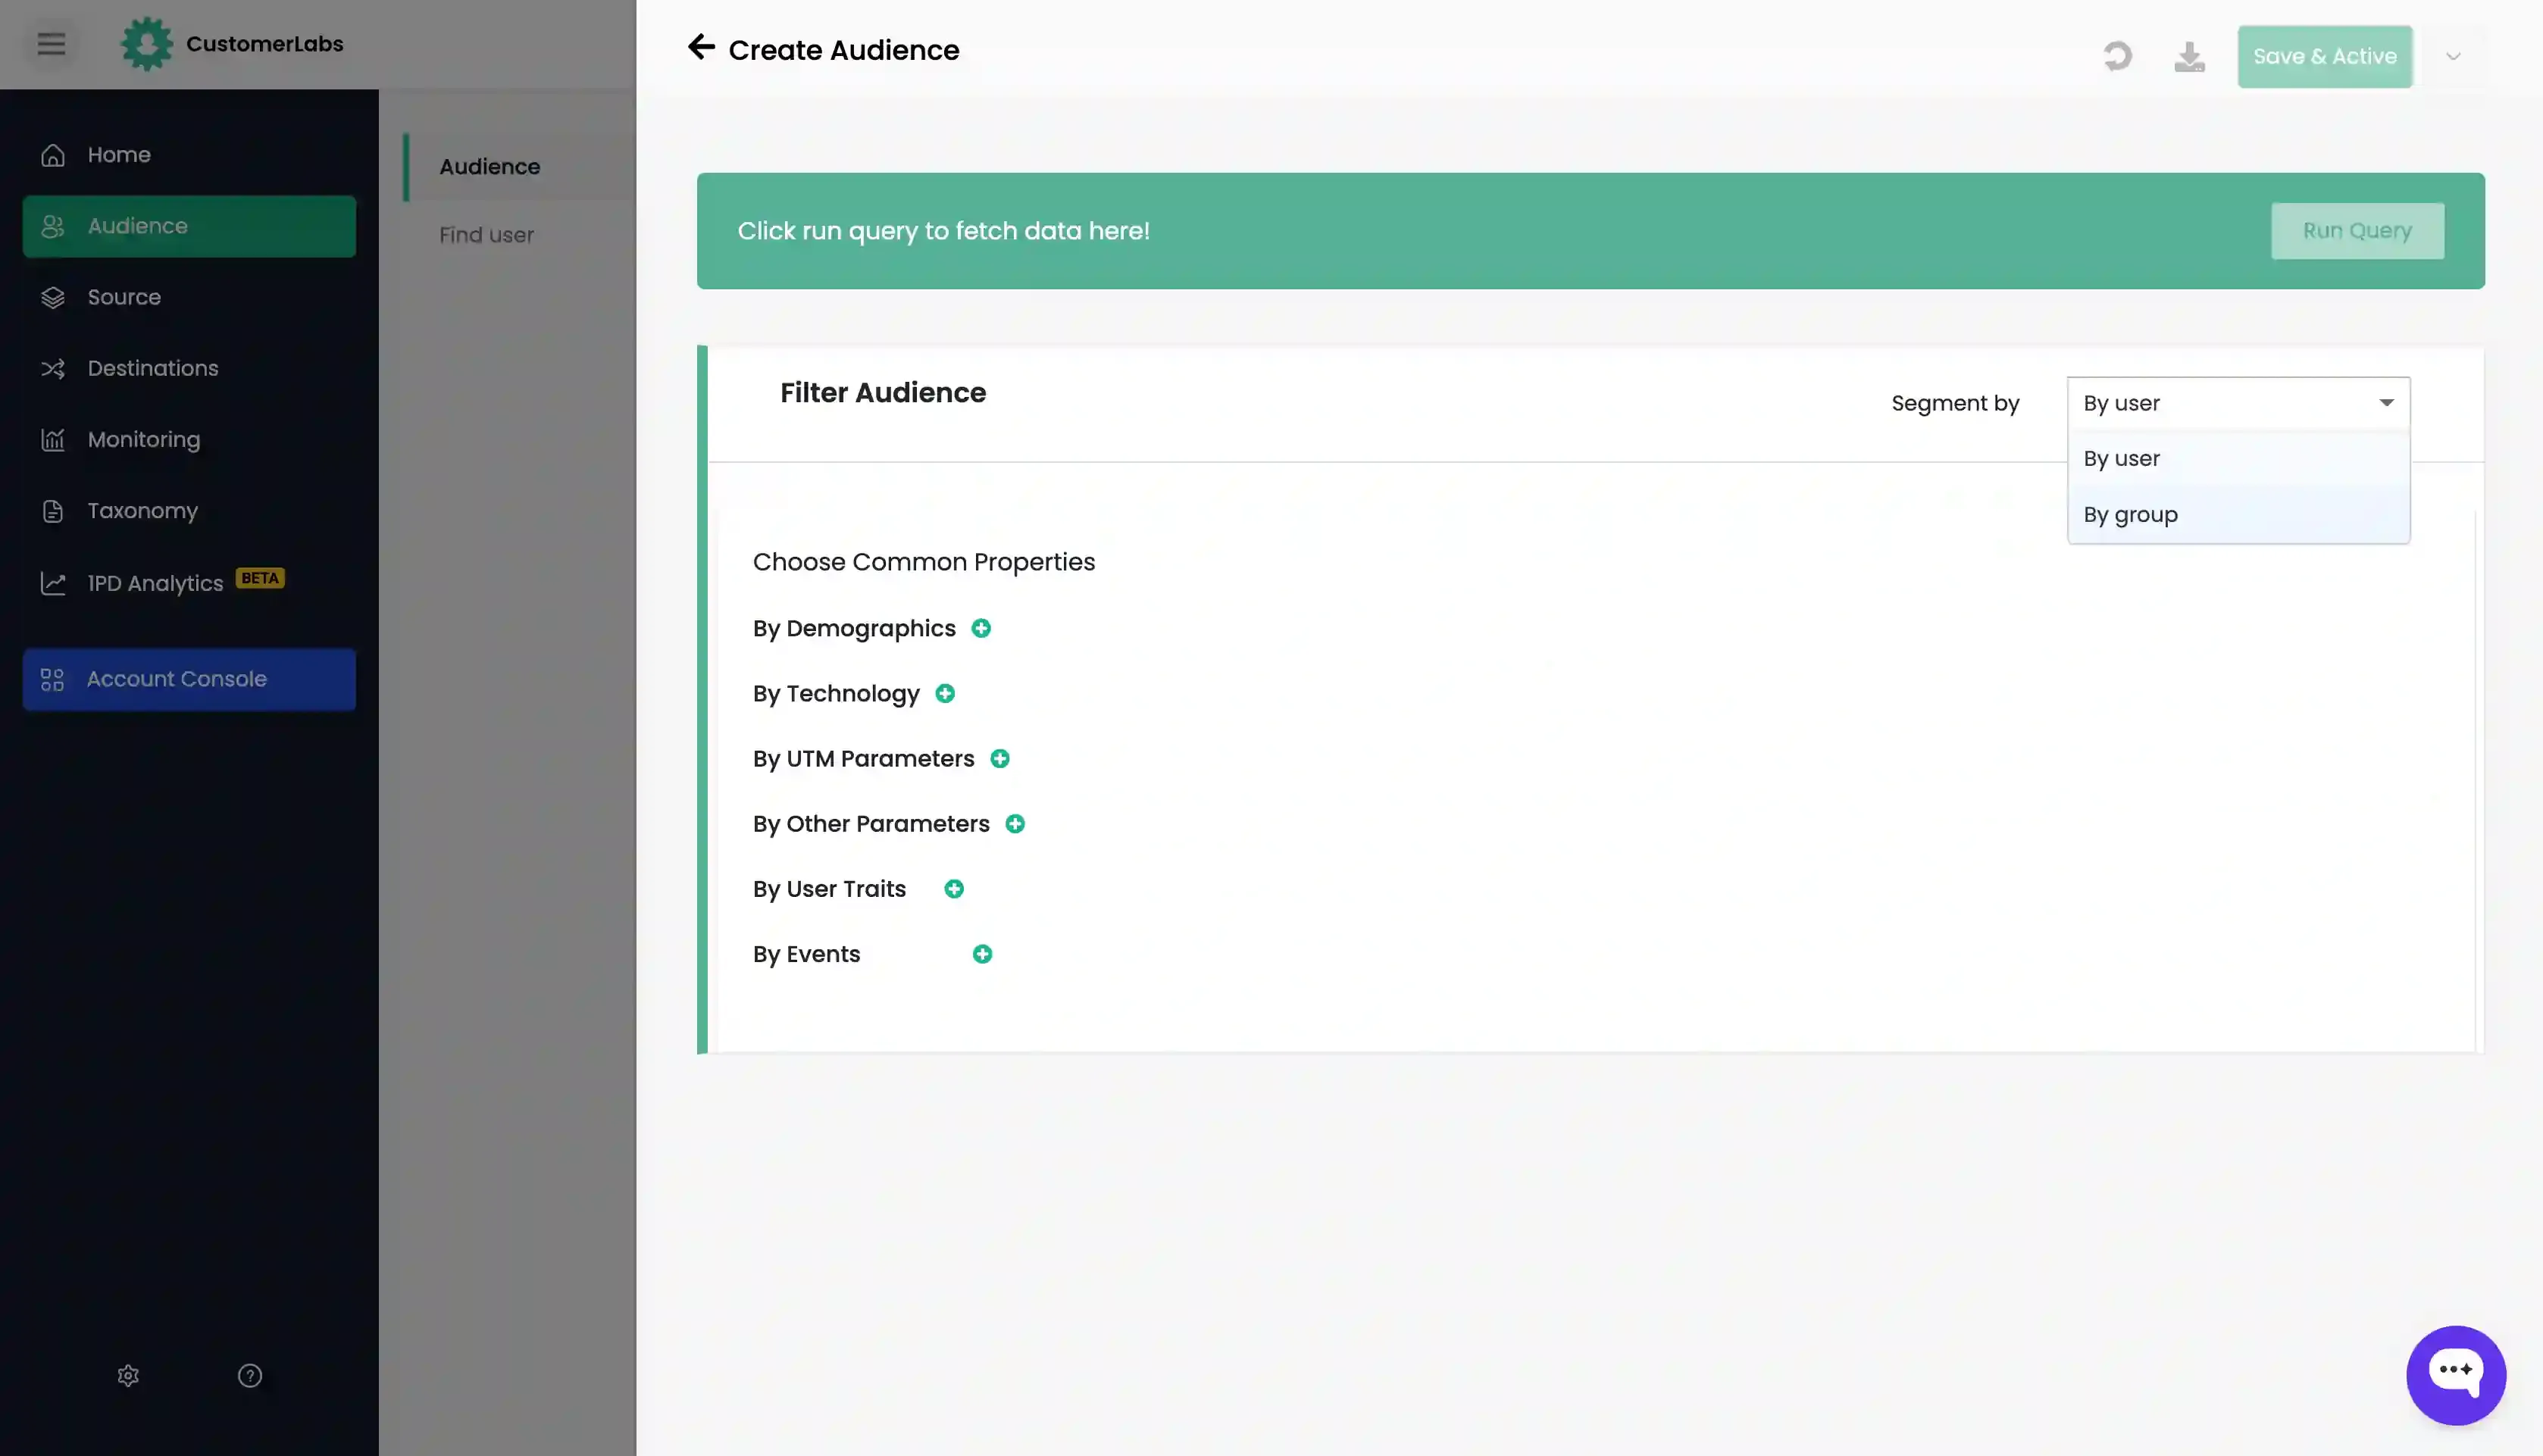
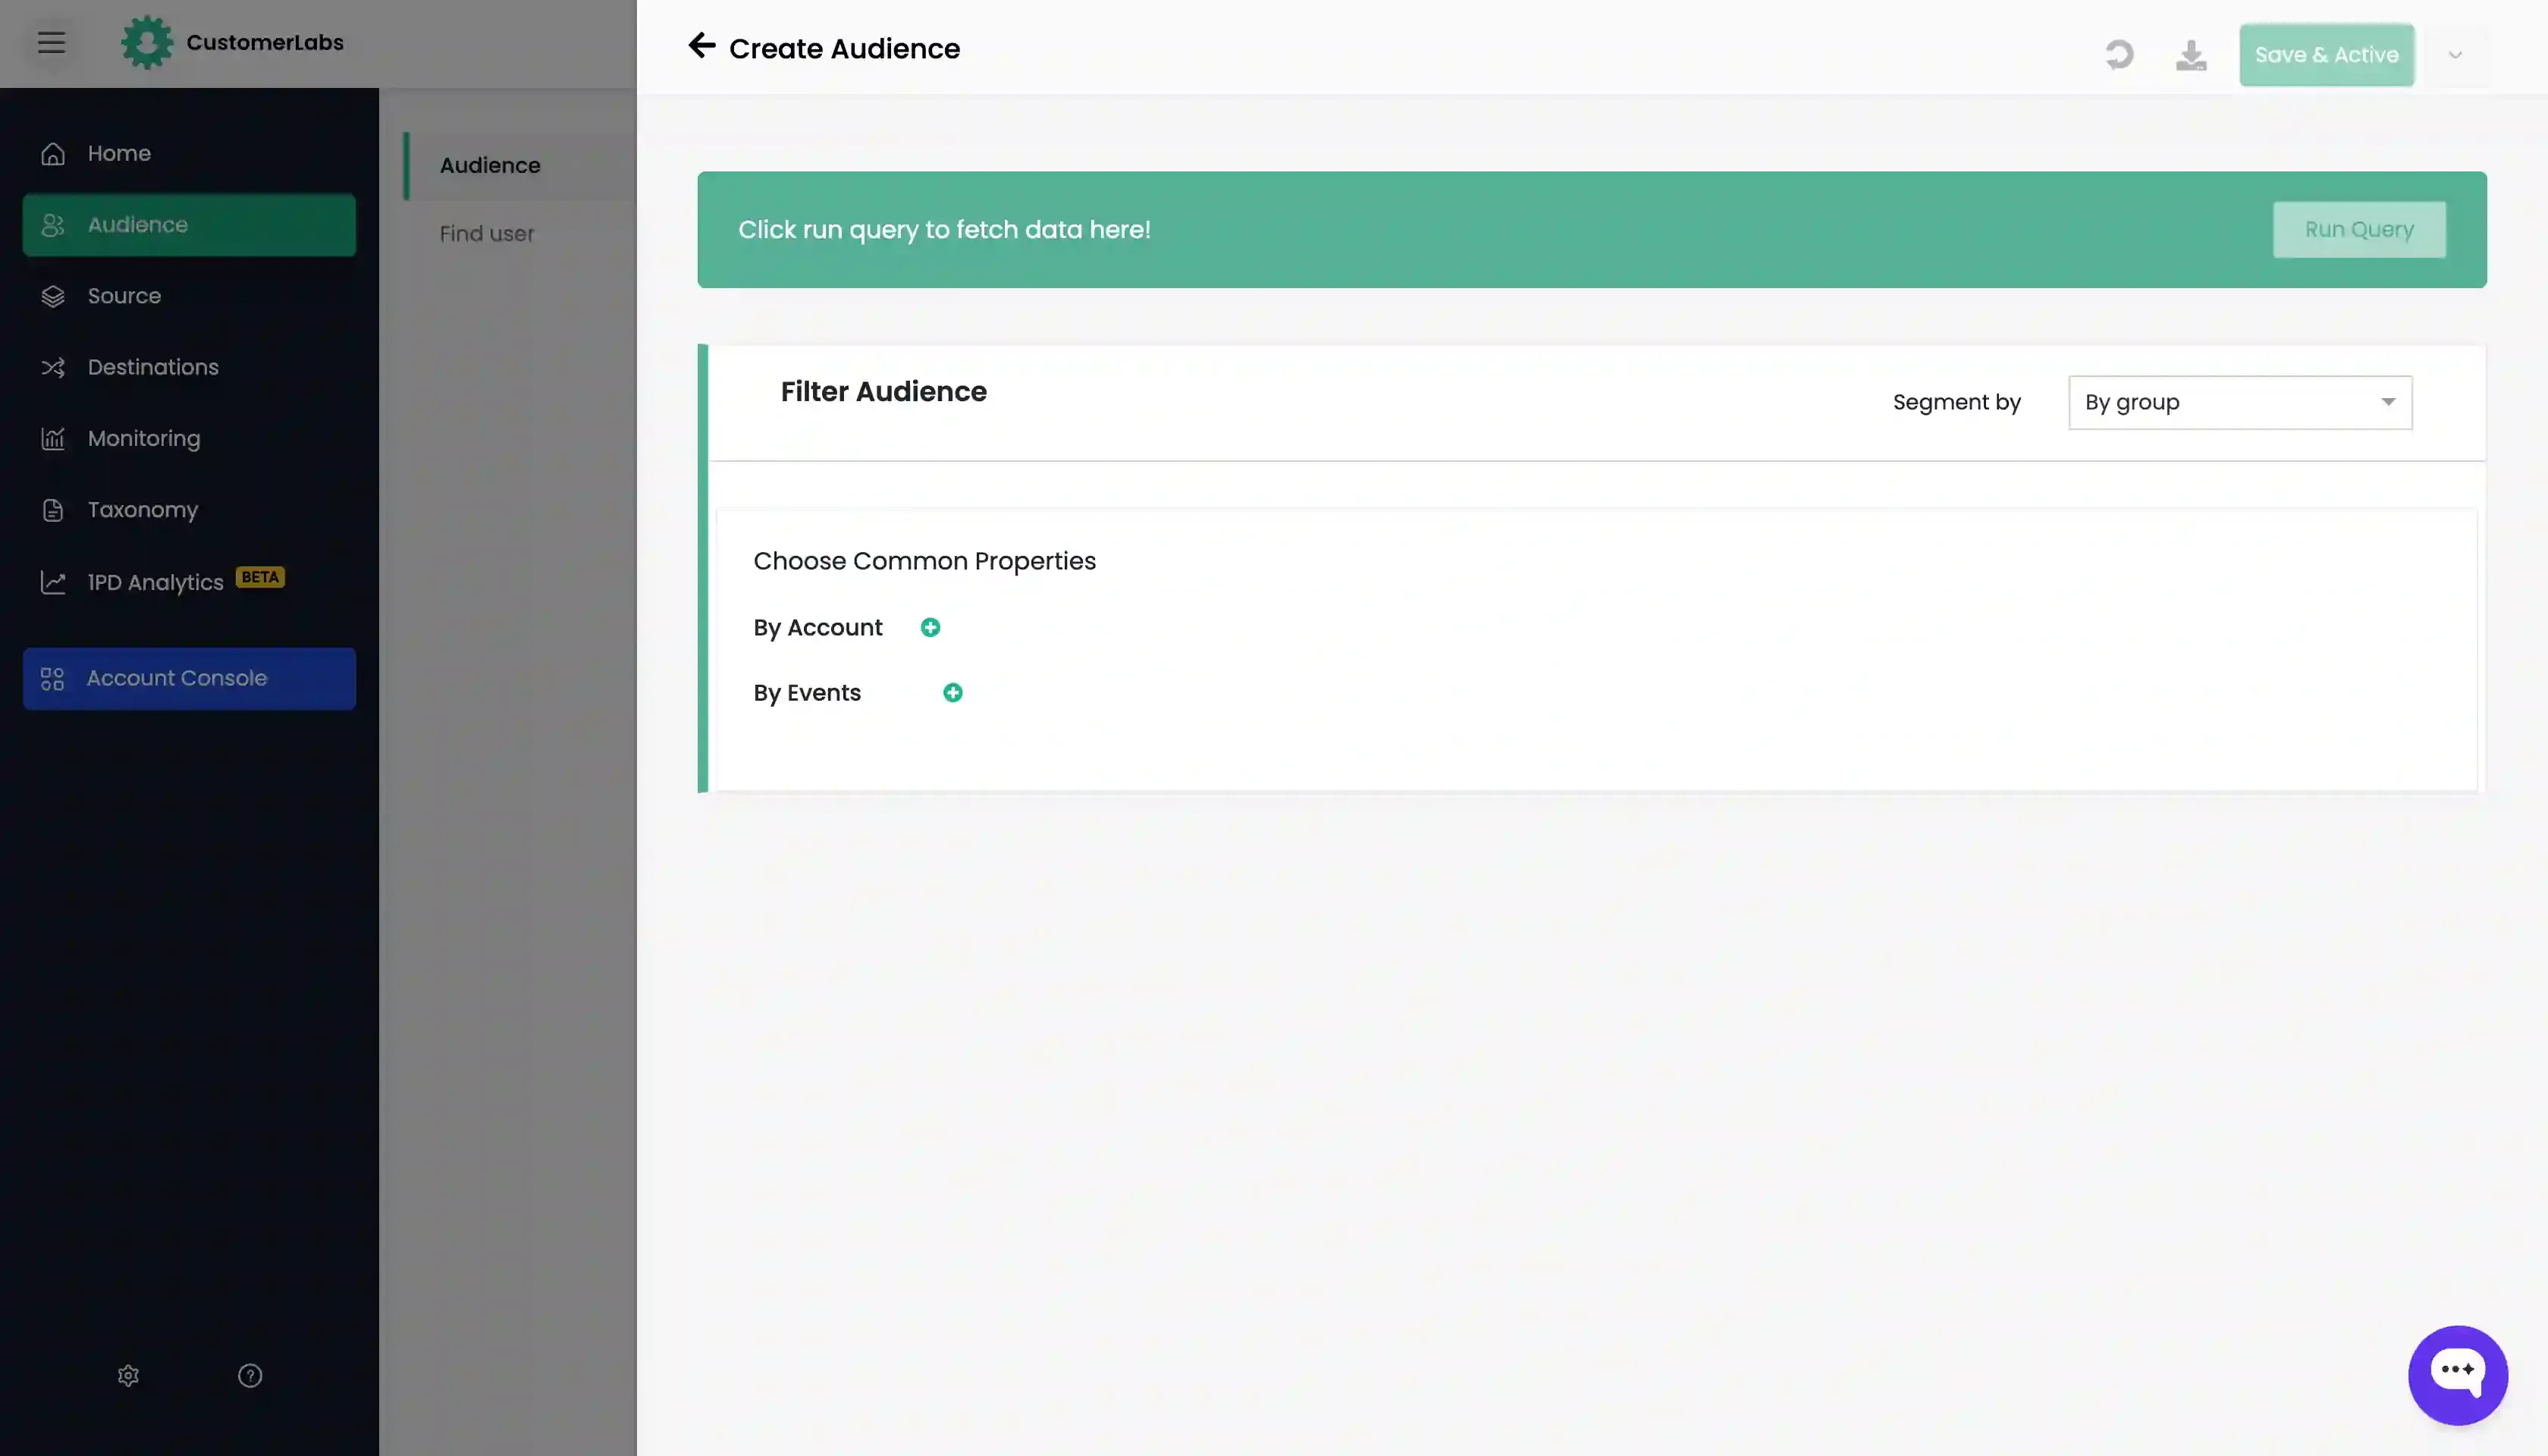
Section titled “Ways to filter the data”Segmenting Users and groups
Section titled “Segmenting Users and groups”CustomerLabs allows you to create segments for both individual users or groups of users.
- Go to Audiences → Create a custom audience
- On the top right, you can see an option “Segment by” with a drop down
- The default value is “Users”
- You can change it to group
This will allow you to choose between filtering the data based on individual users using user_traits and events or groups of users based on group_traits and the users’ belonging to the group and their activities.
Segmentation Criteria
Section titled “Segmentation Criteria”Audiences can be created in CustomerLabs using the following pre-built criteria. Any information tracked in the website or app can fit into one of these categories.
Options available for “Segment by Users” are:
-
Demographics: City, State, Country, Language, etc.
-
Technology: Browser, Device type, Platform.
-
UTM Paramters: Any UTM paramters that are used in your campaigns (such as source, medium, campaign, etc.)
-
Other Parameters: Any other properties, traits or external ids that are captured in the website (such as click id, cart token, user id, etc)
-
User Traits: All user traits that are captured and stored can be used (such as email, phone, city, address, etc)
-
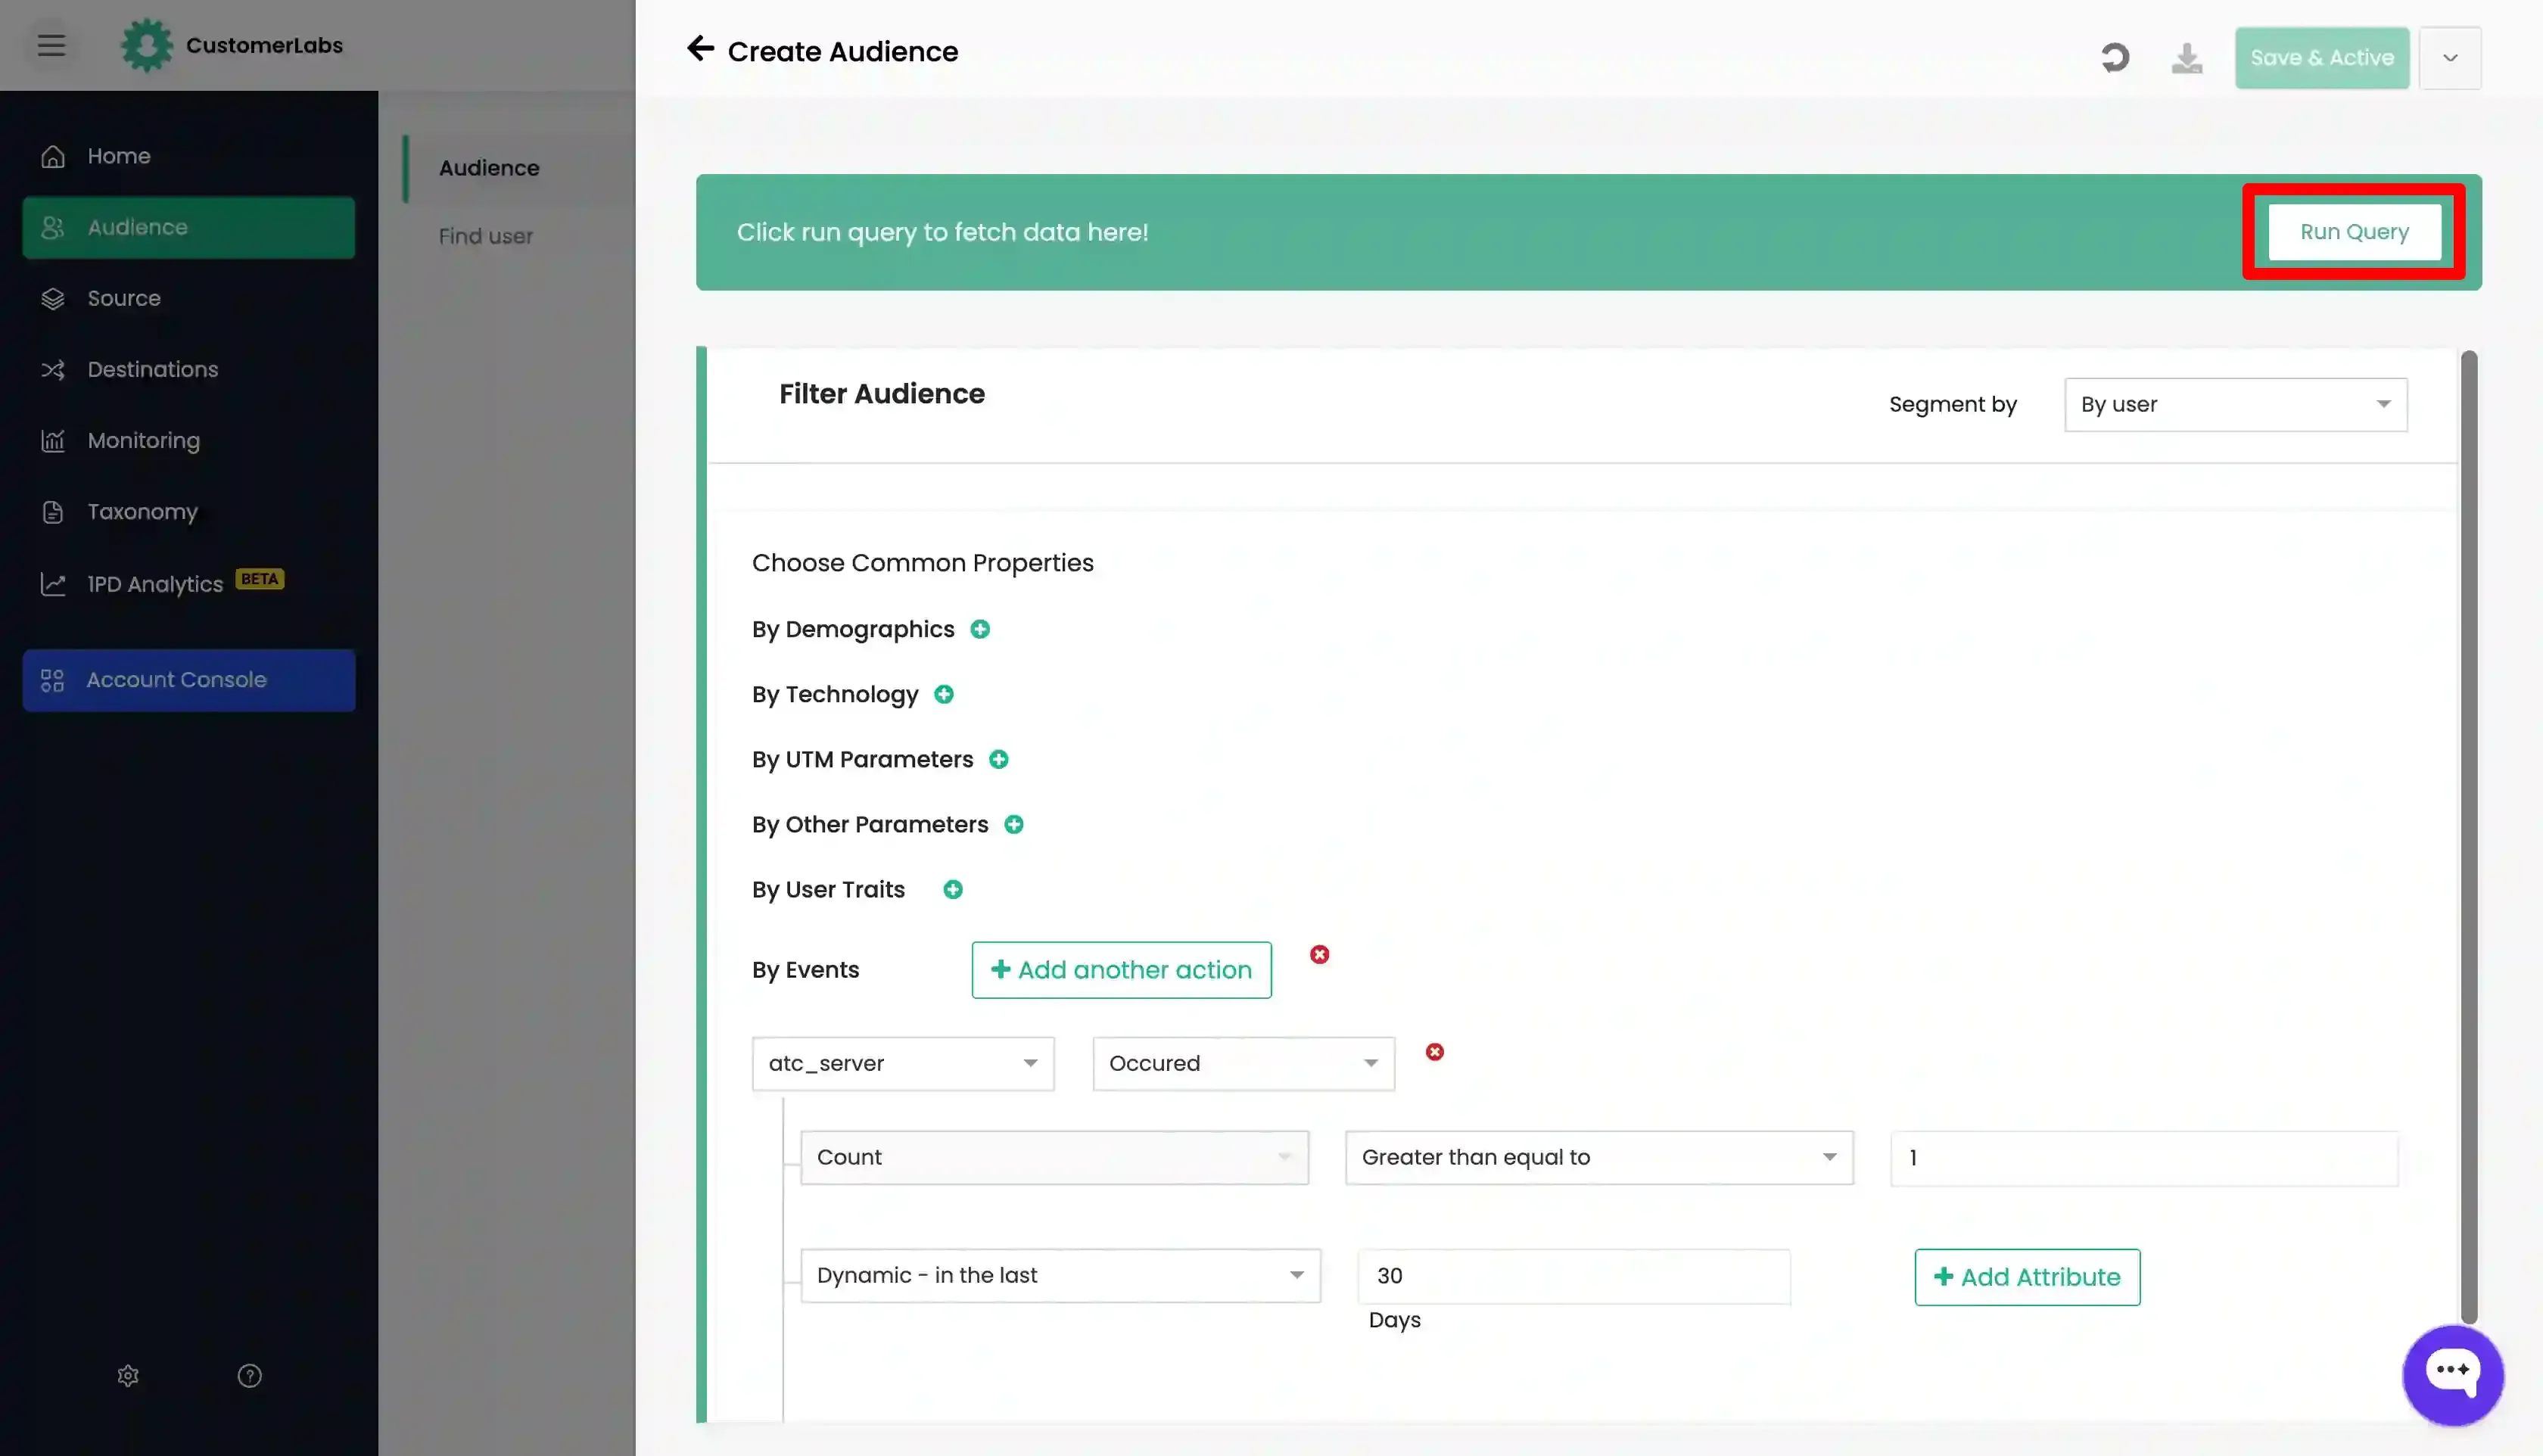
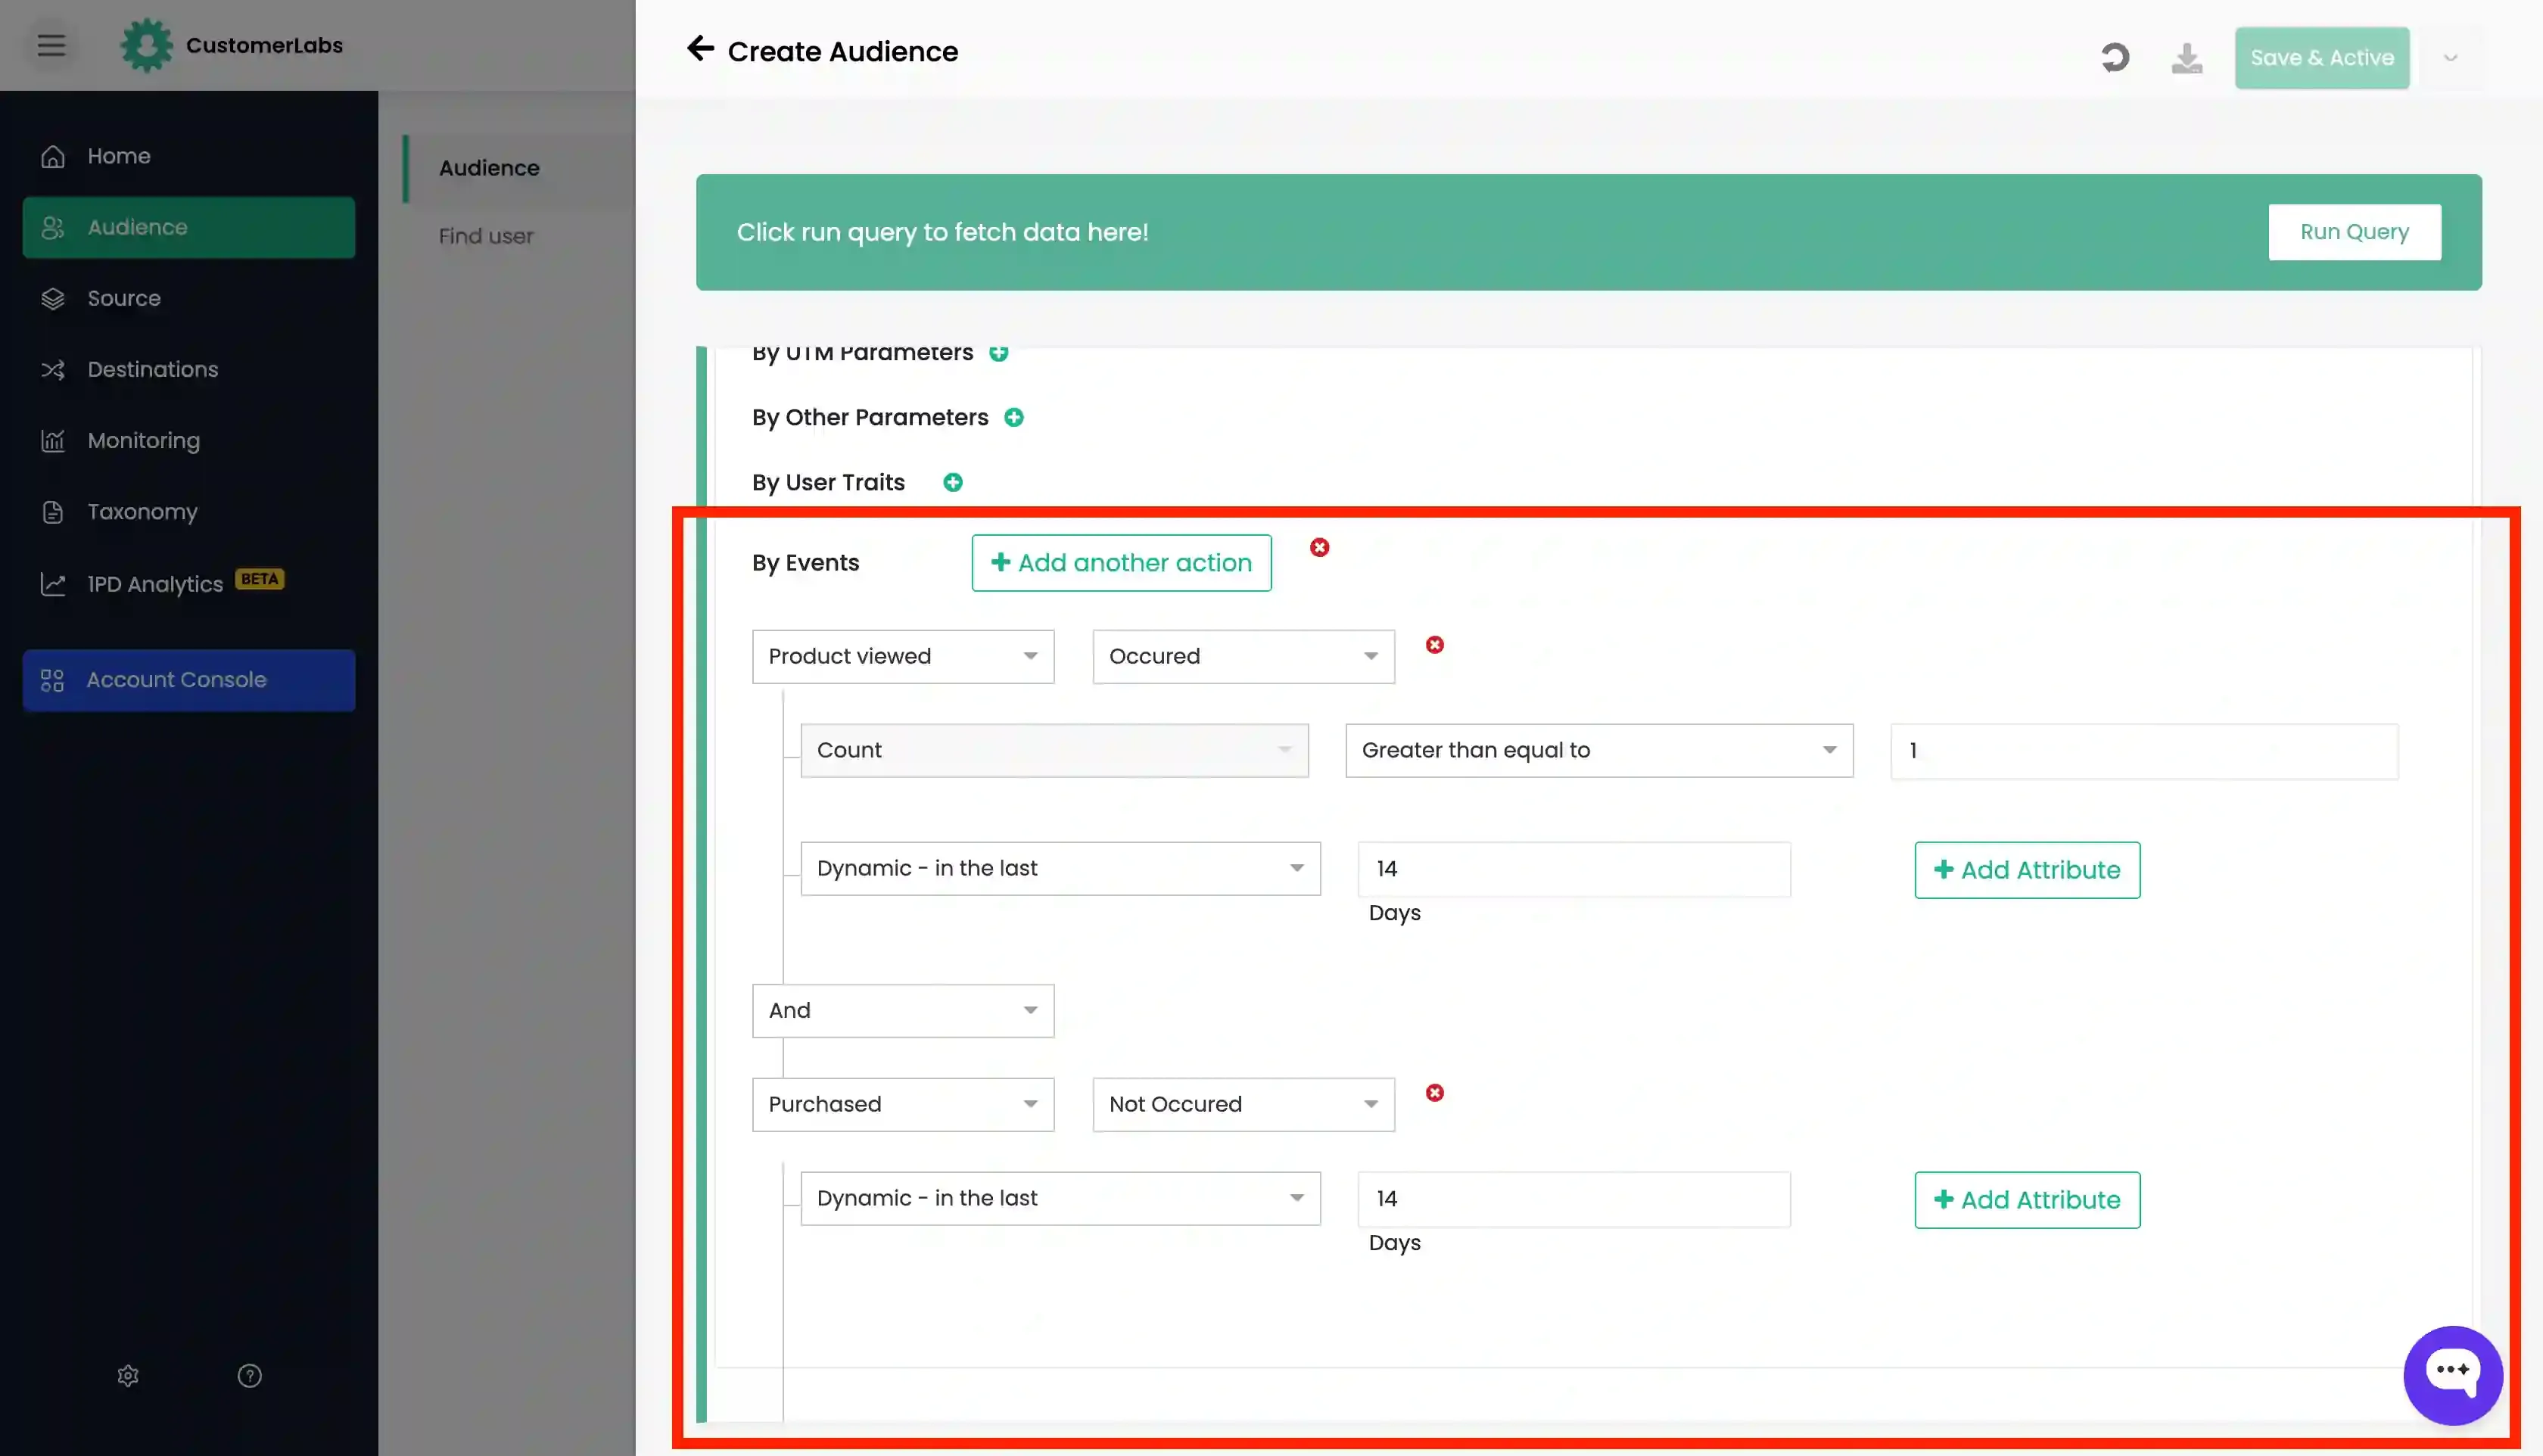
Events: Any interactions with website and app (such as pages visited, add to cart, checkout, purchase, form submission, etc.)
Options available for “Segment by Groups” are:
- By Account: All account traits such as
company name,company website,number of employees, etc. - Events: Any interactions with website and app (such as pages visited, add to cart, checkout, purchase, form submission, etc.)
- Occurance: While choosing the event, you can filter the data based on the occurrence of the event like Occured, First occurred, Last occurred, Not occurred.
- Event Count: While choosing the event, you can filter the data based based on the count of the event like Count is equal to, Count is not equal to, Count is greater than, Count is less than, Count is greater than or equal to, Count is less than or equal to.
- Date range: Refer Deciding the time-frame for segment creation.
Setting up the event filtering
Section titled “Setting up the event filtering”- Occurance: While choosing the event, you can filter the data based on the occurrence of the event like Occured, First occurred, Last occurred, Not occurred.
- Event Count: While choosing the event, you can filter the data based based on the count of the event like Count is equal to, Count is not equal to, Count is greater than, Count is less than, Count is greater than or equal to, Count is less than or equal to.
- Date range: Refer Deciding the time-frame for segment creation.
- Attributes: You can further filter the data using attributes (if available) for the event. For example:
-
urlcan be added as attribute forpageviewevent. -
product_nameorproduct_idorvariant_id, etc can be added as attributes for e-commerce events likeproduct viewedoradded to cartevent for filtering the users who have viewed a specific product or added to cart.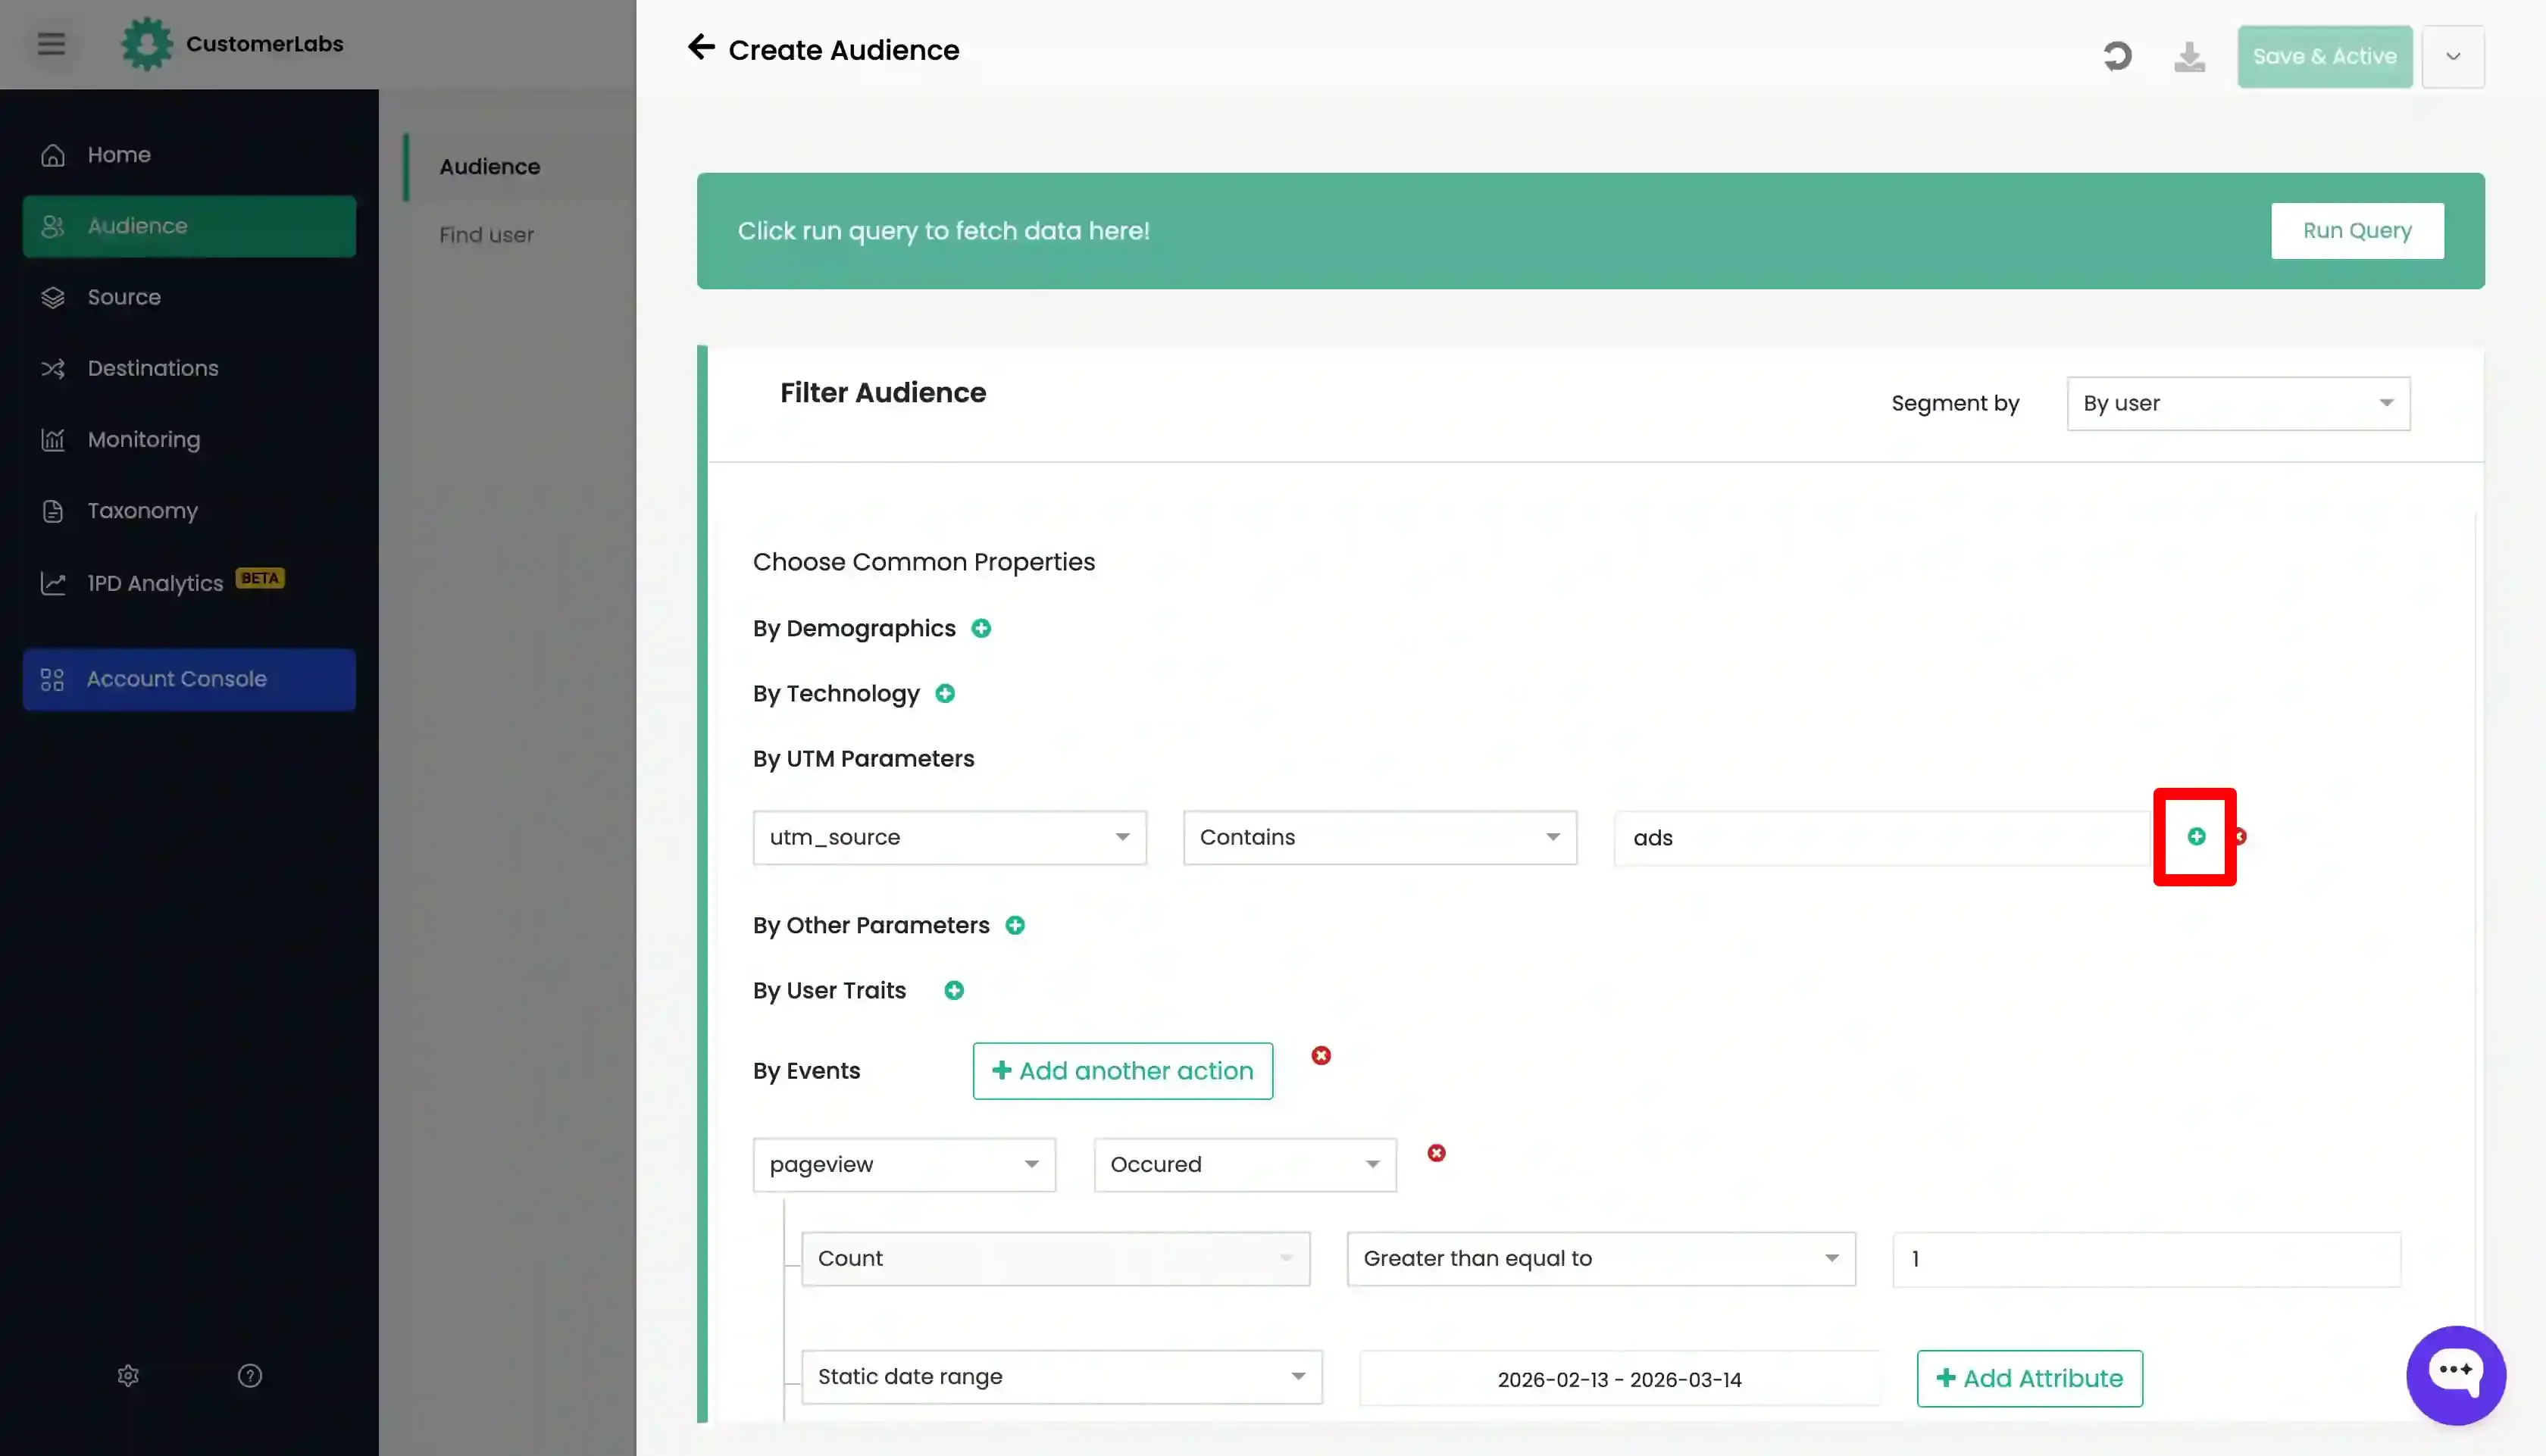
-
Multiple actions can be combined for advanced segmentation by clicking on the “Add another action” button and using the conditional filter “AND” or “OR”.
- And: Filters the data that match the criteria of all the actions.
- Or: Filters the data that match the criteria of any one of the actions.
Deciding the time-frame for segment creation
Section titled “Deciding the time-frame for segment creation”Audiences can be created in CustomerLabs with static and dynamic dates.
Static Date Range
Section titled “Static Date Range”- The audience is created for a fixed date range.
- No new users are added or removed from the segment as this is for a fixed date range.
- Refresh interval is not applicable for static audiences (even if specified).
Dynamic Date Range
Section titled “Dynamic Date Range”- The audience is created for a dynamic date range that keeps changing.
- New users are added or removed from the segment based on the given date range and refresh interval.
- Options available for dynamic date range are:
-
in the last ‘x’ days: Filters the data in the last specified number of days.
-
date from: Filters the data from the date mentioned till date and keeps on extending every day.
-
yesterday: Filters data for the previous day.
-
days between: Filter collects from and to days relative to the current day, enabling to select a rolling audience for a specific period.
-
in the last 2 hours, 4 hours, 8 hours, 12 hours, and 24 hours: Filters the data in the last specified number of hours.
-
Refresh Interval
Section titled “Refresh Interval”The first-party audiences created in CustomerLabs can be synced with platforms connected as destinations (e.g. Facebook, Google Ads, GA4, etc.). The refresh interval is the time interval after which the audience is refreshed to connected platforms.
Why should you refresh the audience?
Section titled “Why should you refresh the audience?”- When audiences are created with dynamic date range, the audience will dynamically change based on the time frame. Since the audience keeps on changing, the latest audience must be syned with the connected platforms.
- This refresh interval updates the audiences at fixed intervals to ensure that the audience is up-to-date with the latest users who match the given criteria.
What is the ideal refresh interval?
Section titled “What is the ideal refresh interval?”- The ideal refresh interval depends on the type of audience you are creating.
- For audiences that are created with dynamic date range, it is recommended to set the refresh interval to 1 for the first 3 days. After that you can switch it to desired frequency.
- However, since events will be consumed for everytime the audience is synced, it is recommended to set the refresh interval to balance both the audience accuracy and event consumption.
- For audiences that are created with static date range, the refresh interval can be set to any value as it will only be synced once.
Based on the date range chosen, the audience becomes a static or dynamic audience.
-
Static audience is fixed for the date range given and no new users are added or removed from the segment.
-
Dynamic audience is changing and new users are added or removed based on the given date range and refresh interval. Every time an audience gets refreshed, an inclusion event called
added_to_segmentis assigned to the user who enters the audience segment and an exclusion event calledremoved_from_segmentis assigned to the user who is excluded from the audience segment based on the audience filter criteria.
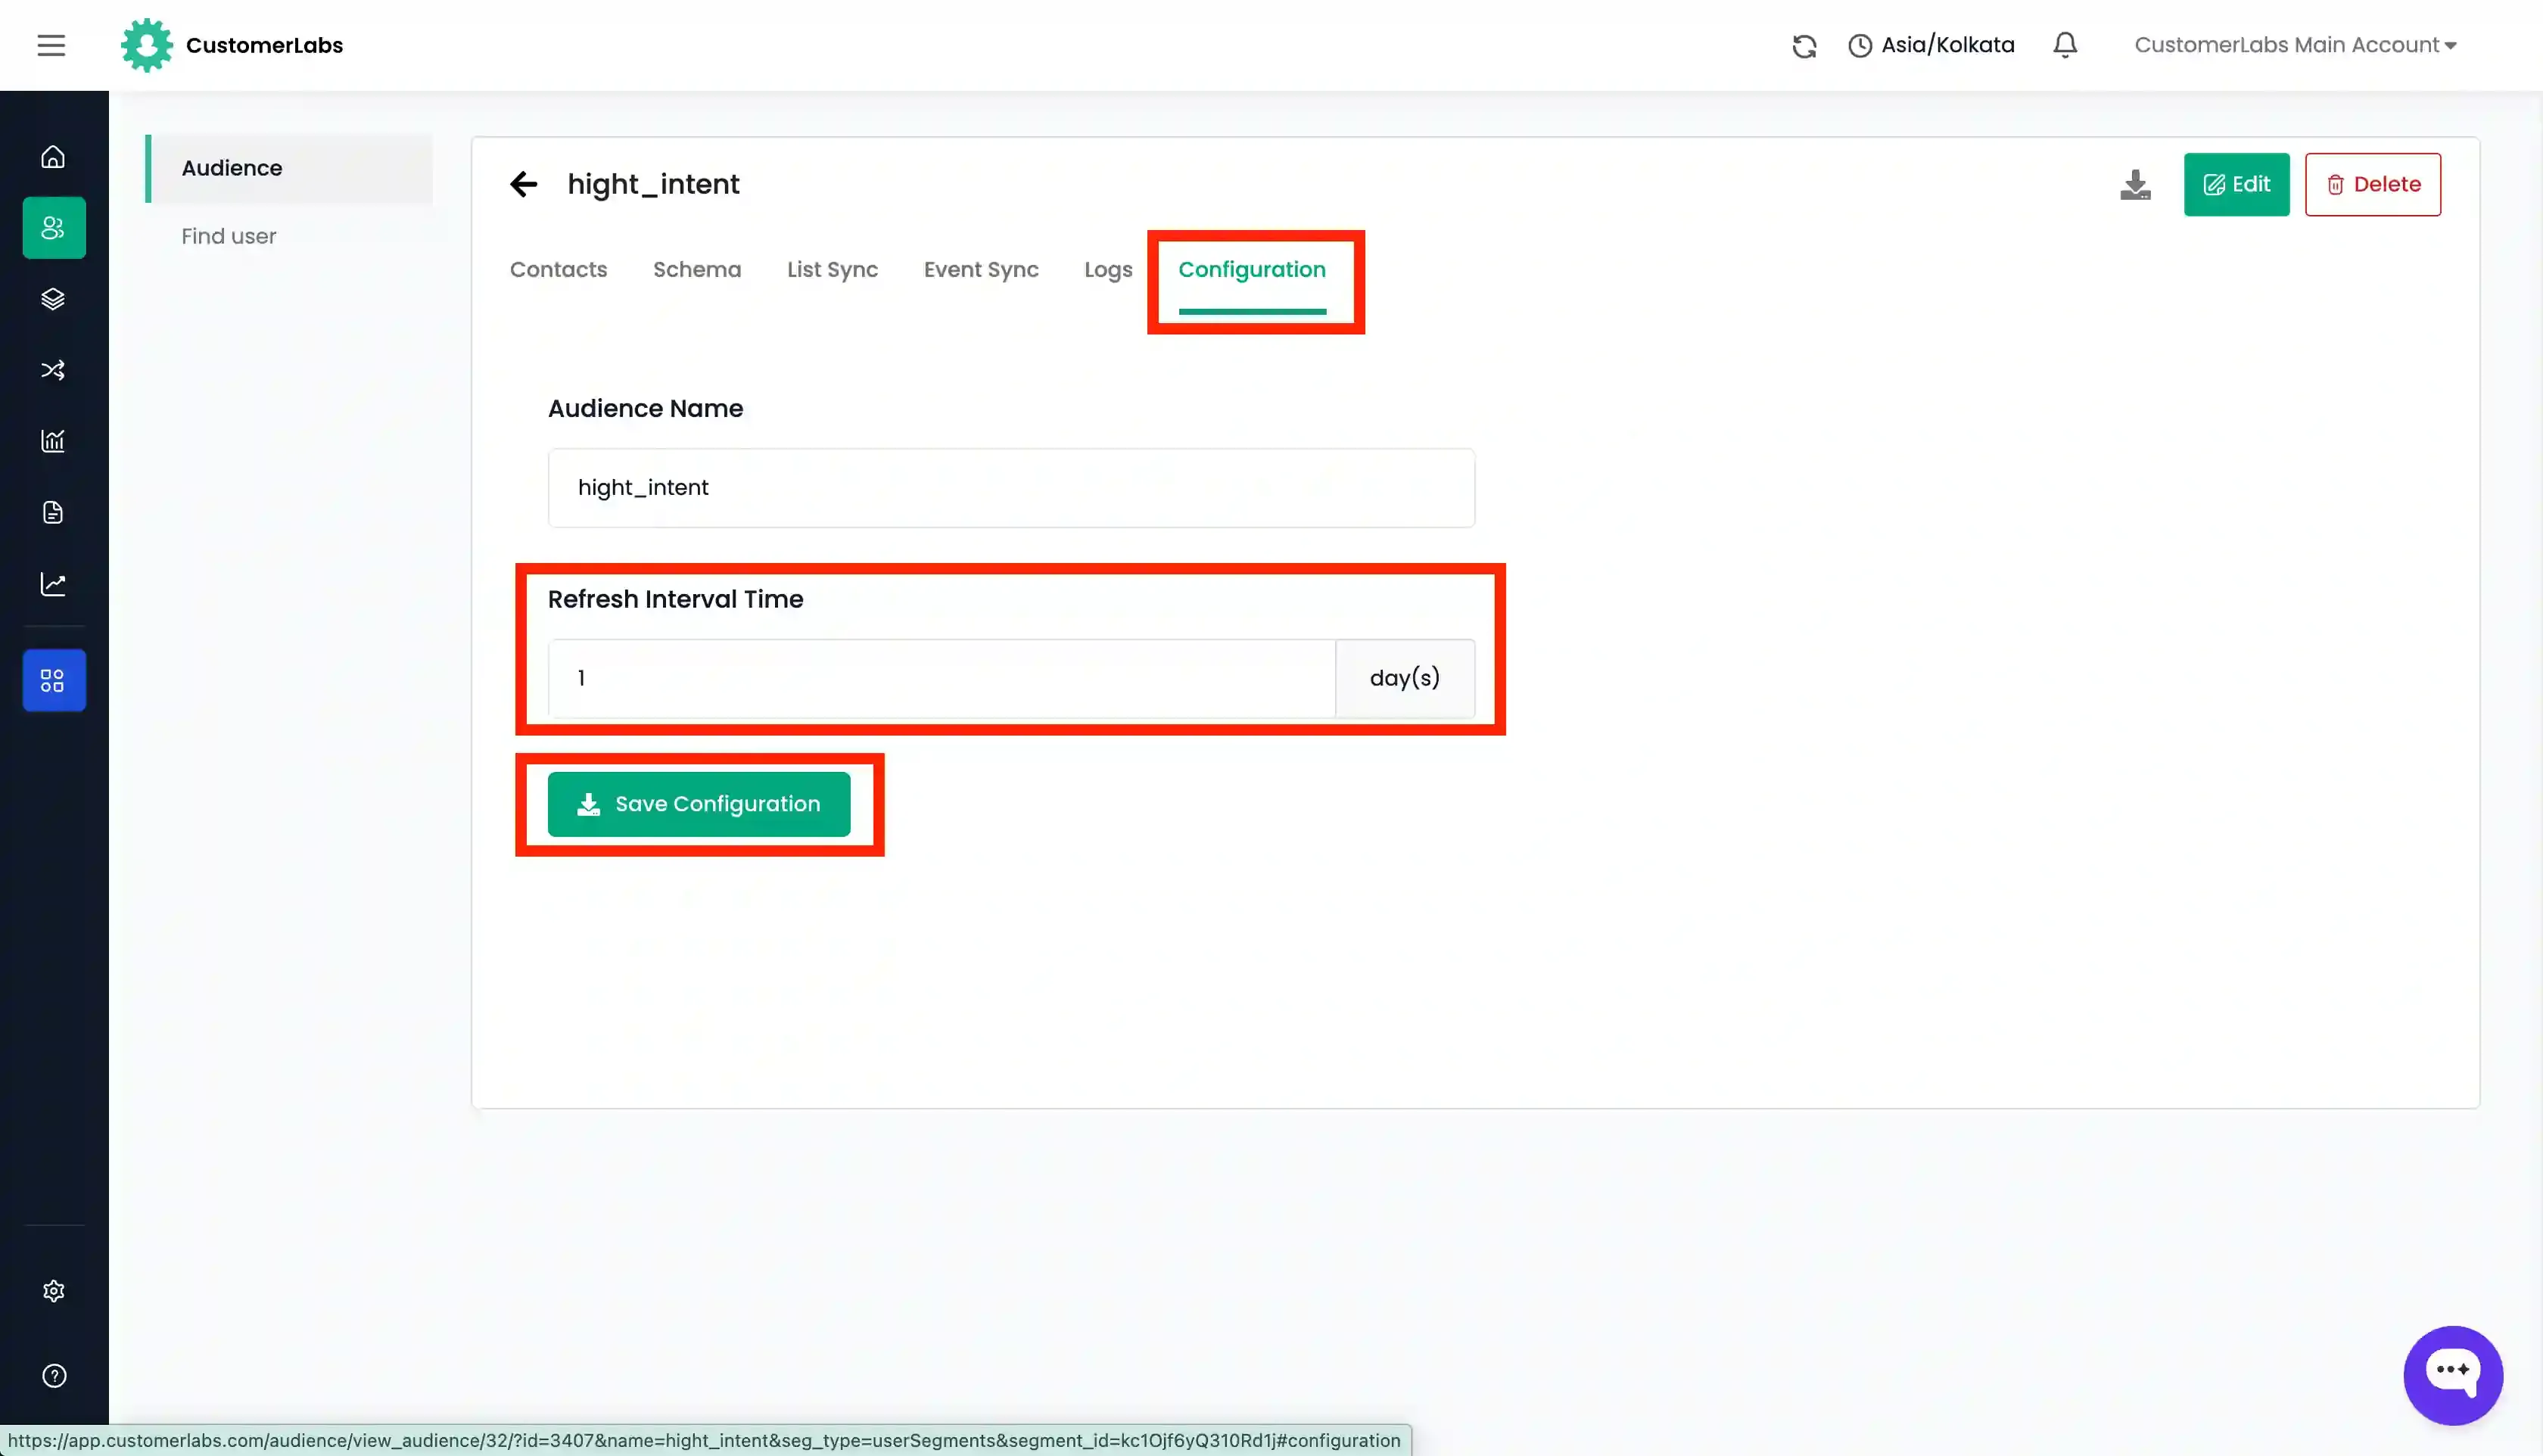
Modifying the refresh interval
Section titled “Modifying the refresh interval”- Click on the view icon (eye icon) in the audiences page.
- Go to “Configuration” tab.
- Change the refresh interval and enter the desired interval.
- Click on the “Save Configuration” button.