Customerlabs CDP Documentation
Shopify Implementation Guide
Shopify or Shopify Plus is an e-commerce platform that allows users to set up an online store. By connecting your Shopify store with CustomerLabs 1PD Ops, you can start tracking the events (user-behavioral activity) of your website visitors without writing any code.
Here is a detailed video that guides you through the step-by-step procedure to integrate your Shopify store with CustomerLabs
You can also go through the simple steps below to integrate your Shopify/Shopify Plus store with CustomerLabs.
Using One-Click Checkout (India)?
If your store uses one-click checkout tools like Razorpay, Gokwik, Shiprocket, or Shopflo, please follow the docs below before onboarding to CustomerLabs.
These platforms often interrupt the standard user journey with a pre-filled pop-up on the checkout page. To ensure complete tracking, you must push bottom-funnel events to the data layer.
Once you’ve updated the Datalayer, CustomerLabs will be able to track the entire customer purchase journey through Google Tag Manager.
We’ve provided separate integration guides for platforms using one-click checkout patterns:
- Gokwik
- Shiprocket
- Breeze
- Shopflo
Section 1: Initial Setup
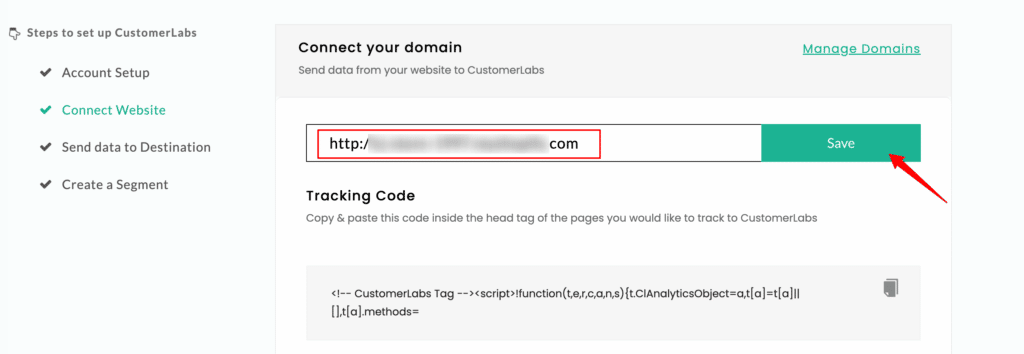
Step 1: Connect Your Domain
- 1. Log in to the CustomerLabs account
- . On the Home page → Under “Connect your domain” → Enter your website URL → Click Save.
(Note: Add additional domains and exclude misattributed referral domains using URL Management )
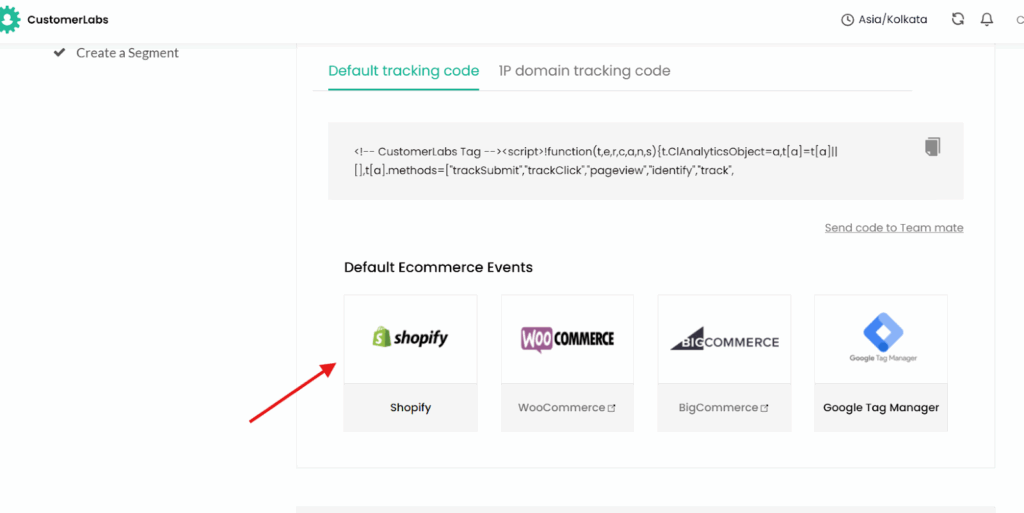
Step 2: Enable Shopify Integration
- Go to the Default Ecommerce Events section and click Shopify to open the integration setup.
Next, add your domain name by clicking the “Add Domain” button.
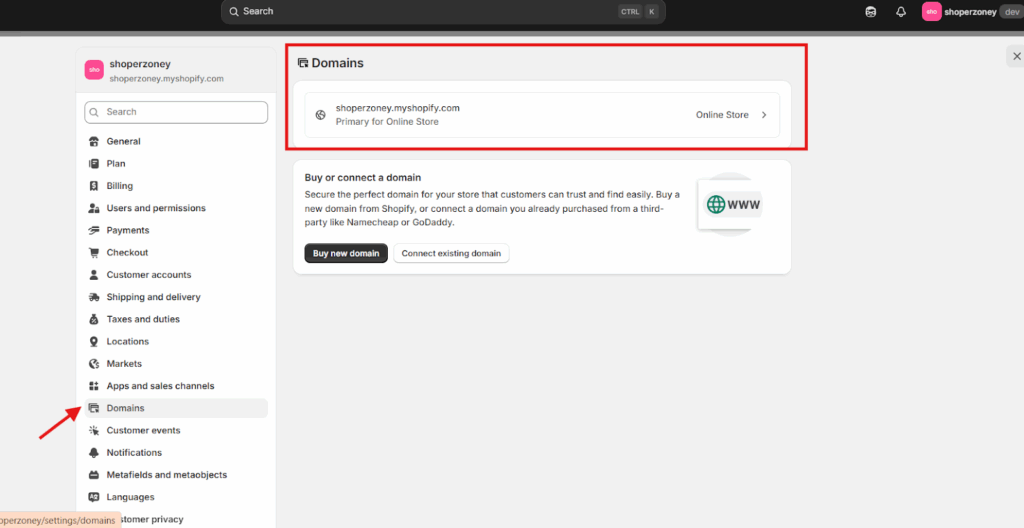
Open Shopify → Domain Settings, copy the domain name, and paste it into the setup.
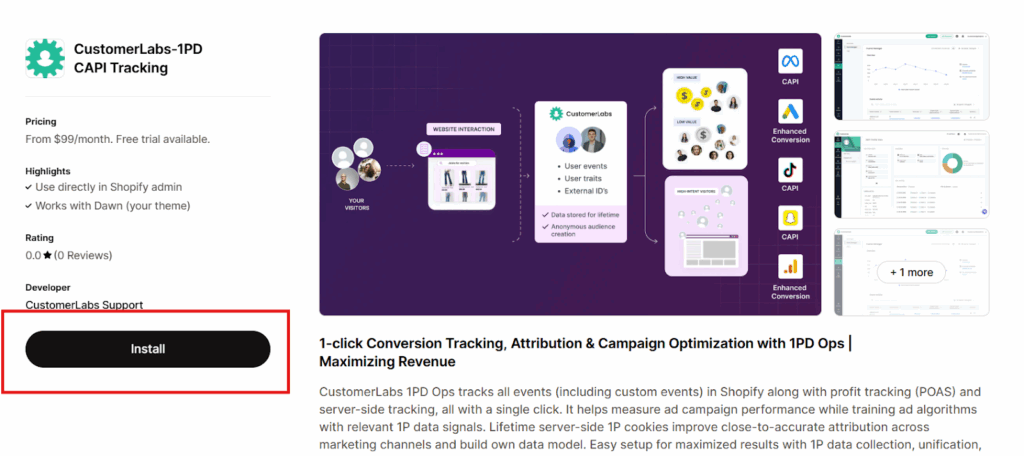
Now, we are installing CustomerLabs on your Shopify account. Open Shopify store
Now, click Install, and CustomerLabs will be added to your Shopify store
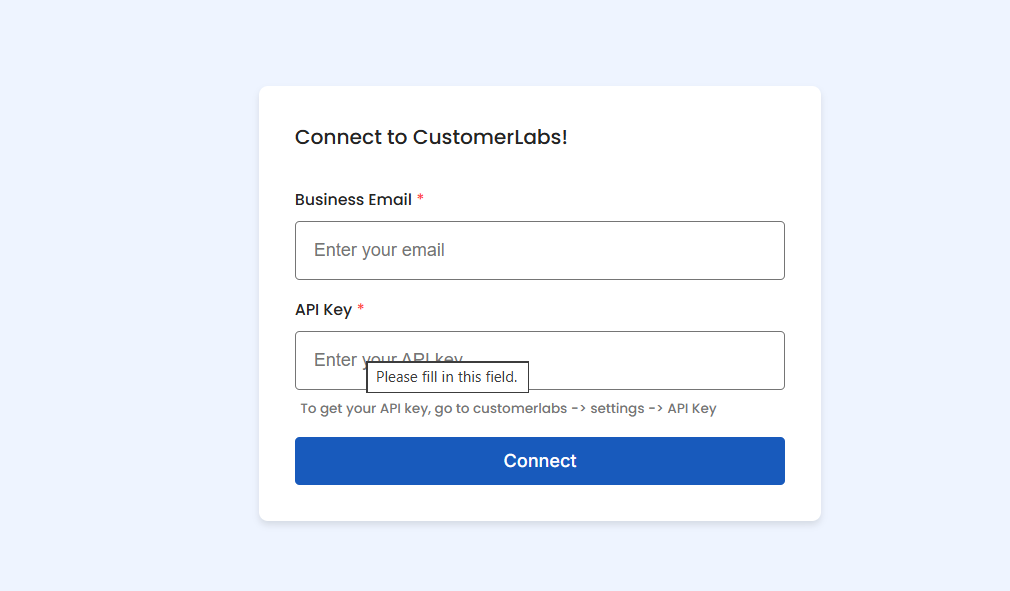
Step 3: Authenticate
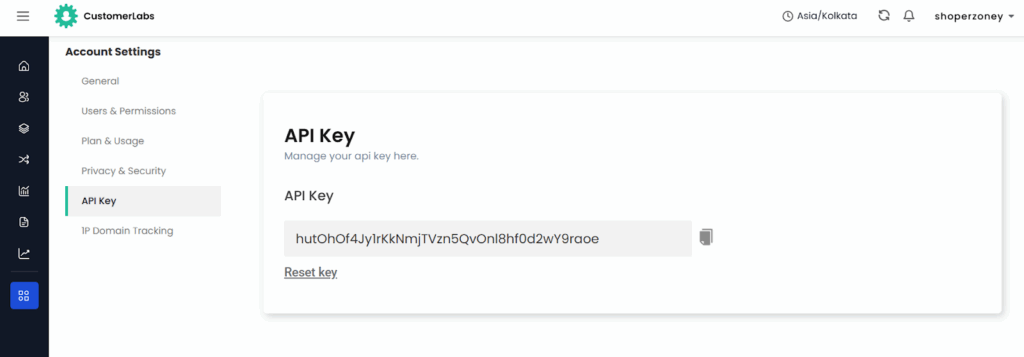
- Enter your CustomerLabs account email and API key
To get the API key, go to CustomerLabs → Account Settings → API Key, and copy it.
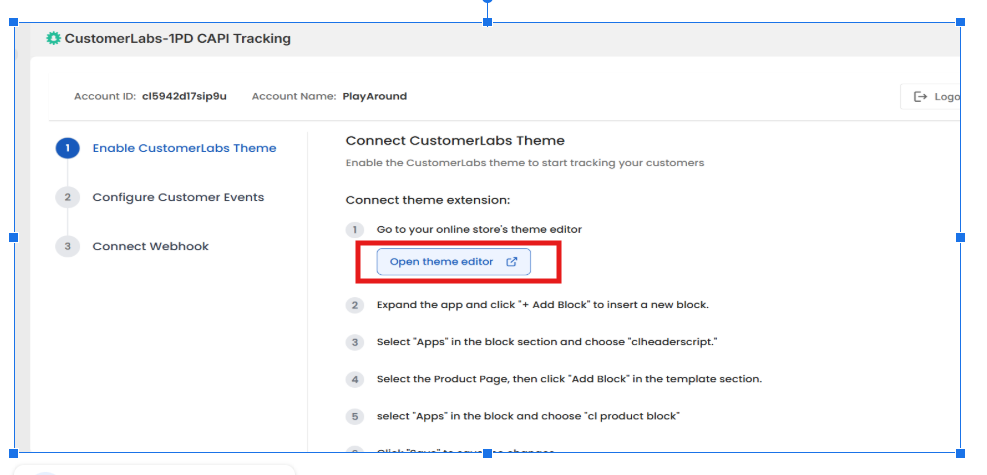
Step 4: Add Tracking Scripts to Theme
- Add the CustomerLabs tracking block through the Theme Customize:
- Open the Theme Editor and navigate to the Customize section.
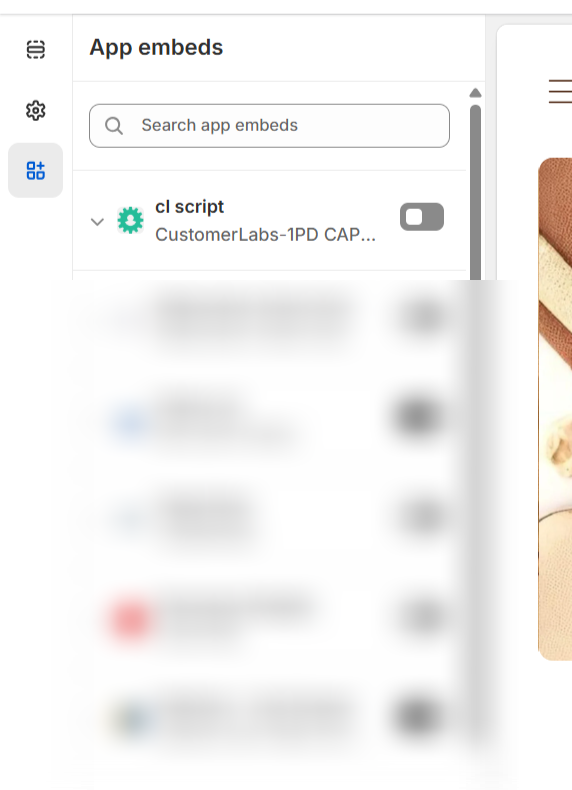
- Navigate to the App embeds and enable the toggle CL script
- Click Save to apply the changes.
Go to Apps > Embeds and turn on the “CL_script” toggle and save.
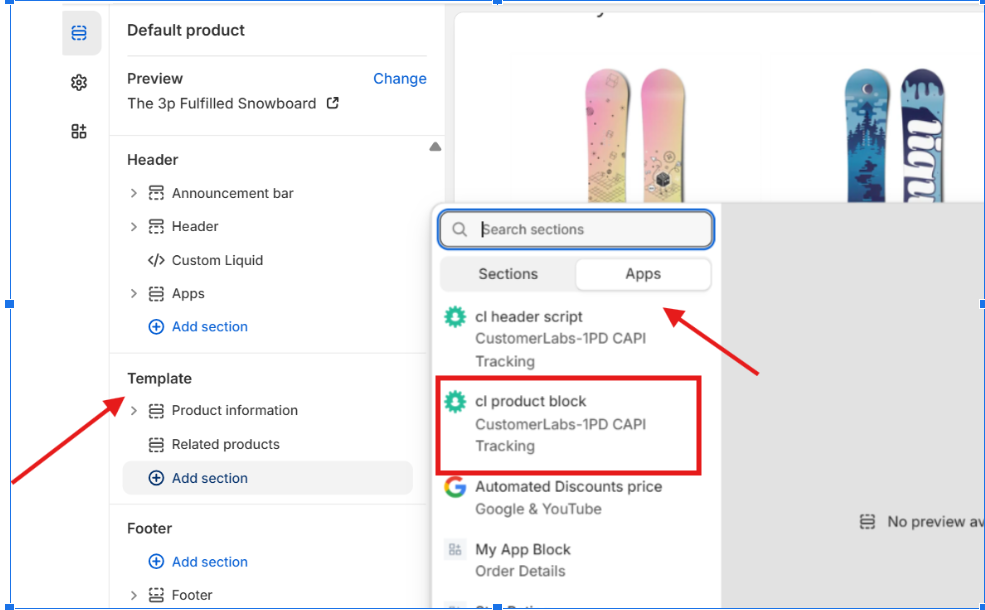
Step 5: Add Product Tracking Script
- Navigate to the Default Product Page in your Shopify website.
- Navigate to the Template section, click on Add Section.
- Go to the Apps tab, select CL Product Scripts and install
- Click Save to apply the changes.
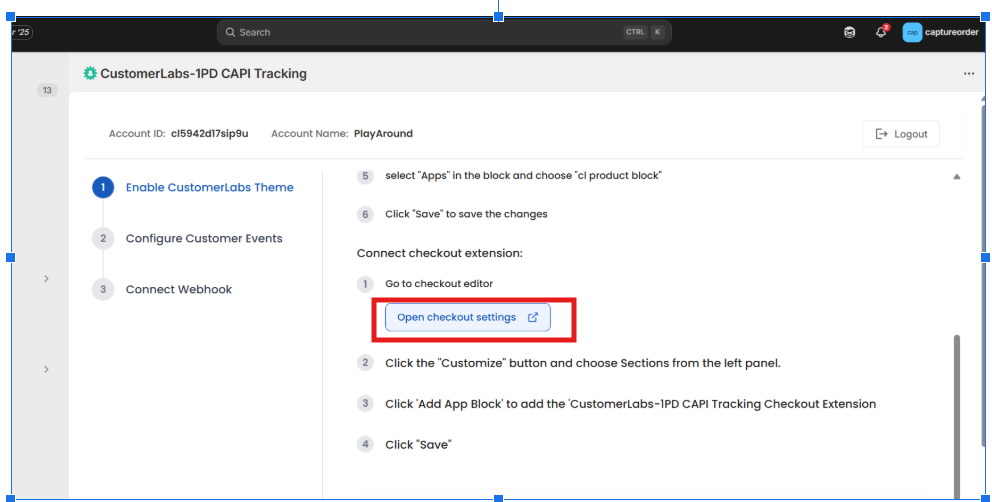
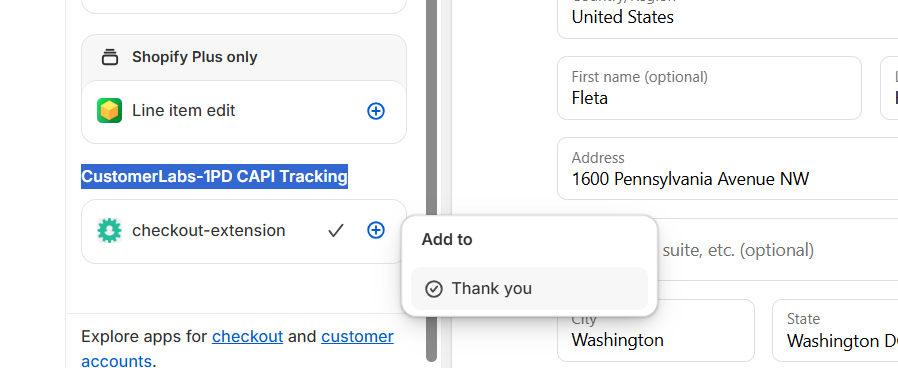
Step 6: Add Checkout Extension
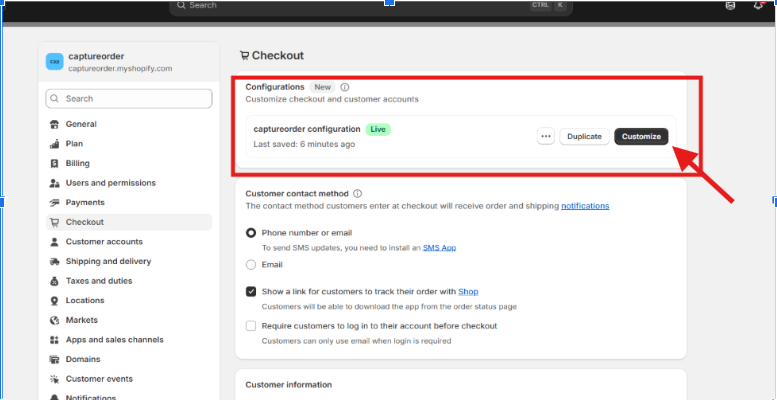
- Open the Checkout Editor in your Shopify settings.
- In the Checkout Settings panel, click Customize.
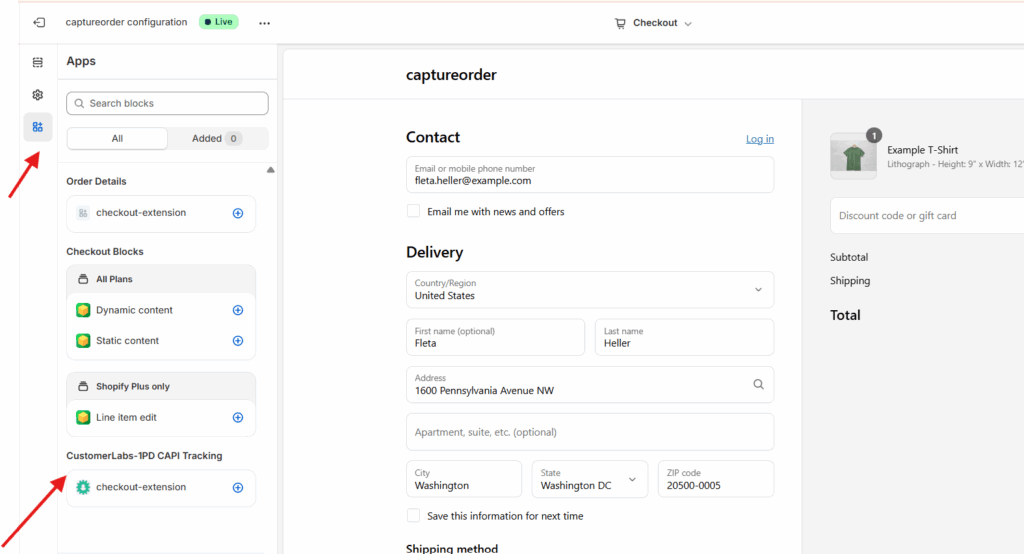
- From the left panel, scroll down to the Apps section (located below Settings).
- Click Add App Block and select CustomerLabs‑1PD CAPI Tracking – Checkout Extension.
- Click the + next to Thank You to add the extension.
- You’ll be redirected to the Thank You page. Click Save to complete the setup.
- Click Save to apply the changes.
Section 2: Customer Events Setup
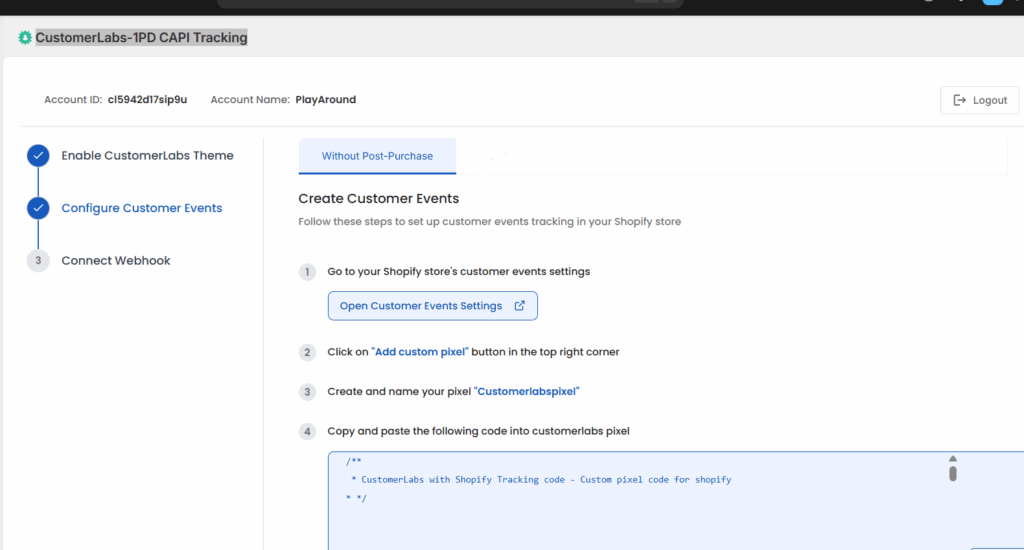
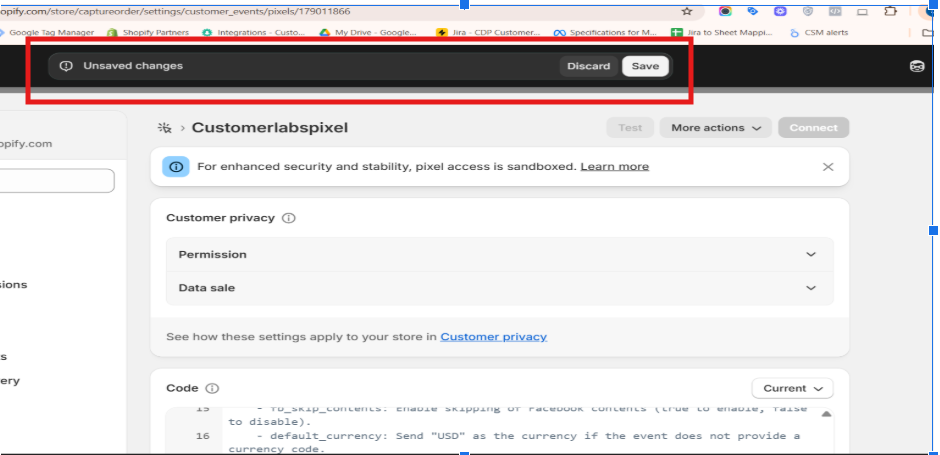
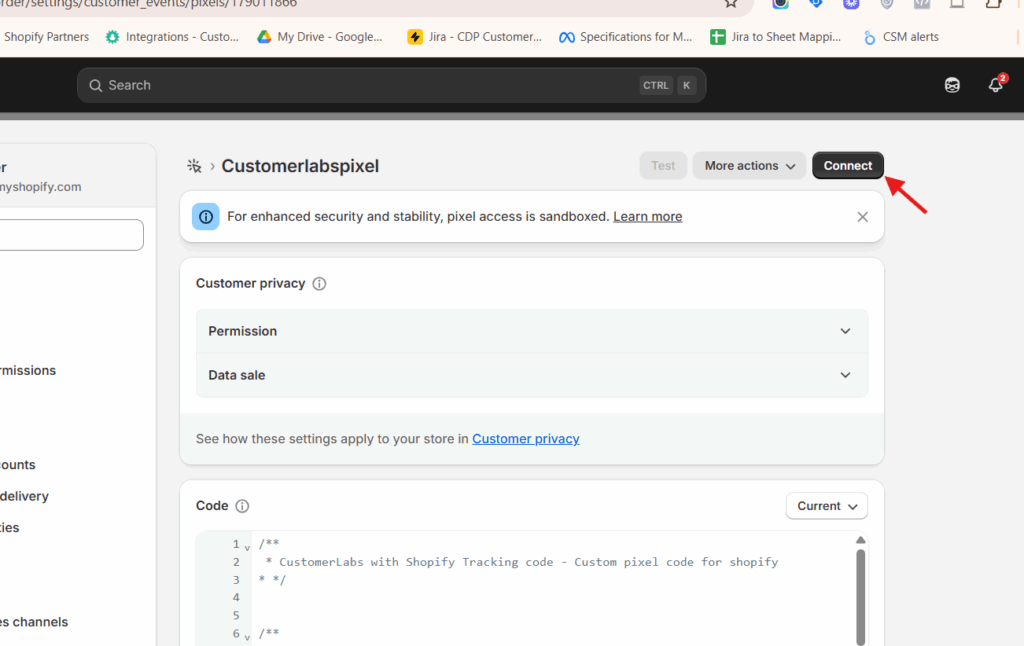
Step 1: Add Custom Pixel
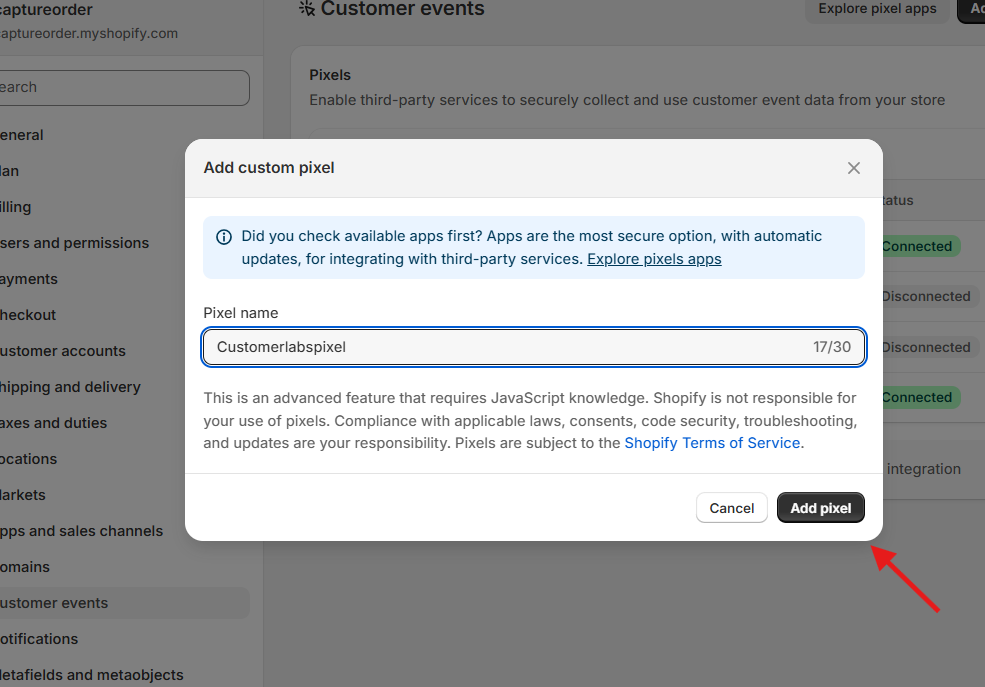
- Navigate to your Shopify Admin panel and open the Customer Events section.
- Click on Add Custom Pixel located in the top-right corner.
- Enter a name for your new pixel and name it “ CustomerLabsPixel”
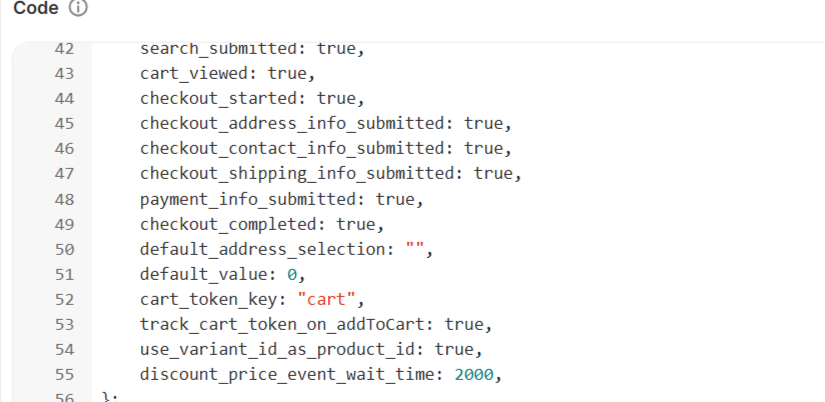
- Copy and paste the provided code snippet into the custom event script section
- Scroll to lines 53 & 54 in the code and update them as true
- track_cart_token_on_addToCart: true,
- use_variant_id_as_product_id: true,
- Click save & connect the pixel
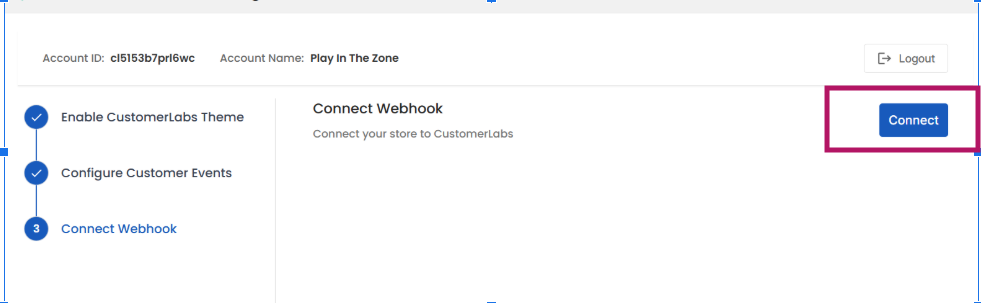
Section 3: Connect Webhook for Purchase Events
- Connect Your Store to CustomerLabs
- Click the Connect Button:
- After you click the “Connect” button to start the webhook setup, proceed to the next step.
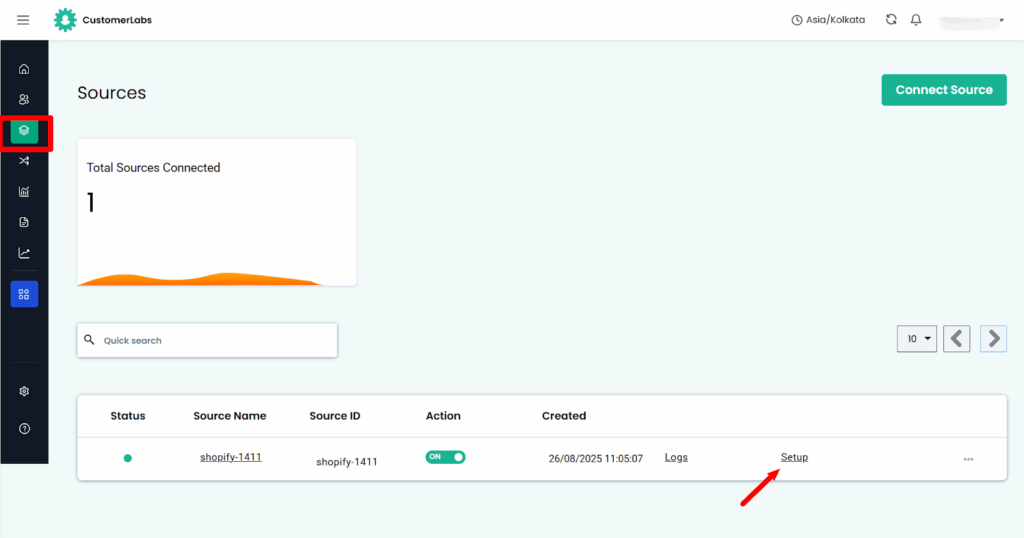
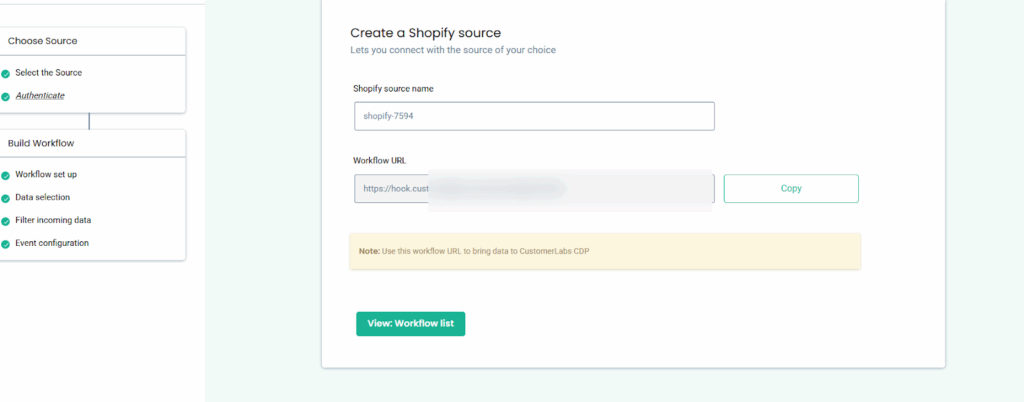
- Go to CustomerLabs and navigate to the Source section to see if the source has been created successfully, and then click the Setup button.
- Follow the on-screen instructions provided by CustomerLabs to complete the webhook setup.
- Bring in Purchase event data using Webhook
- Currently, for the Purchase event data to be tracked correctly, we also recommend that you bring the Purchase data from your Shopify store directly through Shopify Source (Webhook).
- The use of a webhook to bring in purchase event data helps overcome this challenge and ensures comprehensive tracking of all purchase events.
- With CustomerLabs, you can set up various workflows. In this example, we are creating a purchase order workflow
- Now, trigger a test purchase to check if you’re receiving the cart token in CustomerLabs.
- After triggering a test purchase, go to CustomerLabs → Sources → shopify_purchase → Setup → Next: Workflow set up. Learn more about workflow
- In the Workflow setup, it is mandatory to update the delay. Refer here
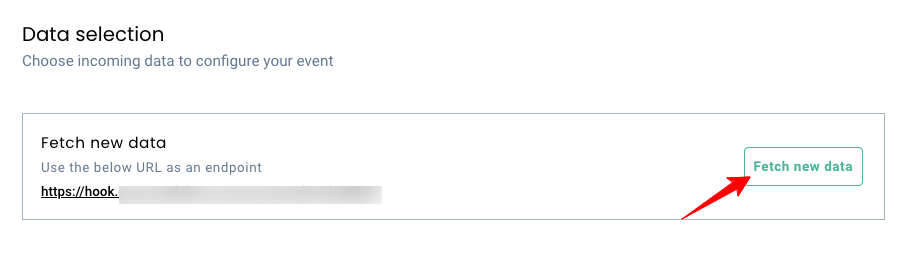
- Now, click on Fetch new data
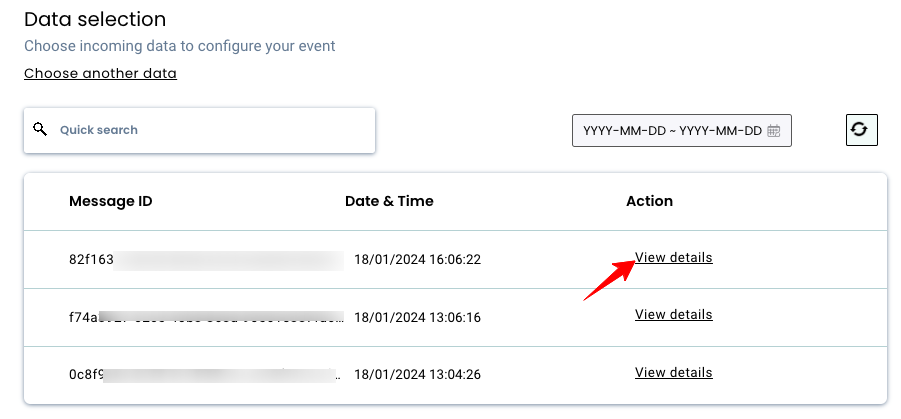
- Click on View details to view the incoming data and choose the relevant sample data.
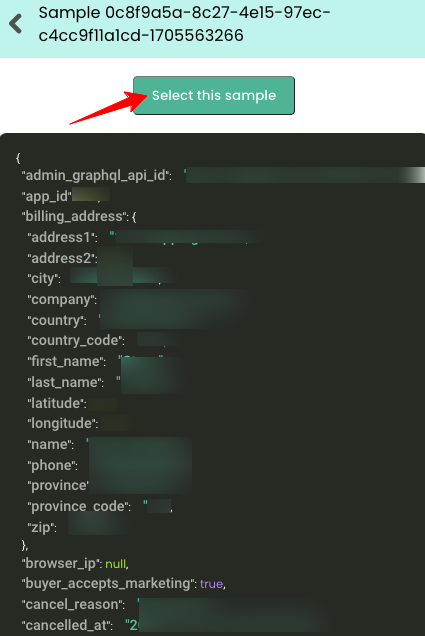
- . Note: In the sample data selection, check for the presence of cart_token or note_attributes_cart_token as shown in the image.If not, please contact [email protected].
13. Select this sample and skip to Completing the workflow setup for further steps.
Completing the workflow setup
1. Select the sample with the cart token.
Note: While selecting the sample, ensure the data contains no parameters with null values, as given in the image
The Customer Labs will not process parameters with null values. This is because null values are not considered valid data by the system. For example, if the parameter is “first_name”, you could pass the value “John Doe” or the empty string” “.
2. Filter incoming data – this step helps in filtering out irrelevant data and allows only the information you need to enter the workflow in the future. This is an optional step in the workflow.
For example, If you want the purchase data to be entered into the database that has an email address. You can the filter the data as shown below.
3. Event configuration: Give the event name as cl_purchase by selecting a custom event from the dropdown.
4. Identity mapping: Choose identify_by_email or identify_by_phone as the field to map the incoming email ID and phone number from Shopify.
Along with those identifiers,
- If you have cart token in Shopify, you must map the cart token note attribute in identity mapping
- If you don’t have cart token and have added custom scrip manually, then map the note attribute customerlabs_user_id under identity mapping as shown in the image below.
This mapping is crucial for unifying purchase data and serves as a unique identifier for a customer. Learn more about identity mapping.
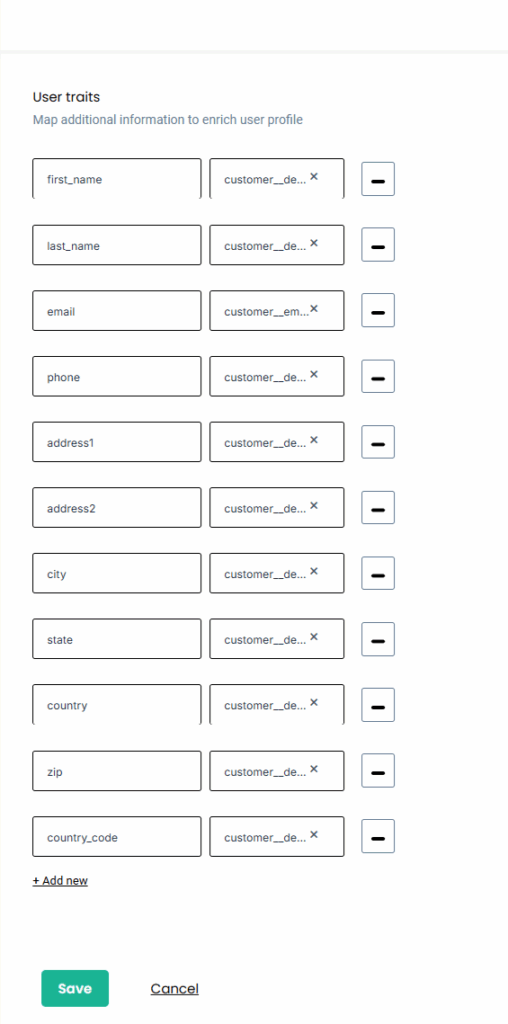
5. Map Attributes: Post-user identity mapping, you can map incoming attributes under one major field – User traits
User traits
User traits refer to specific characteristics or attributes associated with an individual user. The user traits include first name, last name, city, state, company, zip code & other similar information that can be added under User traits.
To send users’ attributes to the ads platforms, you must map them as user traits under event configuration. The more user details you share with platforms like Facebook, the higher the Event Match Quality will be.
Product details:
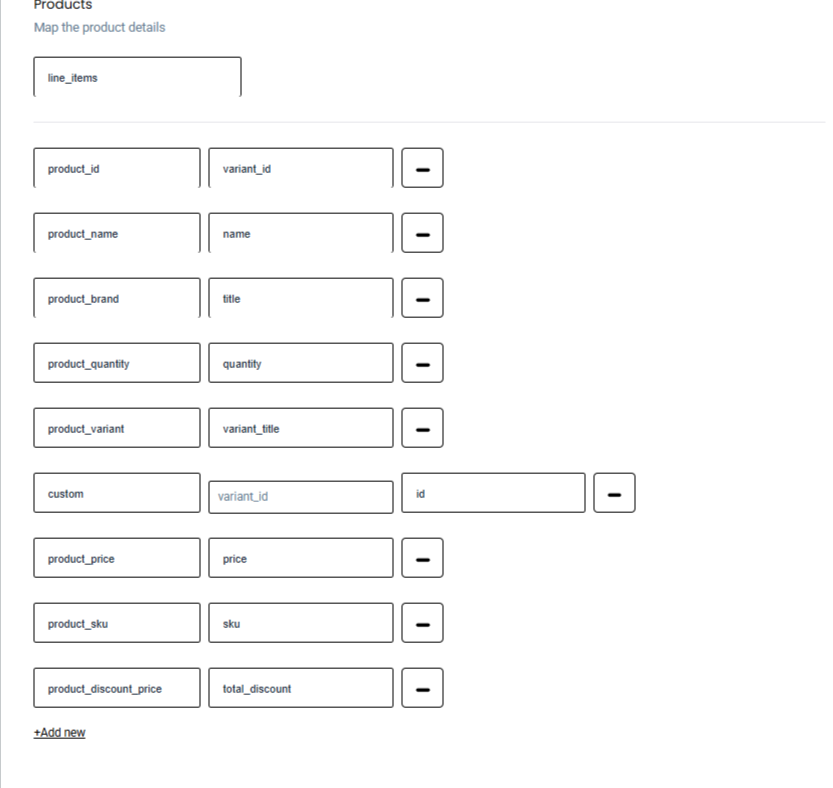
Product attributes can be added for events related to E-commerce/other business categories such as Product viewed, Product clicked, Purchases, etc. Details such as product sku, product ID, product variant, and product size can be added under product details and choose line_items from the dropdown.
Event Properties:
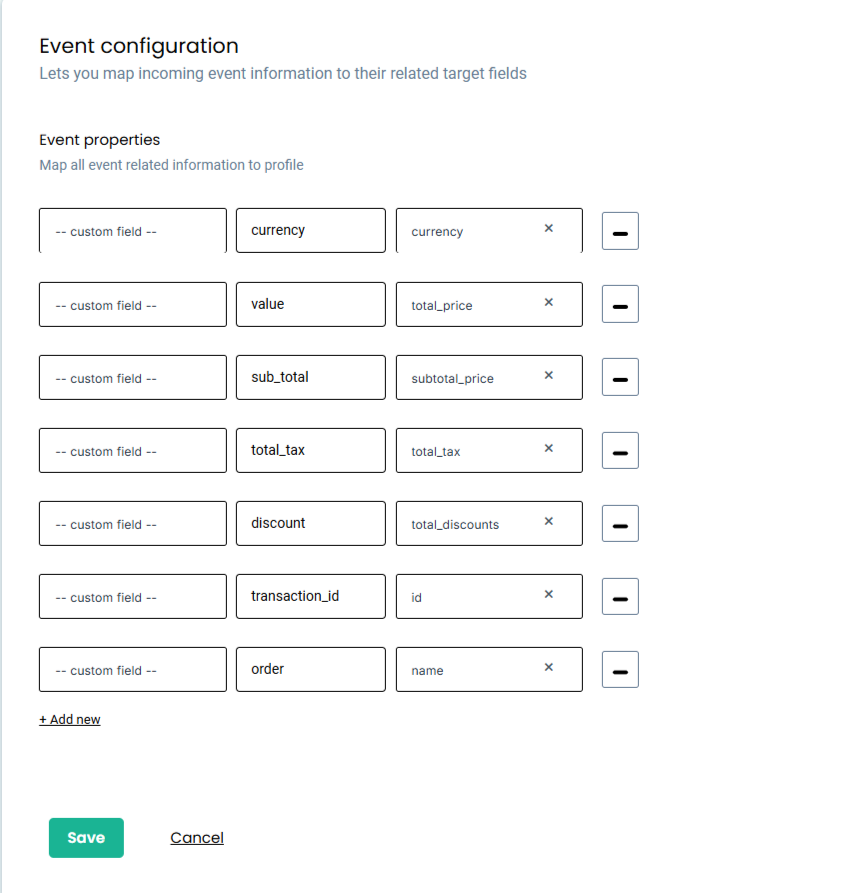
Additional information pertaining to the event can be added under event properties. The Mandate fields are: value, currency, transaction id and order id. The transaction ID can be mapped to transaction number or order id.
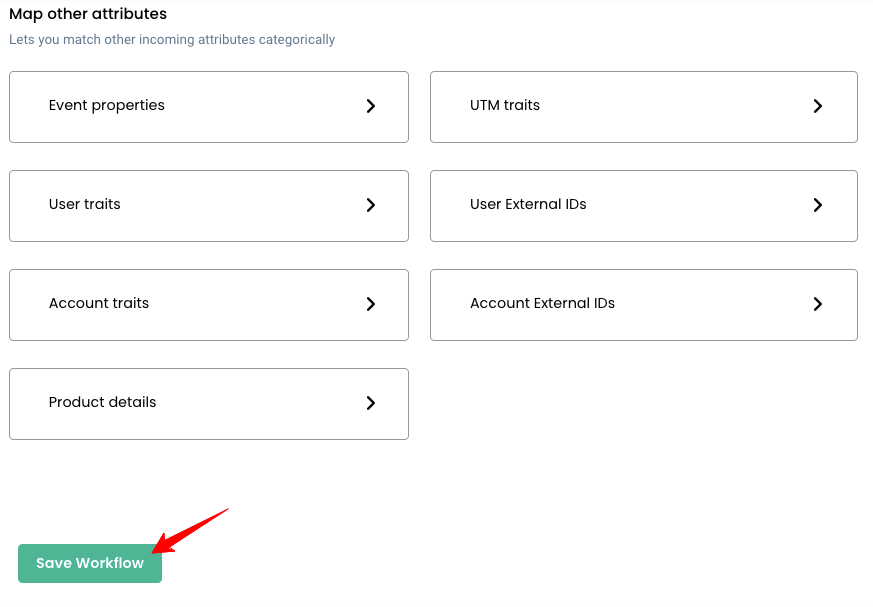
6. After completing the configuration as required, click on Save Workflow.
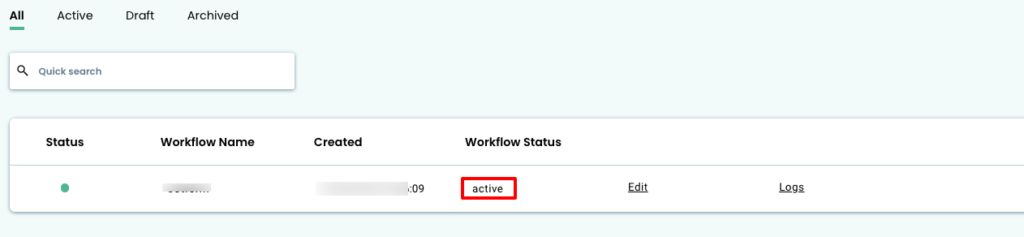
7. Verify if the workflow is active by navigating to the Sources > Click on shopify_purchase > Check the ‘Workflow Status’ column
Refer to the documentation to learn more about workflow and other attributes mapping.
You have now connected your Shopify store with CustomerLabs!
You will start receiving the events on the Events Manager page in CustomerLabs.
Section 1: Initial Setup
Step 1: Connect Your Domain
- 1. Log in to the CustomerLabs account
- . On the Home page → Under “Connect your domain” → Enter your website URL → Click Save.
(Note: Add additional domains and exclude misattributed referral domains using URL Management )
Step 2: Enable Shopify Integration
- Go to the Default Ecommerce Events section and click Shopify to open the integration setup.
Next, add your domain name by clicking the “Add Domain” button.
Open Shopify → Domain Settings, copy the domain name, and paste it into the setup.
Now, we are installing CustomerLabs on your Shopify account. Open Shopify store
Now, click Install, and CustomerLabs will be added to your Shopify store and open the App after installation
Step 3: AuthenticateEnter your CustomerLabs account email and API key
To get the API key, go to CustomerLabs → Account Settings → API Key, and copy it.
Step 4: Add Tracking Scripts to Theme
- Add the CustomerLabs tracking block through the Theme Customize:
- Open the Theme Editor and navigate to the Customize section.
- Navigate to the App embeds and enable the toggle CL script
- Click Save to apply the changes.
Go to Apps > Embeds and turn on the “CL_script” toggle and save.
Step 5: Add Product Tracking Script
- Navigate to the Default Product Page in your Shopify website.
- Navigate to the Template section, click on Add Section.
- Go to the Apps tab, select CL Product Scripts and install
- Click Save to apply the changes.

Step 6: Add Checkout Extension
- Open the Checkout Editor in your Shopify settings.
- In the Checkout Settings panel, click Customize.
- From the left panel, scroll down to the Apps section (located below Settings).
- Click Add App Block and select CustomerLabs‑1PD CAPI Tracking – Checkout Extension.
- Click the + next to Thank You to add the extension.
- You’ll be redirected to the Thank You page. Click Save to complete the setup.
Click Save to apply the changes.
Section 2: Customer Events Setup
Step 1: Add Custom Pixel
- Navigate to your Shopify Admin panel and open the Customer Events section.
- Click on Add Custom Pixel located in the top-right corner.
- Enter a name for your new pixel and name it “ CustomerLabsPixel”
- Copy and paste the provided code snippet into the custom event script section
- Scroll to lines 53 & 54 in the code and update them as true
- track_cart_token_on_addToCart: true,
- use_variant_id_as_product_id: true,
Click save & connect the pixel
Section 3: Connect Webhook for Purchase Events
- Connect Your Store to CustomerLabs
- Click the Connect Button:
- After you click the “Connect” button to start the webhook setup, proceed to the next step.

Go to CustomerLabs and navigate to the Source section to see if the source has been created successfully, and then click the Setup button.
- Follow the on-screen instructions provided by CustomerLabs to complete the webhook setup.
- Bring in Purchase event data using Webhook
- Currently, for the Purchase event data to be tracked correctly, we also recommend that you bring the Purchase data from your Shopify store directly through Shopify Source (Webhook).
- The use of a webhook to bring in purchase event data helps overcome this challenge and ensures comprehensive tracking of all purchase events.
- With CustomerLabs, you can set up various workflows. In this example, we are creating a purchase order workflow
- Now, trigger a test purchase to check if you’re receiving the cart token in CustomerLabs.
- After triggering a test purchase, go to CustomerLabs → Sources → shopify_purchase → Setup → Next: Workflow set up. Learn more about workflow
- In the Workflow setup, it is mandatory to update the delay. Refer here
- Now, click on Fetch new data
Click on View details to view the incoming data and choose the relevant sample data.
- Note: In the sample data selection, check for the presence of cart_token or note_attributes_cart_token as shown in the image.If not, please contact [email protected].

13. Select this sample and skip to Completing the workflow setup for further steps.
Completing the workflow setup
1. Select the sample with the cart token.
Note: While selecting the sample, ensure the data contains no parameters with null values, as given in the image
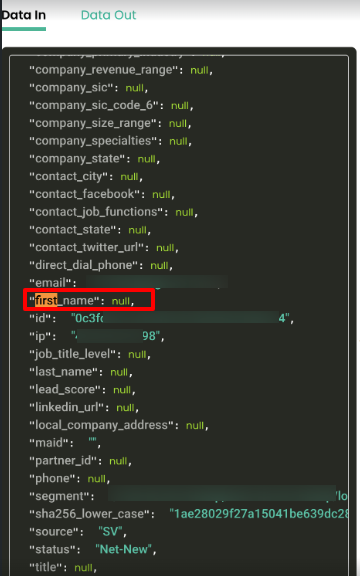
The Customer Labs will not process parameters with null values. This is because null values are not considered valid data by the system. For example, if the parameter is “first_name”, you could pass the value “John Doe” or the empty string “”.
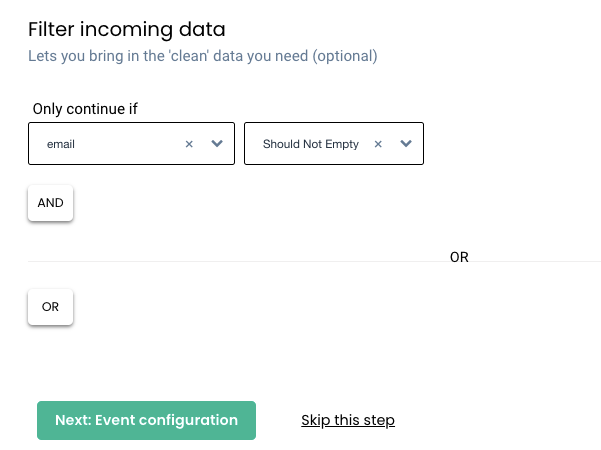
2. Filter incoming data – this step helps in filtering out irrelevant data and allows only the information you need to enter the workflow in the future. This is an optional step in the workflow.
For example, If you want the purchase data to be entered into the database that has an email address. You can filter the data as shown below.
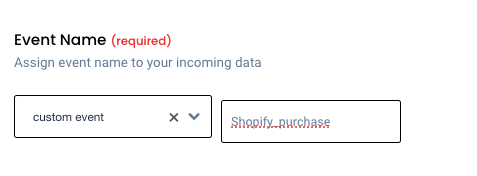
3. Event configuration: Give the event name as cl_purchase by selecting a custom event from the dropdown.
4. Identity mapping: Choose identify_by_email or identify_by_phone as the field to map the incoming email ID and phone number from Shopify.
Along with those identifiers,
- If you have cart token in Shopify, you must map the cart token note attribute in identity mapping

If you don’t have a cart token and then map the note attribute cart token under identity mapping as shown in the image below.
This mapping is crucial for unifying purchase data and serves as a unique identifier for a customer. Learn more about identity mapping.
5. Map Attributes: Post-user identity mapping, you can map incoming attributes under one major field – User traits
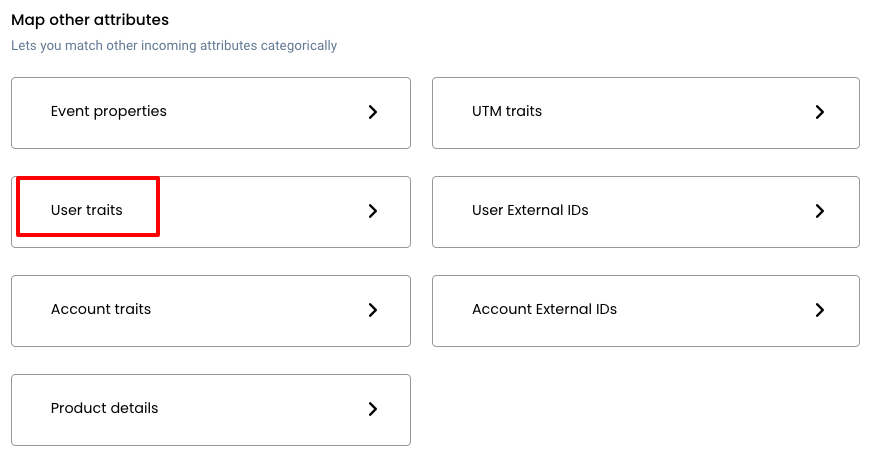
User traits
User traits refer to specific characteristics or attributes associated with an individual user. The user traits include first name, last name, city, state, company, zip code & other similar information that can be added under User traits.
To send users’ attributes to the ads platforms, you must map them as user traits under event configuration. The more user details you share with platforms like Facebook, the higher the Event Match Quality will be.
Product details:
Product attributes can be added for events related to E-commerce/other business categories such as Product viewed, Product clicked, Purchases, etc. Details such as product sku, product ID, product variant, and product size can be added under product details and choose line_items from the dropdown.
Event Properties:
Additional information pertaining to the event can be added under event properties. The Mandate fields are: value, currency, transaction id and order id. The transaction ID can be mapped to transaction number or order id.
6. After completing the configuration as required, click on Save Workflow.
7. Verify if the workflow is active by navigating to the Sources > Click on shopify_purchase > Check the ‘Workflow Status’ column
Refer to the documentation to learn more about workflow and other attributes mapping.
You have now connected your Shopify store with CustomerLabs!
You will start receiving the events on the Events Manager page in CustomerLabs.
Optimise Campaigns with custom events
Refer to the mentioned playbooks to optimise your campaigns based on custom events,
Further, optimisation based on a user trait such as gender, country and other attributes like payment option can also be done.Need assisstance? Seek help from [email protected]

