Customerlabs CDP Documentation
GoKwik is a popular one-click checkout platform that helps improve eCommerce conversions, but many users face challenges with event tracking and data accuracy on Meta. Customers often experience duplicated purchase counts and discrepancies in Meta Ads reporting due to duplicated pixel firing and browser limitations affecting client-side tracking.
By leveraging CustomerLabs’ first-party data (1PD) platform, businesses can implement server-side tracking via Meta’s Conversions API, overcoming GoKwik’s native tracking restrictions. This ensures more accurate event data, reduces data loss, and improves ad attribution and campaign optimization on Meta and Google Ads.
Prerequisites:
Before proceeding, ensure you have the necessary access, including administrative access to your website or Shopify store, a Google Tag Manager account, and credentials for CustomerLabs and GoKwik integrations.
Google Tag Manager (GTM) Setup
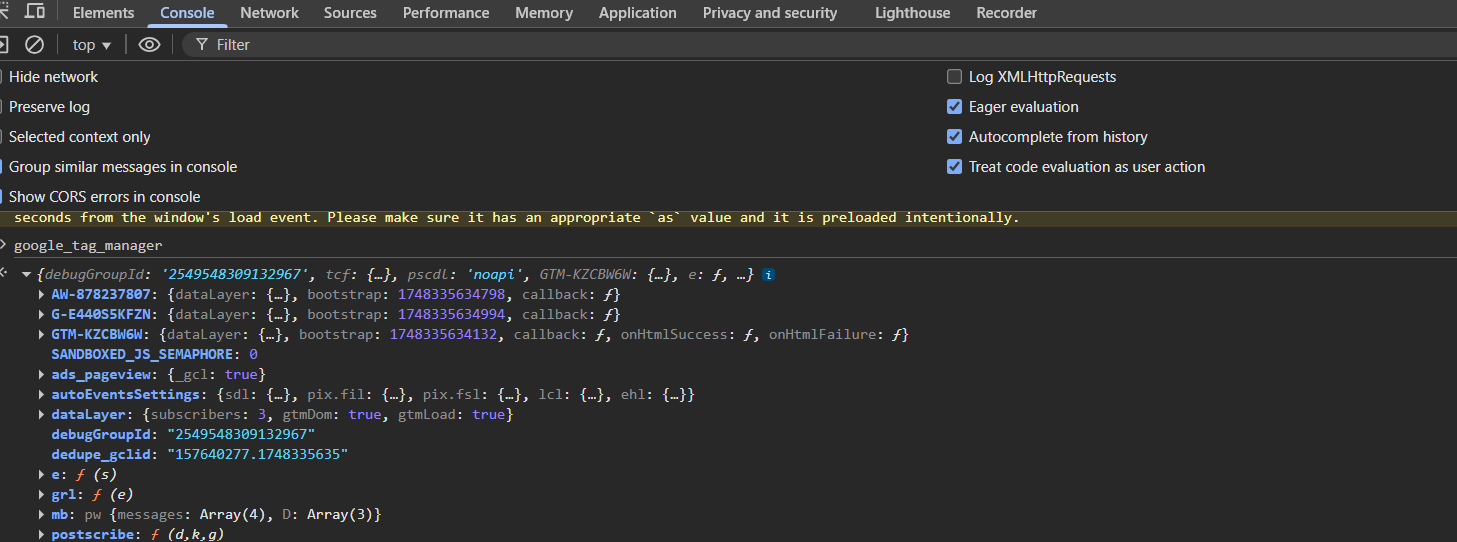
Step 1: Check if GTM is already present on your website
- Right-click on your website and click Inspect.
- Go to the Console tab and search for google_tag_manager.
- If GTM is installed, you’ll see the following pattern, GTM-XXXXXX in the console.
Step 2: If GTM is not present on your website
- Create a GTM account. (Refer to the attached document for GTM setup instructions.)
- Once your account is created, go to the Home page and click on your Container ID.
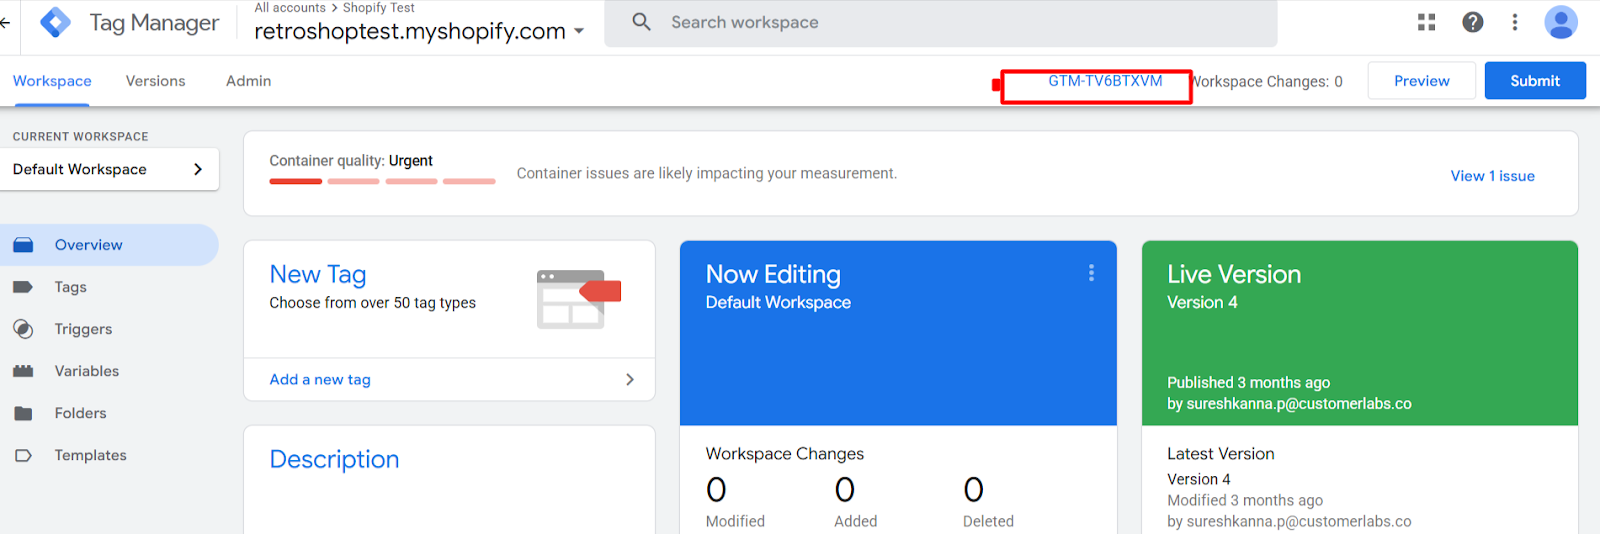
- A pop-up will appear showing the GTM installation code, and copy the first code snippet shown.
Step 3: Paste the GTM Code into Your Website
For general websites: Paste the copied code below the <head> tag.
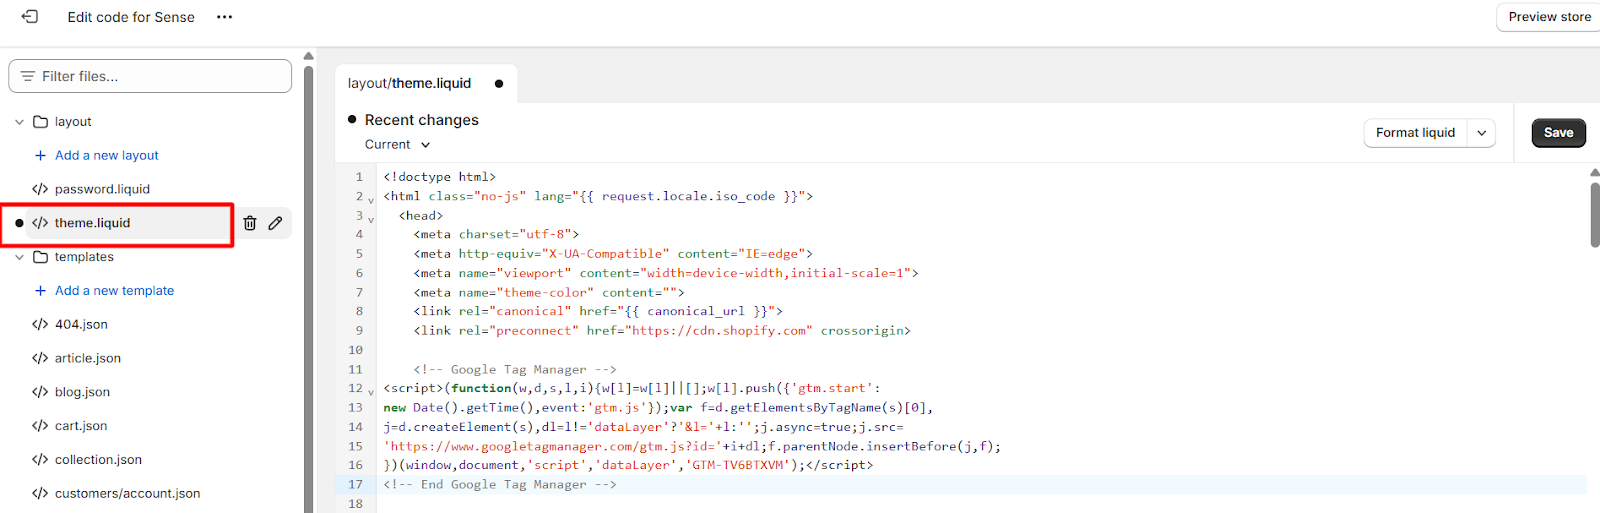
For Shopify:
- Go to Sales Channel > Online Store > Themes > Edit Code.
- Search for the <head> tag in the theme. liquid file.
- Paste the GTM code just below the <head> tag.
- Save your changes.
Step 4: Verify Installation
- Reload your website and check again in the Console (Inspect > Console > search google_tag_manager) to confirm that GTM is properly installed as mentioned in the docs above.
Step 5: Data Layer Enablement/Verification
- Go to GoKwik→ Kwik Checkout→ Settings → Integration → Turn on the toggle CustomerLabs
- Once the prerequisite setup is complete, perform a test flow on your website, from page view to purchase, using GoKwik.
- Right-click anywhere on your website and select Inspect.
- Go to the Console tab.
- Type dataLayer and press Enter.
- You should be able to see the list of events being pushed into the data layer
Step-6 Configuring the GoKwik events(Checkout):
6.1 Go to GoogleTagManger→Tags→New Tag.
6.2 Name the tag as “CL _initiate_checkout” and click on the tag configuration and
Choose custom HTML and paste the code which is given below:
<script>
    function productsConversion(productsArr) {
        var products = [];
        for (var i = 0; i < productsArr.length; i++) {
            var productsStructure = {};
            for (key in productsArr[i]) {
                switch (key) {
                    case "item_name":
                        productsStructure["product_name"] = {
                            t: "string",
                            v: productsArr[i][key],
                        };
                        break;
                    case "item_id":
                        productsStructure["product_id"] = {
                            t: "string",
                            v: (productsArr[i] || {})[key],
                        };
                        break;
                    case "price":
                        productsStructure["product_price"] = {
                            t: "number",
                            v: productsArr[i][key],
                        };
                        break;
                    case "category":
                        productsStructure["product_category"] = {
                            t: "string",
                            v: productsArr[i][key],
                        };
                        break;
                    case "quantity":
                        productsStructure["product_quantity"] = {
                            t: "number",
                            v: productsArr[i][key],
                        };
                        break;

                    case "variant":
                        productsStructure["product_variant"] = {
                            t: "string",
                            v: productsArr[i][key],
                        };
                        break;
                    case "brand":
                        productsStructure["product_brand"] = {
                            t: "number",
                            v: productsArr[i][key],
                        };
                        break;
                    default:
                        if (productsArr[i][key]) {
                            var isNum = /^\d+$/.test(productsArr[i][key]);
                            var type =
                                Number.isFinite(productsArr[i][key]) || isNum ?
                                "number" :
                                typeof productsArr[i][key];
                            productsStructure["product_" + key] = {
                                t: type,
                                v: productsArr[i][key],
                            };
                        }
                }
            }
            products.push(productsStructure);
        }
        return products;
    }


var data = window.google_tag_manager["GTMABCDEFGH"].dataLayer.get("eventData");
var productProps = data["ecommerce"] || {};
var properties = {};

if (productProps) {
    properties["customProperties"] = {
        "currency": {
            t: "string",
            v: productProps.currency,
        },
        "content_type": {
            t: "string",
            v: "product_group",
        },
        "coupon": {
            t: "string",
            v: productProps.coupon,
        },
        "total_discount": {
            t: "number",
            v: productProps.total_discount,
        },
        "value": {
            t: "number",
            v: productProps.value,
        },
    };
    properties["productProperties"] = productsConversion(productProps.items);
    _cl.trackClick("Checkout made", properties);
}

</script>
6.3: Note: Kindly update the your GTM container-ID in the above code
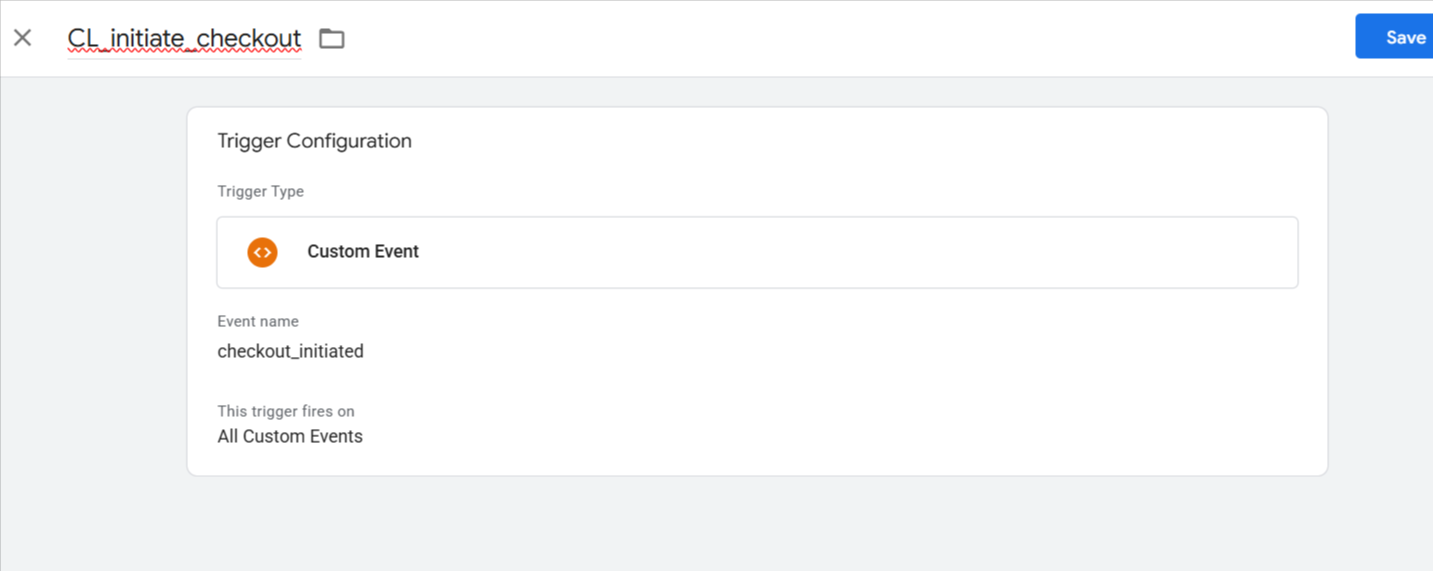
6.4 Add the trigger, click on the new button, choose the trigger type as custom event, name the trigger as cl_initiate_checkout, and the event name should be checkout_initiated, and save changes.
Step-7 Configuring the GoKwik events(Payment Screen):
7.1 Go to GoogleTagManger→Tags→New Tag.
7.2 Name the tag as “CL_payment_screent” and click on the tag configuration and
Choose custom HTML and paste the code which is given below:
< script >

    function clProductsConversion(productsData) {

        var products = [];

        for (var cli in productsData) {

            var product = productsData[cli];

            var newproduct = {};

            for (prodkey in product) {

                switch (prodkey) {

                    case "item_id":

                        newproduct["product_id"] = {

                            "t": "string",

                            "v": product[prodkey]

                        };

                        break;

                    case "item_name":

                        newproduct["product_name"] = {

                            "t": "string",

                            "v": product[prodkey]

                        };

                        break;

                    case "price":

                        newproduct["product_price"] = {

                            "t": "number",

                            "v": product[prodkey]

                        };

                        break;

                    case "item_brand":

                        newproduct["product_brand"] = {

                            "t": "string",

                            "v": product[prodkey]

                        };

                        break;

                    case "item_category":

                        newproduct["product_category"] = {

                            "t": "string",

                            "v": product[prodkey]

                        };

                        break;

                    case "quantity":

                        newproduct["product_qty"] = {

                            "t": "number",

                            "v": product[prodkey]

                        }

                    case "item_variant":

                        newproduct["product_variant"] = {

                            "t": "string",

                            "v": product[prodkey]

                        }

                    case "discount":

                        newproduct["coupon"] = {

                            "t": "string",

                            "v": product[prodkey]

                        }

                    default:

                        if (typeof product[prodkey] !== "object") {

                            newproduct["product_" + prodkey] = {

                                "t": "string",

                                "v": product[prodkey]

                            };

                        }

                        break;

                }

            }

            products.push(newproduct);

        }

        return products;

    };

var data = window.google_tag_manager["GTM-ABCDEFG"].dataLayer.get("eventData");

var productProps = data["ecommerce"] || {};

var properties = {};

properties["customProperties"] = {

    "currency": {

        "t": "string",

        "v": productProps.currency

    },

    "coupon": {

        "t": "string",

        "v": productProps.coupon

    },

    "total_discount": {

        "t": "number",

        "v": productProps.total_discount

    },

    "shipping_tier": {

        "t": "number",

        "v": productProps.shipping_tier

    },

    "content_type": {

        "t": "string",

        "v": "product_group"

    },

    "value": {

        "t": "string",

        "v": productProps.value

    }

}

properties["productProperties"] = clProductsConversion(productProps["items"] || []);

_cl.trackClick("AddPaymentInfo", properties);

</script>
7.3: Note: Kindly update your GTM container-ID in the above code
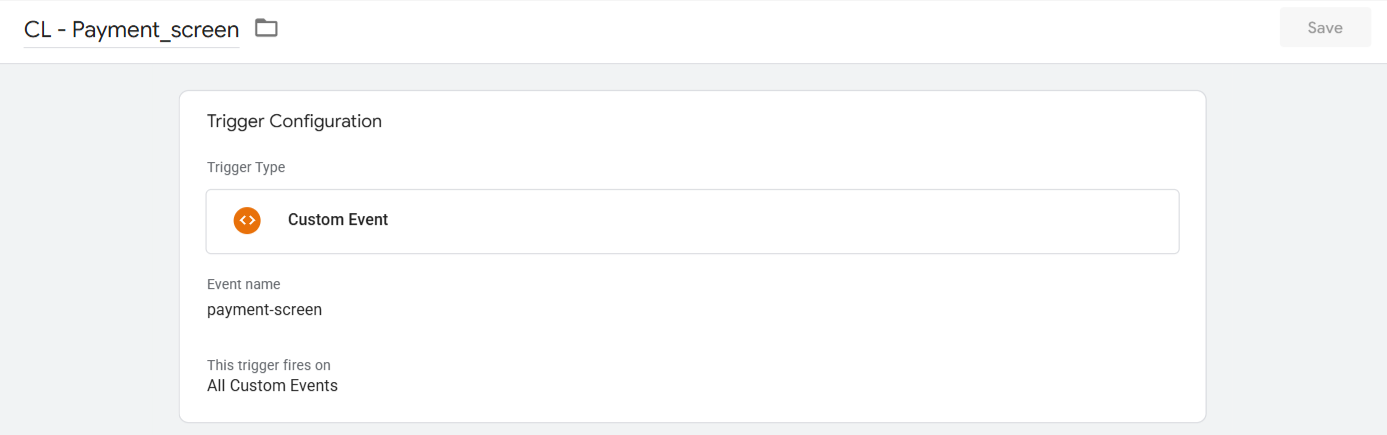
7.4 Add the trigger, click on the new button, choose the trigger type as custom event, name the trigger as cl_payment_screen, and the event name should be
payment-screen, and save changes.
Step-8 Configuring the GoKwik events(Purchased):
8.1 Go to GoogleTagManger→Tags→New Tag.
8.2 Name the tag as “CL_purchased” and click on the tag configuration and
Choose custom HTML and paste the code which is given below:
 <script>
 function clProductsConversion(productsData){
    var products = [];
    for(var cli in  productsData){
        var product = productsData[cli];
        var newproduct = {};
        for(prodkey in product){
            switch(prodkey){
                case "item_id":
                    newproduct["product_id"] = {
                        "t": "string",
                        "v": product[prodkey]
                    };
                    break;
                case "item_name":
                    newproduct["product_name"] = {
                        "t": "string",
                        "v": product[prodkey]
                    };
                    break;
                case "price":
                    newproduct["product_price"] = {
                        "t": "string",
                        "v": product[prodkey]
                    };
                    break;
                case "item_brand":
                    newproduct["product_brand"] = {
                        "t": "string",
                        "v": product[prodkey]
                    }
                    break;
                case "item_category":
                    newproduct["product_category"] = {
                        "t": "string",
                        "v": product[prodkey]
                    };
                    break;
                case "quantity":
                    newproduct["product_qty"]= {
                        "t": "string",
                        "v": product[prodkey]
                    };
                    break;
                case "item_variant":
                    newproduct["product_variant"] = {
                        "t": "string",
                        "v": product[prodkey]
                    };
                    break;
                case "discount":
                    newproduct["coupon"] = {
                        "t": "string",
                        "v": product[prodkey]
                    }
                    break;
               case "mrp_price":
                console.log("mrp_price", product[prodkey]);
                newproduct["mrp_price"] = {
                        "t": "string",
                        "v": product[prodkey]
                    }
                    break;
                default:
                    newproduct["product_" + prodkey] = {
                        "t": "string",
                        "v": product[prodkey]
                    }

                    break;
            }
        }
        products.push(newproduct);
    }
    return products;
};

var data = window.google_tag_manager["GTM-KRBTWPPG"].dataLayer.get("eventData");
var productProps = data["ecommerce"] || {};
var properties = {}
var transactionId = productProps.transaction_id || Math.floor(10000000 + Math.random() * 90000000);
    properties["customProperties"] = {
        "currency": {
            "t": "string",
            "v": productProps.currency
        },
        "content_type": {
            "t": "string",
            "v": "product_group"
        },
        "value": {
            "t": "string",
            "v": productProps.value
        },
        "coupon": {
            "t": "string",
            "v": productProps.coupon
        },
        "shipping_tier": {
            "t": "string",
            "v": productProps.shipping_tier
        },
        "payment_type": {
            "t": "string",
            "v": productProps.payment_type
        },
        "discount": {
            "t": "string",
            "v": productProps.discount
        },
        "tax": {
            "t": "string",
            "v": productProps.tax
        },
        "subtotal": {
            "t": "string",
            "v": productProps.subtotal
        },
        "shipping": {
            "t": "string",
            "v": productProps.shipping
        },
        "total_discount": {
            "t": "string",
            "v": productProps.total_discount
        },
        "transaction_id": {
            "t": "string",
            "v": transactionId
        },
        "transaction_number": {
            "t": "string",
            "v": transactionId
        }
    }
    properties["productProperties"] = clProductsConversion(productProps.items || [])
    _cl.trackClick("Purchased", properties)

</script>
8.3: Note: Kindly update your GTM container-ID in the above code
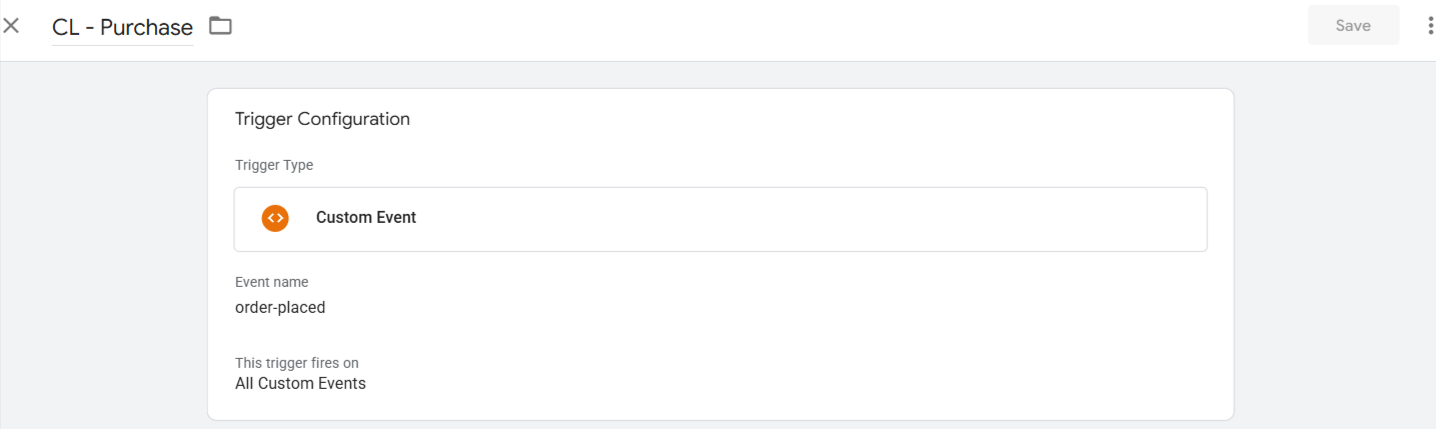
8.4 Add the trigger, click on the new button, choose the trigger type as custom event, name the trigger as cl_purchase, and the event name should be order-placed, and save changes.
Step 9: Configuring the CreateUser Event:
9.1 Go to GoogleTagManger→Tags→New Tag.
9.2 Name the tag as “CL_create_user” and click on the tag configuration and
Choose custom HTML and paste the code which is given below:
8.3: Note: Kindly update your GTM container-ID in the above code
<script>

var obj = window.google_tag_manager["GTM-ABCDEFG"].dataLayer.get("eventData") || {};
var email = obj["email"];
var phone = obj["phone_num"];

var userProperties = {
    "customProperties": {
        "user_traits": {
            "t": "Object",
            "v": {
                "firstname": {
                    "t": "string",
                    "v": obj["first_name"]
                },
                "lastname": {
                    "t": "string",
                    "v": obj["last_name"]
                },
                "email": {
                    "t": "string",
                    "v": email
                },
                "phone": {
                    "t": "string",
                    "v": phone
                },
                "city": {
                    "t": "string",
                    "v": obj["city"]
                },
                "state": {
                    "t": "string",
                    "v": obj["state"],
                },
                "country": {
                    "t": "string",
                    "v": obj["country"],
                },
                "zip": {
                    "t": "string",
                    "v": obj["pincode"],
                },
            }
        }
    },

};
if (email && email != null && email != "") {
    userProperties["customProperties"]["identify_by_email"] = {
        "t": "string",
        "v": email,
        "ib": true
    }
    if (phone && phone != null && phone != "") {
        userProperties["customProperties"]["external_ids"] = {
            "t": "Object",
            "v": {
                "identify_by_phone": {
                    "t": "string",
                    "v": phone
                }
            }
        }
    }
} else if (phone && phone != null && phone != "") {
    userProperties["customProperties"]["identify_by_phone"] = {
        "t": "string",
        "v": phone,
        "ib": true
    }
}
if (phone || email) {
    _cl.identify(userProperties);
}
</script>
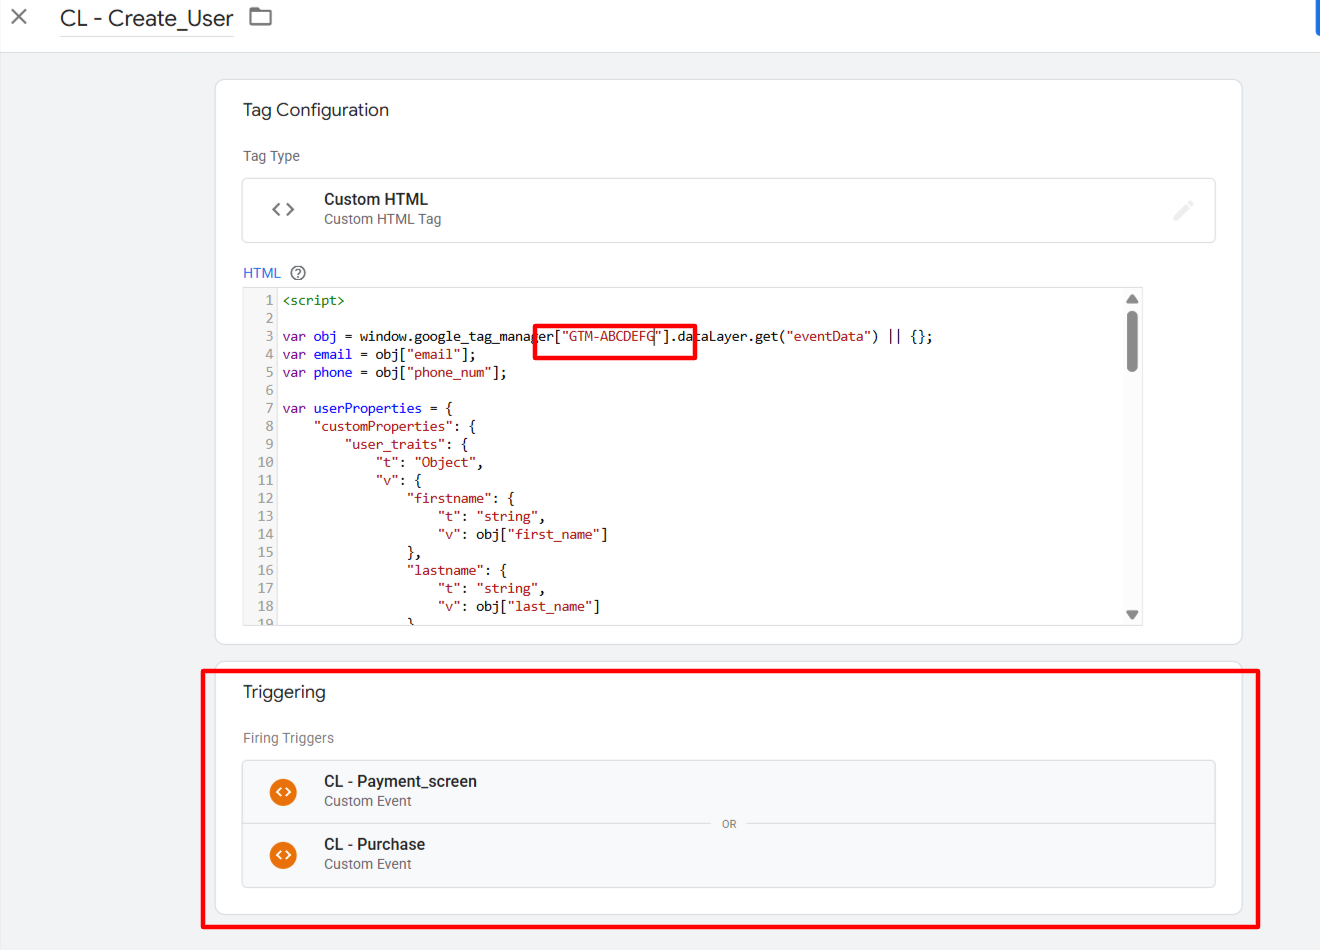
8.4 Click on the “New” button to add a trigger.
Select the triggers cl_purchase and cl_payment_screen (which were created earlier), as shown in the screenshot below. Once selected, save the changes.
Step 10: Publish the Code:
- Once the code has been placed in the respective tags, make sure to publish the changes in Google Tag Manager to activate the setup on your website.
Step 11: GTM Trigger Audit:
- After publishing the code, click on the Preview button in Google Tag Manager and perform actions on the website — from page view to purchase.
- This will open GTM in preview mode, where you’ll be able to verify whether the configured tags (like cl_purchase, cl_payment_screen, etc.) are being triggered correctly during user actions on the website.
Step 12: Events Audit:
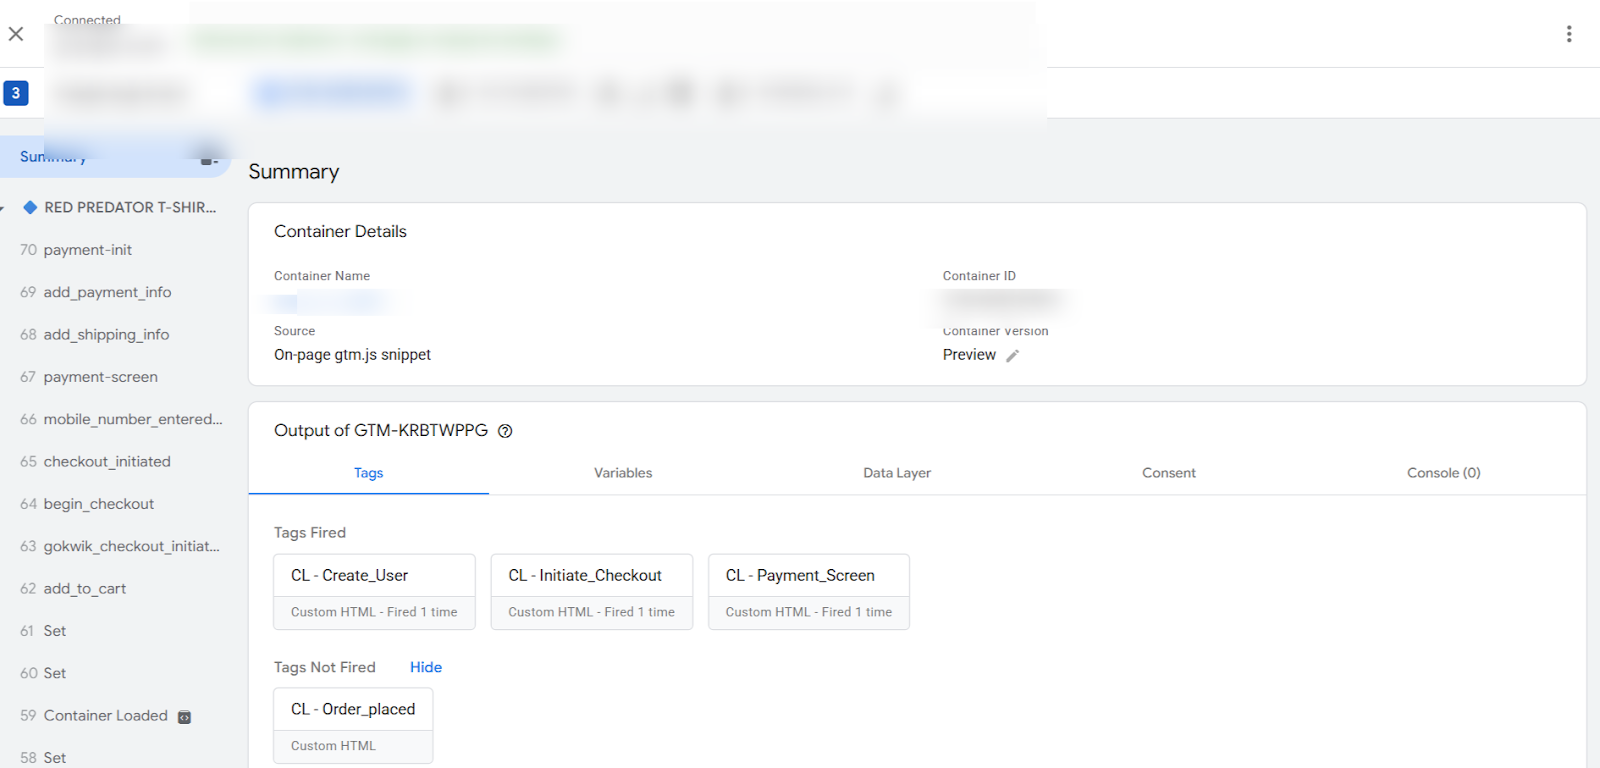
- Once the code has been published and tested in Preview mode, and you start receiving the purchase events, you will be able to see them in CustomerLabs.
- To check the events: Go to CustomerLabs → Monitoring → Event Manager

Here, you can verify if the purchase and other configured events are being successfully received.


