Customerlabs CDP Documentation
The Swipe pages tool is used to build your landing pages and forms in the landing pages.
Integration Requirement
- Admin access to Swipe pages
- Access to CustomerLabs account.
Step 1 :
Log in to the swipe pages account and click on the “Landing Pages”

Step 2 :
Once you reach the landing pages, edit the pages as shown below.

Step 3 :
Click on the page so this will take you to the edit page where you will find the form as shown below.

Step 4 :
Select the right section on which your form is added and attach the test section for your reference.

Step 5 :
Click on the “add a form field”

Step 6 : Now click on the “Create a new field” form the menu.

Step 7 :
On the create contact property name the field as “cluid” and choose the field type as “hidden”

Step 8 :
After adding the field “click save”, the contact property will be created, then again click on add more fields as shown below.

Step 9 :
If you click on the “add a form field” an already created custom field will be available in the menu as shown below.

Now add the “cluid” to the form field and the field will be added as hidden to the form and publish the form to the live environment, then follow the below steps to add the “cluid” to the URL query
CustomerLabs Workflow Integration
To complete the integration with CustomerLabs, follow the given steps:
Customerlabs—–>Destination —-> Custom Integration
1. Go to CustomerLabs.
2. Navigate to destination.
3. Select Custom Integration

Step 3: Custom Integration
Name the configuration “Swipe Pages” and update the below script
in the script field as shown below, and save the integration.
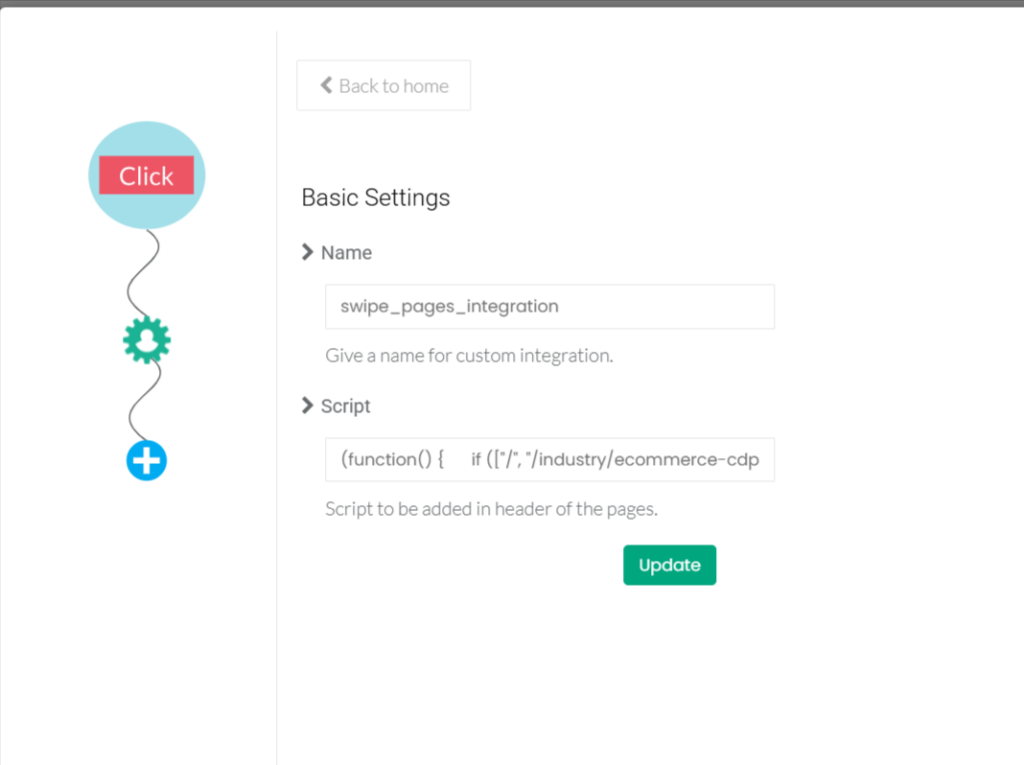
Script:
(function() {
if ([“/”, “/industry/ecommerce”].includes(window.location.pathname) && window.location.host == “customerlabs.com”) {
var cluid = window.CLabsgbVar.generalProps.uid;
var queryParams = new URLSearchParams(window.location.search);
if (!queryParams.has(‘cluid’)) {
queryParams.append(‘cluid’, cluid);
window.location.search = queryParams.toString();
}
}
})()
Note:
Replace “/industry/ecommerce” with the pathname of your form for tracking purposes.
To find your form’s pathname, use the browser’s developer tools:
1. Right-click and choose the inspect element option from your browser
2. Go to the console.
3. Enter `window.location.pathname`.

Replace ”customerlabs.com” with the hostname of your form.
To find your form’s hostname, use the browser’s developer tools:
1. Right-click and choose the inspect element option from your browser
2. Go to the console.
3. Enter `window.location.hostname`.

Step 4: Configuration Verification:
After performing the configuration part, try filling out the form and you can able to observe that the CustomerLabs id is being captured in the source logs as well as in the swipe pages dashboard page.

Now you have successfully captured the lead event from the front end. Followed by this Integration Connect your swipe pages with CustomerLabs on Custom Source – How to set up a custom Source
How to set a custom source in CustomerLabs
What is a Source in CustomerLabs 1PD Ops?
When a platform is connected as a Source, you will be able to bring all the event data from that particular platform through webhooks to CustomerLabs 1PD Ops. This will enable you to enrich existing user profiles and create a unified view of the customer in one place.
Currently, CustomerLabs 1PD Ops supports integrations with server-side and cloud app sources. View platforms that you can connect with CustomerLabs 1PD Ops here.
Getting Started
Sources are currently accessible to all users of the platform. See how you can access Sources from your CustomerLabs 1PD Ops home screen below,

The Sources dashboard gives a complete overview of the number of sources connected, their status, and the ability to access their setup.

To connect a new source, Click on Connect Source on the top right corner. This will open up the list of sources that CustomerLabs 1PD Ops currently offers.
Step 5: Select your source

Once the platform integration is complete, you can now create workflows to bring specific customer data into CustomerLabs 1PD Ops.
What is a Workflow?
A Workflow helps you to turn the raw data you receive from the source into specific event data based on the workflow configuration which includes filtering and modifying the parameters. You can create multiple workflows inside a Source. A workflow is a one-time setup that constantly receives customer data & updates user profiles in CustomerLabs 1PD Ops in real-time.
Once a Source platform is authenticated, users can build workflows without writing a single line of code.
How to build a Workflow?
The four-step process to build a workflow is as follows,
Step 6: Setup the workflow
Name your workflow
This helps you quickly select relevant workflows – just for internal purposes.
Example: If you want to receive the data of users whose stage is changed to “Lead” in your CRM through this workflow, you can name this workflow “lead_updated” or “lead_created”.
Workflow Delay
Workflow delay is recommended when you have multiple workflows in a source.
The data coming into the source will be sent across the workflows at the same time if the workflow delay is not given. This may result in concurrency issues.
For example, Whenever a user enters from the source, CustomerLabs checks if the user is already available in the database or assigns a unique user id to the user. Say, you have 4 workflows for the source and when the data is sent across all the workflows at the same time, 4 new user ids will be created for the same user if the user is not there in the database. Hence, setting up the delay time will make sure the new user is assigned a single unique ID.

Step 7: Choose sample data
To receive event samples, trigger an event in that particular Source. For example, if you’re setting up a workflow to receive contact information as and when it gets updated in your CRM. Update a test contact in your CRM to receive event information in CustomerLabs 1PD Ops.

You will be able to update up to 5 samples at once. Fetching sample data in a few source platforms might take time. In that case, please wait for some time before you try again.
You can view the incoming sample data and select the sample that suits your use case.
You can view the incoming sample data and select the sample that suits your use case.

Note: While selecting the sample, ensure the data contains no parameters with null values as given in the image and check if the cluid is passed in the source log
The Customer Labs will not process parameters with null values. This is because null values are not considered valid data by the destination. If the sample data consists of any field with a null value, it will not be pushed to the destination.
We suggest passing all the required parameters with a value or an empty string.
For example, if the parameter is “first_name”, you could pass the value “John Doe” or the empty string
” “. Only if you pass all the required parameters with a value or an empty string, we can process the data and send them to the integrated destinations successfully.
Step 8: Event Configuration
Event configuration is the workflow setup’s final and most important step.

8.1. Event name
Assign the event name by selecting from the drop-down as shown below and choosing the custom event and name it cl_leads or cl_ registration


8.2 User Identity Mapping
As previously mentioned, we are capturing the “cluid” using a hidden field. This “cluid” serves as an identifier that helps in the unification of both browser and server-side events and mapping the “cluid” as an identifier is an important step in integration

You can choose upto 3 different identifiers including external IDs to map user information. These external IDs will be stored by CustomerLabs 1PD Ops to create an enriched user profile.
User traits: All user/contact/individual-related information can be added under user traits and a screenshot example is given below


To send the user traits to the destination, you must map the user details under this section. This mapping process will allow you to send this valuable user information to the intended destination.
For example, if you’ve set up a workflow to receive all contact updates from your CRM to CustomerLabs 1PD Ops. Information such as Contact first & last name, phone, email, address, company, lifecycle stage, job title etc. can be added under user traits. One such scenario would be when you want to run an email campaign with Klaviyo, you should add email ID as a user trait in this section to pass this information to Klaviyo or any such destinations in this case.
Source Logs
Source Logs show a list of events received by the source webhook before being sent to the workflows for event processing. There may be a delay in displaying the events items of up to 10 minutes, which is currently optimized.
You can see the logs by clicking on “Logs” from a particular source as shown below.

Every single message received by CustomerLabs 1PD Ops will have a unique message id and we’ll be logging them so you can see how it is being processed in various workflows before appearing in the event manager.
Source ‘Data in’ log
The below image shows the log data of the message received from that particular source and data variables in JSON format.

Source ‘Data out’ log
The below image shows the log data of the message processed and sent to respective workflows along with a new message id.

Workflow Logs
Individual workflows will also have their own logs, and you can use them to see how the event is transformed including user traits, event attributes, group(account) traits, external ids, group(account) identities, and other attributes.

Few tips on workflow status messages in ‘Data out’
You’ll see the following messages in the workflows and the reasons are listed below.
a) Mapping not found – When a workflow is in draft mode, the message as “Mapping not found” is thrown.
b) Filter condition failed – When a workflow filter condition is failed, this message is thrown.
c) User ID missing or Account ID is missing – We assume every event should have User identity or account identity fields. When the data is missing we’ll throw an error and the event won’t be processed further.
d) Data not found – This message means the data is still being processed, sometimes when there are a lot of requests the systems will take up to 10 minutes to process the data.
Destination
Send incoming data to third-party apps to boost marketing effectiveness. Learn more about the destination tools we support.


