Customerlabs CDP Documentation
Wishlist Tracking
Track customer wishlists to send customized coupons/offers across channels to boost conversions. See how you can set up wishlist tracking in Action Recorder by following the steps below.
1.Login to your CustomerLabs account
2. Launch Action Recorder by clicking the icon
3. You will be redirected to your website and Action Recorder panel will open up
4. You can move the panel up or down by clicking the icon
5. Click on “Record Action” to start recording
6. Select “Added to Wishlist” for Action Name or create a custom name if you wish

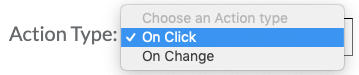
7. Change the Action Type to “On click”
8. Now click on to go to your website to select the wishlist button
9. After selection, you will be redirected back to the Action Recorder panel. Select both “Pick a common selector” and “Map attributes to User Profile” and click “Add details”
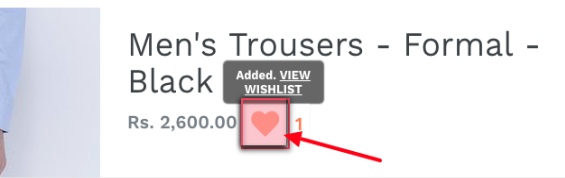
10. The “User_Id” attribute value can be the name of your product. Click on the to select the product name (Men’s Trousers – Formal – black in this case) from your website. But select “Event attributes” before doing so

11. Click “Save”
12. Repeat steps 10 and 11 to add multiple product attributes (Product variant, Size, Quantity, price and more) but this time all these information should be captured by selecting the “User Traits”

13. You can skip the next step by clicking on “Next | Tracking rule”
14. Select “All pages” to track wishlist events for all pages and click “Save” and “Save Action”

15. You’re all set!
16. If you’re still facing facing issues, get in touch with our team by clicking on the chat icon on the lower right corner. We will set up all your events for free 🙂


