Without Code or developer assistance, we can set our own add-to-cart tracking.
This saves us a lot of time, gets rid of code complexity, and stops relying on the developer to get this job done.
Because setting up add to cart setup is now easy like a user manual to set your cupboard. Just click, copy, paste, toggle on, drag, and select that’s it.
In this step-by-step guide, we’ll learn how to track WooCommerce Add to Cart events accurately in both Google and Meta without GTM or custom code. We’ll walk through the exact setup, verification steps, and data is clean, reliable, and actually useful for ad optimization.
What is the right way to track the WooCommerce add-to-cart event
To stay ahead of the game, WooCommerce marketers have to adapt to the advanced tools that help collect data effectively, play around with it, and sync with Google Ads without any signal loss.
One of the advanced tools that helps track all the events, including the add to cart event, effectively is the CustomerLabs WooCommerce conversion tracking plugin. It also feeds Google Ads with the right audience signals. It also feeds Google Ads with the right audience signals. It offers a robust conversion tracking feature that powers your Google Ad campaigns with the right audience signals.
Note: CustomerLabs WooCommerce conversion tracking plugin also helps you track events on any website built on WordPress.
Read the blog 5 best plugins to set up conversion tracking for your WooCommerce store – their features, pros, and cons to find the right plugin..!
How to track Add to cart event using the WooCommerce Conversion Tracking plugin by CustomerLabs
CustomerLabs WooCommerce Conversion Tracking plugin offers direct integration with Google & Meta Ads for your WooCommerce store through a server-side connection. It automatically by default tracks the following events:
-
Add to cart
-
Remove from cart
-
Product viewed
-
Category viewed
-
Purchased
-
Checkout made
Additionally, you can track any custom event with the help of the CustomerLabs no-code event tracker without a developer’s help.
Sometimes, when you have an iframe for the payment gateway, you are unable to track the purchase event for your WooCommerce store. In that scenario, to track the purchases made, people generally track the WooCommerce thank-you page. The CustomerLabs plugin will make it easy to track the WooCommerce thank you page without any additional effort.
Here’s a step-by-step setup to track WooCommerce add to cart
Integrate CustomerLabs with WooCommerce to track visitor events along with key parameters and unify customer profiles. This unified data can then be synced across your martech stack, helping you improve attribution, targeting, and overall marketing effectiveness.
Integrate Customerlabs and WooCommerce
-
Follow these steps to start tracking events from your WooCommerce server:
-
Sign up or log in to your CustomerLabs account.
-
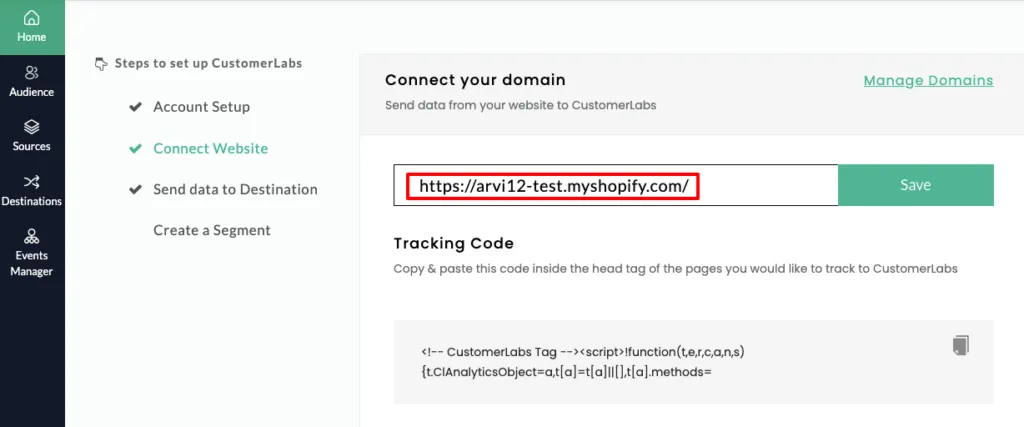
On the Home page, under Connect Website, enter your website URL and click Save.
-
Once the setup is successful, log in to your WooCommerce (WordPress) dashboard.
-
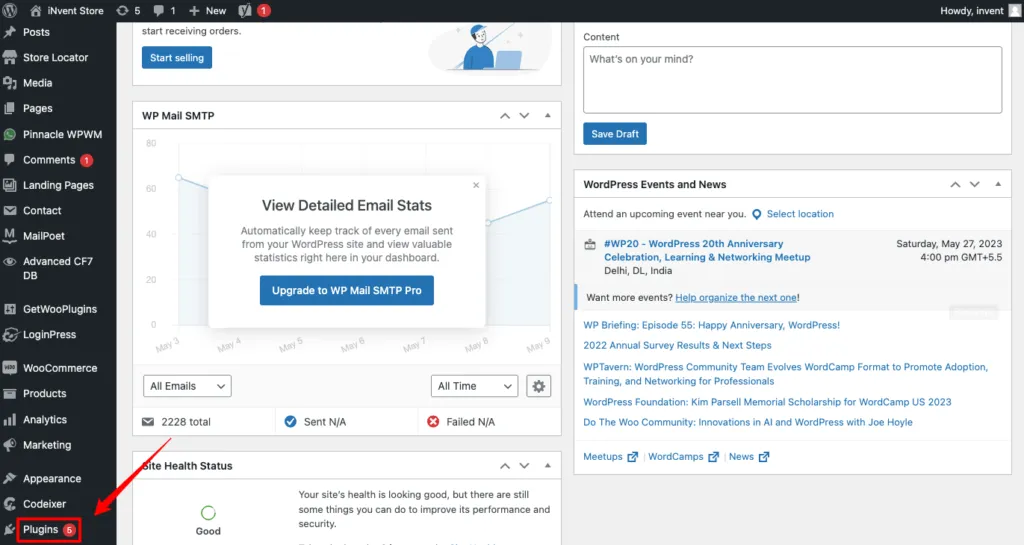
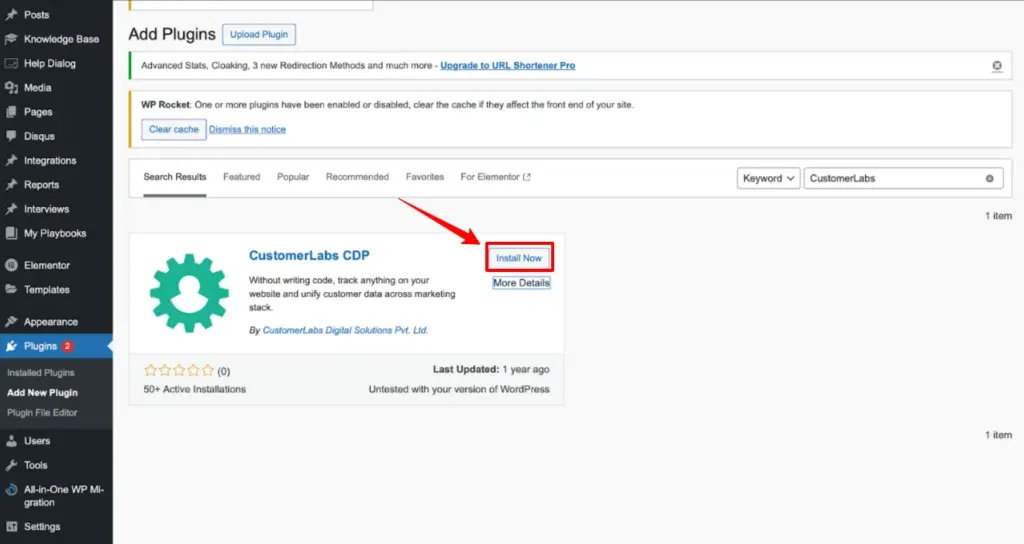
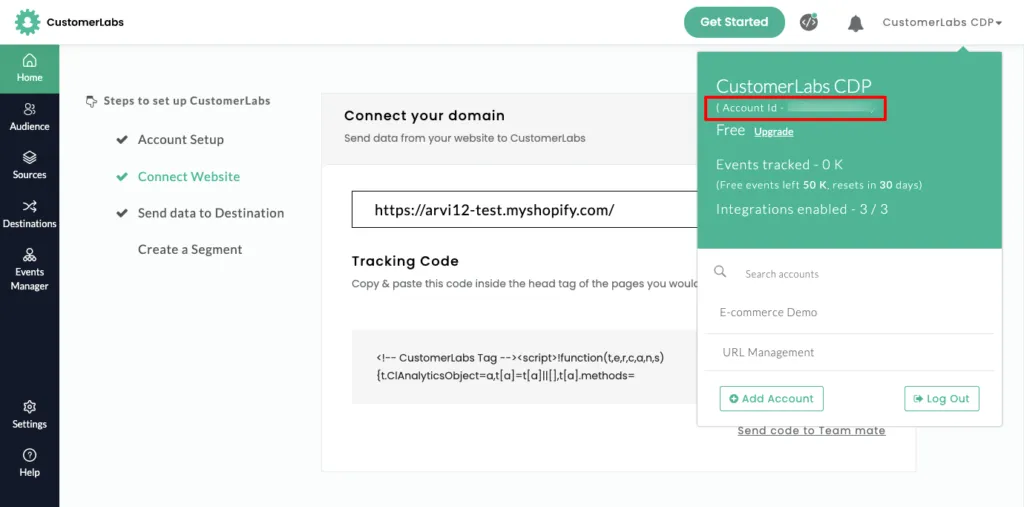
From the left panel, click Plugins - Add New, then search for CustomerLabs
- Click Install now
- Open the CustomerLabs App and copy the “Account ID” as shown in the image below.
For the complete WooCommerce + Customerlabs setup, check out our official document along with the Facebook configuration and WooCommerce conversion tracking in Google Ads. Now, moving forward, let’s get into the core section of the blog, the WooCommerce add to cart tracking that is integrated with CustomerLabs.
Integrate Customerlabs and add to cart tracking
Add-to-cart tracking helps understand exactly how shoppers interact with store before they buy. It allows you to retarget visitors who showed purchase intent but didn’t convert, using more relevant and personalized messaging. It also gives clear insights to optimize website and remove friction points that stop users from completing a purchase.
-
To set up add-to-cart tracking, follow these simple steps:
-
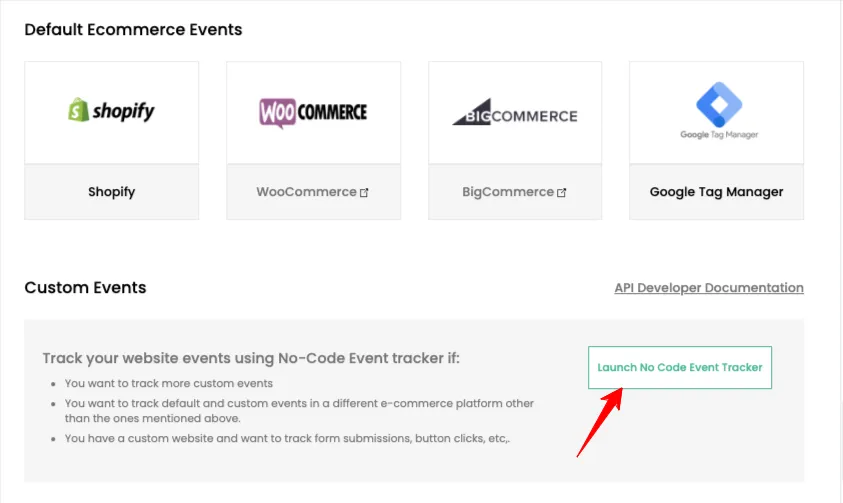
Log in to your CustomerLabs account.
-
From the Home page, open the No-Code Event Tracker to start tracking add-to-cart events without any developer support.
-
You’ll be redirected to your website, where the No-Code Event Tracker panel will automatically open.
-
Click Record Action to begin capturing the event.
-
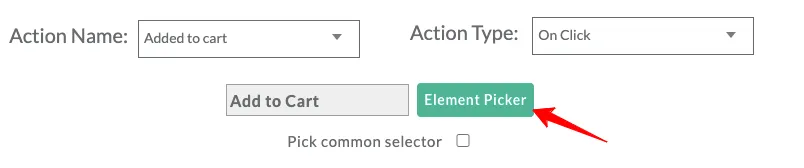
From the Action Name dropdown, select Added to Cart (or create a custom name if needed), and set the Action Type to On Click.

- Next, click on the Element Picker, which will take you back to your website. Once there, simply select the Add to Cart button you want to track.

-
Once you select the Add to Cart button, you’ll be taken back to the No-Code Event Tracker panel.
-
Check the Pick a common selector option and click Add details.
(Want to understand how this works? Learn more about Pick a common selector.)
![]()
-
From the dropdown, choose the attributes you want to track, such as product_name, currency, product_price, and more.
-
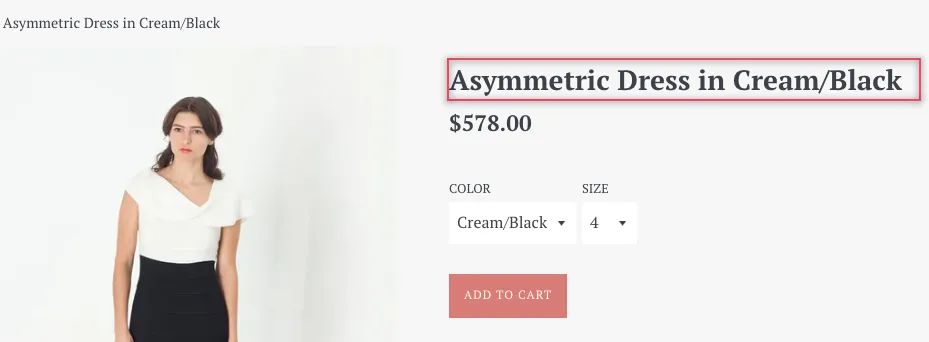
For example, select product_name, then click the Element Picker and choose any product name on your website. Make sure to enable Pick a common selector so the rule applies across all products.
-
Click Save to apply the changes.
-
In the same way, add the product_price attribute. Click the Element Picker, select the product price on your website, and make sure Pick a common selector is enabled.

- To track currency, select JavaScript as the source, choose the appropriate currency from the dropdown, and specify the currency format (for example, USD or INR). Once everything looks correct, click Save.

- Repeat steps 10 and 11 to add additional product attributes such as product variant, size, quantity, and more.
Configure the success scenario:
-
a. If the action redirects users to a success page (like a thank-you page or confirmation page), you can track it by adding the page path, as shown in the example image.
-
b. For the Add to Cart event, there’s usually no separate success page. Instead, you can track the success confirmation message.
-
Select Static Text, then click the Element Picker and choose the “Item added to cart” message displayed on the website (marked with an asterisk in the image). Once selected, click Save.
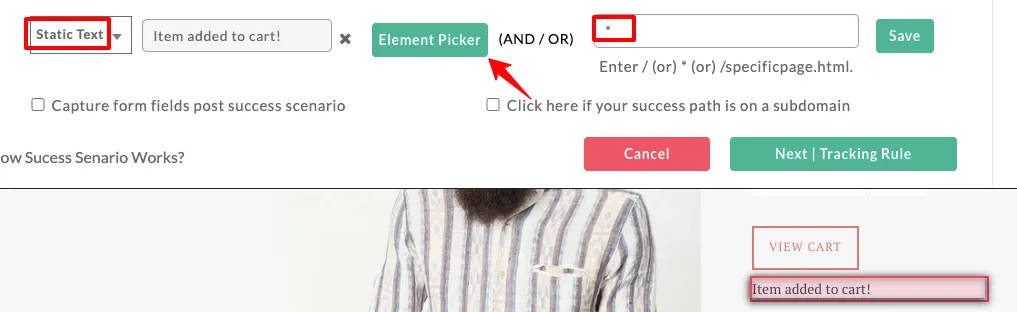
Alternatively, you can skip this step by clicking Next | Tracking rule.
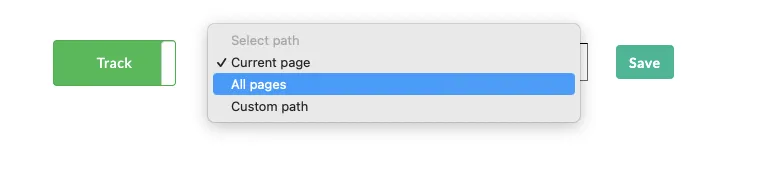
- Select the pages where you want this action to be tracked, then click Save to complete the setup.
- Finally, click the Save icon to complete and store the event setup

- That’s it! Your eCommerce Add to Cart event is now successfully set up and ready to track
(Note: You can also add 1P domain tracking to start tracking your user data using first-party cookies set on the server side)
That’s it. All the events, including the add to cart event, flow into your Google Ads Meta Ads for your WooCommerce store.
Now, we have WooCommerce add to cart setup for Google and Meta ads. Let’s learn the benefits of using CustomerLabs 1PD Ops
What are the Benefits of using CustomerLabs to track WooCommerce add-to-cart events
Here are a few benefits you can leverage for your WooCommerce store using CustomerLabs:
-
Easy no-code integration with any platform (Google Ads, Meta Ads, LinkedIn Ads, TikTok Ads) and automatic event tracking without signal loss
-
URL-based tracking
-
Store the data and user consent as long as you want
-
Custom audience segmentation
-
Go beyond the standard conversion event
When using CustomerLabs, we can create custom conversion events, such as high AOV purchases or a specific product category purchased event, and sync these synthetic events with ad platforms. These custom conversion events help WooCommerce marketers go beyond the limitations of all the other plugins, only to boost their marketing strategies, ultimately leading to increased revenue.
“Using CustomerLabs, we implemented conversion tracking effectively, which helped us see a clear spike in the overall ad campaign performance. I would recommend CustomerLabs for tracking conversions and boosting the ad performance with more signals.”
~ A Business Owner who did not want to be disclosed.
Should we optimize for the WooCommerce Add to cart event?
This is one question people often ask or think about because the goal is to get purchases. Then why optimize for adding to cart? So, the ad algorithms need enough data to run ad campaigns efficiently.
Now, let’s say your ad campaign, optimized for a purchase event, does not work as expected, due to insufficient purchase data. In this scenario, you must optimize your ad campaign for the second most valuable action - checkout made/add payment info.
If you still lack data, it is advisable to optimize for the add-to-cart event, get more add-to-carts, and then, in the next campaign, optimize for the purchase event.
That’s how the entire funnel is optimized inside Google Ads for a WooCommerce store.
![]()
Conclusion
The right implementation of conversion tracking for a WooCommerce store helps to track the add-to-cart event and other useful events accurately in Google Ads. Using the right plugin to implement event tracking can help witness the entire funnel inside Google Ads.
As we have seen, 1P domain tracking with server-side tracking will enhance the conversion tracking, ensuring efficient attribution in Google Ads. Thus, you get to see the true performance of a Google Ads campaign.
CustomerLabs helps you go beyond tracking standard events such as add-to-cart events to give a boost to your marketing strategies and unleash the full potential of your first-party data. This flexibility and customization of events help meet the specific marketing needs of your business.
The journey of conversion tracking or event tracking does not stop at setting up the connection and event flow into Google Ads. It just starts there. Adapting the advanced marketing strategies using the conversion tracking for your WooCommerce store is the need of the hour to stay ahead of your competitors in the era of 1PD Ops or first-party data ops. Start your 14-day free trial and track for more user data. If you face any difficulties, do call our expert for clarification.