iOS14+ updates, GDPR, CCPA, & other data privacy regulations have brought in awareness among the organizations and individuals about the limitations of third-party data tracking and its negative impact on the ad campaign performance in the present times.
The recommended solution to tackle these issues is to equip the ad platforms with relevant first-party data that can be shared via server-side integration from your Shopify store.
Shopify Event Tracking
Track all the events in your shopify store seamlessly using our direct integration without writing a single line of code. Once the events are tracked, you can easily integrate your first-party data with Google Analytics (GA4) & Meta (formerly Facebook).
Haven’t migrated from Google Universal Analytics to GA4 yet? – Step by Step process to migrate to GA4 seamlessly
Let’s go with a step-by-step process to set up the direct integration in less than a few minutes.
Step 1: Account Set up
As soon as you sign up, your account is readily set up and you progress to the second stage where your domain is automatically generated in the connect your domain section. You can change it if you want to integrate another shopify store.
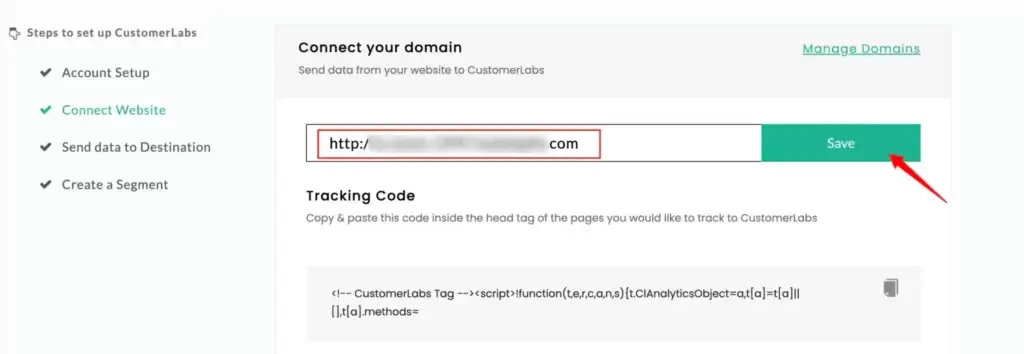
Click on ‘Save’ after you enter the url.
Step 2: Connecting your Shopify store
After you click on Save, you will get a tracking code. Copy the code using the copy button on the right side of the code to track all the events on your Shopify store.
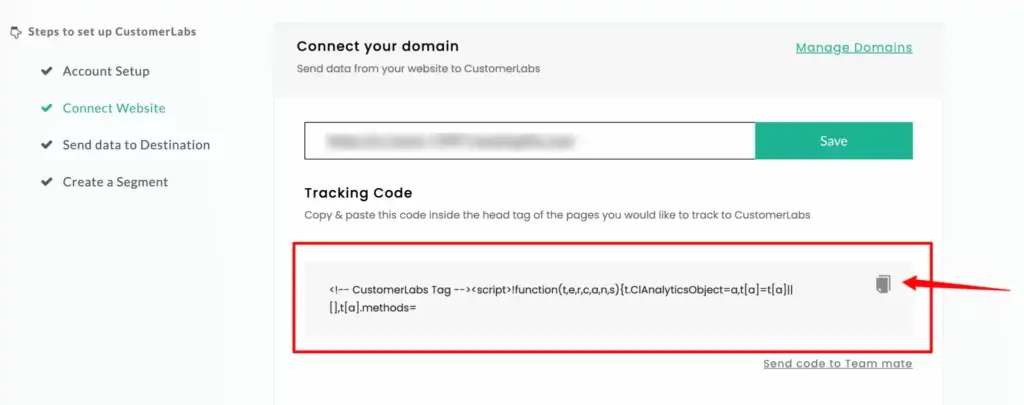
This code should be pasted in your Shopify store.
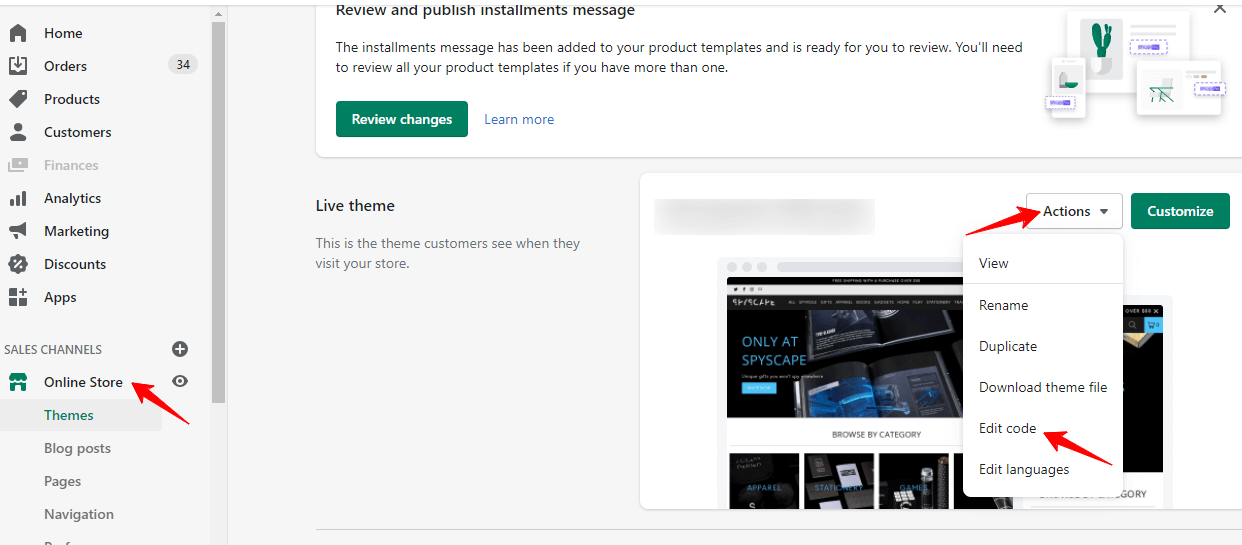
And to do that, login to your shopify store and click on Online store and then Themes. Click on Actions and then Edit code.
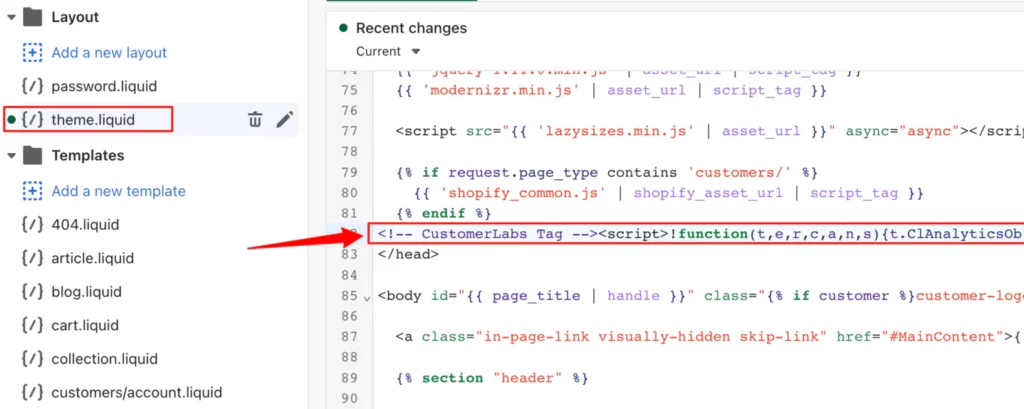
You get the below screen. Click on theme.liquid and search ‘</head>’.
Paste the code you copied from CustomerLabs dashboard just above </head>
Save it.
Now navigate to customer events to create a custom pixel for your Shopify store to track all the events.
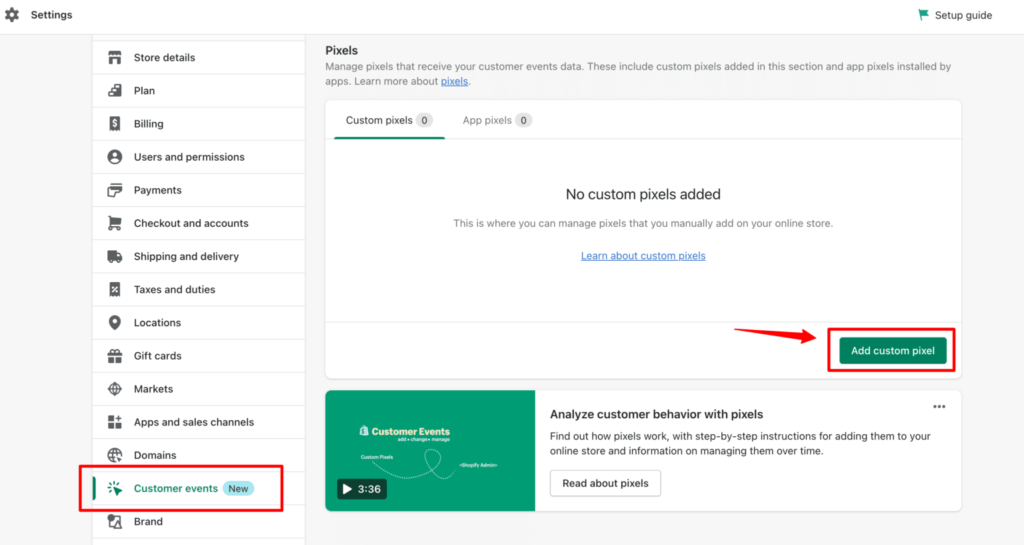
Add custom pixel > Give the pixel name as CustomerLabs > Add pixel
Doing so will send Shopify events tracked including Shopify GA4 purchase event & Shopify Facebook Pixel event to CustomerLabs if you follow the below steps.
Step 3: Direct Integration of Shopify store for event tracking
Next step is to go back to Your Account Dashboard on CustomerLabs.
Scroll down on the home section to find the Shopify logo under the default eCommerce events section.
Here there will be two primary differences.
Your shopify store might have a post-purchase page or might not have a post-purchase page. Now, to track events on your Shopify store that has a post-purchase page, follow these steps. If you do not have a post-purchase page, you click on the without post-purchase button and follow upto step 6 with the variation only in step 1.
Shopify event tracking on stores with a post-purchase page (Common for Shopify store without a Post purchase page until Step 6)
Step 1:
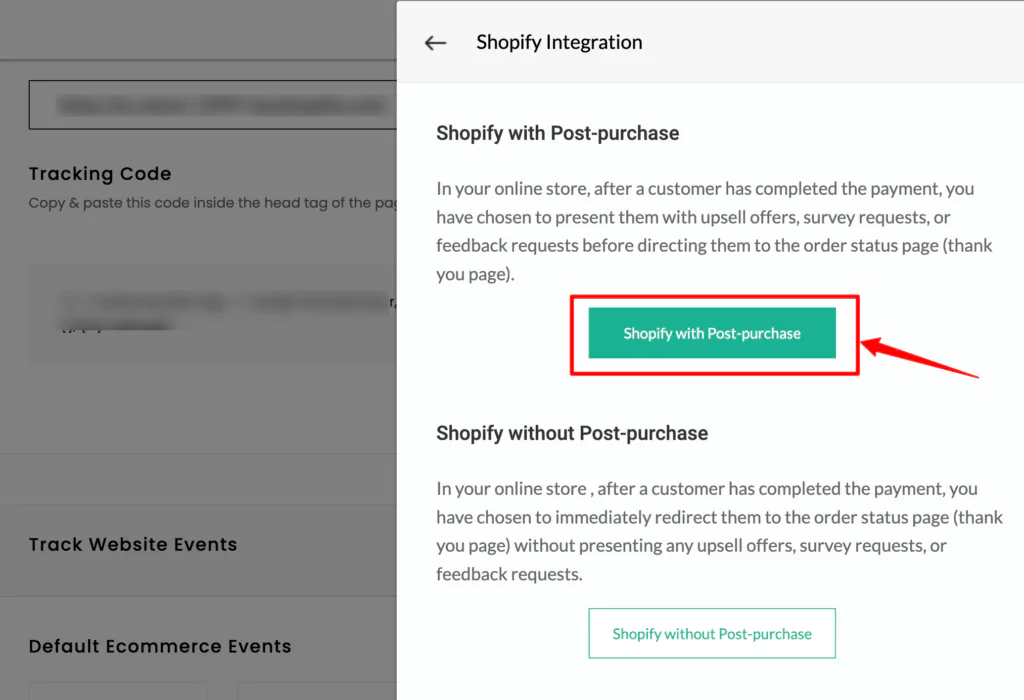
Click on Shopify logo and click on Shopify with Post-purchase
Step 2:
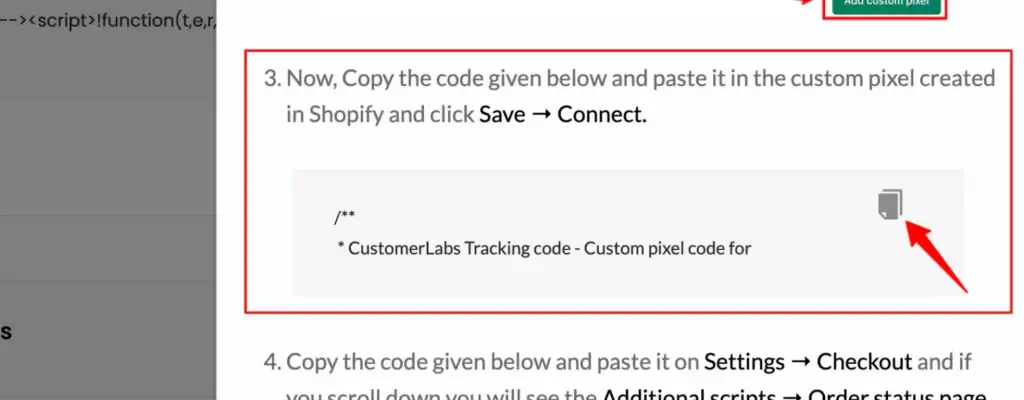
In the displayed box, you will find steps. In the 3rd step, you will find the custom pixel code for your shopify store.
Step 3:
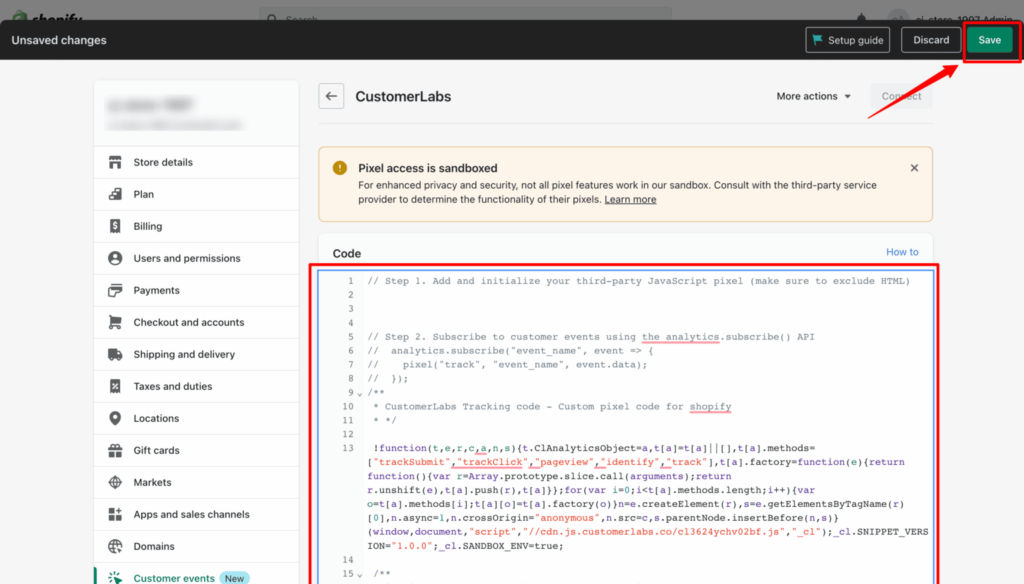
Copy that code and paste it in your shopify store’s customer events pixel code. And to do that go to Customer events > CustomerLabs Pixel (The one you created)
Step 4:
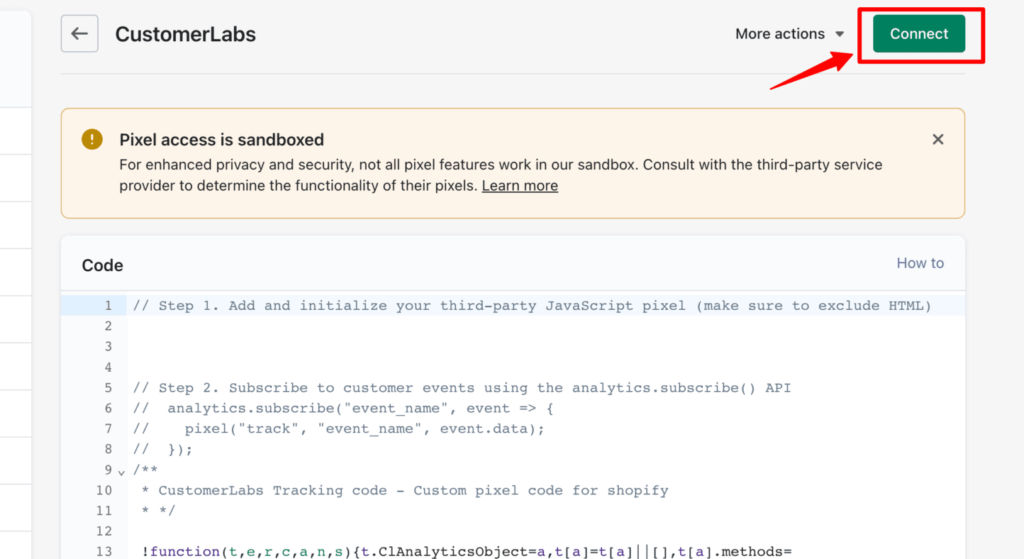
Click Save > Click Connect
Step 5:
Go to CustomerLabs dashboard where you found the above pixel code. Copy the 4th code in the dashboard.
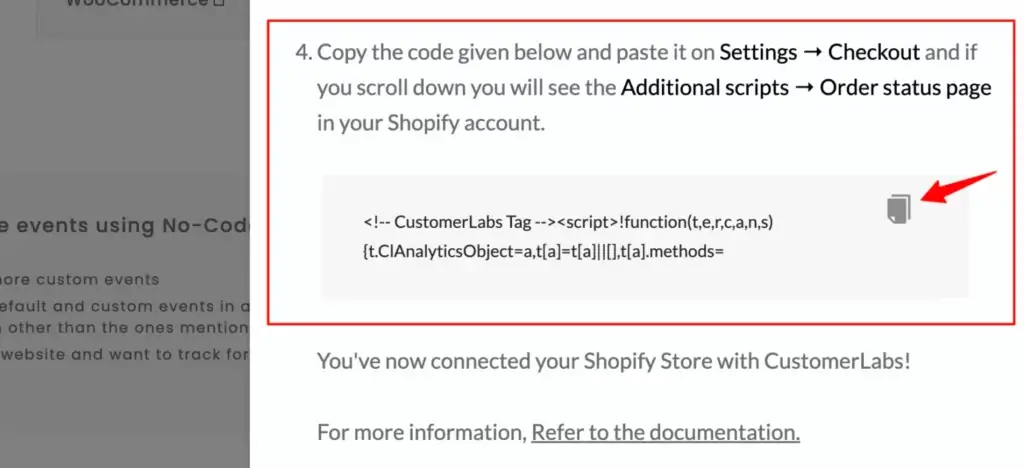
Step 6:
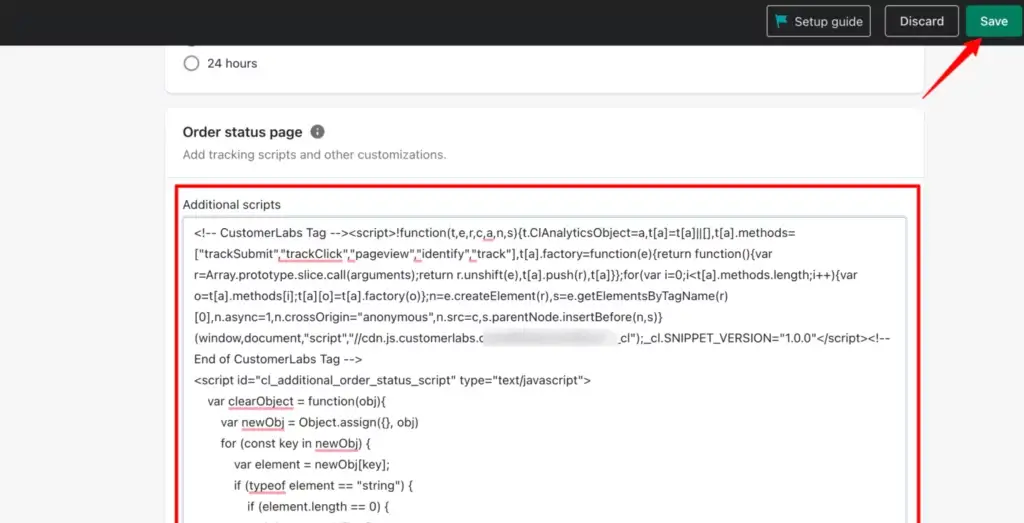
Paste this code into the checkout page > Additional scripts > Order status page > Click Save
Step 7:
Go to CustomerLabs dashboard home page where you have clicked on Shopify logo and again from that, copy the 5th code
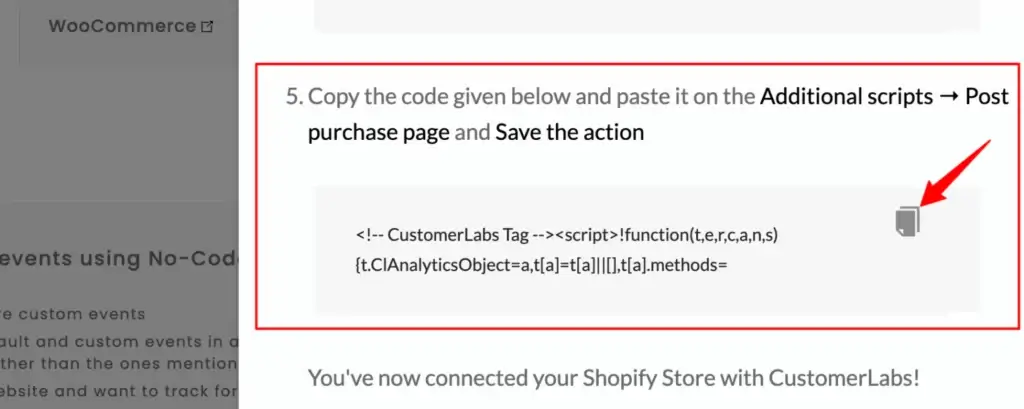
Step 8:
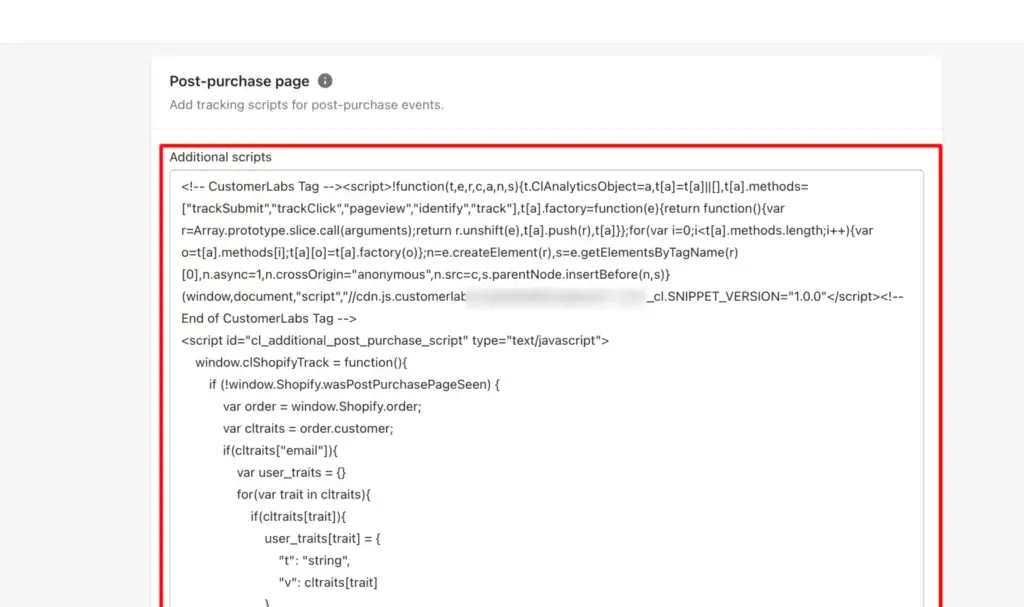
Back in your Shopify, navigate to Checkout section in the settings > Additional scripts > Post-Purchase page
Paste the copied code here and click on Save.
That’s it. Your Shopify store and Customerlabs are now in sync to leverage the potential of first-party data.
To verify if your Shopify store integration is successful, perform some actions such as added to cart, checkout made, etc., and then click on verify event data on the CustomerLabs dashboard page to see the data populating there.
By default all the events that will be tracked for your Shopify store are:
Product viewed event
Category viewed event
Added to cart event
Search made event
Checkout made event
Add Payment info event
and Shopify Purchase event
All the above events can be sent to GA4 and Facebook
Now all Shopify datalayer events and Shopify pixel events that are shown above are synced with CustomerLabs and are ready to be sent over to GA4 and Facebook.
However, if you want to track other custom events, you can use the No-Code event tracker and track all the custom events as you want.
For example, you can track the ‘add to wishlist’ event on your shopify store
Shopify ‘Added to Wishlist’ event tracking using No-Code Event Tracking
From the dashboard, click on the ‘Launch No Code Event Tracker’ button. This will redirect you to your connected Shopify store.
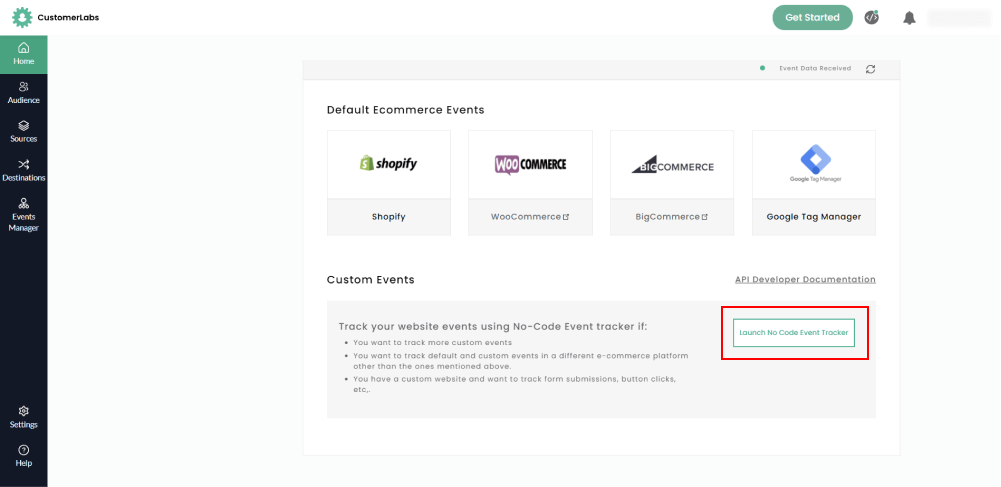
On your Shopify store you will see the event tracker dialogue box with the name Record Actions:
To track add to Wishlist events, ensure the below are done
Action Name: Added to wishlist > Action type: On-Click > Click on the Element Picker > Pick the Add to Wishlist button
Click on ‘Add Details’.
Attributes:
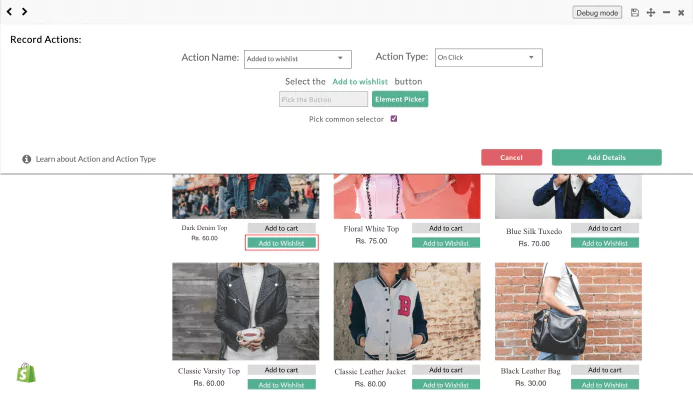
In the next step, Use the attribute type as text. Select all the important attributes such as product name, product price, product id, product quantity etc.
Select the attribute, then pick that block using the element picker. Click on Save.
Once you are done with adding all the attributes you need to understand the data, click on Next | Post-trigger action button.
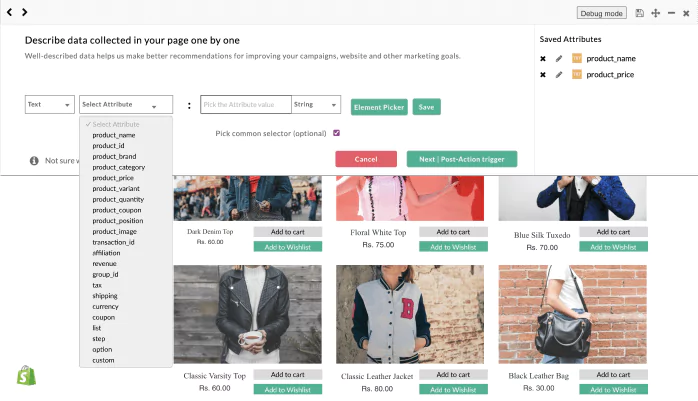
Clicking so will land you in the next stage of tracking events on your shopify store which looks like below.
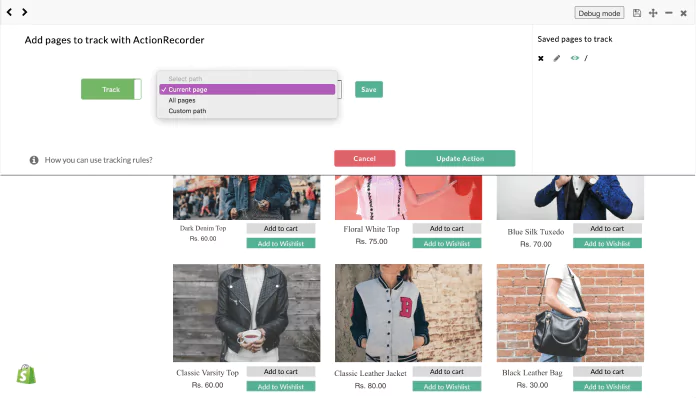
If you want to track this event across all the pages, choose all pages and save.
Finally, click on Update Action.
Save the events tracked.
This will track the user behavior of all the users who clicked on the Add to Wishlist button.
Verify if the event tracking data is being collected or not by using the ‘verify event data’ button on the dashboard.
Click on view data > recent data
You can see all the events being tracked over there.
Shopify Google Analytics Integration using CustomerLabs Direct Integration
Just a few clicks and your Shopify store is in sync with Google Analytics. And you will receive Shopify event tracking data on Google Analytics.
In the home page, find the ‘destinations’ icon in the left side menu.
You will find all the destinations available.
Click ‘Google Analytics gtag’
The below screen will be displayed.
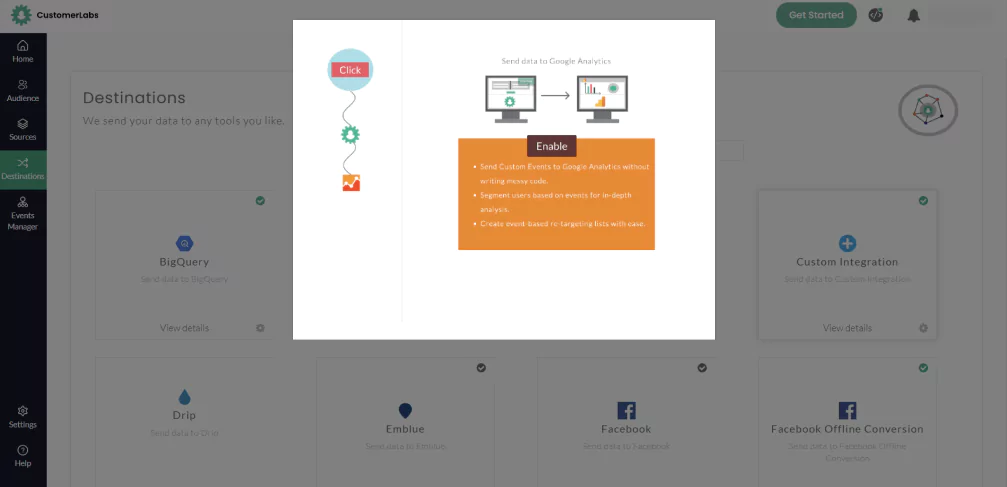
Now you should click on Enable.
After you enable the Google Analytics Integration for your shopify store, you will have to configure.
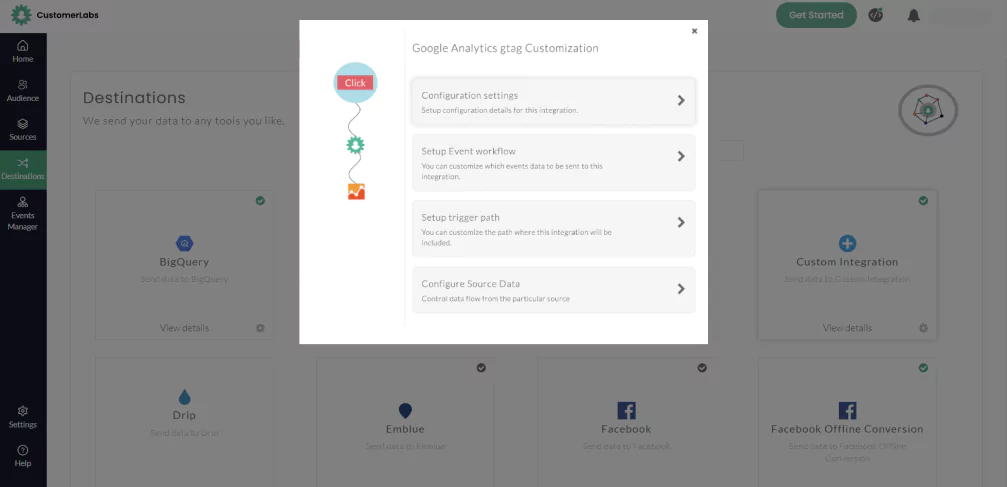
Once entered into the Configuration settings, you will have to enter the GA4 measurement ID.
Still on Universal Analytics? Do not be left behind. GUA is going away. Here’s the blog that shows you how to migrate to GA4 on Google Analytics from Google Universal Analytics.
Authentication:
Now, once in GA4, you will get the measurement ID by following the below steps.
Admin Panel > Setting > Data Streams > Website > Measurement ID
Once you have the GA4 measurement ID, enter it in the configuration settings on CustomerLabs Google Analytics integration.
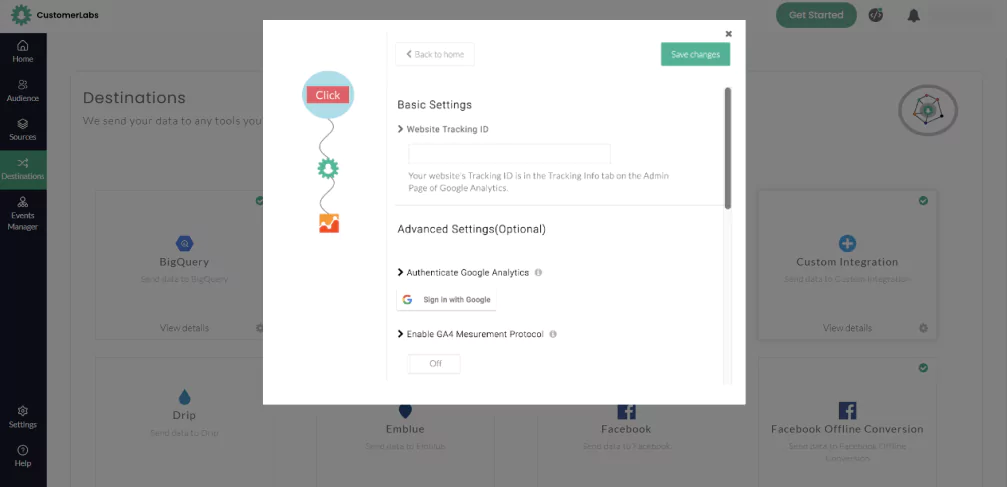
After you enter the GA4 ID in the website tracking ID field, click on the Sign in with Google button in the Advanced Settings section.
Once the authentication is successful, below screen will appear in front of you.
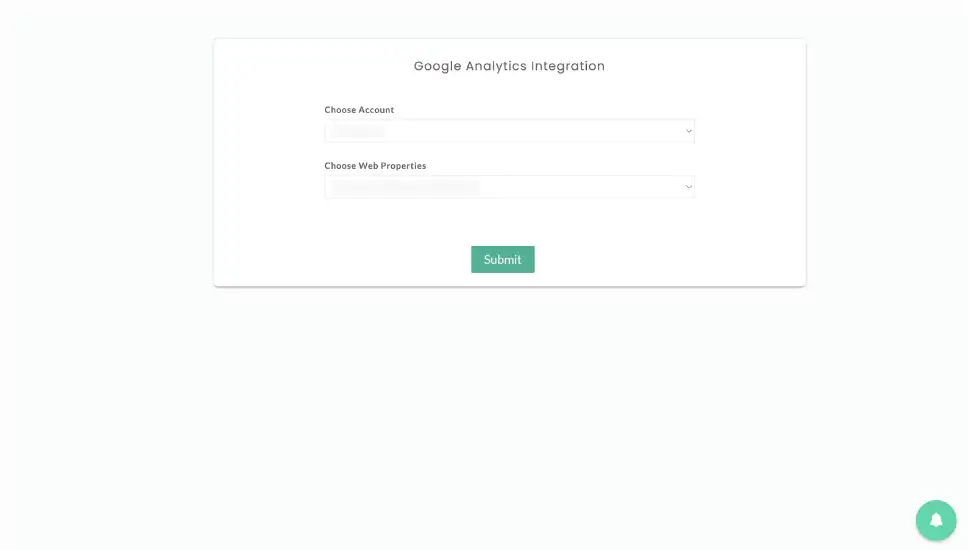
Choose the Account where you want to sync the event data collected on your shopify store with Google Analytics.
Similarly, choose GA4 on choose web properties.
You will see a message – Authentication Successful.
Click on Submit.
Your screen should look like below after you enable the GA4 Measurement Protocol to ensure that you are connected to Google Analytics successfully to integrate all tracked events of your shopify store.
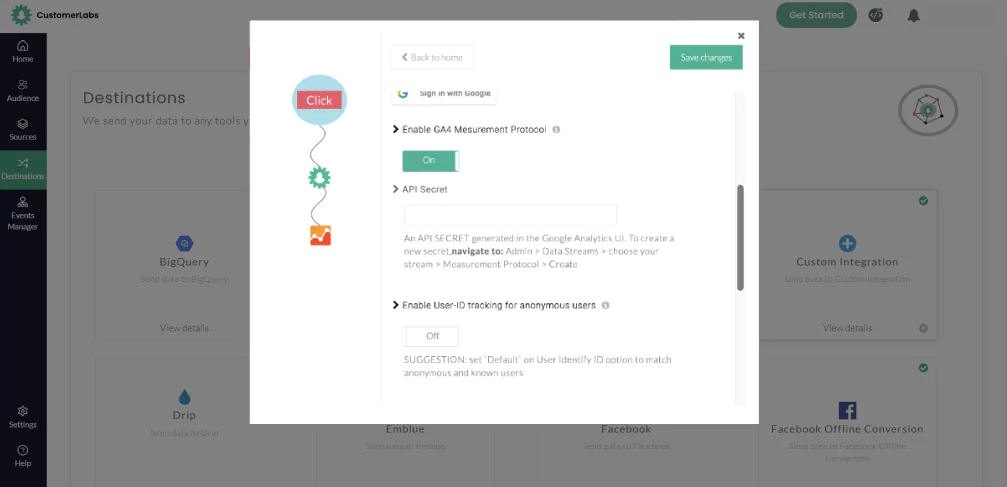
Enter the API Secret key.
Toggle on ‘Enable User-ID tracking for anonymous users’.
To leverage the full potential of CustomerLabs 1PD Ops to track events of your shopify store and integrate it with Google Analytics, you have to enable the enhanced eCommerce option by scrolling down on the screen.
Once you have done all these steps, click ‘Save changes’.
And done. You are now ready to sync all the event data that you tracked on your shopify store using our No Code event tracker and the few-clicks integration of Shopify store with CustomerLabs 1PD Ops on Google Analytics.
Refer to the full documentation for more details on Google Analytics Integration.
Shopify Facebook Integration using CustomerLabs Direct Integration
You might have already noticed the Facebook Conversions API Integration in the same destinations dashboard earlier where you found the Google Analytics Gtag integration.
Click on it and click on Enable
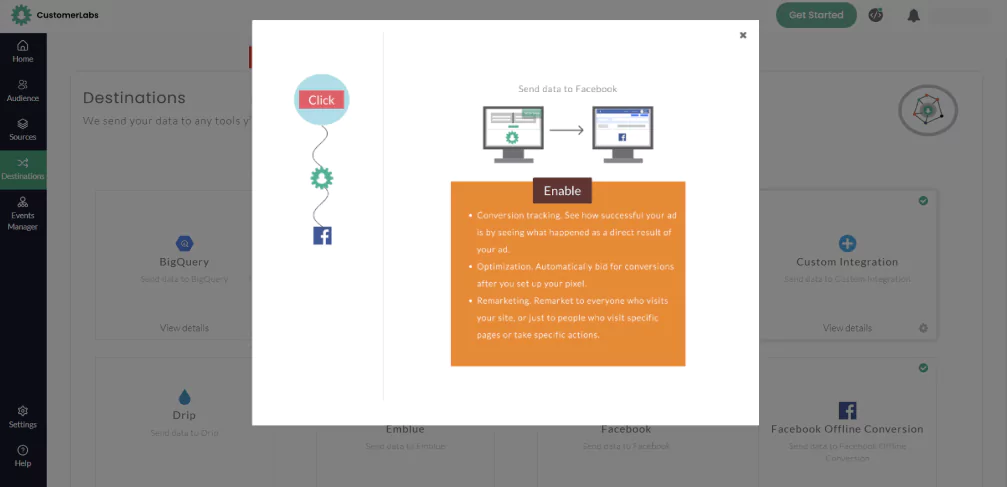
Once you click on Enable, the below screen will appear.
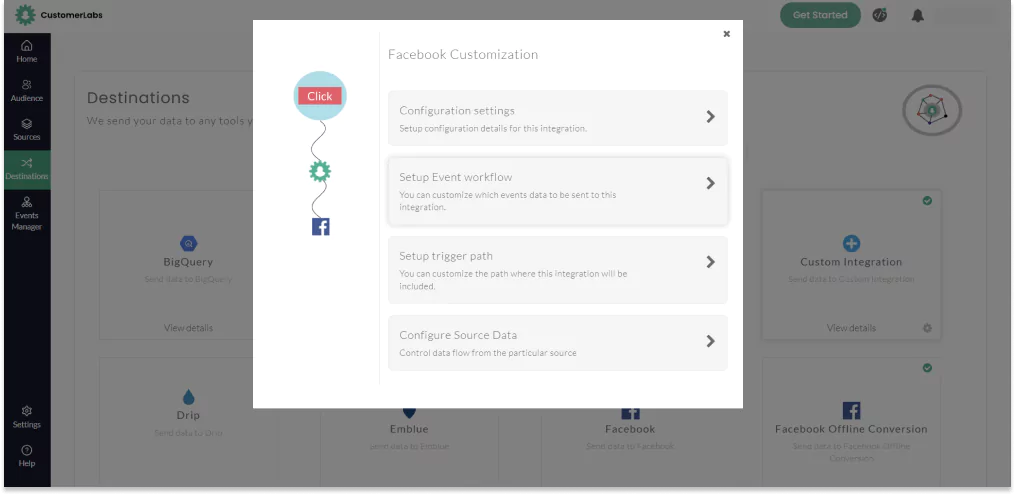
For your Shopify store to synchronize all the events you tracked using CustomerLabs 1PD Ops you have to finish configurations on your CustomerLabs Dashboard.
Click on Configuration settings
Click on the Authenticate Facebook account button.
Doing so will redirect you to Facebook.
Select the account you have admin access to and the one authorized to run ads.
After you select the account, it will prompt you to choose the page for which you want to run the ads.
Once you choose and move forward, it will automatically redirect you to the CustomerLabs dashboard and the below screen will appear.
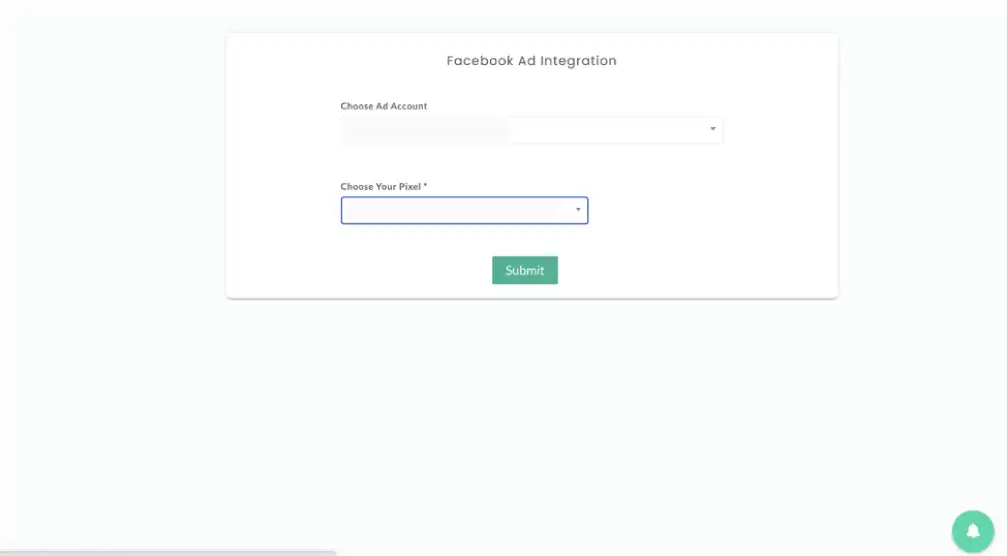
Next choose your Facebook Pixel from the above screen and submit.
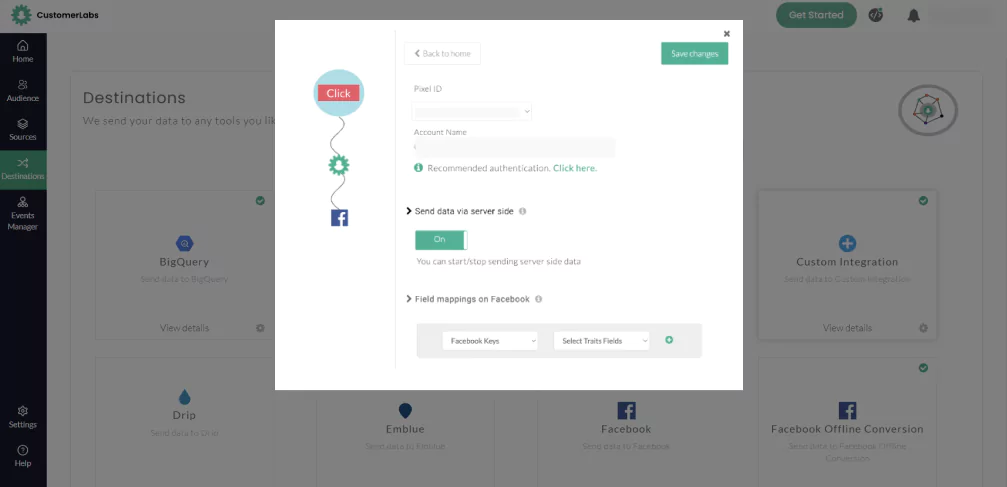
On the above screen, toggle the send data via server-side ON.
Finally, click on Save Changes.
Now, you have chosen to send the data via server-side for your Shopify store.
Note: If you do not have a pixel created already, follow the below steps to create one.
Meta Business Manager > select your business > Data Sources > Pixels > Add (you will find this near search bar) > Enter Pixel name of your choice > insert website URL > Continue
Your Shopify Store is now fully integrated with Facebook and ready to send event data collected through CustomerLabs 1PD Ops.
Refer to the complete documentation for more information on Facebook Integration here.

