Every click, page view, and purchase matters. That’s how you figure out whether your campaigns are winners or wasting your budget. And if you’re on WooCommerce, proper conversion tracking isn’t just helpful, it’s essential. It lets you measure what’s working, fix what isn’t, and make smarter decisions that boost your sales without burning through ad spend.
In this blog, I’ll walk you through how to set up Google Ads conversion tracking for your WooCommerce store, explain why it’s so powerful, and share simple best practices to help you get the most out of it.
Let’s dive in.

How to Integrate WooCommerce with CustomerLabs?
Follow these steps below:
-
Sign up or log in to your CustomerLabs account.
-
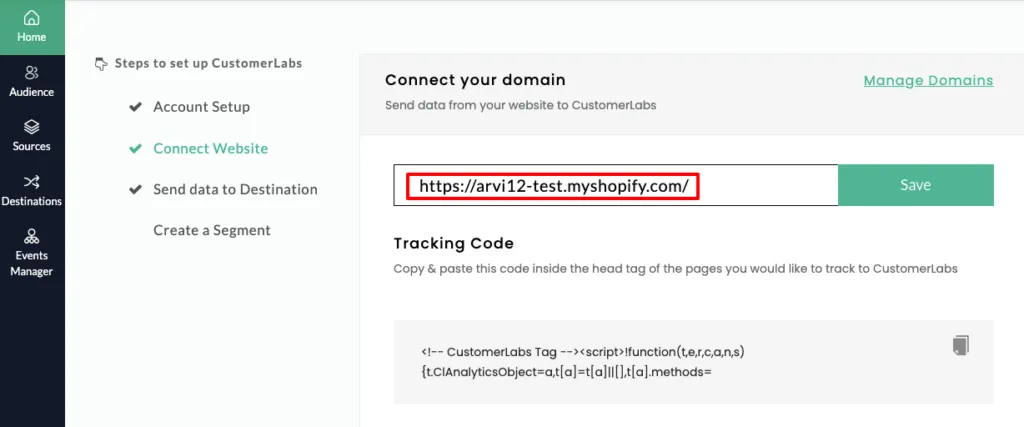
Go to the Home page → under “Connect website” → enter your website URL → click Save.
-
Once the connection is successful, log in to your WooCommerce account.
-
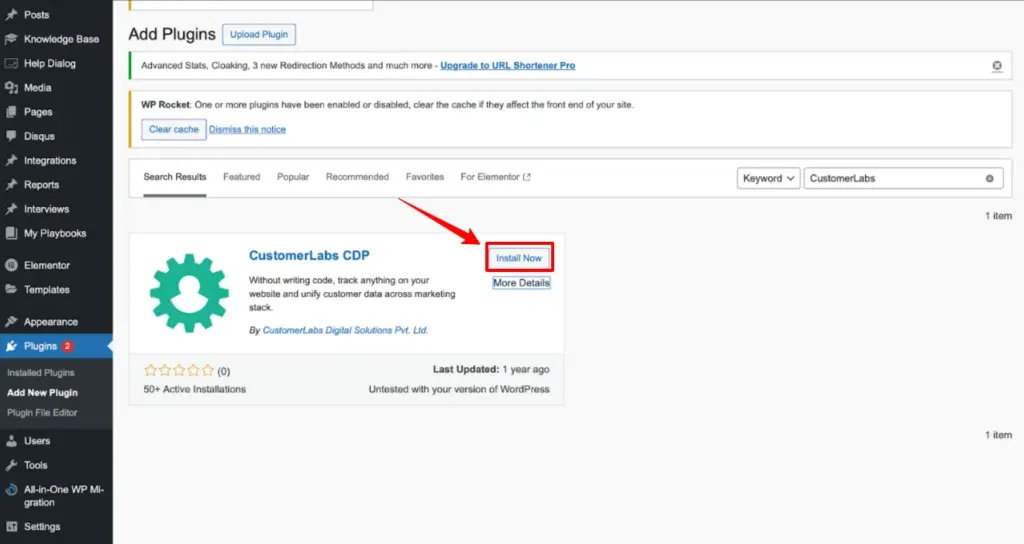
In WordPress, go to Plugins on the left panel → click Add New Plugin → search for “CustomerLabs.”
- Click on Install Now
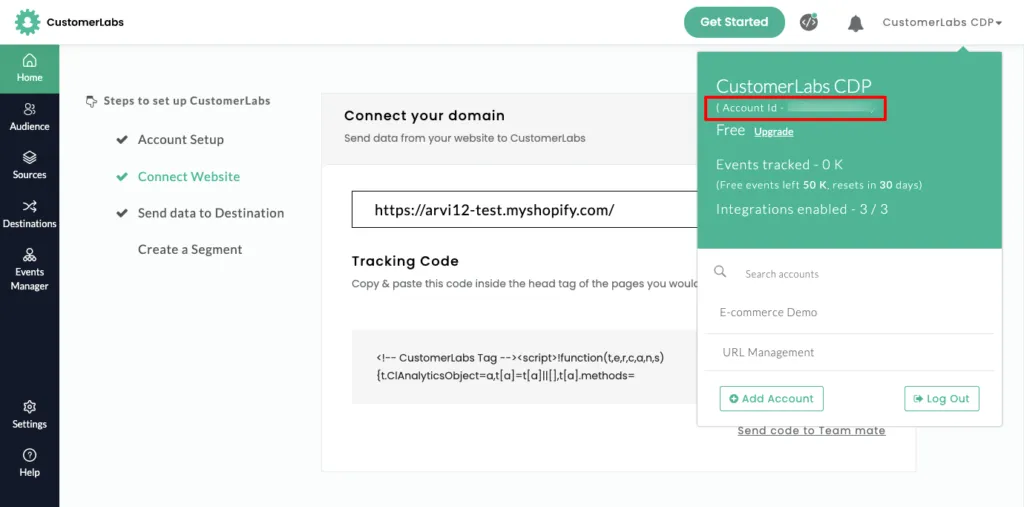
- Now, open the CustomerLabs app and copy your “Account ID” from the section shown in the image.
- Go to the installed CustomerLabs plugin → open Settings, and paste the copied “Account ID” into the “CustomerLabs App ID” field as shown in the image.
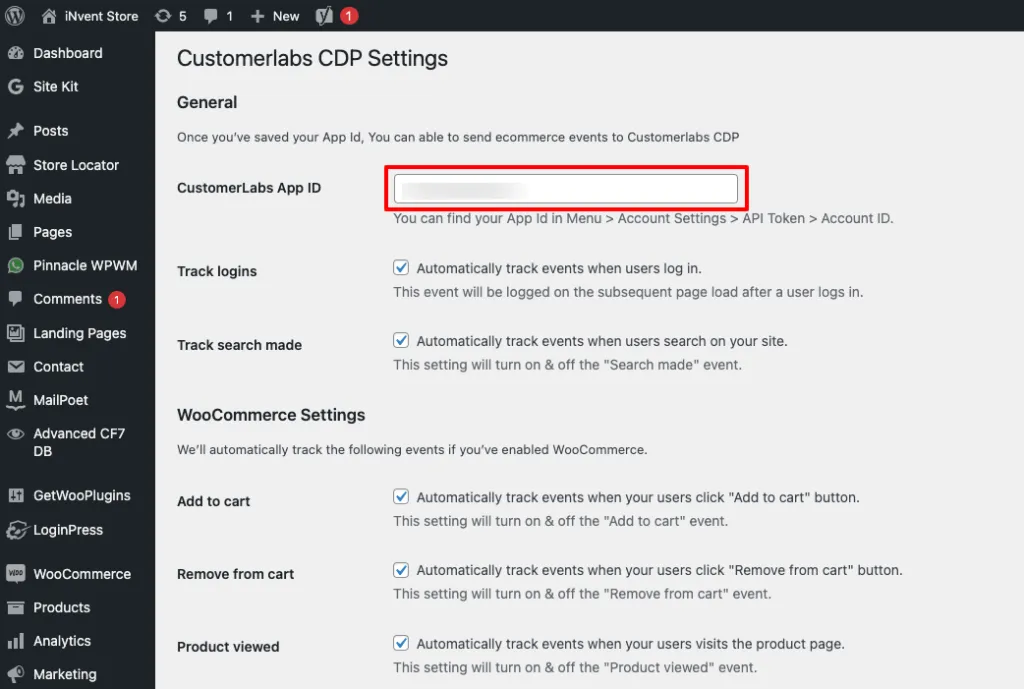
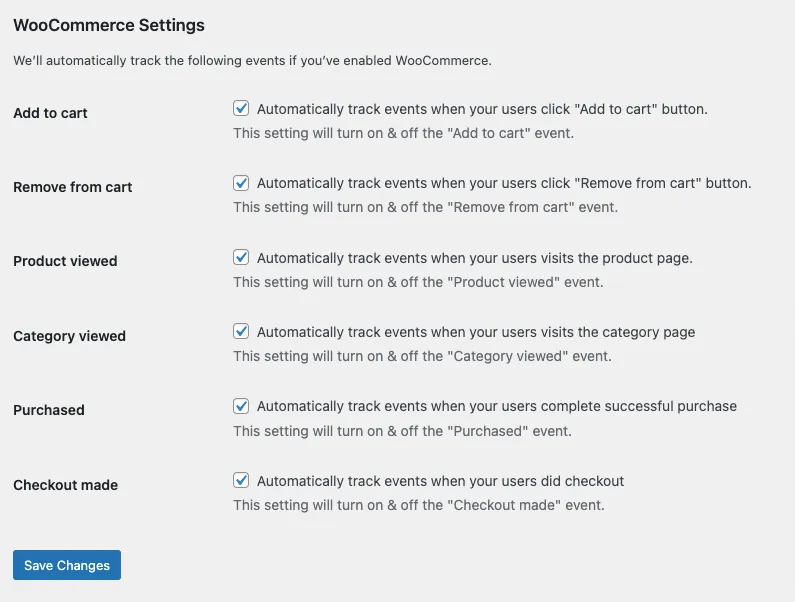
- Make sure you enable all the conversions you want CustomerLabs to track. We recommend selecting all events for the best marketing results. After selecting, don’t forget to click “Save” as shown in the image.
-
Your WooCommerce site is now successfully integrated.
-
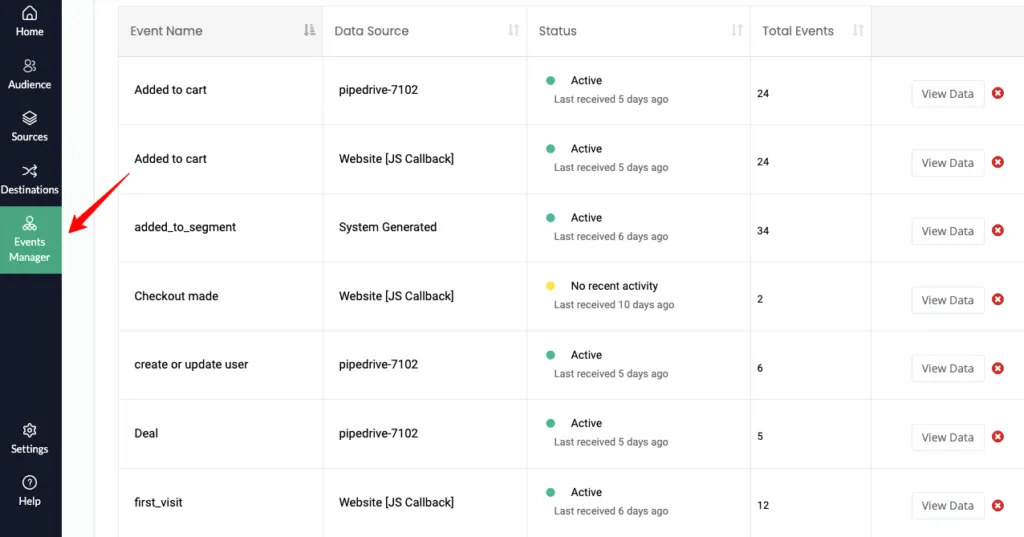
Next, go back to CustomerLabs and open the “Events Manager” to verify that the data is flowing correctly into your account.
![]()
Step-by-Step Setup Guide: CustomerLabs + Google Ads Integration
With CustomerLabs 1PD Ops, you can track all key user actions on your website, button clicks, page views, product views, form submissions, and more, and send this data directly to Google Ads.
This helps you:
-
Track both online and offline conversions
-
Enable Enhanced Conversions for better accuracy
-
Run remarketing using Google Ads tags
-
Build audiences based on real website activity
-
Do everything without writing a single line of code
You can also sync your first-party audience segments from CustomerLabs to Google Ads in a few clicks and use them for personalized targeting that boosts performance.
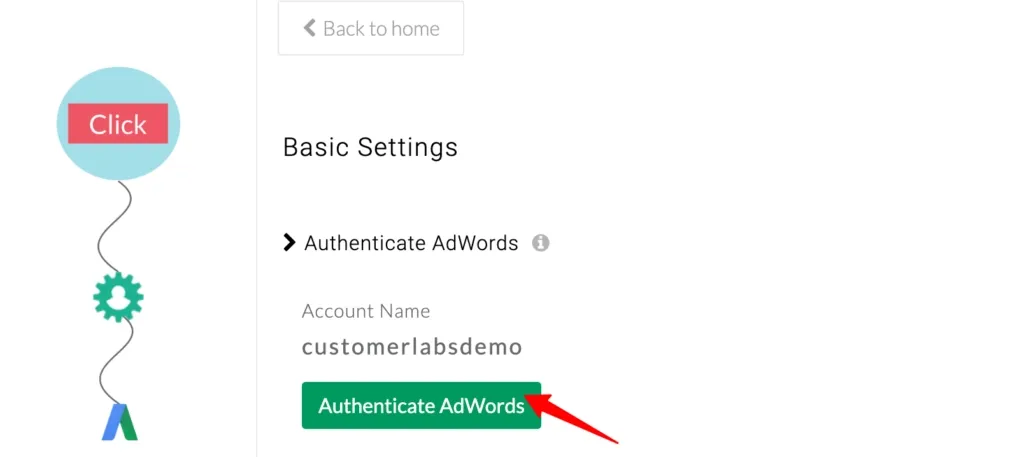
Authenticate Google Ads in Destinations
-
Log in to your CustomerLabs account.
-
Go to the Destinations section from the main menu.
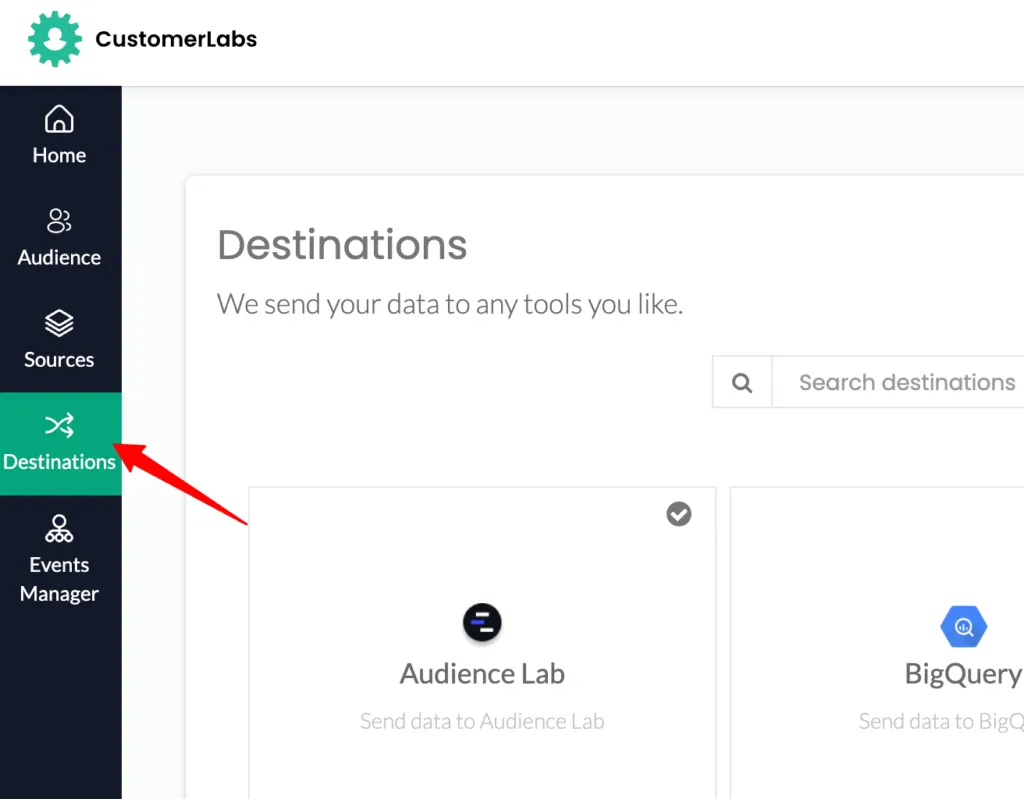
In the Destinations list, search for “Google Adwords” and select it.
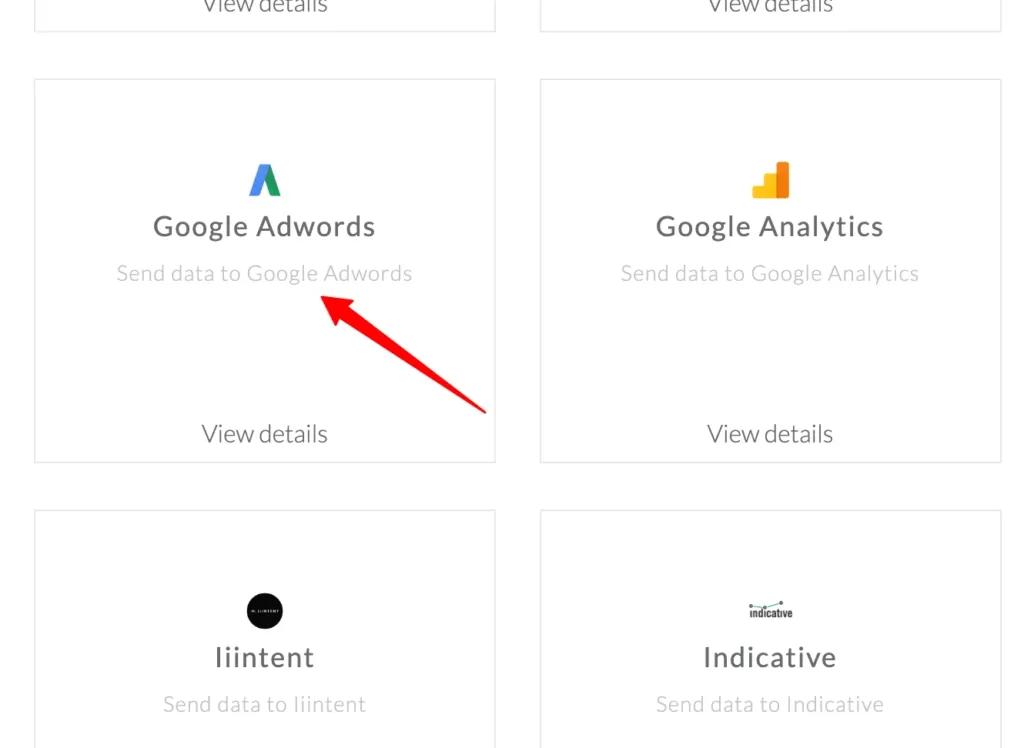
Go to “Configuration settings.”
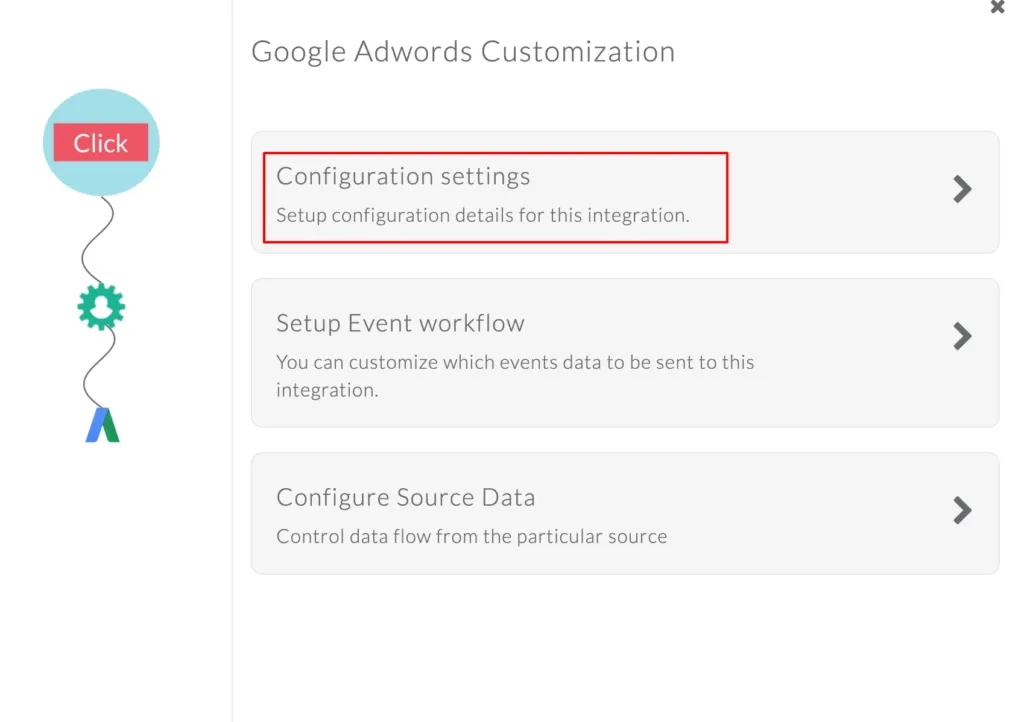
Click “Authenticate AdWords” to connect and sync your Google Ads account.
Tracking Website Conversions
You can create website conversion actions in your Google Ads account and map them to the website events tracked in CustomerLabs. This ensures your conversions are synced accurately with Google Ads.
-
Set Up a Website Conversion Action in Google Ads
-
Sign in to your Google Ads account.
-
Choose the account where you want to create the conversion action.
-
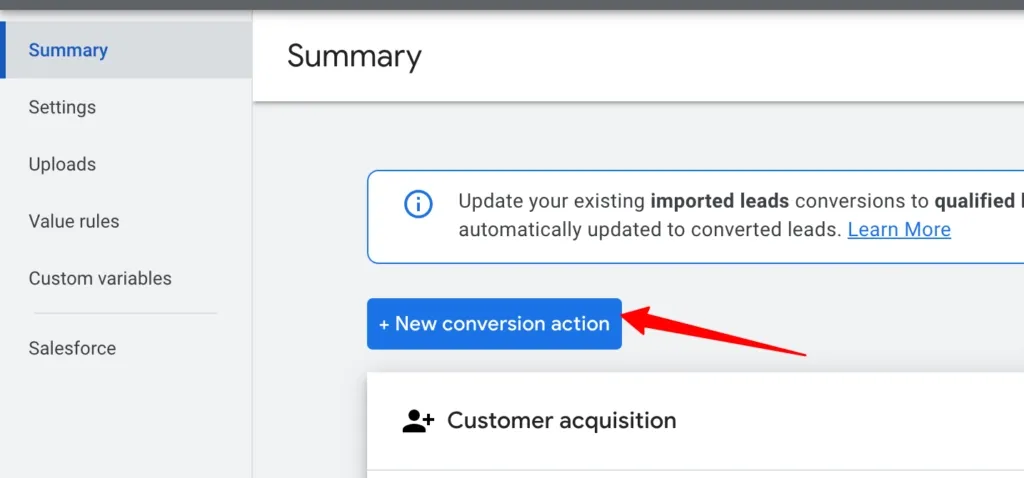
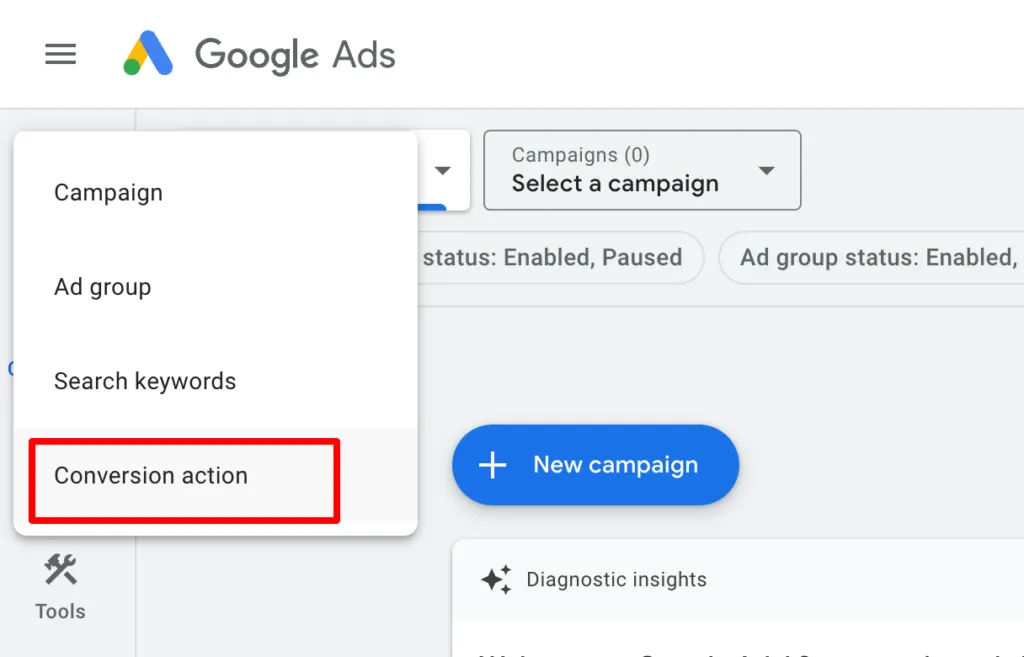
In the left panel, go to Goals.
-
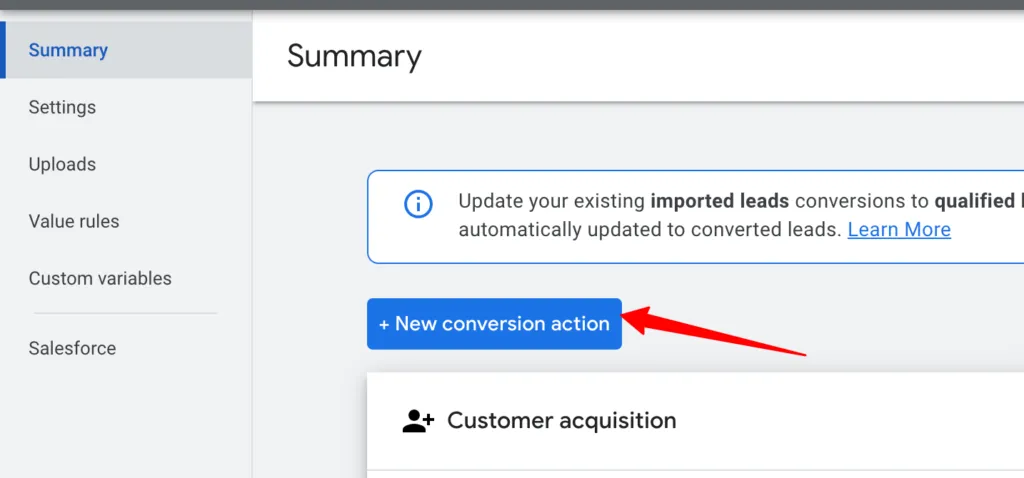
Click Conversions under the Summary section.
-
Inside the Summary page, click + New conversion action.
- In the new Google Ads design, click “+ Create” in the top-left corner and select “Conversion action” to create a new conversion.
-
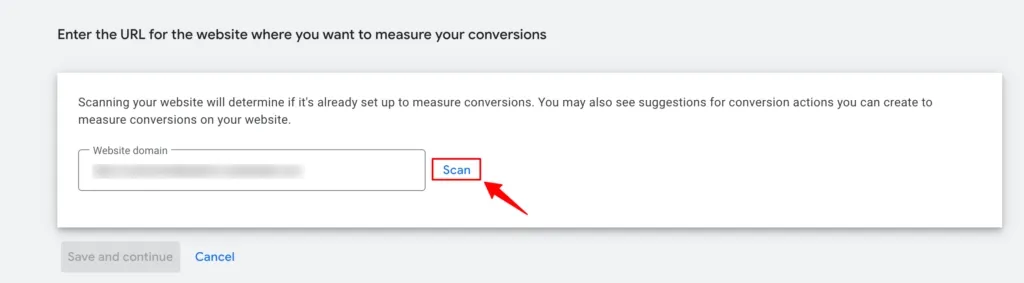
You’ll see four conversion source options: Website, App, Phone calls, and Import.
-
To track website conversions, select “Website.”

Enter your website domain in the field provided and click Scan.
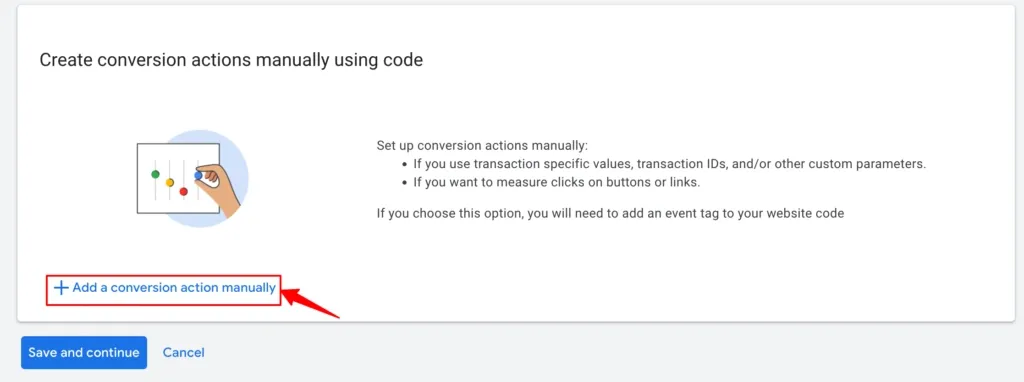
You’ll see two setup options: Using URL or Manual setup. For integrating with CustomerLabs, scroll to “Create conversion actions manually using code.”
Click “+ Add a conversion action manually.”
Enter the details for the conversion action you want to track. (Refer to Google’s documentation if needed.)
After filling in the details, click Save and Continue.
You’ll then see the conversion snippet setup step since CustomerLabs handles this automatically; simply skip it and click Done.
Map the conversion action in the Configuration settings
1. Go to CustomerLabs → Destinations → Google Adwords → Configuration Settings → Map Actions to Conversion

The conversion actions you set up in the Google Ads account will be fetched here.
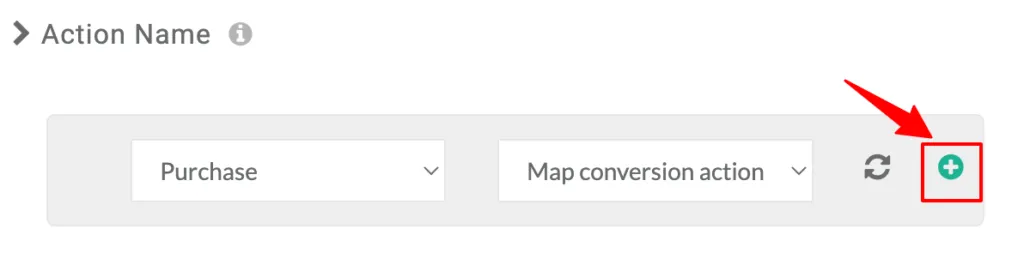
2. You can map the conversion actions with the relevant event names tracked in CustomerLabs.

For example, you can map the CustomerLabs event “Purchased” with the “Purchase” Conversion action in Ads account.
Note: You can only map website events with website conversion actions. You can’t map any server events (offline events or the events brought from any source) with website conversions in Google Ads
3. After mapping the event with the conversion action, click “+” icon to add it to the list of conversion actions.
4. Click on “Save Changes”
Sync the events with Adwords
1. Now, to sync the conversion events with Google Adwords, go to Setup Event Workflow from the Google Adwords Customization screen.
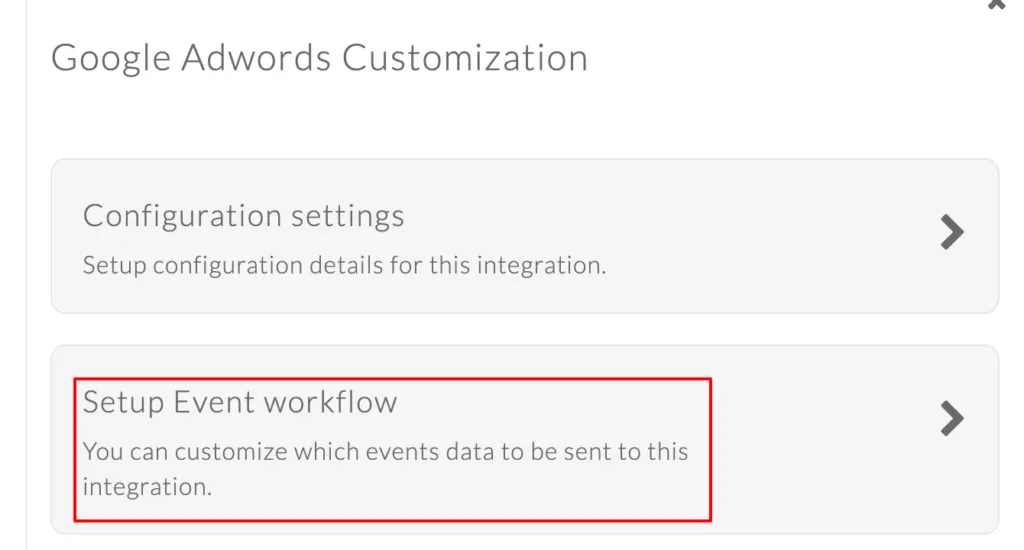
2. Turn on the toggle for the events for which you have mapped the conversion actions.
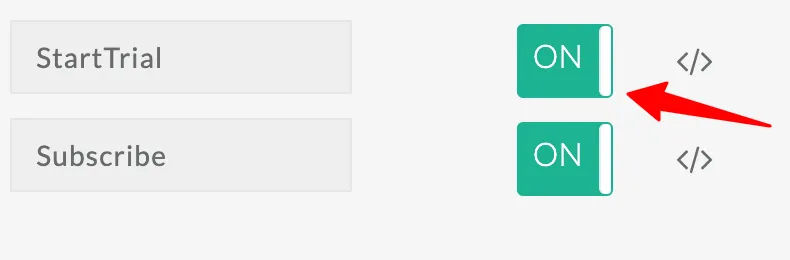
3. Click on “Save Changes”.
Now, you have synced the events with Google Adwords, and this will enable you to track the conversions on your Adwords account.
Tracking Offline conversions
You can set up offline conversion actions in Google Ads and map the offline events that are tracked in CustomerLabs to sync with offline conversions in Google Ads.
Set up the conversion action in Google Adwords (Import from external sources)
1. Sign in to your Google Ads account.
2. Select the account where you want to set up the conversion action.
3. Go to Tools & Settings in the upper right corner.
4. Click “Conversions” under “Measurement”.
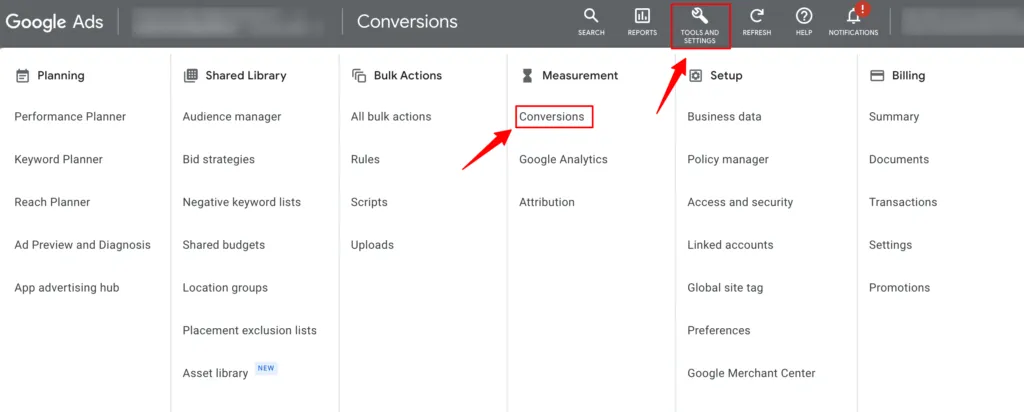
5. Under Summary, click + New conversion action.
6. You will have 4 types of conversion sources – Website, App, Phone calls or Import
7. Choose the “Other data sources or CRMs” → “Track conversions from clicks” radio button and click Continue.
Note: We don’t support “Track conversions from calls”
8. You will be redirected to enter the details for the conversion action like Goal, conversion name, etc. Check Part 1 of this Google’s documentation for setting this up.
9. After setting this up, click Create and Continue.

10. You will be asked to choose the Method for measuring conversions if you’re setting it up for the first time. You can measure using enhanced conversion parameters (check about enhanced conversions below) or you can choose to continue with Google Click identifiers.

Note: Based on how you modify the method of measuring conversions, Google accepts the conversions accordingly from CustomerLabs.
11. Click Done.
You have now created an offline conversion action. Now go to the CustomerLabs app to sync these offline conversions.
Map the conversion action in Configuration settings
1. Go to CustomerLabs → Destinations → Google Adwords → Configuration Settings → Map Actions to Conversion
2. You can map the conversion actions with the relevant event names tracked in CustomerLabs.

You can map both offline (server-side) events and website events with offline conversion actions. For example, you can map the “Subscribed” (offline server-side) event and the “Subscribed” website event with the “Qualified lead” conversion action by adding “+” icon after mapping each.
3. After mapping the event with the conversion action, click “+” icon to add it to the list of conversion actions.
4. Click on “Save Changes”
Sync the events with Adwords
1. Now, to sync the offline conversion events with Google Adwords, go to Setup Event Workflow from the Google Adwords Customization screen.
2. Turn on the toggle for the events (on the server-side & client-side) for which you have mapped the conversion actions.

3. Click on “Save Changes”.
Now, you have synced the events with Google Adwords and this will enable you to track the offline (server-side) conversions on your Adwords account.
Enhanced Conversion Tracking
Enhanced conversion tracking improves the accuracy of your conversions by sending hashed first-party data to Google. By attaching additional information about your users which includes email address, phone number, first name, last name, you can enhance your conversion measurement in Google.
For enhanced conversion tracking, you need at least one of the following:
-
Email address
-
Name and Address (street address, city, state/region and postcode)
-
Phone number (must be provided in addition to one of the other two pieces of information above)
Refer to Google documentation for more information.
You can enable enhanced conversion tracking in CustomerLabs and attach first-party data like email, phone number, etc (if available) with the conversions and send them to Google Ads.
Here are the steps to enable Enhanced conversion tracking.
1. Before enabling Enhanced conversion in CustomerLabs, make sure you have enabled enhanced conversion in your Google Ads account.
2. Go to your Google Ads Account → Tools and Settings → Conversions under Measurement section → Settings
3. Click on Customer data terms → Tick the checkbox → Save

4. Click on Enhanced conversions for leads → Tick the check box Turn on enhanced conversions for leads → Choose the method as Google tag from the drop-down → Save
(Note: Only after completing steps 3 & 4, you can enable enhanced conversion tracking in CustomerLabs.)
5. Now, go to CustomerLabs → Destinations → Google Adwords → Configuration settings.

6. Under Advanced settings, you have Enable enhanced conversion tracking.
7. Turn on the toggle for enabling enhanced conversion tracking.

8. You can also map the fields that you want to add when sending enhanced conversions.
Note: By default, CustomerLabs will map the relevant fields available. If you want to map any additional or multiple fields, you can do that in this section.
9. Click “Save Changes”

When Enhanced conversion is enabled in CustomerLabs, we send enhanced conversion parameters for the events if Google Click identifier (GCLID) is not available.
If both GCLID and enhanced conversion parameters are available, we send both and based on the priority of parameters Google Ads has, it accepts the conversions.
If both are not available for the events, we still send the conversions, but Google doesn’t take these conversions into account.
Learn more about Consent Mode V2
Google has updated the consent mode (V2) settings to help advertisers adhere to EU consent policy for use in ad personalization.
You can view the consent mode status in your Google Ads account → Conversions → Click on a Google Ads website conversion action → Diagnostics
If your users are from the European Economic Area, you have to pass the end-user consent choices to Google.
Based on the consent choices provided by the users, Google dynamically adjusts the storage and usage of the user’s data for ads, analytics or modeling.
We have given an update to our Google Ads integration where you can easily set up this Advanced consent mode within a few simple steps.
Consent Mode setup in CustomerLabs
Here are the steps to set up consent mode for Google Ads:
1. Navigate to Destinations → Google Adwords → Configuration Settings → Consent mode Configuration
2. Turn on the toggle below that.

3. For Google Ads, you have to pass the consent received from the user through three parameters based on the purpose of usage. They are
-
Ad Storage
-
Ad user data
-
Ad personalization
Learn more about consent mode parameters and their definitions
4. If the user has not initially chosen their consent preferences through the banner displayed, Google recommends setting default values for each of the consent parameters.
For this, you have to set the default values to be stored and/or sent using the drop-down as shown.
5. a. If you’re using a Google-certified Consent Management Platform (CMP), the default values initialization for the consent parameters are taken care of by the CMP.
5. b. If you’re not using a CMP, you should turn on the toggle for “Client Side Consent Initialization” for CustomerLabs to initialize default values for the consent parameters as described in step 4.
Note: If you’re using a CMP and still want to initialize default values from the CustomerLabs side, you can still turn on the toggle

6. After setting all this up, click “Save Changes”
Update the Consent preferences your users
For collecting the consent preferences from your user, you might use a cookie banner supported by a Consent Management Platform (CMP) or a banner that was built by you.
When a user updates the consent preferences through your banner, the information is stored and this information should be passed onto to CustomerLabs to update the consent preferences in our system.
If you’re using Google Certified CMP and the CMP pushes the details to dataLayer, you can pass on these parameters through GTM (Google Tag Manager). Refer to the documentation here.
This updation is important to store and transfer the consent preferences of your users (first-party data) while sending the data on the server-side (Google Ads Offline conversions).To update the consent preferences, you have to call the function _cl.trackConsent ()
Copy Code
Function Params
    /**
     *
     *
     * This function is available for end users to send consent params to update the consent
     * @function trackConsent
     * @param {object} params consent params
     */
    "ad_user_data": "granted/denied" //granted or denied consent based on specific needs
Function example
_cl.trackConsent({
    "ad_user_data": "granted",
    "ad_personalization": "granted",
    "ad_storage": "denied"
});
list //params that can be added for consent
{
    "ad_user_data": "granted",
    "analytics_storage": "granted",
    "ad_personalization": "granted",
    "ad_storage": "granted",
    "functionality_storage": "granted",
    "personalization_storage": "granted",
    "security_storage": "granted"
}
If you have difficulty setting this up using your CMP or on your self-developed banner, you can contact our support team ([email protected]) for help.
Send Consent Signals without Consent banner
No Consent Banner? No problem. Send Consent Signals to Google Ads. Click here…
How to use Remarketing Tags?
Remarketing tags are used to re-engage the users who already visited the website with the tag by adding them to the remarketing lists. This is used for both standard and dynamic remarketing.
You can map the events tracked in CustomerLabs with the remarketing tags created in Adwords without installing the remarketing tag manually on your website. This enables you to add users to the remarketing lists without the intervention of a developer.
You can either map the events to existing remarketing tags or you can create a remarketing tag and map the relevant events.
Here’s how you create a remarketing tag and map it in CustomerLabs for remarketing purposes as required.
1. Go to your Google Adwords account → Tools and Settings → Shared Library → Audience manager
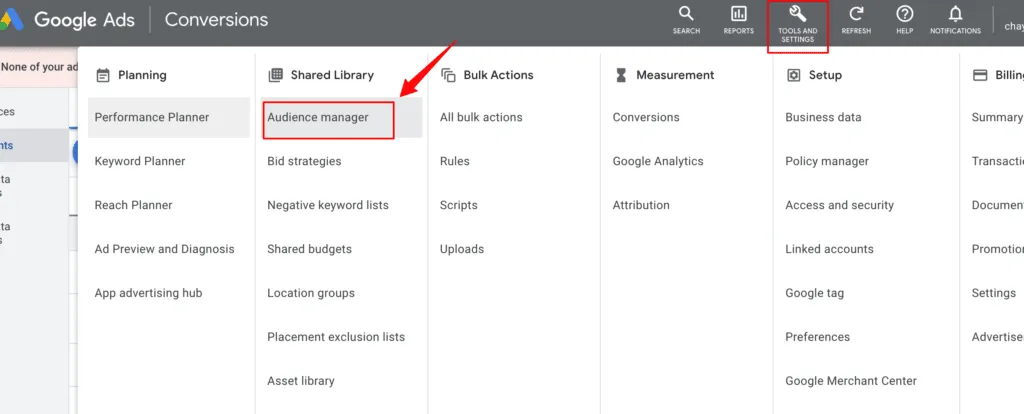
2. Under Segments → Click on “+” icon (Create remarketing list) → Website visitors

3. In the Segment members section, choose “Visitors of a page with specific tags” from the drop-down.

4. In the Tags section, you will have the option to create a + New Tag

5. Name the Tag and Save it

6. Now, go to CustomerLabs → Destinations → Google Adwords → Configuration settings
7. Under Advanced settings, you have Map Actions to Remarketing.
8. Map a relevant action with the remarketing tag you just created.

9. For dynamic remarketing, you need to update the Business vertical, which can be done by choosing the vertical from the drop-down as shown below.
9. After updating the required details, click on “Save Changes”
You can instead use the events tracked in CustomerLabs directly while creating a remarketing list in Google Adwords.
Before creating the list in Google Adwords, do a quick check in CustomerLabs whether the events are being sent (toggled on) to Adwords from Destinations → Google Adwords → Setup Event workflow

Follow the steps below to create a remarketing audience in Google Adwords using the events.
1. Go to your Google Adwords account → Tools and Settings → Shared Library → Audience manager

2. Under Segments → Click on “+” icon (Create remarketing list) → Website visitors
3. In the Segment members section, choose “Visitors of web pages” from the drop-down.
4. In the Actions section, you will have the events from CustomerLabs account in the drop-down to choose from.

5. Give the required number of days and Refine the actions further as you want.
6. Click on Create segment.

You can use this audience for your remarketing campaigns.
Sync the audience
The simplest way to send the first-party user-behavior data to Google Adwords is by creating audience segments in CustomerLabs and sync them directly with Adwords, which gives you higher match rates. You can use these audiences to personalize your retargeting campaigns. Refer to the documentation to sync your audiences with Google Adwords.
Conclusion
Setting up Google Ads conversion tracking for your WooCommerce store becomes far more powerful and dramatically simpler when you use CustomerLabs 1PD Ops.
Instead of juggling scripts, plugins, and developer help, CustomerLabs gives you a clean, no-code workflow to track website actions, sync online and offline conversions, enable enhanced conversions, manage consent mode, and even run high-precision remarketing using first-party data.
Whether you’re mapping purchase events, syncing CRM leads, or building laser-focused remarketing audiences, everything flows smoothly between WooCommerce - CustomerLabs - Google Ads.
This ensures accurate measurement, better optimization, and higher ROAS across your campaigns. Start your free 14 trial, and if you face interruption while signing, no worries, consult a call with our expert.