Let me tell you a harsh truth: you pretend to know the GA4 (Google Analytics) setup for WooCommerce conversion tracking, but you really don’t.
F*****n no way, I picked the right thing to talk about in this blog.
Anyways,
This blog is not about “just install this plugin and you’re done” shortcuts. The easiest integration ever.
It’s a clear, step-by-step path to make sure your Google Analytics (GA4) captures the data that actually moves your business forward. We cover why GA4 matters for WooCommerce conversion tracking, and how to set the GA4 with WooCommerce conversion tracking. Let’s move ahead.
Why WooCommerce GA4 Conversion Tracking Matters?
GA4 (Google Analytics 4) is Google’s next-generation analytics platform that tracks user interactions through events instead of pageviews.
You might’ve connected GA4 to your store, watched a few tutorials, and seen some traffic numbers. But the reality is, without proper event tracking, you’re basically driving with blindfolds.
You might think you’re doing everything right, but those missing events? That’s where your real insights (and revenue) live.
Why does it matter?
Because people shop and browse differently now. With new privacy rules, limited cookie tracking, and users switching between devices, the old tracking methods just don’t work anymore.
You need this because it helps:
- Track user journeys across devices (web + app).
- Get more accurate conversion data even with cookie loss.
- Use machine learning to fill gaps where data is missing.
- Measure real engagement instead of just traffic numbers.

Prerequisites for the Setup: What You’ll Need Before You Dive In
Before you start setting up WooCommerce GA4 conversion tracking, make sure you’ve got a few essentials ready. This isn’t complicated, just a quick checklist to ensure everything connects smoothly when you integrate WooCommerce with Google Analytics (GA4).
1. A working WooCommerce store
You’ll need an active WooCommerce store with your products, checkout pages, and theme already running. If you can browse your store, add items to the cart, and reach the checkout, you’re good to go.
2. A GA4 property in your Google Analytics account
- Head over to Google Analytics and make sure you’ve set up a GA4 property (not the old Universal Analytics one).
- Once done, create a Web Data Stream. This gives you a Measurement ID that starts with “G-XXXXXX.”
- That ID is what links your WooCommerce site to GA4, so data can start flowing in.
3. Access to your WordPress Admin Dashboard
You’ll need login access to your WordPress site to install or activate plugins. Don’t worry, it’s as simple as going to Plugins – Add New – Search – no coding required.
4. Handle cookie consent (if your visitors are from the EU or UK)
If your store uses a cookie banner or consent management tool (like CookieYes or Complianz), you’ll need to make sure Consent Mode is enabled and your Google Analytics tags respect user preferences.
(Note: will talk about the Consent Mode detailed in this blog)
This step keeps your tracking GDPR-compliant, ensuring analytics data is only collected when visitors give permission.
Congrats..! Now you would have successfully created a store, but for the conversion tracking, you need an advanced setup that provides you with the best results. So now we are going to start with the WooCommerce GA4 conversion tracking without GTM or code.

How to Set up Woocommerce GA4 conversion tracking without GTM (Google Tag Manager)?
The best easy way to set this up is using a no-code tracker, CustomerLabs 1PD Ops. This is not just limited to tracking; you can collect, create audience segmentation or build new audiences, even activate and sync the data with multiple platforms(including your offline data, aka your CRM data).
Let’s get right into it.
Step 1: Integrate Customerlabs + WooCommerce
Integrate CustomerLabs with WooCommerce to seamlessly track your website visitors’ actions along with key event parameters to build unified customer profiles.
- Follow these steps to start tracking events from your WooCommerce server:
- Sign up or log in to your CustomerLabs account.
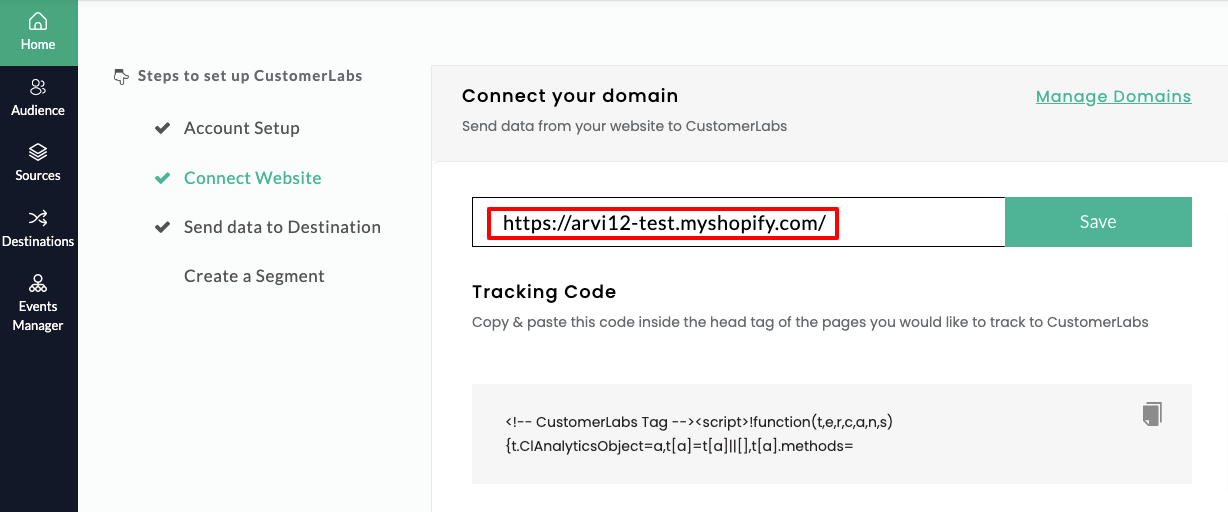
- On the Home page, go to “Connect Website”, enter your website URL, and click Save.
(Tip: You can also add extra domains or exclude misattributed referral domains anytime using URL Management.)
- Once your website connection is successful, log in to your WooCommerce account.
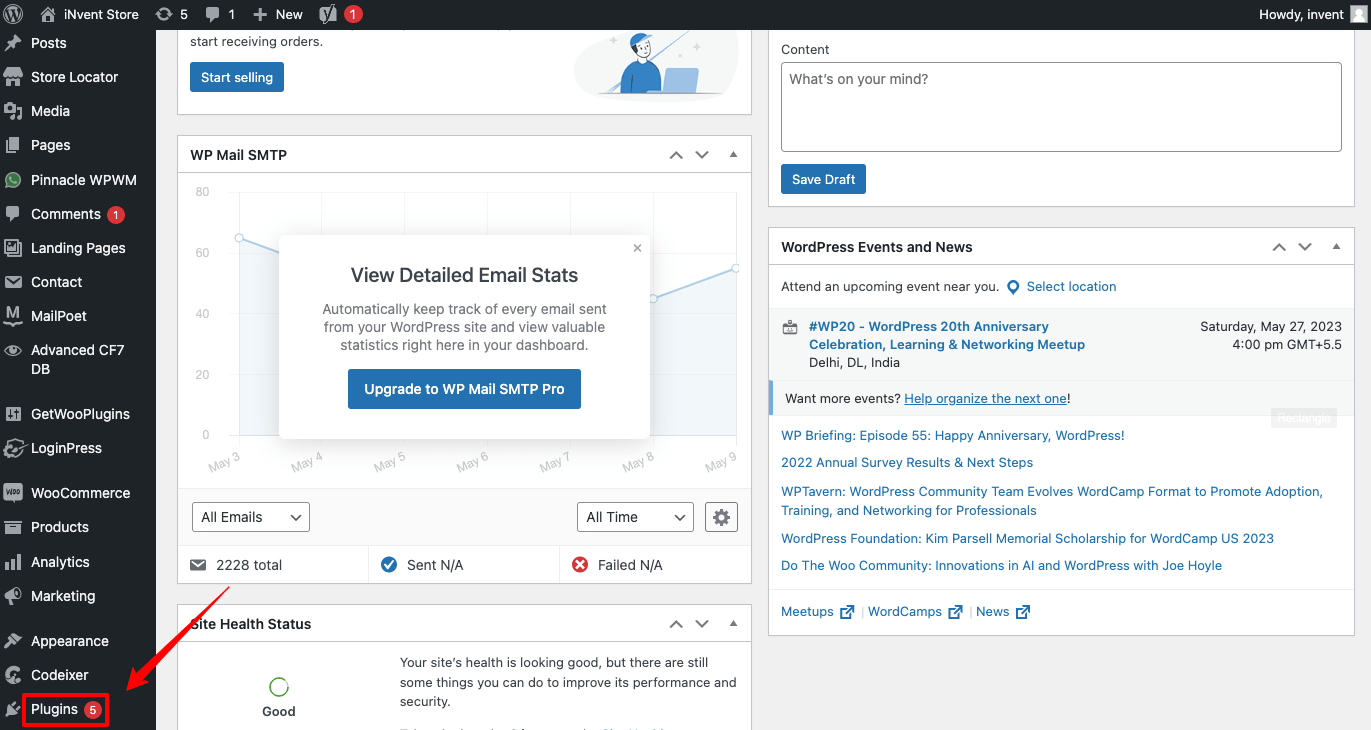
- In your WordPress dashboard, navigate to Plugins on the left sidebar – click Add New Plugin – and search for “CustomerLabs.”
(Note: If there’s a plugin version update, go to Plugins – Search “CustomerLabs” – Click “Update Now.”)
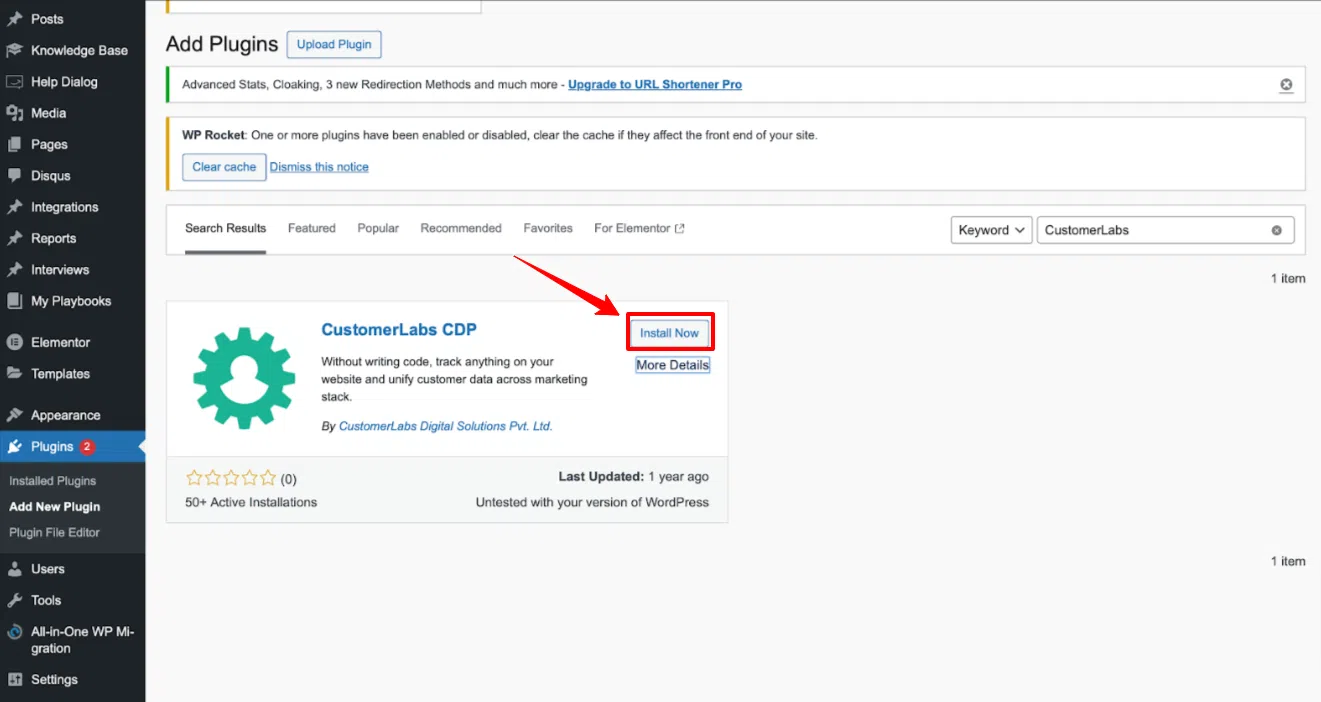
- Click on Install Now
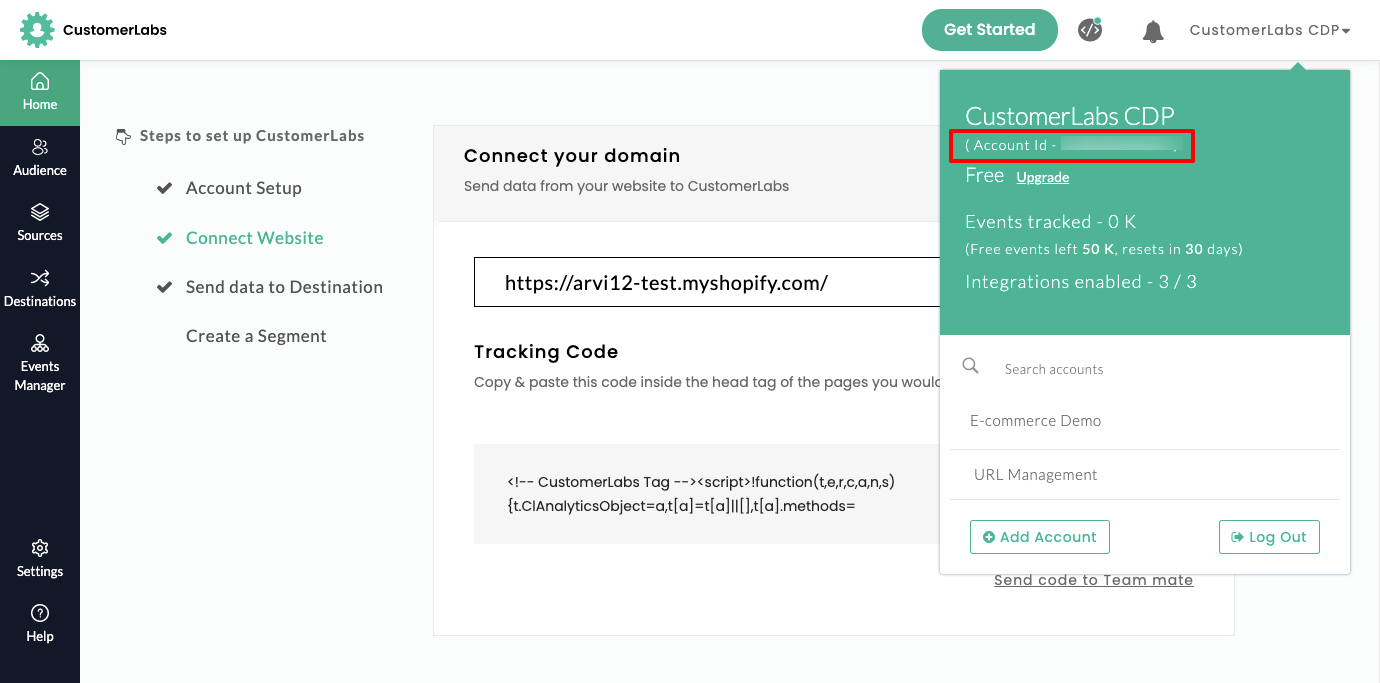
- Next, open your CustomerLabs app and copy your “Account ID” from the section shown in the image below.
- In your WordPress dashboard, open the installed CustomerLabs plugin.
- Go to Settings, and paste the copied “Account ID” into the field labeled “CustomerLabs App ID”, as shown in the image below.
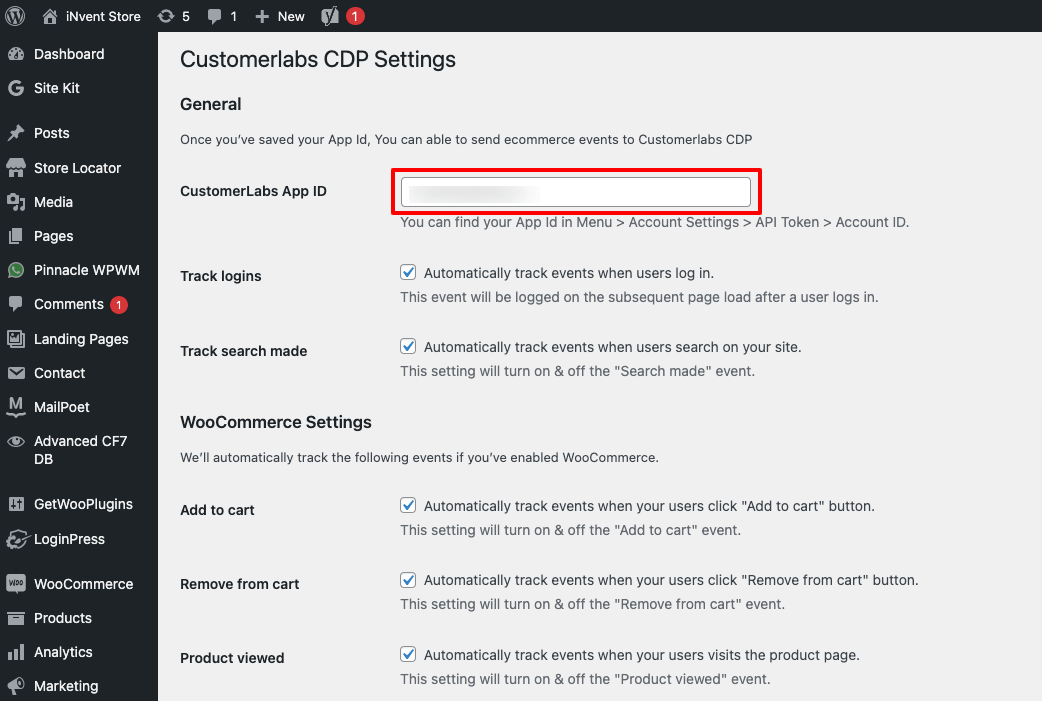
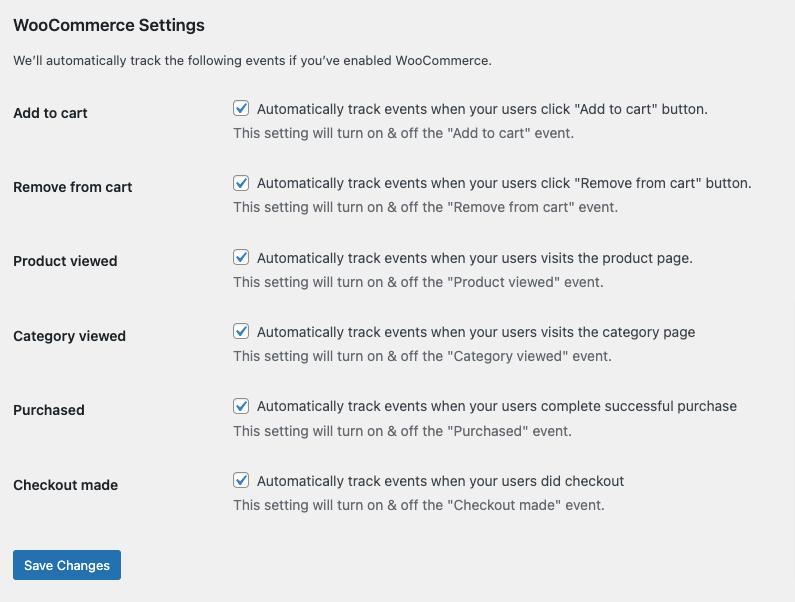
- Make sure to select all the conversions you want CustomerLabs to track and collect. For effective tracking, it’s recommended to enable all conversions.
- Once done, don’t forget to click “Save” to apply your settings, as shown in the image below.
- Your WooCommerce website is now successfully integrated with CustomerLabs.
- Head back to your CustomerLabs dashboard and open “Events Manager” to verify that data is flowing correctly from your WooCommerce site to CustomerLabs.
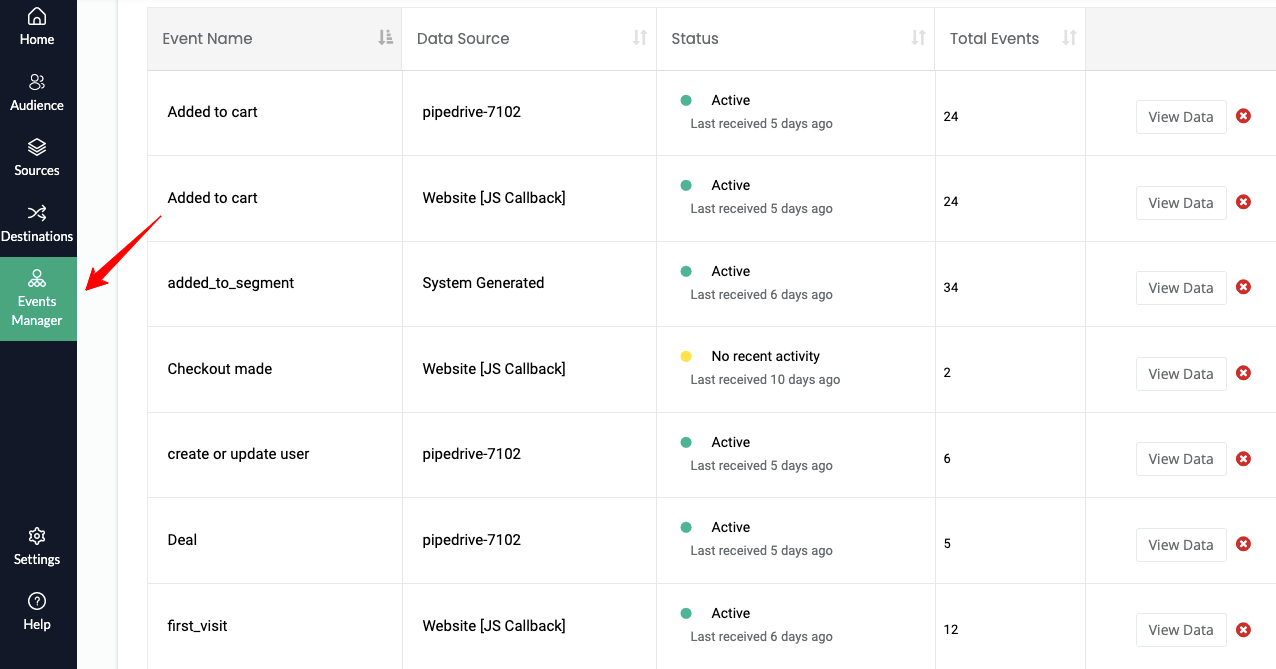
Now you can now send these tracked events to ad platforms like Facebook and Google by connecting them through the Destinations page.
Next let’s start connecting with Google Analytics and Woocommerce.
Step 2: CustomerLabs + Google Analytics (GA4)
With the CustomerLabs GA4 integration, you can go beyond basic tracking, gaining deep insights into goal conversions, funnel performance, and attribution to build precise audiences and plan more effective campaigns.
Browser Side
1. Log in to your Google Analytics account.
2. Select the account you want to integrate with CustomerLabs.
3. In the Admin section of your Google Analytics account, create a new Property to begin setting up the integration.

4. Once the new Property is created, click on “Data Streams” under that Property.
5. Then, click “Add Stream” and select “Web” to set up your website data stream.

6. Open the newly created Data Stream and copy the “Measurement ID”, you’ll need this to connect Google Analytics with CustomerLabs.

7. Log in to your CustomerLabs account.
8. From the main menu, go to the “Destinations” page.
9. Search for and select “Google Analytics (gtag)” from the list of available destinations.
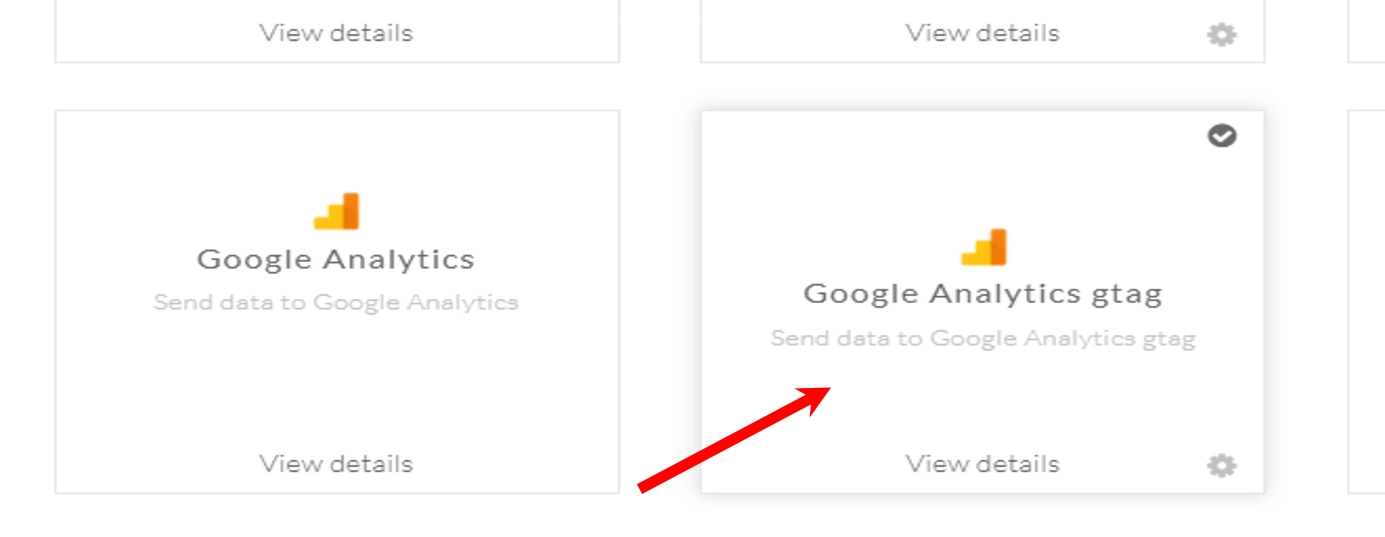
10. Click “Subscribe”, then navigate to “Configuration Settings.”
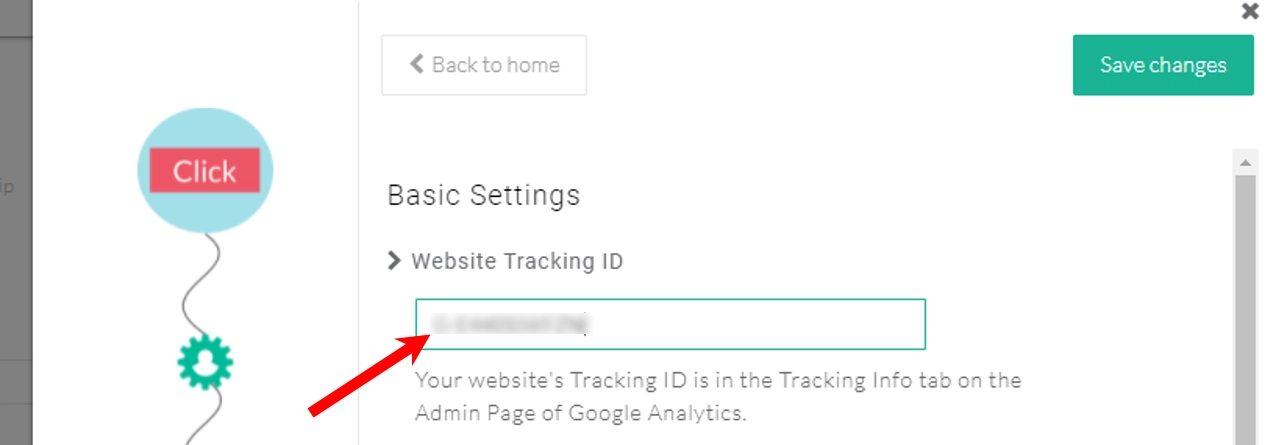
11. In the “Website Tracking ID” field, paste the “Measurement ID” you copied from Google Analytics.
Server Side
1. In your Google Analytics account, open the new Data Stream, then navigate to the “Measurement Protocol API Secrets” section.
2. Click “Create” to generate a new secret and assign a nickname for easy identification.
3. Copy the “Secret Value” that’s generated, you’ll use this in your CustomerLabs configuration.

4. Go back to your CustomerLabs account.
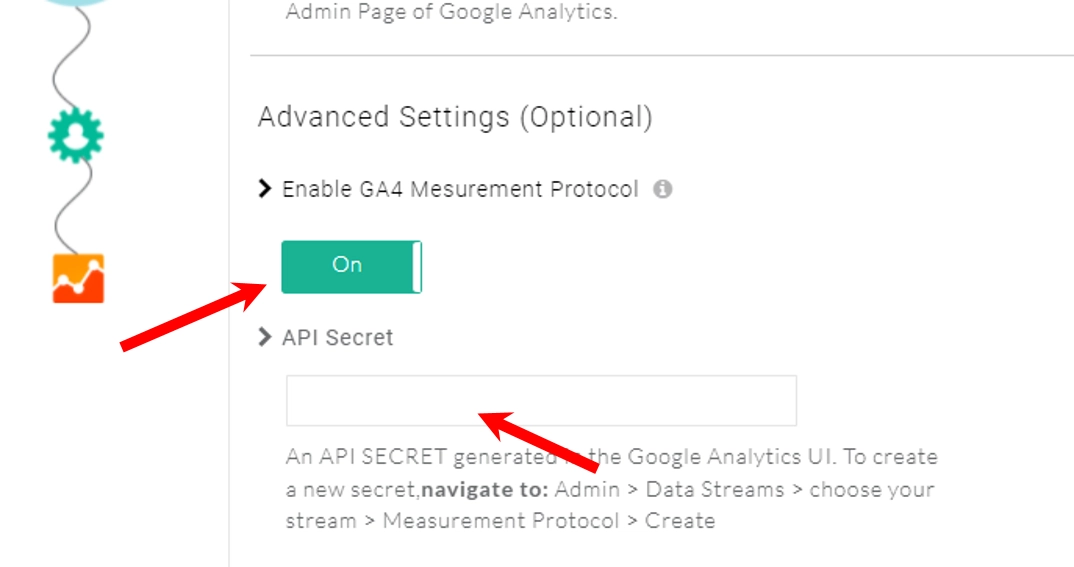
5. In the GA4 configuration settings, navigate to Advanced Settings and enable the toggle for “Enable GA4 Measurement Protocol.”
6. In the “API Secret” field, paste the Secret Value you copied from Google Analytics.
Let’s move to the next setup to measure and send the custom conversion events on reporting.
How to measure and send the custom conversion events on GA4 reporting?
To track and measure custom events effectively, you’ll need to configure custom metrics within your Google Analytics 4 (GA4) account. Follow the steps below to get started:
- Log in to your GA4 account.
- Navigate to the Admin section from the left-hand menu.
- In the Admin settings, navigate to the “Data Display” section to access configuration options for your metrics and dimensions.
- After opening the “Data Display” section, you’ll see a menu of options. Select “Custom Definitions” to proceed with setting up your custom metrics.
- Once you click “Custom Definitions,” a new window will appear, allowing you to configure your custom metric by defining its parameters and measurement details.
- To set up a new metric for your custom event, click on the “Create Custom Metric” button. This will open the configuration panel where you can define your metric details.
- Before creating your custom metric, verify that the data being sent includes the correct parameter for total purchase value.
- In most cases, this will be “ecomm_totalvalue” or “value”, with the unit of measurement set to “Currency.”
Important: You can adjust the unit of measurement to match your specific reporting needs.
- Additional Considerations:
- Custom Event Definition: Make sure the custom event you’re tracking is correctly capturing revenue or transaction data.
- Data Verification: Confirm that the “ecomm_totalvalue” or “value” parameter is being passed properly in your event payload.
- Lead Tracking: Similarly, if you want to measure lead value, you can assign a numeric value to that event and push it to GA4 for tracking and analysis.
After configuring the parameter, unit, and data type, click “Save” to finalize your custom metric setup.
To track and evaluate how your custom metric performs
- To view and analyze your newly created custom metric:
- Go to the “Reports” section in your GA4 dashboard.
- Select “Engagement”, and then click on “Events.”
Here, you’ll be able to track and evaluate how your custom metric performs across different events.
- Once your custom metric is created, go to the “Reports” section in GA4.
- Find the “Events” report, then click the edit to customize and modify the report layout to include your newly created custom metric.
- While editing the report, go to the “Customize Report” panel.
Here, you’ll see a “Metrics” button; click on it to manage and add metrics to your report.
- To include your custom metric in the report, open the “Metrics” section.
- Click on “Add Metric” to proceed with adding your newly created custom metric to the event report.
- From the dropdown menu, select the custom metric you created.
- You can then add it to your existing Events report and save the changes, or create a new report that includes this metric for dedicated tracking and analysis.
- Once your custom metric is set up in GA4, it will begin displaying values as data starts flowing in.
However, keep in mind that GA4 may take up to 24–48 hours to fully populate and reflect the metric values in your reports.
Tracking the conversions and customer data is truly important, no doubt about it. But making them privacy compliant along with the consent of the users is more important than tracking.

How to Setup Google Consent Mode V2 Using 1PD Ops?
Here are the steps to set up Consent Mode for Google Analytics in CustomerLabs:
- Go to Destinations – Google Analytics (gtag) – Configuration Settings – Consent Mode Configuration.
- Enable the toggle to turn on Consent Mode for your Google Analytics integration.

- For Google Analytics, you’ll need to pass user consent using three key parameters, each corresponding to a specific purpose of data usage:
- Analytics Storage – Controls whether analytics data (like pageviews and events) can be stored.
- Ad User Data – Determines if user data can be used for advertising purposes.
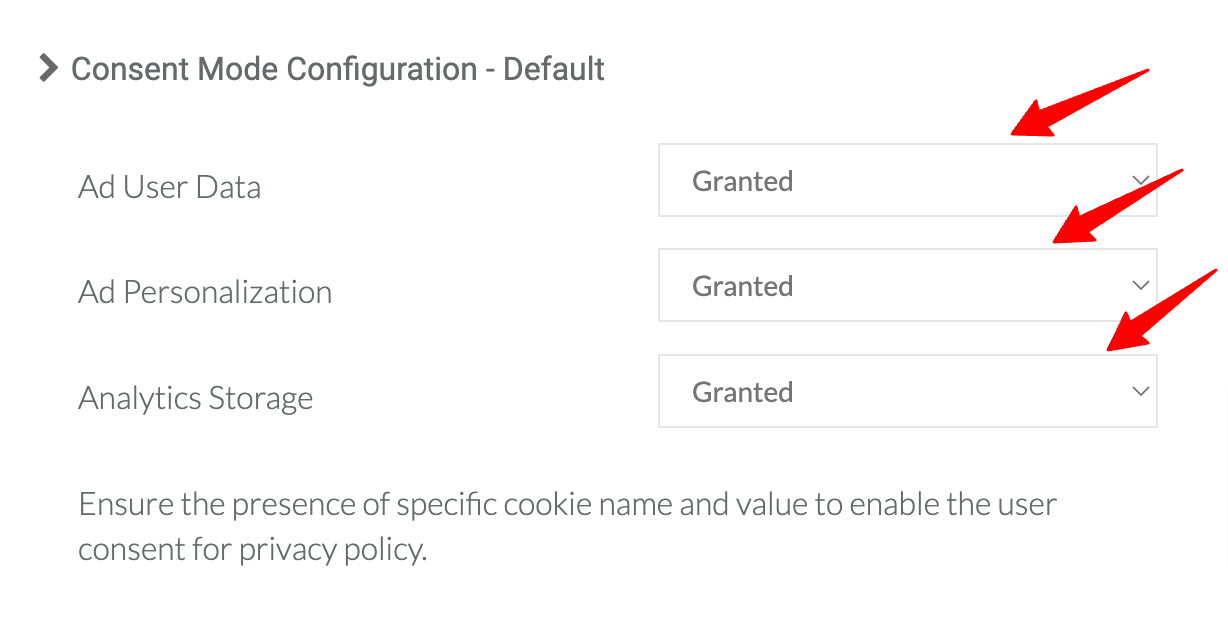
- If a user hasn’t yet selected their consent preferences via the consent banner, Google recommends setting default values for each consent parameter to ensure consistent behavior.
To do this, set the default values (for Analytics Storage, Ad User Data, and Ad Personalization) using the dropdown menus provided as shown in the example below.
These defaults will be stored and/or sent until the user provides explicit consent choices.
- If you’re using a Google-certified Consent Management Platform (CMP), the default consent parameter initialization will be handled automatically by the CMP.
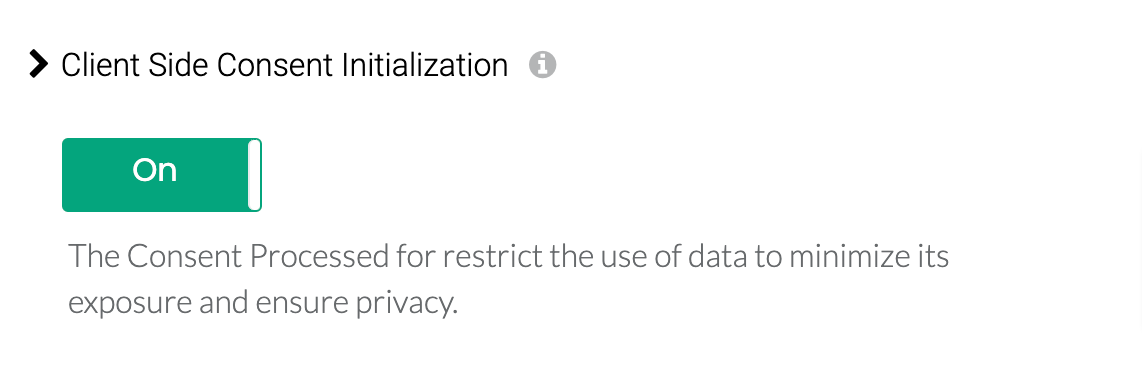
- If you’re not using a CMP, you’ll need to enable the toggle for “Client Side Consent Initialization” in CustomerLabs. This ensures that default values for the consent parameters (as configured in Step 4) are initialized correctly.
Note: Even if you’re using a CMP, you can still enable the toggle in CustomerLabs if you prefer to initialize default consent values directly from the CustomerLabs side.
Client Side Consent Intialization
- Once all the consent parameters and default settings are configured, click “Save Changes” to apply and activate your Consent Mode setup in CustomerLabs.
Read on this doc to know more about Consent mode and how to manage your consent configuration inside GA4.
If you encounter any challenges while setting this up, whether you’re using a Google-certified CMP or a custom-built consent banner, feel free to reach out to our support team at [email protected] for assistance. Our team will guide you through the configuration process to ensure everything works smoothly.
Next up, are the other tracking setups that you can easily integrate into your WooCommerce GA4 setup without GTM or a piece of code.
How to Set Up User ID Tracking with 1PD Ops?
To allow CustomerLabs to assign a User ID for all users, helping unify user details across sessions and devices, enable the toggle for “Enable User-ID Tracking for anonymous users” under Advanced Settings in your GA4 Configuration.
Under “User Identity ID,” select “Default.”
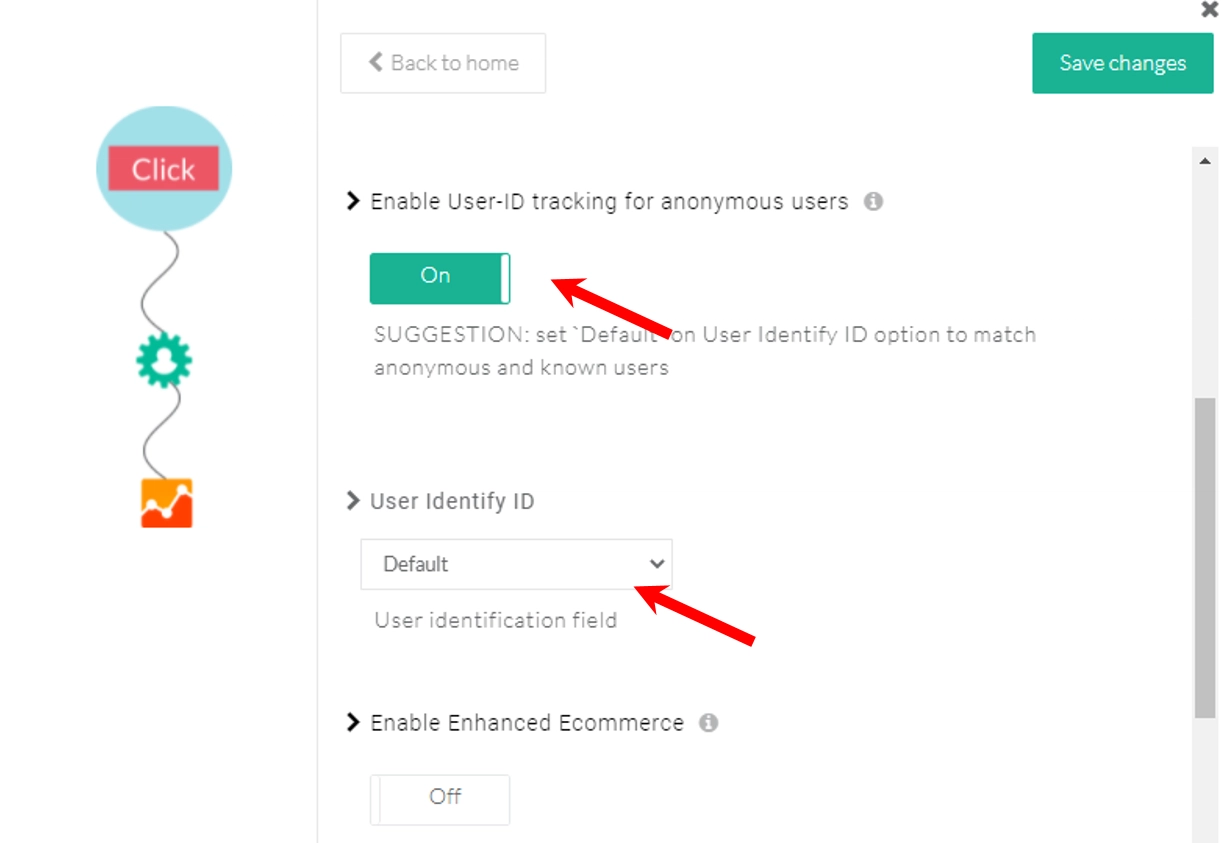
Click “Save Changes”, then return to the Google Analytics (gtag) Customization screen to continue your setup.
Enhanced Ecommerce
Enabling Enhanced Ecommerce allows you to sync additional data for default e-commerce events in GA4, helping you generate more detailed reports and gain deeper insights into user behavior, sales performance, and product interactions.

Note: Enhanced Ecommerce must be enabled during the initial GA4 account authentication. If you wish to activate it later, you’ll need to re-authenticate your GA4 account and then turn on the toggle for Enhanced Ecommerce.
Up next, is the steps to setup event workflow inside GA4
How to Set Up Event Workflow Setup in GA4?
From the Google Analytics (gtag) Customization screen, click on “Setup Event Workflow” to begin configuring your event tracking.
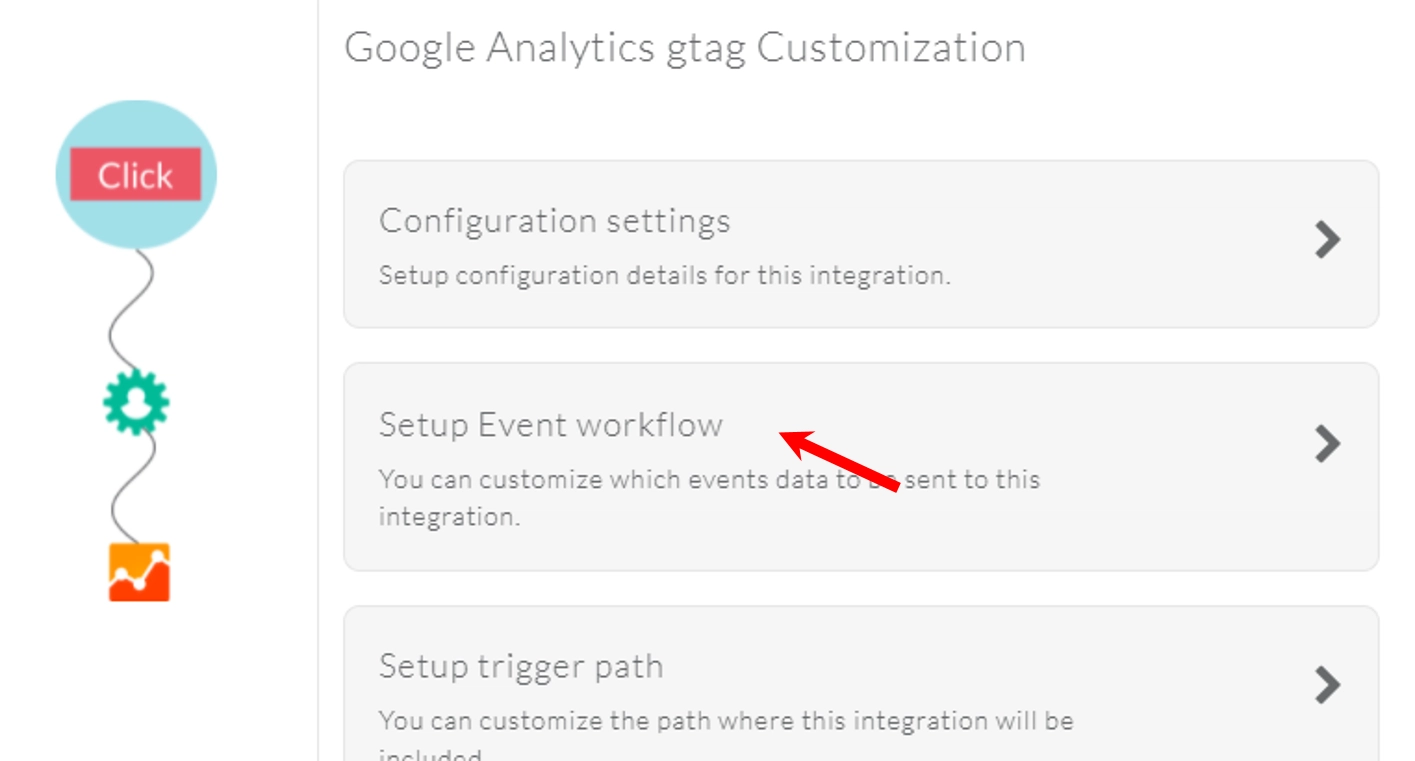
In the server-side callbacks section, enable the toggle for all “added_to_segment” events to start tracking them.
Note: Ensure that you do not enable the same event toggle on both Server-side and Client-side callbacks, as Google does not automatically de-duplicate this data, which could result in double-counting.

Once the “added_to_segment” event is enabled, it will be updated in Google Analytics every time the audience in CustomerLabs is refreshed.
Click “Save Changes” to apply your settings.
Your Google Analytics integration with CustomerLabs is now complete and ready to track events.
Why Opt 1PD Ops to Set Up GA4 WooCommerce Conversion Tracking?
Setting up GA4 conversion tracking for WooCommerce can feel overwhelming with plugins, code, and complex checkout flows. With 1PD Ops, the process becomes seamless, accurate, and fully compliant, capturing every key event without the usual headaches.
Let’s dive into how it ensures your WooCommerce store tracks conversions perfectly.
Every key WooCommerce action, Add to Cart, Begin Checkout, and Purchase, is automatically captured and mapped to GA4. Enhanced e‑commerce tracking is built in, so you get the complete buyer journey, including product variants, subscriptions, upsells, and multi-step checkout flows.
Consent management is fully integrated, keeping your tracking compliant with GDPR, CCPA, HIPAA, and other privacy regulations without losing critical insights. Even complex checkout paths are captured reliably, and real-time event validation ensures every step of your WooCommerce funnel fires exactly as it should.
All this without GTM or even a single piece of code. With 1PD Ops, you don’t have to depend on your developers to get the tracking done.
With 1PD Ops handling your WooCommerce GA4 conversion tracking is precise, comprehensive, and future-proof so you can focus on optimizing campaigns and boosting sales without worrying about data gaps or tracking errors.
Let’s conclude.
Conclusion
GA4 WooCommerce conversion tracking doesn’t have to be complicated, messy, or leave you guessing. With 1PD Ops, you get a setup that’s accurate, fully compliant, and ready to capture every meaningful action on your store from Add to Cart to Purchase, subscriptions, upsells, and beyond.
No code, no GTM headaches, no lost data, just clean, actionable insights that power smarter decisions, better campaigns, and higher revenue.
If you’re serious about understanding your customers, maximizing conversions, and future-proofing your analytics, 1PD Ops isn’t just an option it’s the game-changer your WooCommerce store has been waiting for. Don’t be late just claim your free 14-day trial that provides you more real world experience with your own data. Hurry.!!!
Wait…wait…wait..if you have any queries just book a call with our expert and get clarified.


