In today’s privacy-first world, relying solely on browser-based tracking for your Shopify store is like driving the car blindfolded. You’re technically moving, but you have no real visibility of where you’re headed.
With iOS 14+ privacy updates, stricter cookie restrictions, and the widespread use of ad blockers, the data you see inside Meta Ads Manager often looks incomplete. Store owners everywhere are noticing a growing gap between what platforms report as conversions and what’s actually happening in sales.
This is where the Meta Conversions API (CAPI) steps in as a game-changer. Unlike pixel tracking, which depends on a customer’s browser to fire events, CAPI works server-side. That means even when browser signals are lost or blocked, your purchase, add-to-cart, and other key events are still captured and sent directly to Meta.
The result? More reliable data, stronger optimization, and more accurate audience targeting.
In this blog, you’re gonna learn what Meta conversion API is and how you can setup it up through a step-by-step guide.
What is Facebook Conversions API for Shopify
Meta Conversions API (CAPI) for Shopify is a server-side tracking solution that allows Shopify stores to send customer event data directly to Meta’s servers (Facebook and Instagram).
This direct server-to-server connection enhances the accuracy and reliability of data tracking compared to relying solely on the Meta Pixel, which is browser-based.
Meta says:
Meta itself reports that implementing CAPI can improve Event Match Rate (EMR) by up to 70% in Shopify stores.
A higher EMR means Meta can better connect your ad interactions with actual sales, giving its algorithms the fuel they need to optimize campaigns and reduce wasted ad spend.
To put it simply: if your ads feel like they’re running blindfolded right now, CAPI is the pair of glasses that brings everything back into focus. With clearer tracking, you can finally align your reported conversions with real business outcomes and give your campaigns the data advantage they need in a post-cookie world.
To understand its importance, consider the differences between Pixel and CAPI:
| Feature | Pixel (Client-Side) | CAPI (Server-Side) |
| Data reliability | Limited by ad blockers and iOS restrictions | High |
| Event match rate | Moderate | Up to 70% higher |
| Audience targeting | Limited | Enhanced |
| ROAS tracking | Less accurate | More precise |
The benefits are clear: higher accuracy in event tracking, better campaign optimization, and improved audience quality. One Shopify store saw Purchase tracking increase by 30% after implementing CAPI.
It’s awesome right, where you can completely rely on your better ad campaigns optimization with CAPI, now it’s a phase to learn why you need a CAPI for your shopify store.
Why You Need CAPI for Your Shopify Store
Integrating CAPI isn’t just a technical upgrade; it directly impacts your revenue and marketing efficiency in several
- Higher conversion accuracy
- Better audience targeting
- Enhanced campaign optimization
- Privacy compliance
- Reduced reliance on cookies
Integrating CAPI (Conversions API) with your Shopify store is more than just a technical update; it changes the way you see your marketing data. Unlike the traditional Pixel, which relies on browsers and can miss key actions, CAPI works server-to-server. That means every conversion, add-to-cart, or purchase event is captured with much higher accuracy.
With CustomerLabs’ seamless integration of advanced Facebook Conversions API, Shopify merchants gain access to granular customer insights, enhanced ad targeting, and accurate performance metrics.
With more complete data, Meta can properly attribute conversions. No more guessing which campaigns are truly driving sales every click and interaction gets its rightful credit. This also means audiences can be targeted more precisely. Users that Pixel alone might miss, especially iOS users with limited tracking permissions, are now part of your data pool.
Campaign optimization also becomes more powerful. Meta’s algorithms thrive on accurate event data, and CAPI feeds them exactly what they need to improve performance. At the same time, integrating CAPI helps you stay in line with privacy regulations like GDPR, CCPA, and iOS opt-in rules, all without compromising tracking.
Finally, it reduces reliance on cookies. As browsers tighten privacy restrictions and third-party cookies fade away, server-side tracking ensures your marketing strategy stays effective now and into the future.
Step-by-Step Shopify CAPI (Conversions API) Setup
Set FB Conversion API on Shopify through CustomerLabs Integration
Step 1: Enable Shopify as a Partner via CustomerLabs
- Log in to CustomerLabs
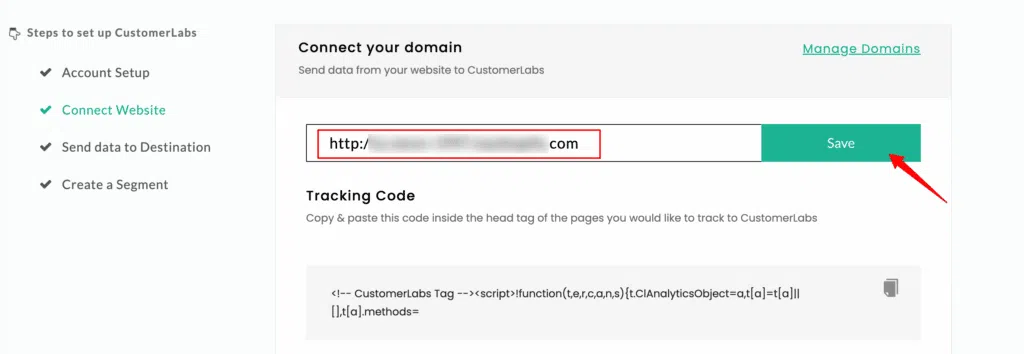
- Start by logging into your CustomerLabs account. If you don’t already have an account, sign up on the CustomerLabs website.
- In the CustomerLabs dashboard, navigate to the Connect Your Domain section.
- Enter your Shopify store URL and save the changes. This connects CustomerLabs to your Shopify store, enabling event tracking.
Add CustomerLabs Tracking Code to Shopify
- After saving your store URL, CustomerLabs will generate a tracking code. Copy this code.
- In Shopify, go to Online Store > Themes.
- Click Actions > Edit Code, open theme.liquid, and locate the </head> tag.
- Paste the CustomerLabs tracking code just above the </head> tag and save your changes.
Step 2: Set Up Facebook Conversions API Integration in CustomerLabs
Create a Custom Pixel in CustomerLabs
- In your CustomerLabs dashboard, go to the Customer Events section.
- Click Add Custom Pixel, name it (e.g., “CustomerLabs Pixel”), paste the pixel code provided by CustomerLabs, and save.
Authenticate Your Facebook Account
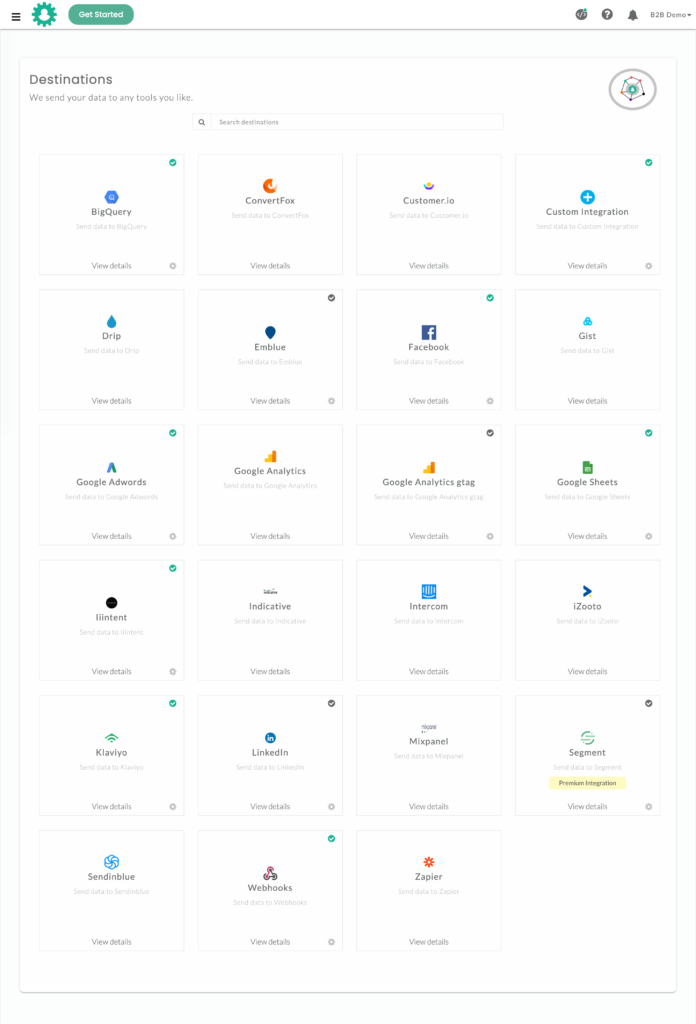
- In Destinations within CustomerLabs, select Facebook and enable it.
- Log in to Facebook and grant the necessary permissions to authenticate your account.
Configure Facebook Pixel and Events
- Choose the Facebook Pixel you want to use for server-side tracking.
- Toggle on Server-Side Data to activate the Facebook Conversion API.
- Select the events you want to track (e.g., Add to Cart, Purchase) and save your settings.
Key Events to Prioritize
- Purchase: Confirms conversions; verify this event in Facebook Events Manager to ensure real-time purchase data syncs correctly.
- AddToCart: Tracks when products are added to cart, signaling purchase intent.
- ViewContent: Monitors product views to reveal interest patterns.
- InitiateCheckout: Captures when users begin the checkout process.
- AddPaymentInfo: Tracks when payment details are entered, showing high buying intent.
Improve Event Match Rate (EMR)
- A higher EMR improves targeting by accurately linking customer actions across platforms.
- Regularly monitor EMR in Facebook Events Manager.
- Adjust Advanced Matching settings to maintain high-quality scores.
Step 3: Verify and Test Your Facebook Conversions API Integration
Test Events on Your Shopify Store
- Perform test actions on your Shopify store (e.g., adding products to the cart or completing a purchase).
- Return to the CustomerLabs dashboard and use the Verify Event Data feature to confirm the events are tracked correctly.
Check Event Data in Facebook Events Manager
- Go to Events Manager in your Facebook Business Manager.
- Verify that events such as ViewContent, AddToCart, and Purchase are firing and capturing data accurately. Adjust settings as necessary if any issues arise.
Complete the Setup and Ensure Compliance
Create a Facebook Commerce Account (If Needed)
- In Facebook Business Manager, go to Commerce and follow prompts to set up a Commerce Account if you don’t already have one.
- Connect your Shopify store, verifying your domain, and upload your product catalog to sync with Facebook. This enables features like dynamic ads.
- Enable Maximum Data Sharing
- Ensure Maximum Data Sharing is selected in both Shopify’s Facebook Channel settings and your Facebook Business Manager. This maximizes data collection and improves event matching for better targeting.
- Review Facebook’s Terms and Conditions
- Review and accept Facebook’s terms to ensure compliance, uninterrupted access, and adherence to Facebook’s advertising policies.
Final Verification of Key Events
- Perform one last test of critical events, such as Purchase and Checkout, to confirm the setup is working seamlessly.

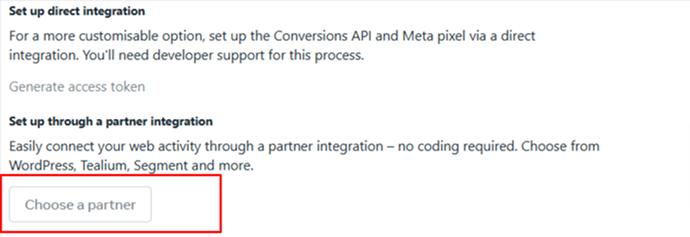
Set FB Conversion API on Shopify through Partner Integration
Step 1:
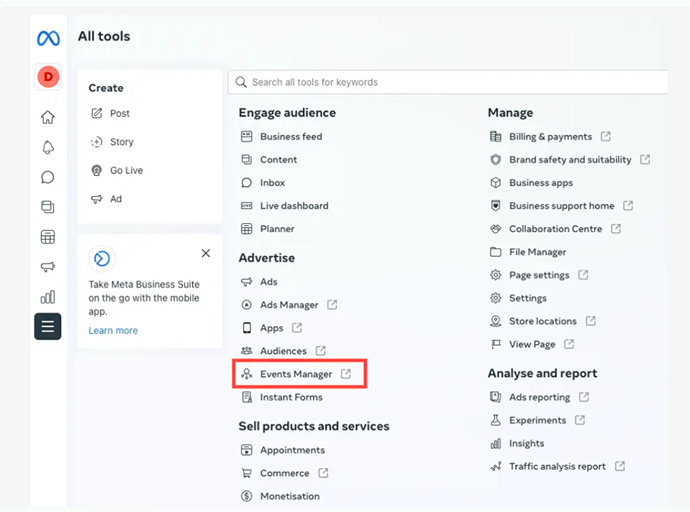
Access Facebook Conversions API in Events Manager
- Go to your Facebook Business Manager.
- Navigate to Events Manager (this is where all your events are managed).
- In the left-hand menu, click on Data Sources under Settings.
- Scroll down until you find Conversions API.
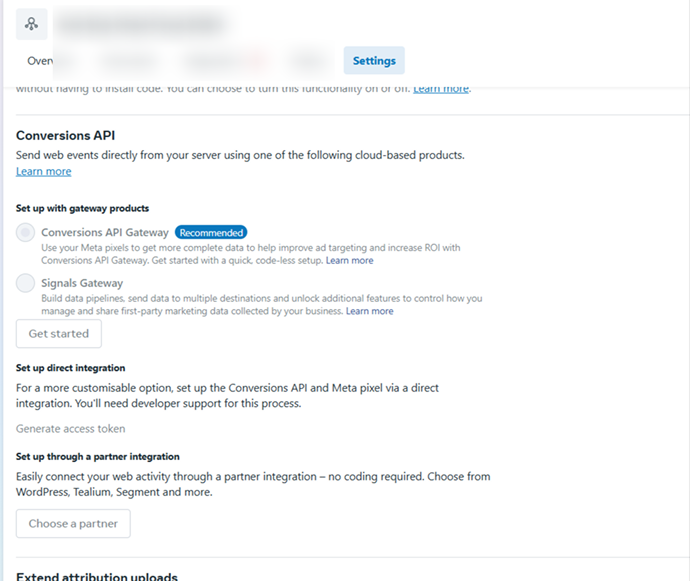
- Step 1: Click Setup through the Partner Integration option.
- Step 2: Click Choose a Partner and select Shopify from the list.
Step 2: Install Facebook App on Shopify
- Go to your Shopify Dashboard.
- Navigate to Apps and click Shop for apps.
- You’ll be redirected to the Shopify App Store.
- In the search bar, type “Facebook”.
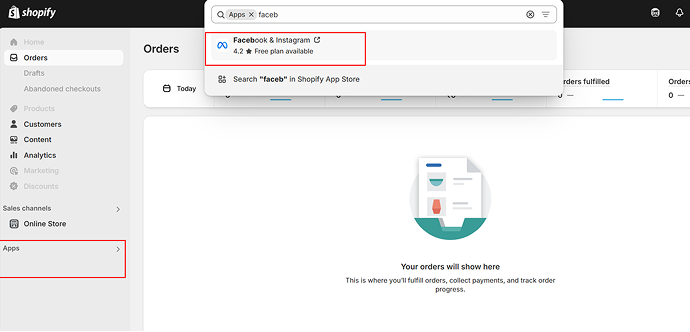
- Click on the Facebook Channel app and select Add app.
- Once added, you’ll be redirected to a page to connect Shopify and the Facebook app.
- Scroll down and click Add sales channel.
- The Facebook app is now successfully installed.
Step 3: Set Up Facebook and Shopify Integration
- On the screen, locate “Sell your products on Facebook” and click Start Setup.
- Click Connect Account to link your Facebook account to Shopify.
- Select your Facebook Business Manager from the list to connect it with Shopify.
Setup 4: Domain Verification
Click on Domain Verification and enter your domain name.
To verify via Facebook Business Manager:
- Go to Business Settings.
- From the left menu, scroll down to Brand Safety and click Domains.
- Click Add, enter your domain name, and click Add Domain.
- Once completed, your domain should be verified. If not, refresh the page.
To verify via DNS Verification:
- Click DNS Verification.
- Log in to your domain registrar and navigate to the DNS section (location may vary by registrar; contact support if needed).
- Click Add Record, set Type to TXT, Name to @, and TTL to Auto.
- Copy the provided TXT code and paste it into the record.
- Hit Save to complete the verification.
Step 5: Connect your Facebook Page
- Click on Facebook Page.
- Select the Facebook Page you want to connect to.
- Click Connect to link the page to Shopify
Step 6: Enable Data Sharing
- Click on Data Sharing.
- Toggle on Enable Customer Data Sharing.
- Select Maximum to enable both Facebook CAPI (server-side) and standard Pixel tracking for optimal performance.
- Standard: Collects basic data via browser events.
- Enhanced: Sends additional customer information like emails or phone numbers (if provided).
- Maximum (Recommended): Combines browser-side Pixel and server-side CAPI events for improved tracking and deduplication.
Click Save to confirm your settings.
Step 7: Setup Facebook Commerce account (Recommended for Display Ads)
Click on Facebook Commerce Account and connect your existing account.
If you don’t have a Facebook Commerce account, create one:
- Go to Facebook Commerce Manager.
- Click Get Started and select Create a Shop.
- Choose where customers will check out:
- Your Shopify website (recommended)
- Facebook or Instagram checkout (available in select regions)
- Your Shopify website (recommended)
- Select the Facebook Business Page that will host your shop.
- Choose your Business Manager Account (or create one if needed).
Step 8: Finish the Setup
- Once all previous steps are completed, click Review Terms and accept the terms and conditions.
- Click Finish Setup and then Confirm.
You have now successfully set up the Facebook Conversion API. Next, we’ll validate and debug the setup to ensure everything is working correctly.
Set FB Conversion API on Shopify through Manual Integration
You can manually set up Facebook Conversion API (CAPI) directly in Facebook Events Manager. This method is free, but implementation can take several weeks depending on the number of events you want to track and the availability of engineering resources.
Steps to get started:
- Log in to your Facebook Business account.
- Navigate to Events Manager to manage your events and configure CAPI.
Link Your Data Source

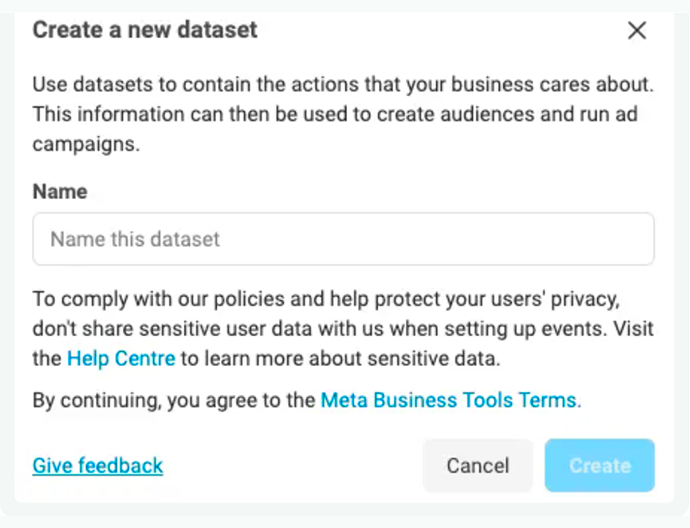
Set Up a New Dataset and Give It a Name
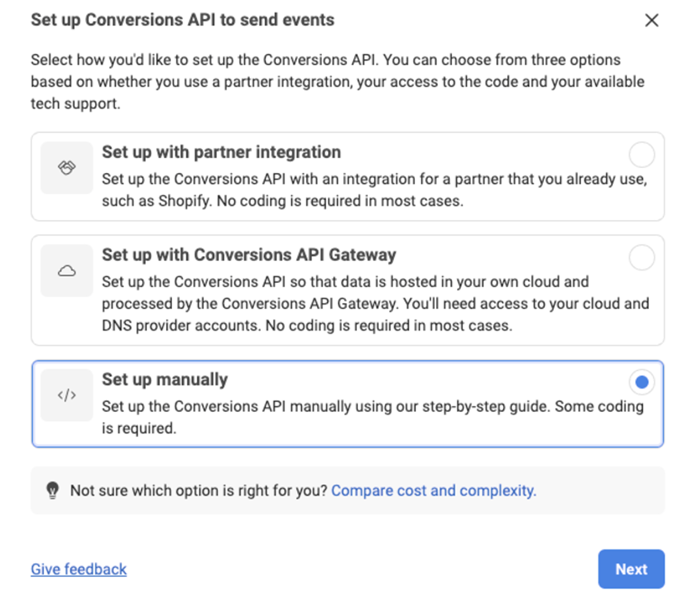
Click on Set Up Manually
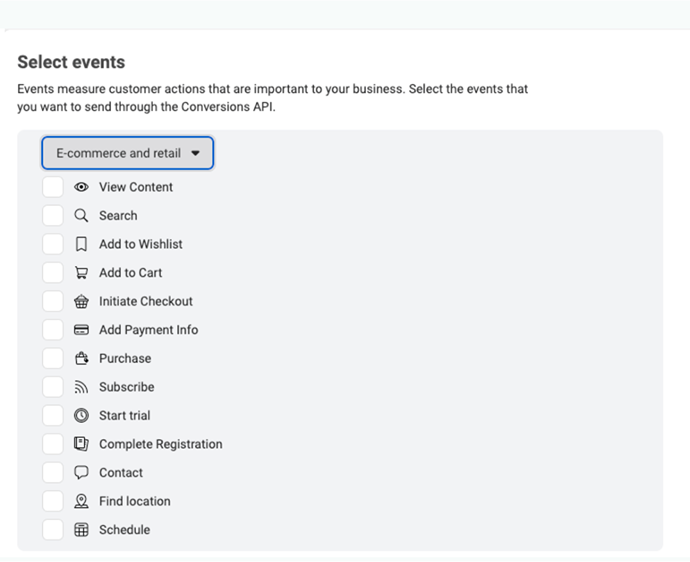
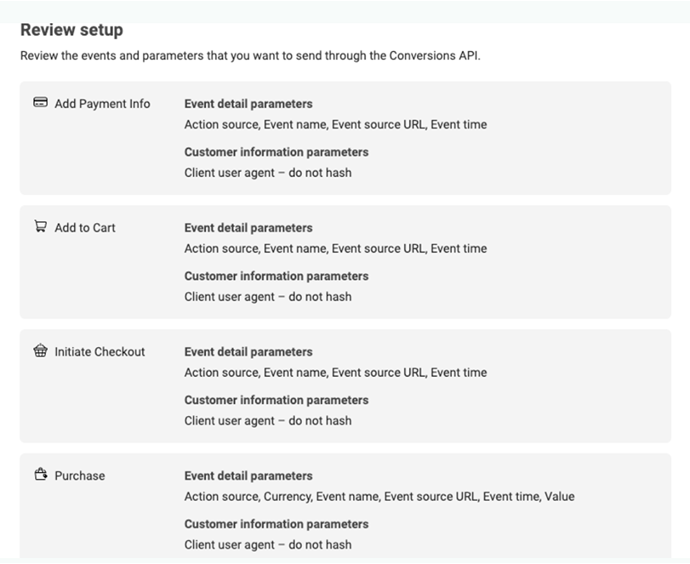
Choose the specific events you want to track and send through the Conversion API.
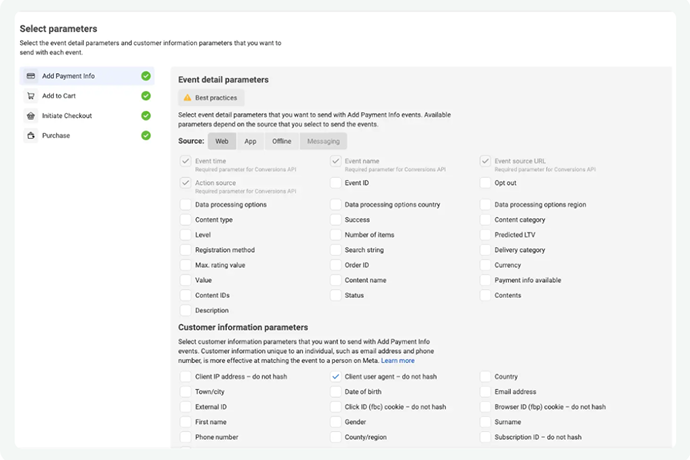
Choose any extra parameters you want to include with each event for more detailed tracking.
Double-check your configuration to ensure everything is set up correctly.
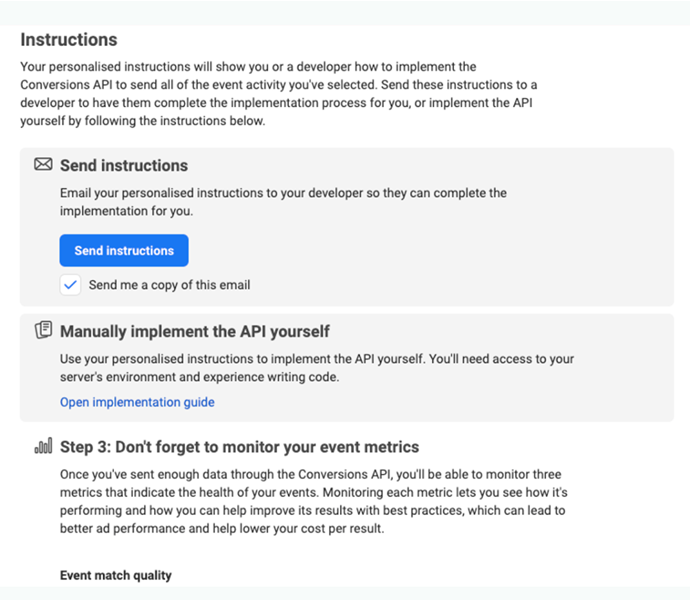
Share the setup with your developer or follow the provided instructions to implement the API.
Advanced Tips & Best Practices
Once your events are flowing correctly, there are additional optimizations you can implement:
- Prioritize high-value events for campaign optimization.
- Use conversion modeling to fill gaps in missing data.
- Enable Maximum Data Sharing in Meta.
- Segment events by revenue and priority to enhance algorithmic learning.
- Multi-store setup and Shopify app compatibility considerations.
These are the limited benefits and advanced tips that I can avail for at this instant, if you need more of it just drive into the conclusion and book your slot.

Conclusion: Unlock Accurate Shopify Tracking Today
Browser tracking alone? It’s like running ads blindfolded. Meta CAPI lifts that blindfold sending server-side events from Shopify to Meta for accurate tracking, smarter optimization, and better audience targeting all while staying privacy-compliant.
With CustomerLabs, setup is effortless, no code, no guesswork. Your events flow seamlessly, conversions are tracked correctly, and your campaigns finally reflect real results.
Stop losing conversions and wasting ad spend. Book a demo to activate CustomerLabs now and turn your data into real growth. I hope you know the seriousness of what you lose if you don’t take action today.
By clicking your 14 day free trail signup can boost your ad campaigns and your exposure level like a skyrocket. This is not conversion – we need to make marketers taste their success by owning it.