If you are using HubSpot as a CRM, you probably are sitting on the cleanest first-party signal source. Email, phone, lifecycle states, form events — the things Meta’s Conversions API (a server-to-server channel that sends conversion events directly to Meta, bypassing the browser) needs to do its job are already in your CRM.
This guide walks you through integration end to end: how the native HubSpot path compares to a no-code bridge, the nine-step no-code setup you actually run from HubSpot source to Meta destination, how to tune Event Match Quality after go-live, and the three failure modes that break most rollouts.
P.S. You can also send your HubSpot CRM deal-stage events to Meta.
I know what you might be thinking right now. “Hubspot already supports direct integration with Meta, isn’t it?”
Yes, of course. You are right. It does support. But it does come with quite a lot of limitations. (Plus it will at least drag you more than a day just to set it up, not to mention the developer’s dependency)
With an effective first-party system in place, you can just connect Hubspot with Meta Conversions API in just about 30 minutes. (It comes its own added advantages)
Native HubSpot Integration vs. No-code First-Party Data Platform
HubSpot’s native integration fires server-side events on exactly three triggers: HubSpot form submissions, lifecycle stage changes, and page views.
So what falls through the cracks? A deal moving to closed-won. A form that isn’t HubSpot’s; your Typeform, your Marketo embed. A custom property flipping. A server-side event from your own app. All of it sits outside the native scope, and it does not reach. But through all this your CAPI setup still looks “connected” on the dashboard.
A no-code first-party data platform picks up exactly where the native path taps out. And there are two flavors in this space, which is where marketers get confused.
The first is a generic automation bridge like Zapier, Make, etc.,. These can technically move an event from point A to point B. But “technically” is doing a lot of work in that sentence.
Picture it. A lead fills out your Typeform, books a call, and three weeks later the deal moves to closed-won inside HubSpot. That closed-won moment is your most valuable signal, it’s the exact outcome you want Meta to optimize toward.
With a generic bridge, getting that one deal-stage event to Meta cleanly means a Zap that fires on the stage change, a hashing step you configured yourself, a deduplication key you hope matches the Pixel, and a mapping doc only you understand.
Miss one piece and Meta either rejects the event or double-counts it. Either way, the algorithm learns from garbage.
The second flavor is a platform built for the HubSpot-to-Meta path specifically, like CustomerLabs. Same closed-won deal, but now the hashing, the dedup, the field mapping, and the EMQ tuning are the product, not your weekend project.
You point it at the deal stage, and the clean, matched signal shows up in Meta ready to train on.
Here’s the honest decision matrix. Read across the row that matches the event you’re actually trying to send.
| Native HubSpot | Generic bridge (Zapier, Stape, Make) | First-party data platform (CustomerLabs) | |
|---|---|---|---|
| Form, lifecycle, and page-view events | Yes | Yes | Yes |
| Deal-stage events | No | Yes (with mapping work) | Yes |
| Non-HubSpot form events | No | Yes | Yes |
| Automatic PII hashing | Yes | Sometimes | Yes |
| event_id deduplication with the Pixel | Limited | DIY | Yes |
| EMQ tuning support | No | No | Yes |
| Tier-capped events | Yes (5 / 50 / 100) | No | No |
| Developer required | No | Light | No |
| Time to go-live | Half a day | 2 to 5 days | About 30 minutes |
How Do You Integrate HubSpot With Meta CAPI (Conversions API) End to End?
Not a reader, see this video:
Two lanes to connect. First, HubSpot starts pushing its contact, company, and deal data into CustomerLabs. Second, CustomerLabs ships that data into Meta server-side. CustomerLabs 1PD Ops sits in the middle, turning raw CRM activity into clean conversion events Meta’s models can learn from, no code required.
How to Connect HubSpot With CustomerLabs?
Goal: Get HubSpot to forward every meaningful change (new contact, lifecycle stage move, deal advancing) into CustomerLabs via webhook — HubSpot pushes to you, you don’t poll it.
Authenticate and grant access
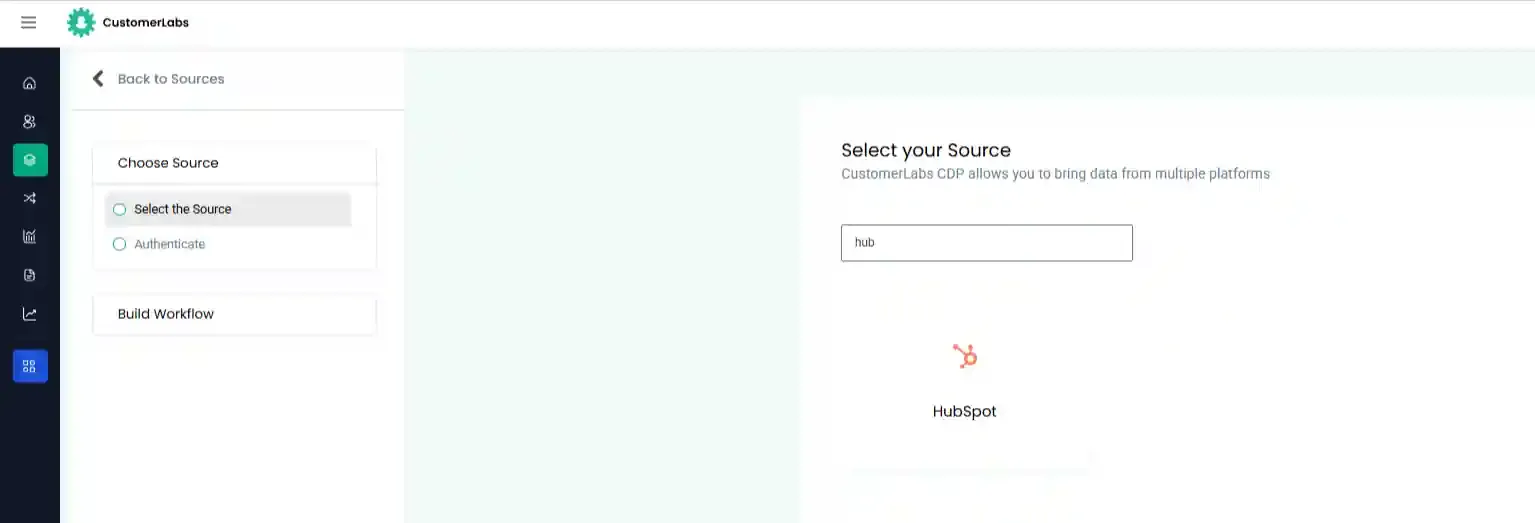
- Log in to CustomerLabs → Sources → Connect Source → HubSpot
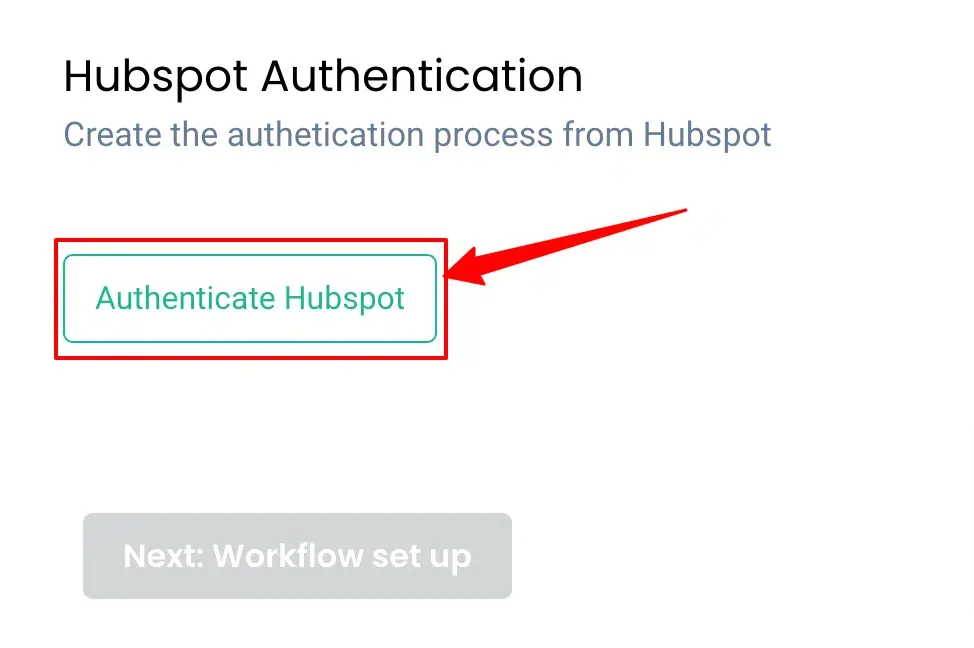
- Click to authenticate → sign in to HubSpot → choose the account to link
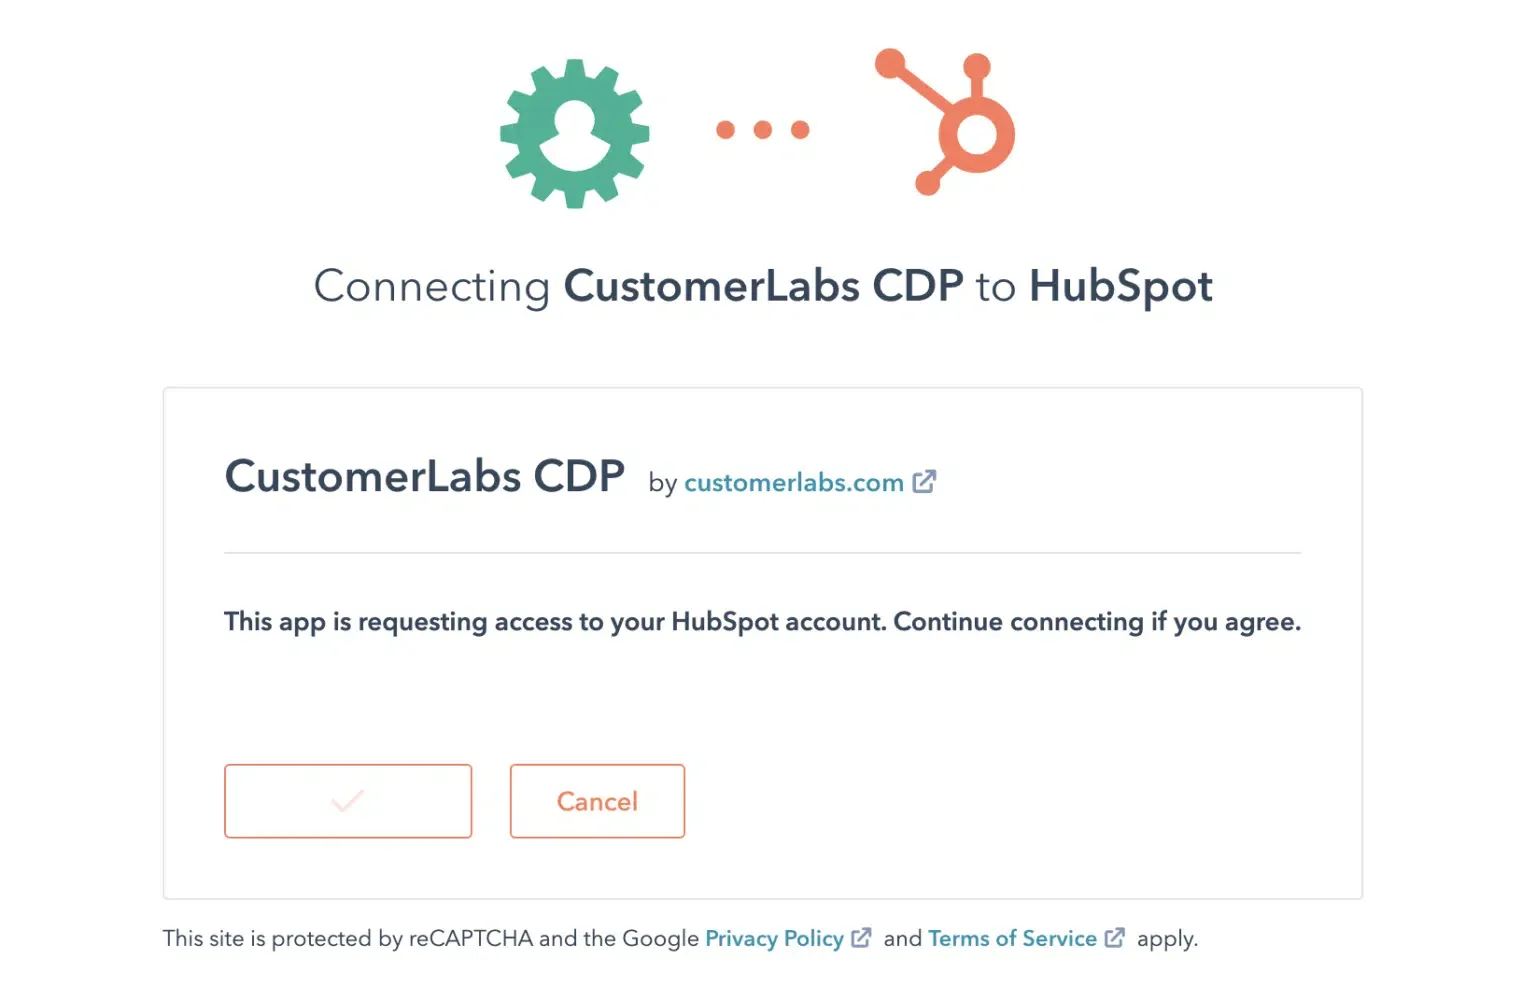
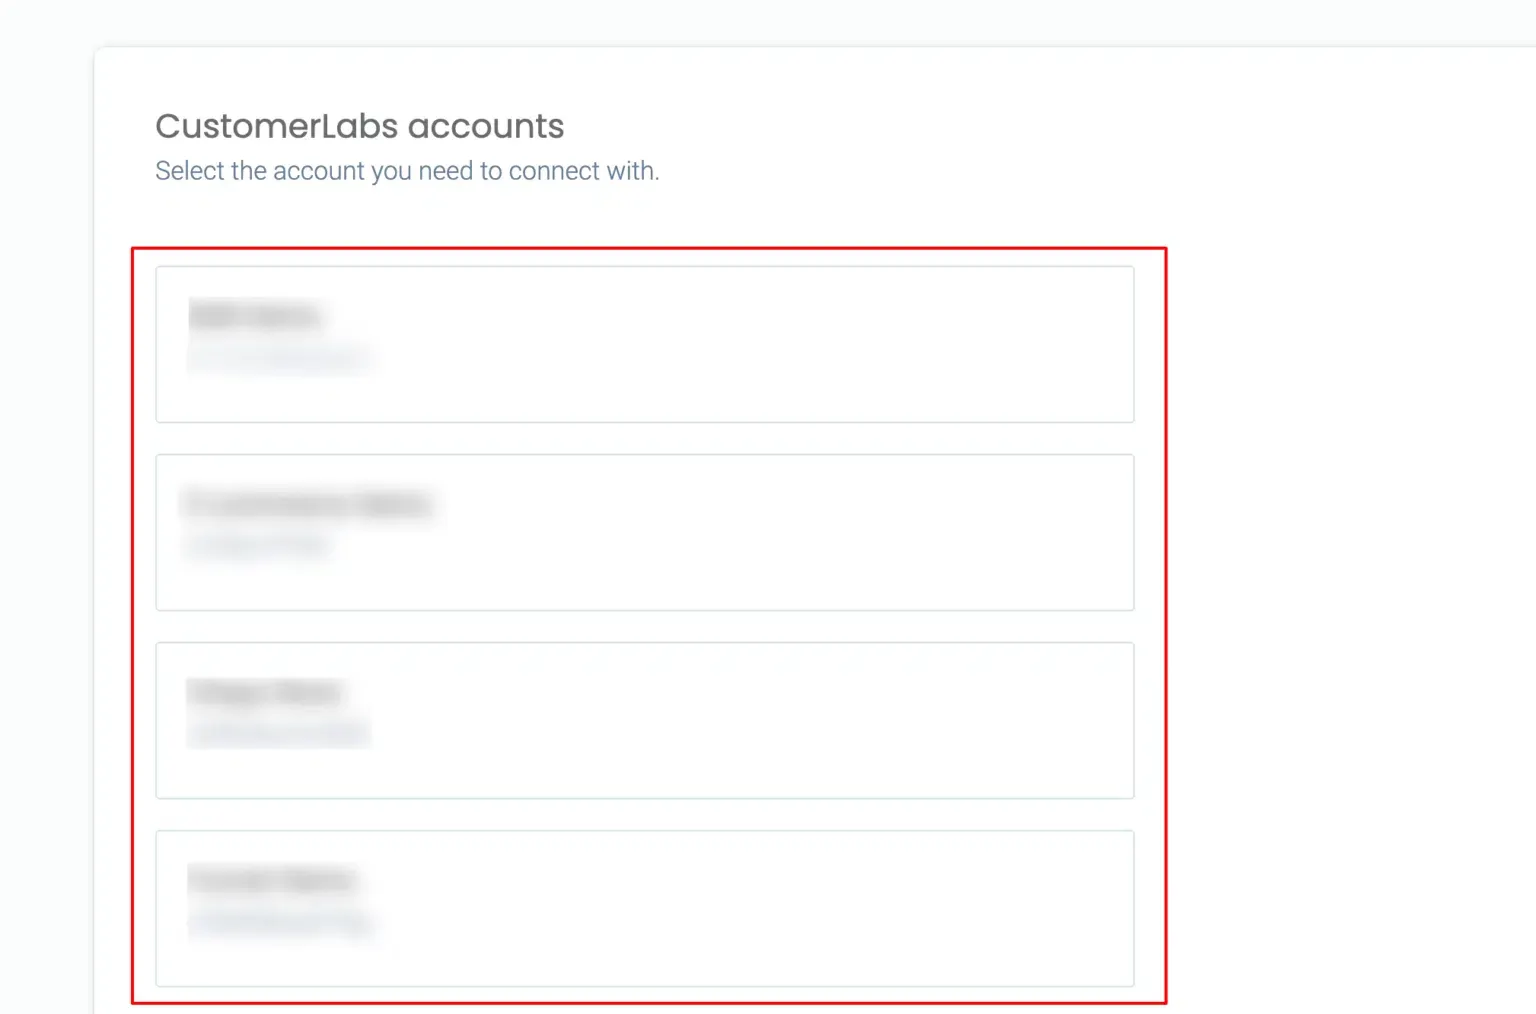
- Approve access to Contacts and Companies (pick the right CustomerLabs account if you run more than one)
Set up your fields
- Standard fields flow in automatically.
- Add custom fields under Custom Field Configurations, max 10 per module
- Add the cluid field to your deal, company, and contact modules — this stitches records into one unified profile
- Create a hidden field named cluid in your HubSpot form and add the tracking snippet that passes the CustomerLabs user ID via query parameters (without it, profile unification has nothing to work with)
Know what HubSpot sends
- Object types: Contacts, Companies, Deals
- Event types: Created, Deleted, Property Changed, Deleted for Privacy
- Most workflows trigger off property changes: contact.propertyChange, deal.propertyChange, company.propertyChange, contact.creation
Build the workflow — capturing a new contact
Quick translation: HubSpot Contact = CustomerLabs User; HubSpot Company = CustomerLabs Account.
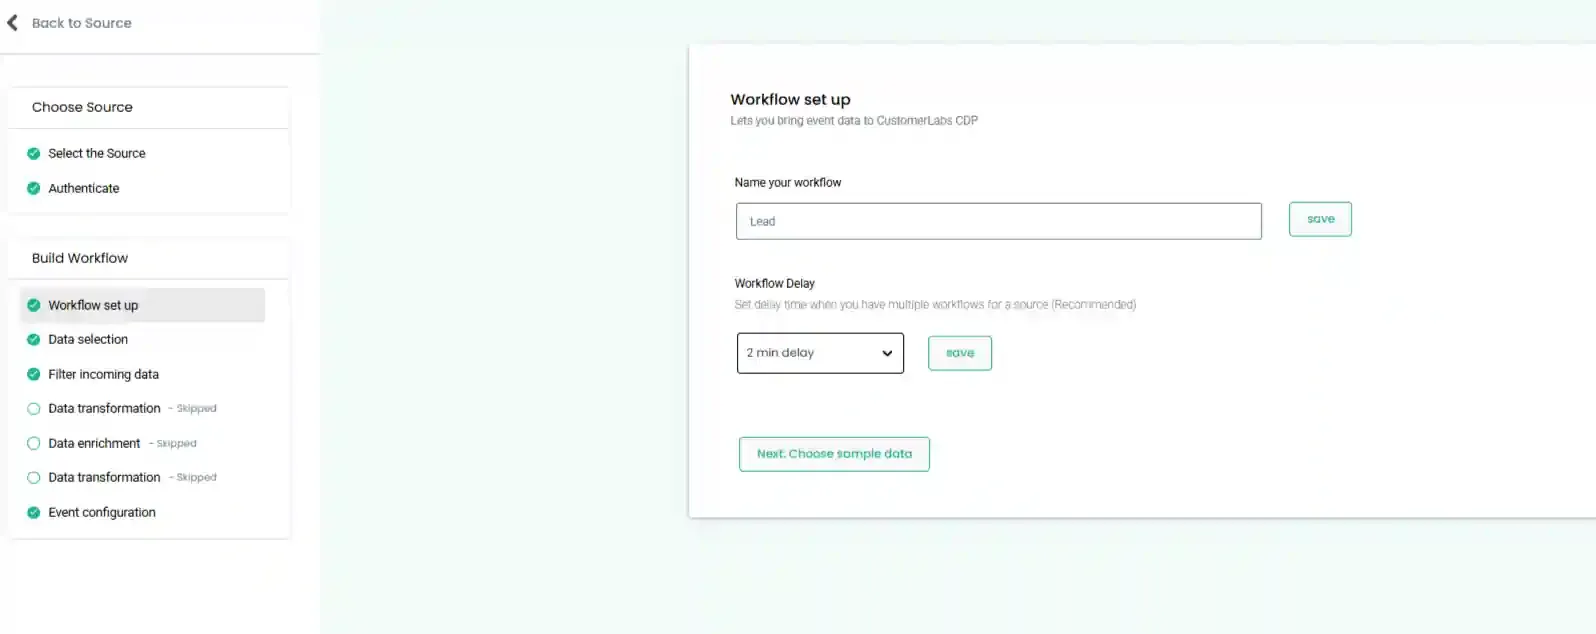
- Initialize: name the workflow → create a test contact in HubSpot → click Choose Sample Data
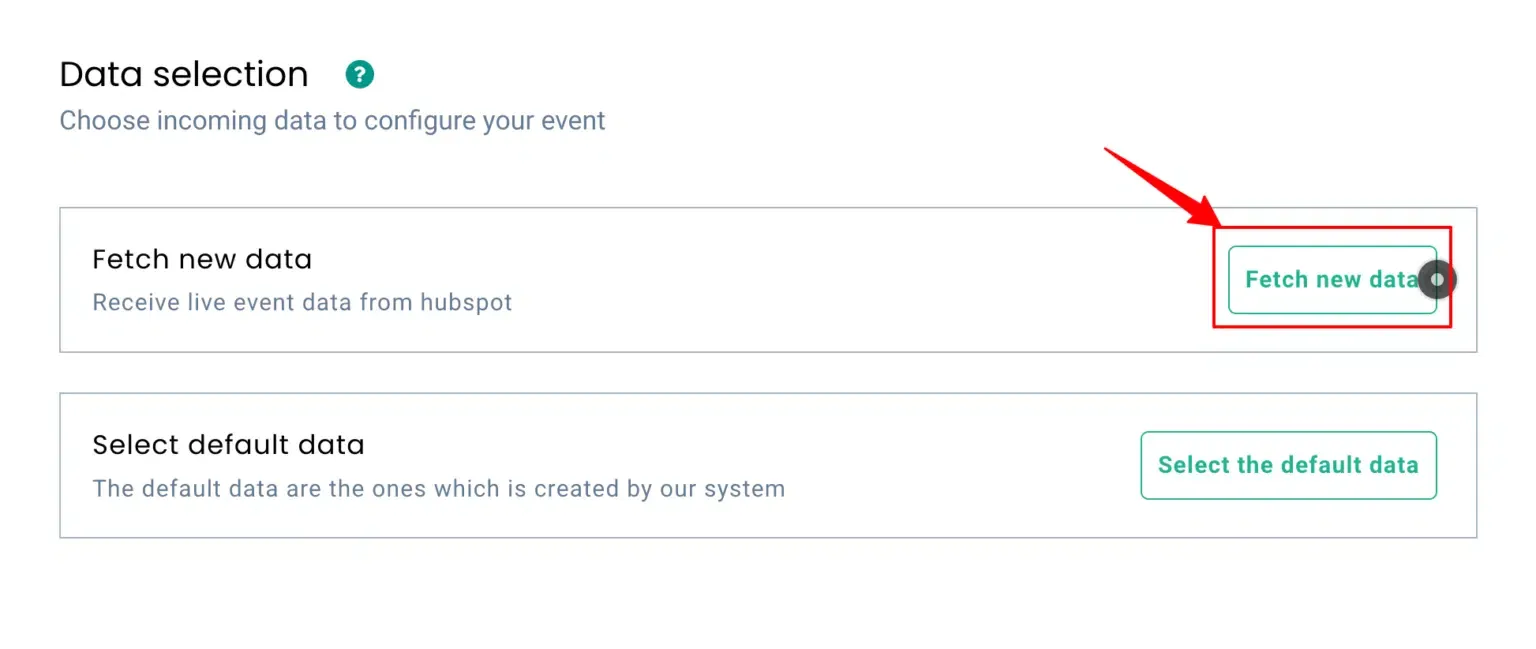
- Pull a sample: click Fetch New Data to see real event samples
- Read the structure: click View Details, review the JSON — note that HubSpot sends each property as its own event (email = one event, first name = another; expected, not a bug)
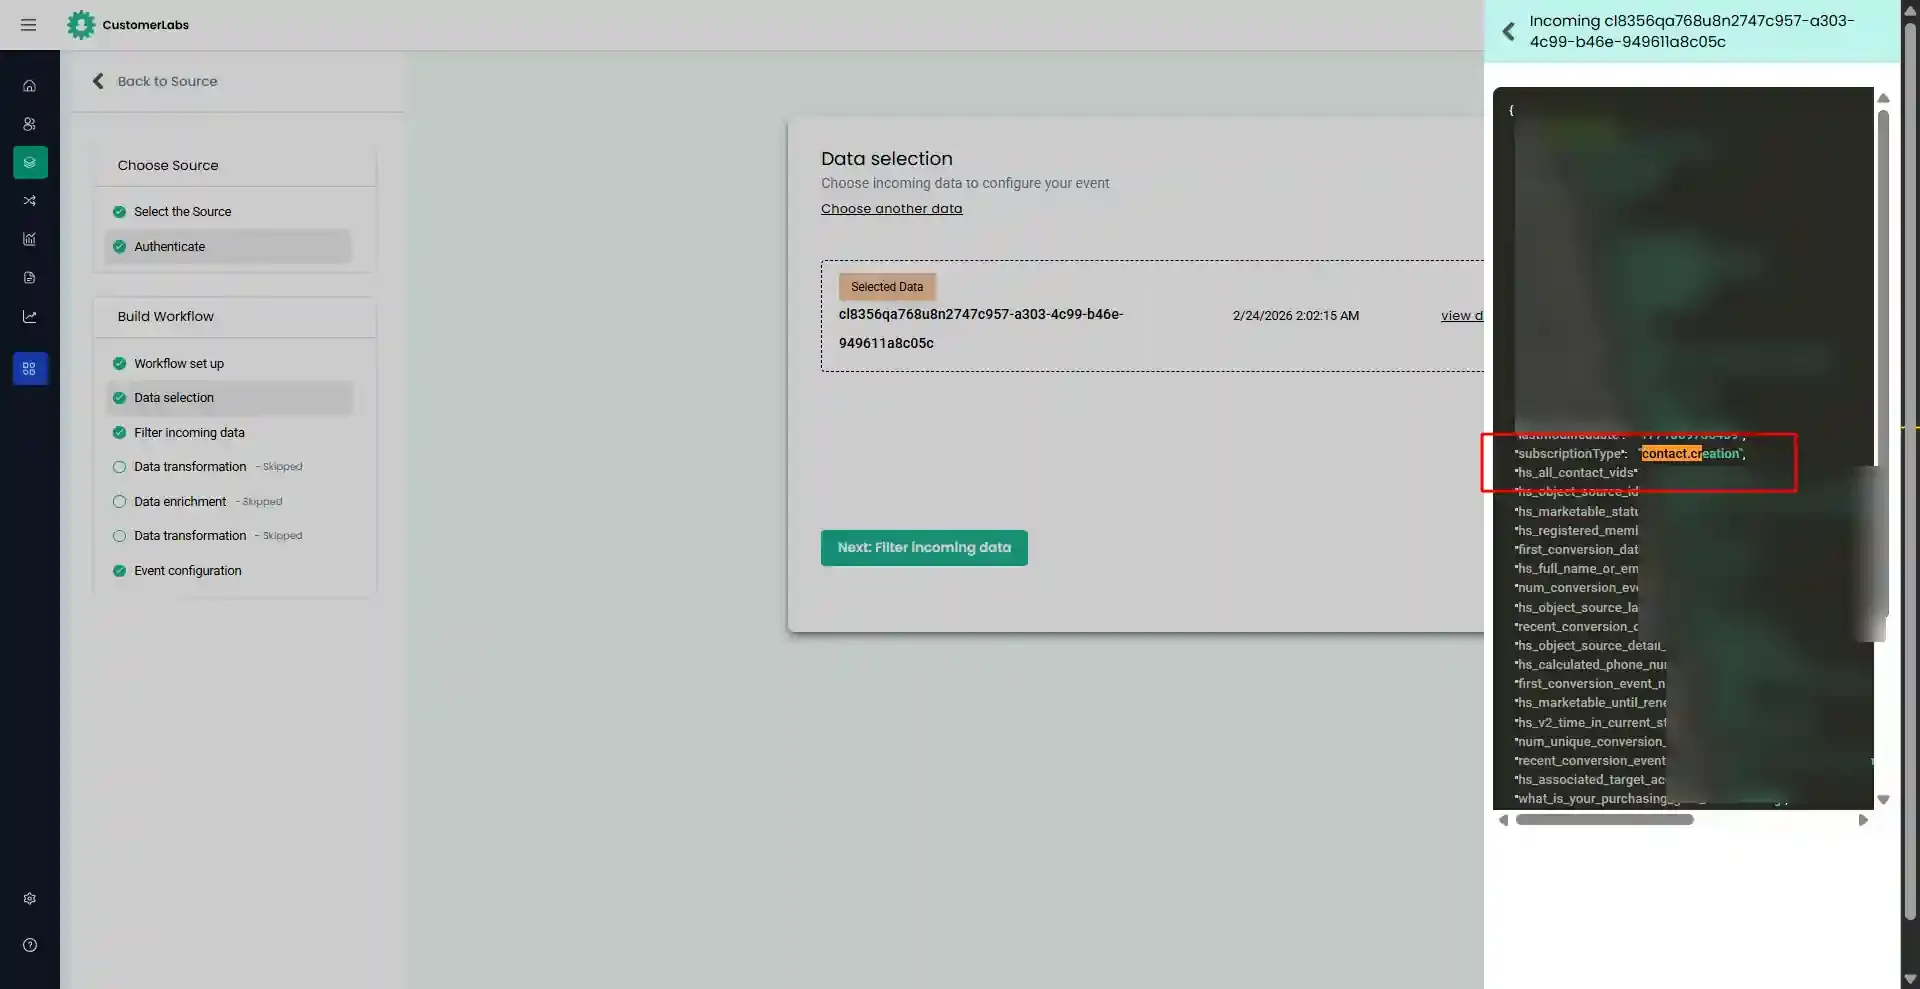
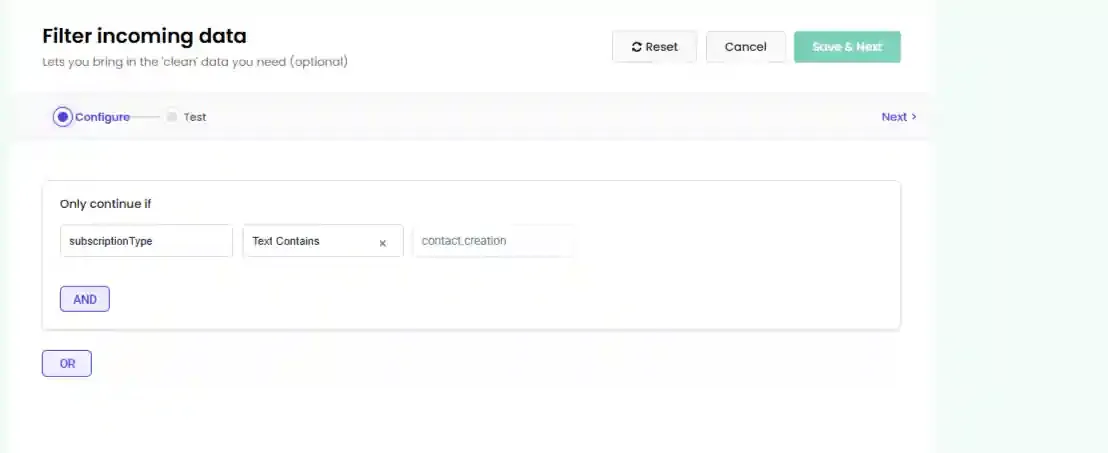
- Pick and filter: choose a sample → select it → create a filter where Event Type = Contact.creation (the subscriptionType field carries this value)
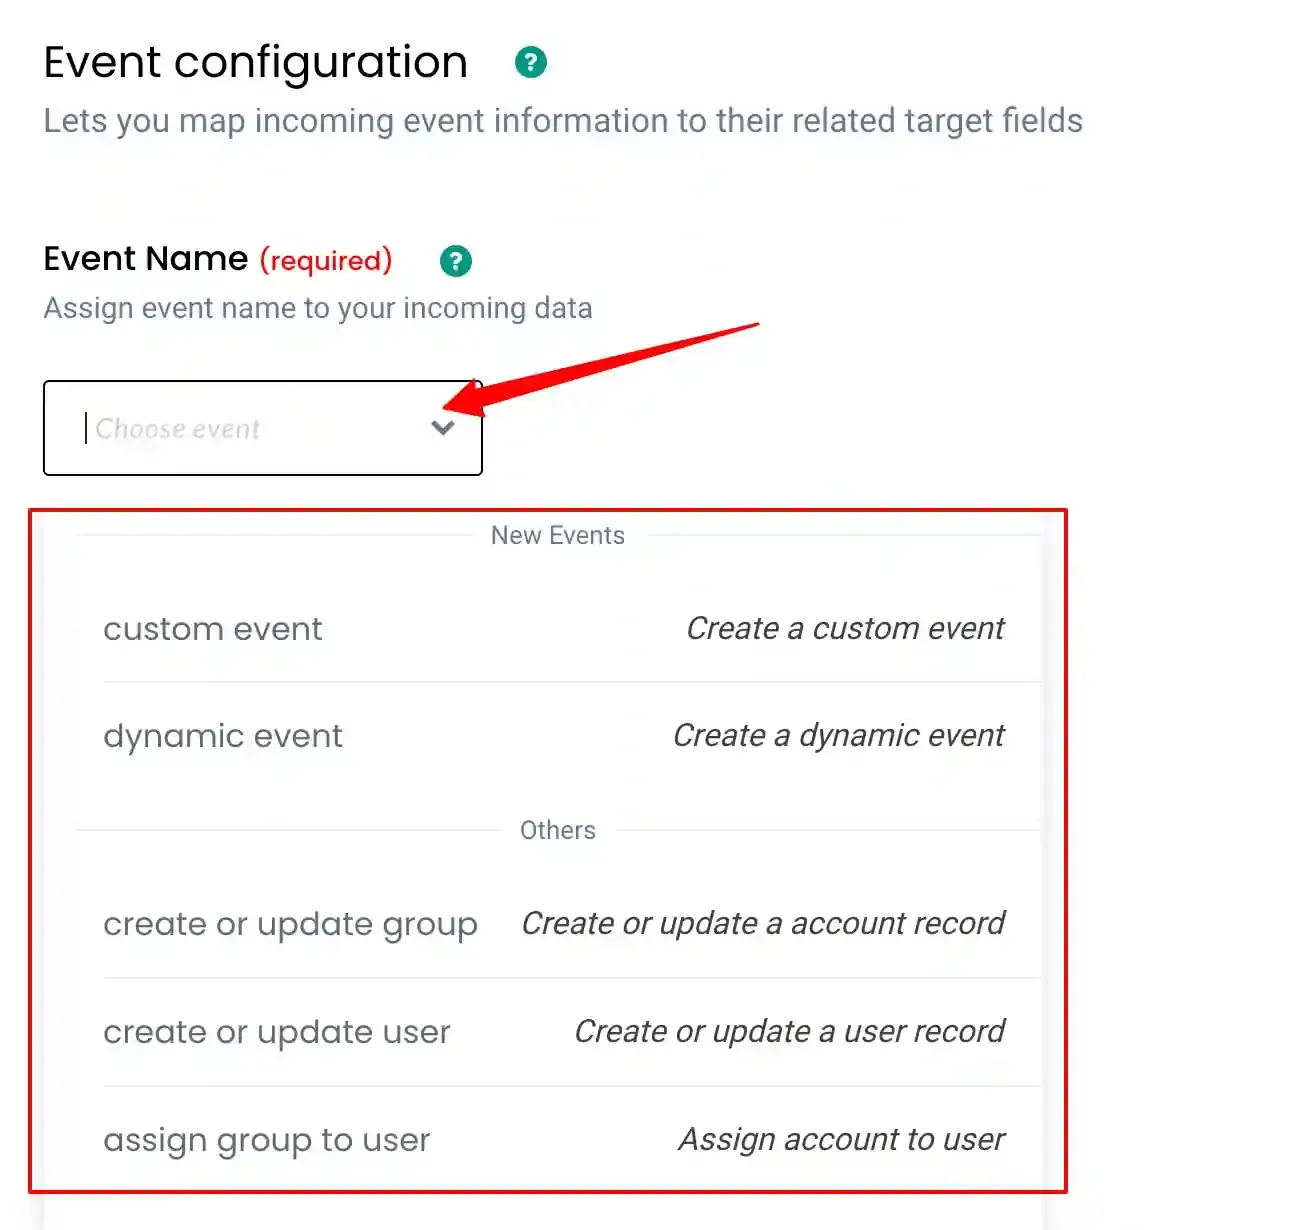
- Name the event: predefined event or custom event name
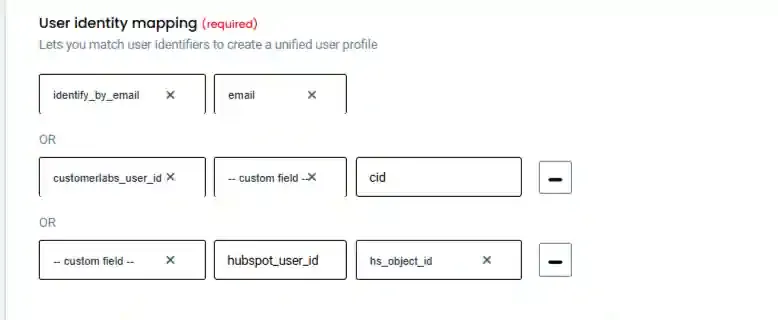
- Map identity: identify_by_email + hubspot_user_id (Object ID)
- Map attributes: route data into User Traits and Event Properties:
- ext_id → User External IDs
- firstname, lastname, email, phone, city, state, country, lifecyclestage, jobtitle → User Traits
Tracking lead/deal stages — same flow, one twist
- HubSpot sends internal field names (lifecycle stage, deal stage, etc.)
- Use a single dynamic event to capture the whole stage cycle — don’t build a separate event per stage
- Payload sometimes carries internal lead/deal IDs instead of stage numbers, so map those IDs to stage names
- Anything missing or unrecognized gets excluded so bad data doesn’t slip through
You can also create workflows to send data when a lead stage is created.
HubSpot is now talking and CustomerLabs is listening. Next, point that data at Meta.
How to Connect Meta CAPI With CustomerLabs?
Goal: Send your CustomerLabs events and audiences into Meta server-side via CAPI — no reliance on a browser pixel that ad blockers keep breaking. Better identity data in = higher Event Match Quality = models training on signal, not noise.
Prerequisites
- Access to Meta Business Manager
- Full access to the Meta Ad Account
- Full access to the Meta Pixel
- Active CustomerLabs account
Authenticate (recommended method)
Why recommended: connects via a system user, so routine manual changes to your Facebook account won’t break authentication or the data flow.
- CustomerLabs → Destinations → all-destinations tab → Facebook
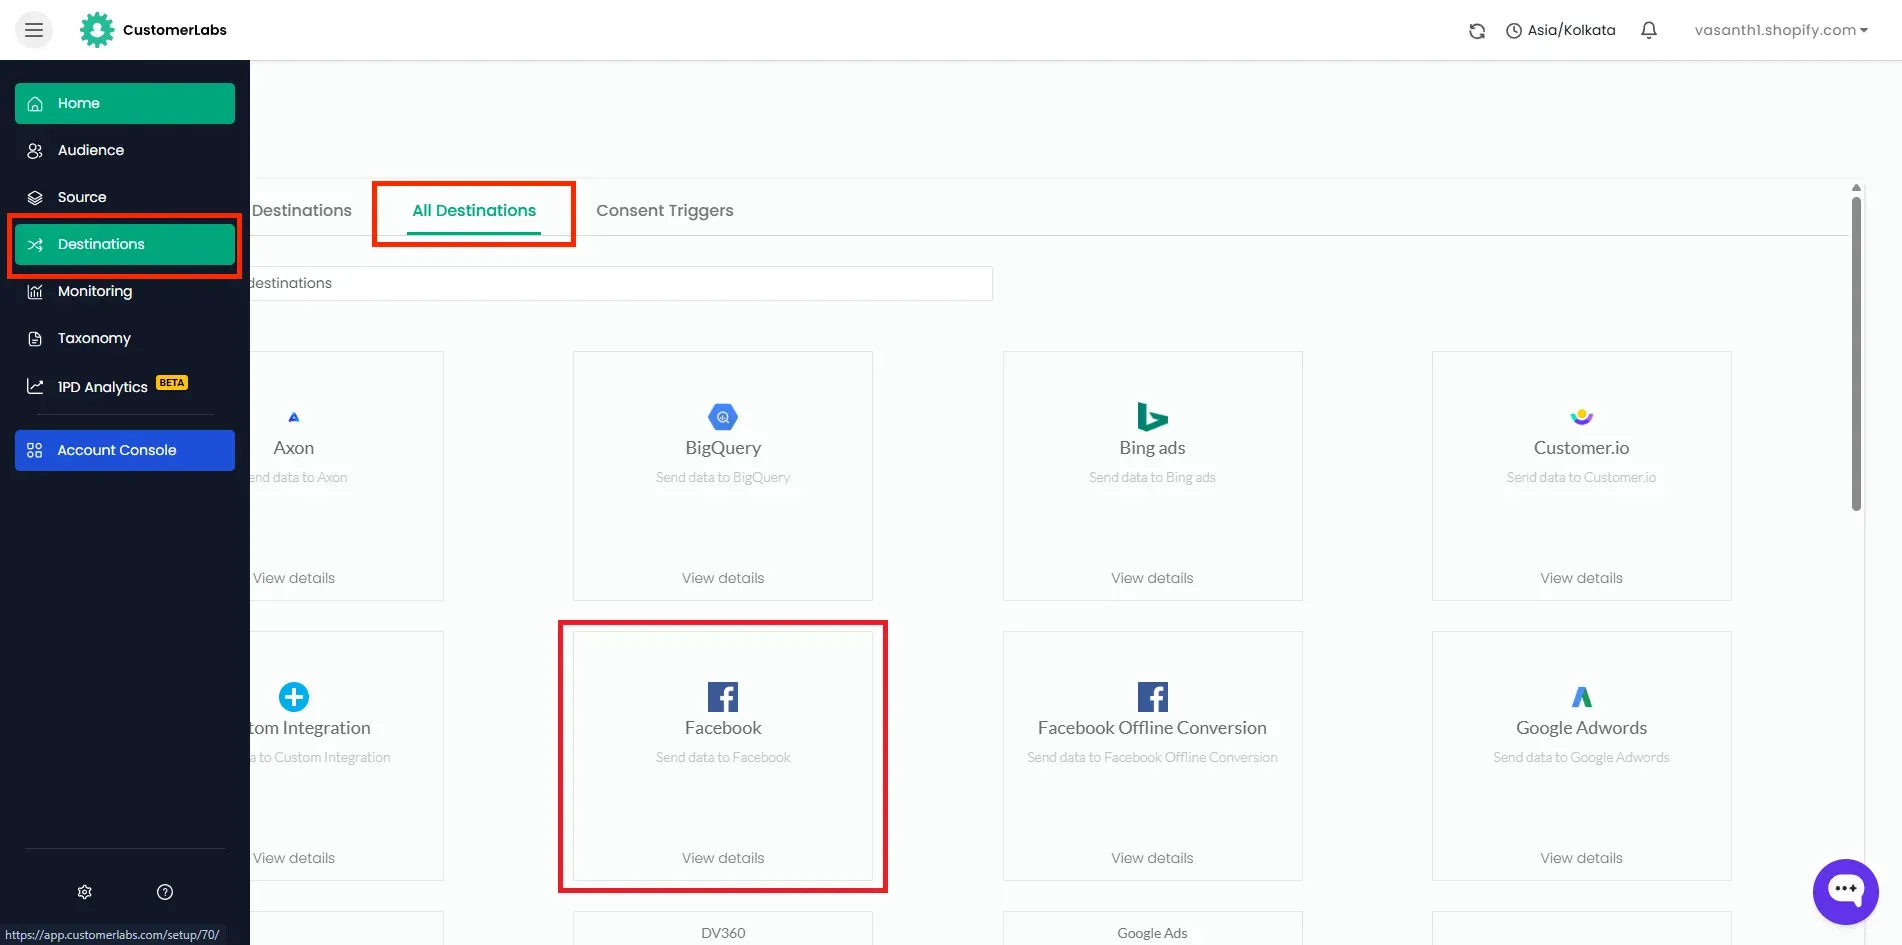
- Enter the last 4 digits of your pixel → Save and Enable
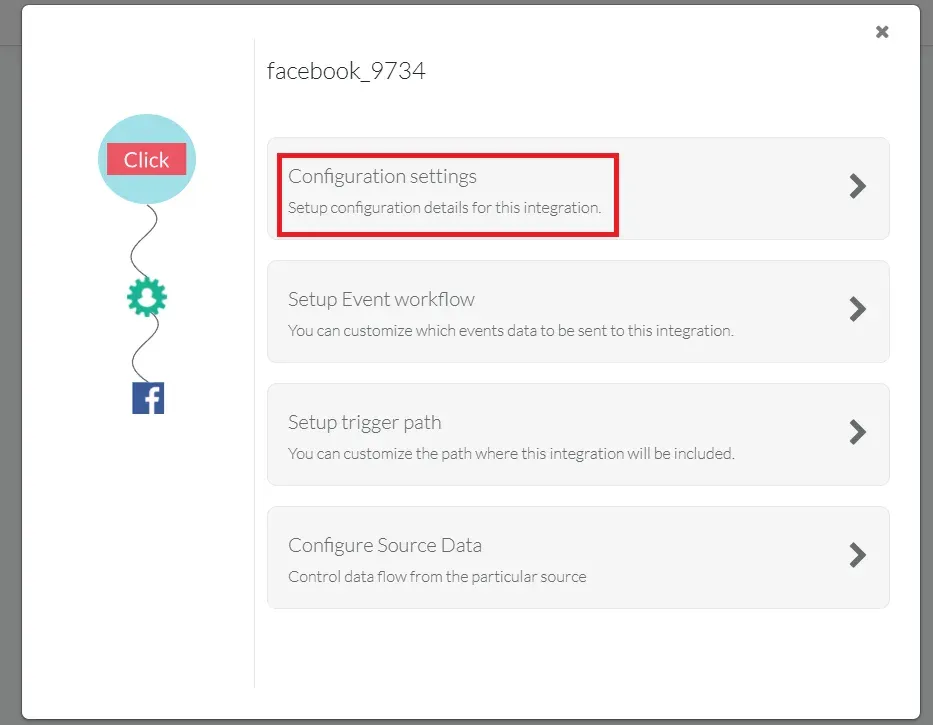
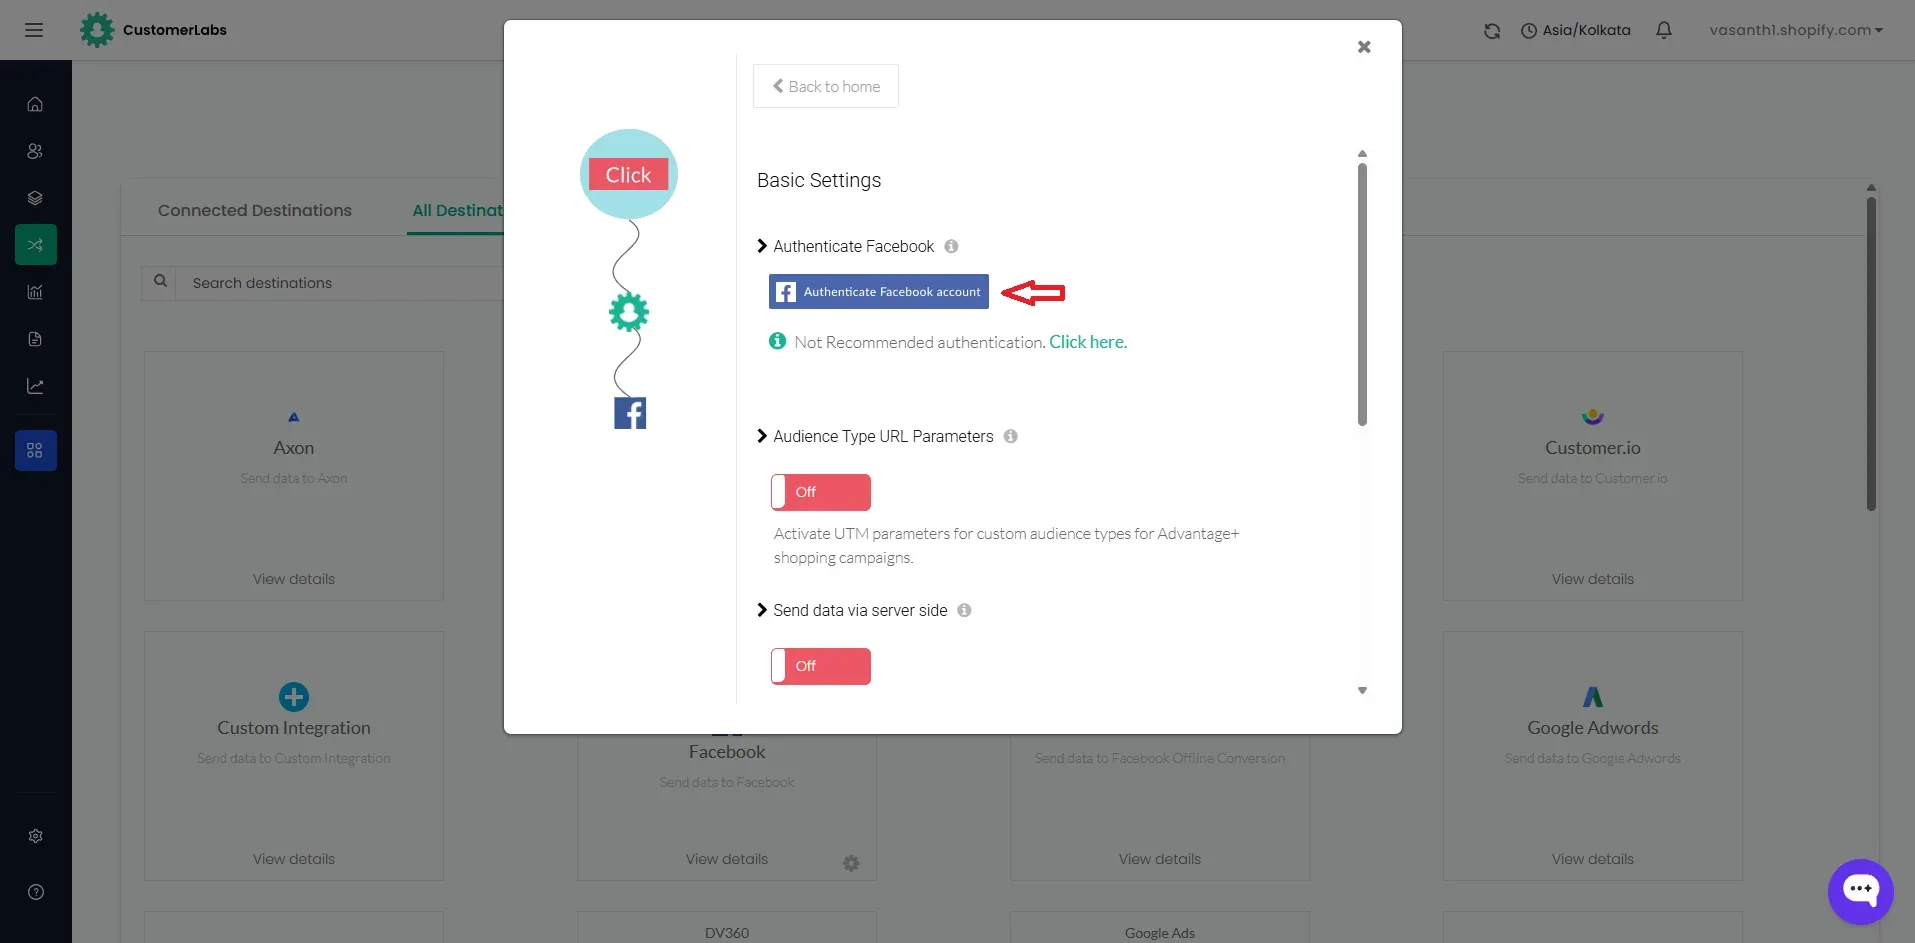
- Open Configuration Settings → Authenticate Facebook account
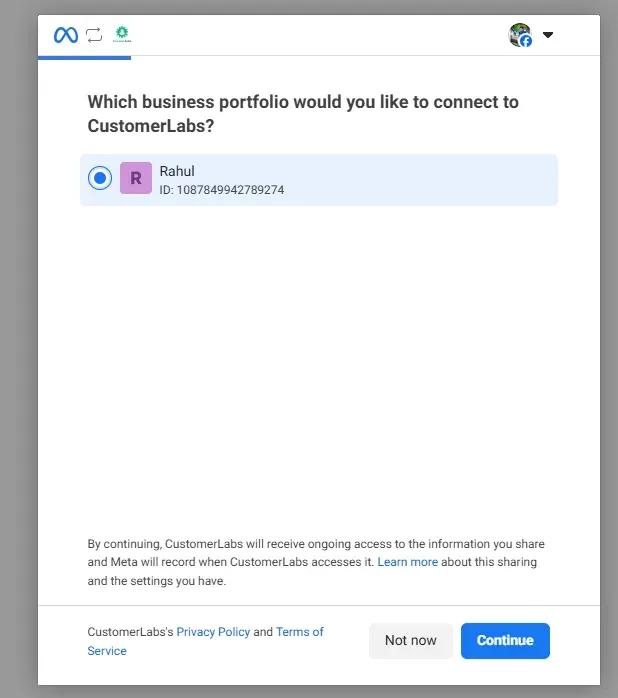
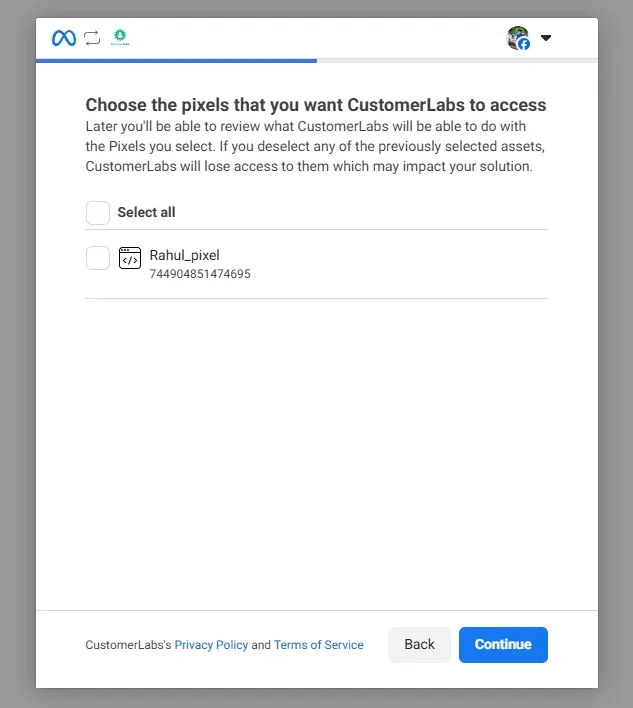
- Select your Business Manager account → Pixel → Ad Account and Catalogue
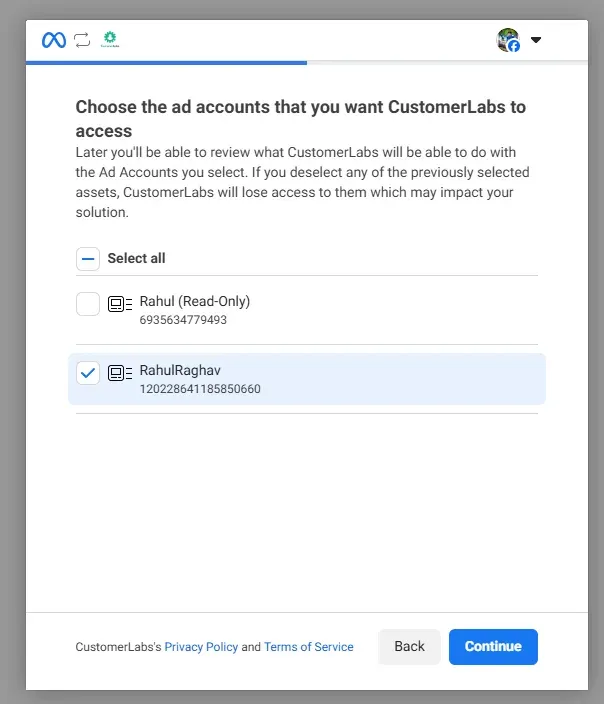
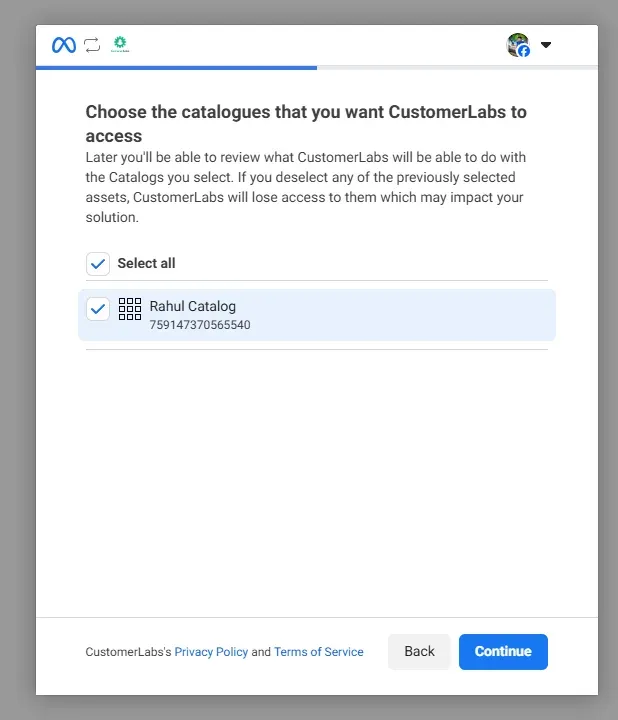
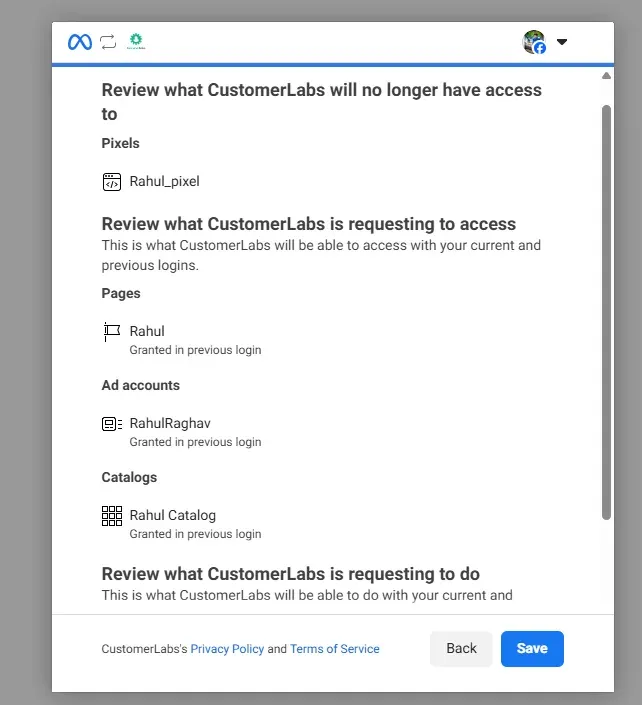
- Click Submit → Got it
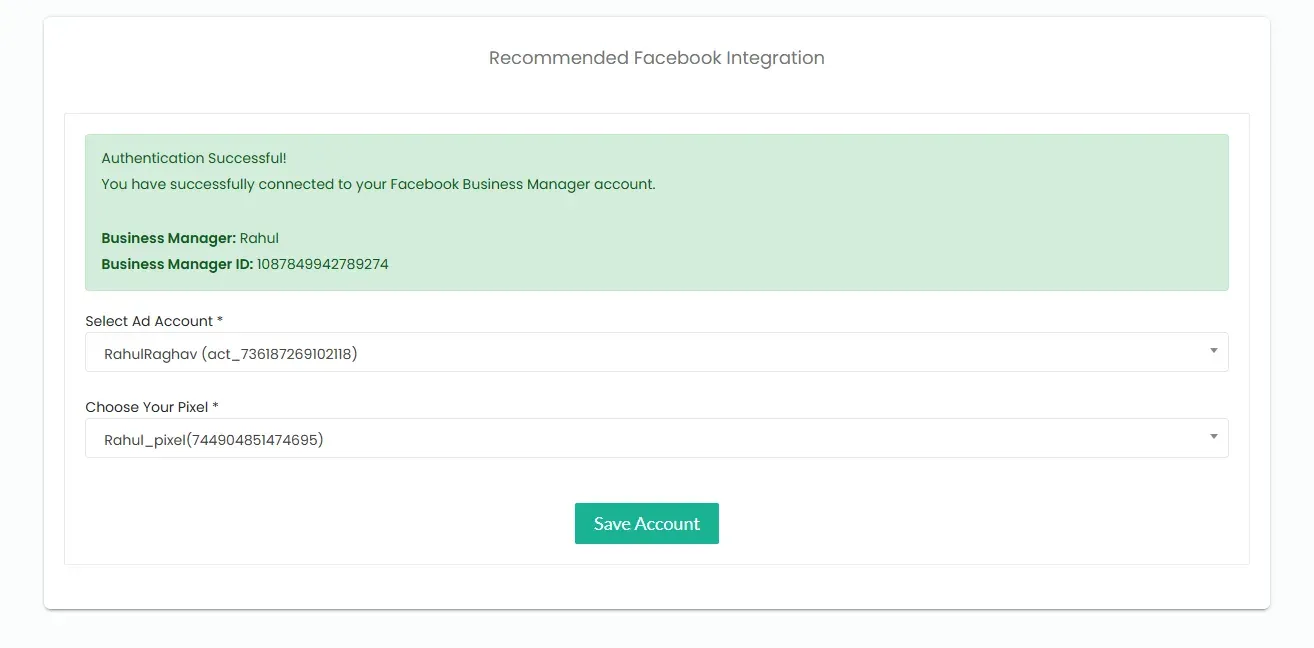
- Confirm the Ad Account + Pixel pairing → Save (you’ll land back in Configuration Settings)
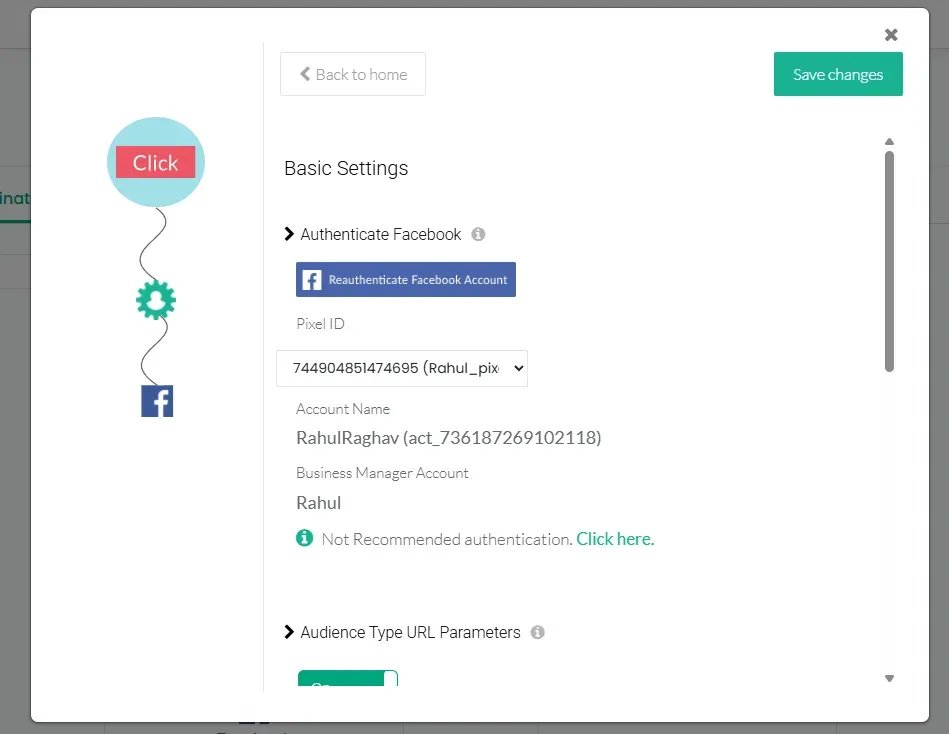
Tune the configuration
- Audience type URL parameters → ON (attributes conversions to your first-party audience in Advantage+ Sales Campaigns)
- Send data via server-side → ON (the whole point; advisable for better tracking)
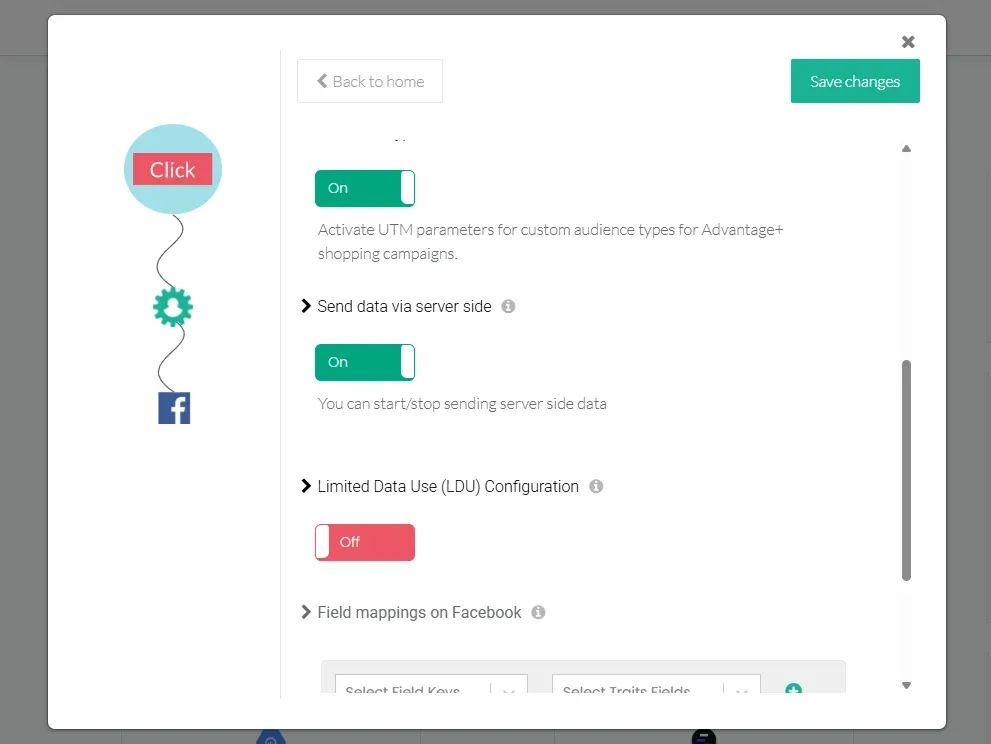
- Limited Data Use Configuration → ON if you operate in applicable US states (details below)
- Custom field mappings (optional): standard traits/properties map automatically (email → em, phone → ph, purchase → Purchase); only map manually for off-schema fields (e.g. custom order_ref → Meta’s order_id)
- Restrict Health and Wellness Data → ON if you’re in Meta’s Restricted Categories
- To check: Meta Events Manager → your pixel → Settings → scroll to Core setup. If Core setup is ON, you’re in a restricted category.
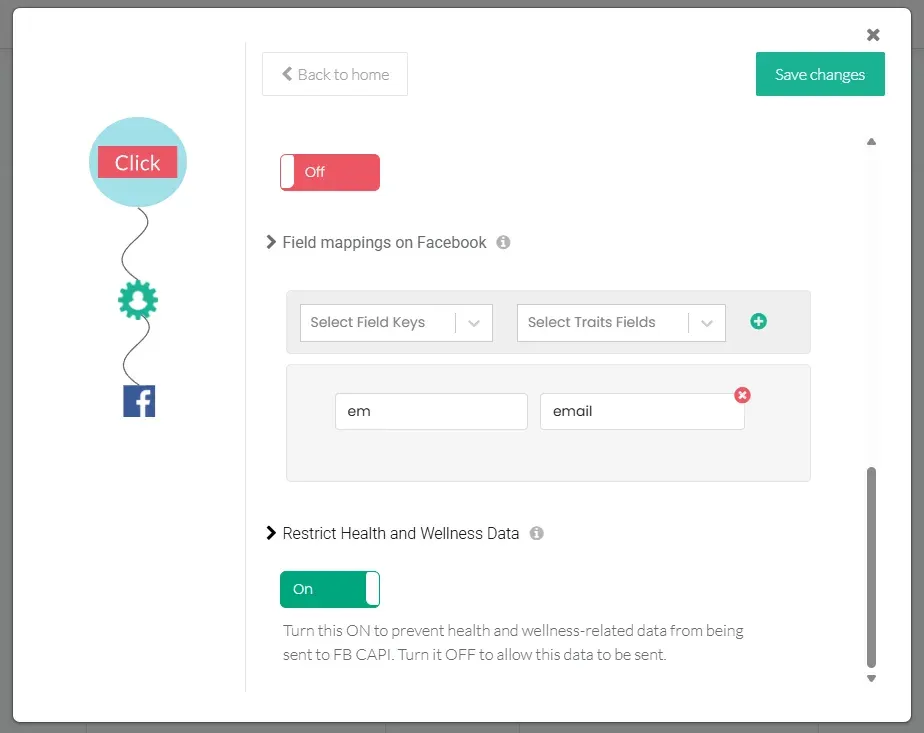
- Click Save Changes
Note: No full Business Manager access? There’s an alternative method (connect via Facebook Pages, pick Ad Account + Pixel from a dropdown), but it’s not recommended — any change to the Ad Account or Pixel forces re-authentication. You can switch to the recommended method later from Configuration Settings; detail updates go through the Reauthenticate Facebook account button.
Set up the event workflow
Authentication opens the pipe; this actually sends events and syncs audiences.
- Destinations → Facebook → Setup event workflow
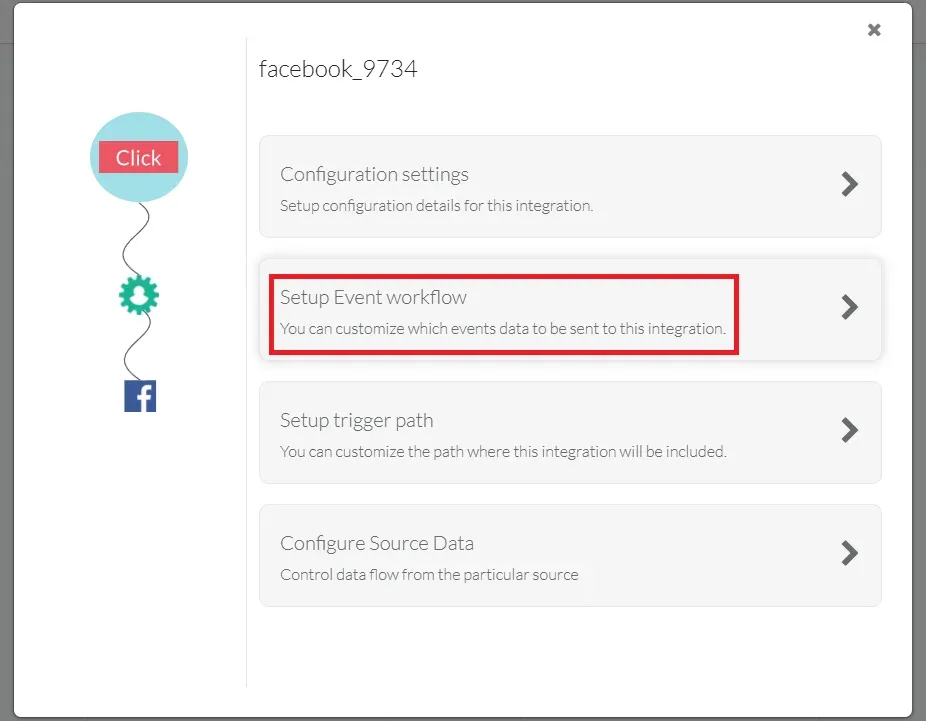
- Click Enable all server-side callbacks to push every event to Meta (this lifts your EMQ)
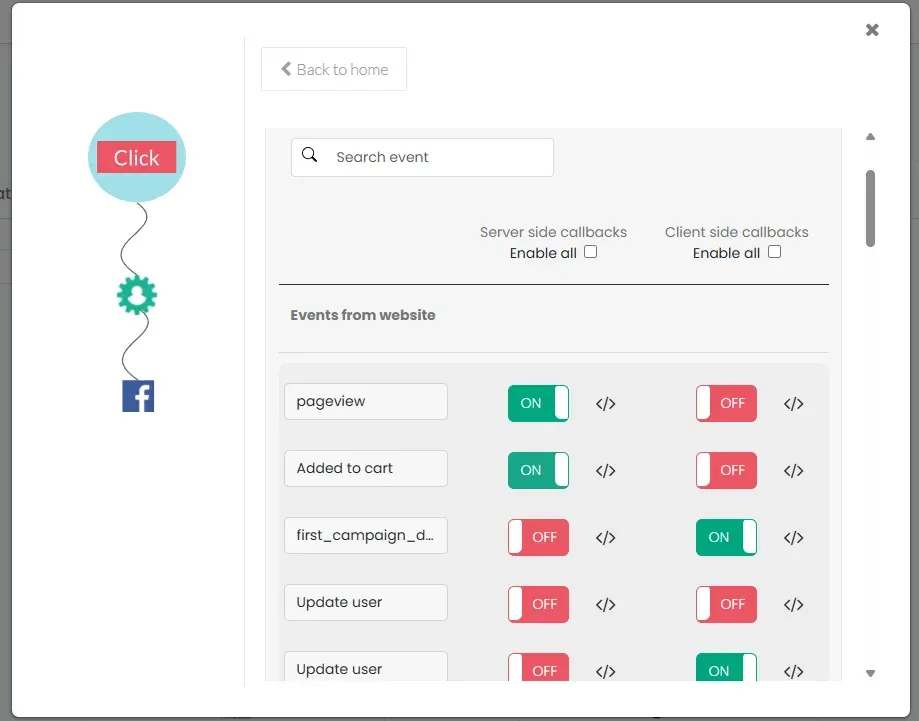
- Audience syncing:
- Turn ON added_to_segment to sync a segment after building it in CustomerLabs
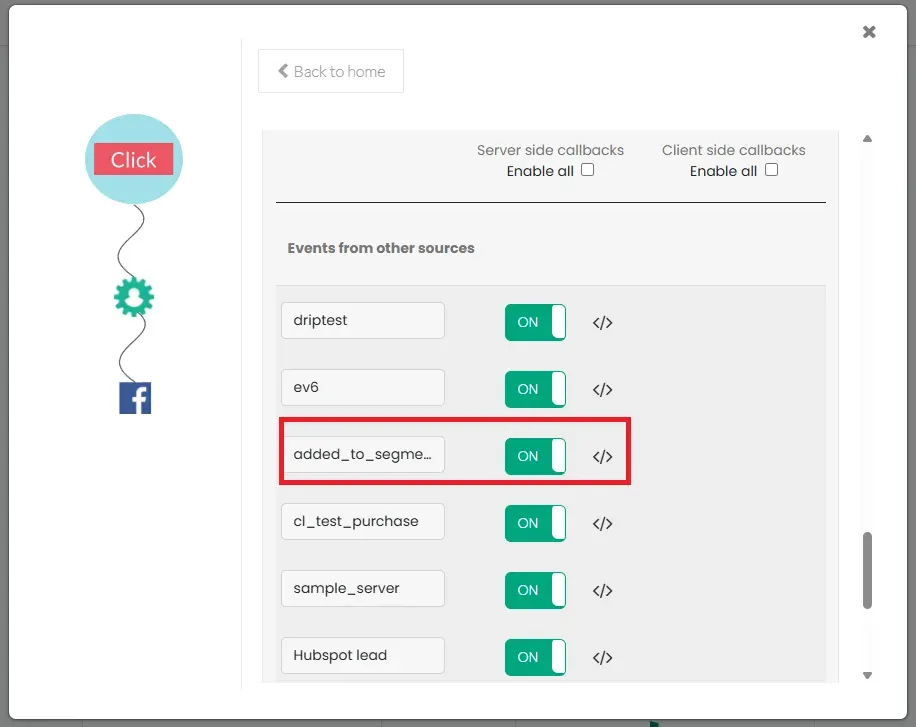
- Turn ON removed_from_segment if you need removals tracked
- Send everything (pageview, purchase, added_to_cart, etc.) or segments only
- added_to_segment refreshes based on the segment’s minimum refresh interval
- Allow 24–48 hours to first populate, keep the toggle ON while syncing
- Click Save Changes
Limited Data Use (LDU), if it applies
Meta’s option to restrict marketing use of data for California, Colorado, and Connecticut. When a user from those states opts out, you flag them and Meta processes their data as a service provider.
- Prerequisite: collect marketing consent on your site (e.g. CCPA cookie plugin) and store it in a named cookie with a boolean value
- CustomerLabs → Destinations → Facebook → Configuration Settings → Limited Data Use (LDU) Configuration → toggle ON
- Enter the cookie name and the cookie value that represents an opt-out (e.g. 1, true, y) → Save Changes
- From then on, when a user’s cookie matches the opt-out value, CustomerLabs sends the LDU flag → Meta identifies the state and applies restrictions
Heads up: enabling LDU can affect campaign performance, retargeting, and measurement.
How To Tune Event Match Quality After Go-live?
Event Match Quality (EMQ) is a score Meta calculates per dataset, on a 0 to 10 scale, that measures how confidently it can identify the user behind each event you send. A higher score means more attributed conversions and a lower cost per result. It is the single most actionable lever you have once the integration is live.
Meta publishes the bands on its official EMQ documentation: Poor below 4, OK between 4 and 5.9, Good between 6 and 7.9, Great at 8 or above. Most B2B accounts go live somewhere in the OK band and never tune past it, which is the lift waiting on the floor.
The identifiers that move the score, in roughly this order: email and phone (highest signal), then the fbp and fbc cookies (Meta’s browser-side identifiers), then external ID (your own customer ID), then IP and user agent.
HubSpot already stores email, first name, last name, and (if you collect it) phone. That gives you a Good EMQ out of the box. Pushing to Great means pushing fbp and fbc on your events too, which means client-side capture in the HubSpot tracking script — doable, with caveats.
Explore the deeper playbook for improving your EMQ from OK to Great — it covers the per-identifier tactics.
What Goes Wrong And How To Fix It?
Setup failures cluster into three failure modes. They are the most common Meta CAPI failure modes reported across debug guides, and once you know them, every other symptom usually traces back to one of these three.
“My events are not showing up in Events Manager.” The most common cause is the access token being wrong, expired, or scoped to a different dataset than the one you connected.
Revisit Step 7, generate a fresh token, and confirm it is tied to the same Pixel ID and dataset. Second most common is timing — events older than 7 days are rejected outright, so any batch sync with a historical event silently drops it. Walk through Step 9 with a brand-new sandbox event to confirm the live stream picks it up.
“My EMQ score is stuck below 5.” Almost always a PII formatting problem. Either the personally identifiable information arrives unhashed (Meta rejects it silently for matching), or it arrives hashed without lowercasing and trimming first.
A no-code platform like CustomerLabs handles that formatting for you at Step 8; a generic bridge or DIY build may not. Confirm em and ph are SHA-256, lowercased, trimmed before send, and that fbp, fbc, IP, and user agent are NOT hashed. If formatting is clean and EMQ is still stuck, the bottleneck is upstream — audit identifier coverage in HubSpot.
“My Pixel and CAPI events are double-counting.” Deduplication is failing. Either event_id is not identical between the Pixel and the CAPI event, or the two are landing too far apart for Meta’s processing window — practitioners report dedup working consistently inside approximately a two-hour window.
When the platform generates event_id for you (Step 8) this is rare; with a generic bridge or a DIY build it is the most frequent breakage, and HubSpot Community threads on missing event_id document the pattern. Confirm both sides emit the same event_id.
Conclusion - Pick Your Path
You do not need a six-week project plan to connect Meta Conversions API with HubSpot. You need to pick one of three paths and start this week. Each path serves a different reader.
Path 1: DIY with the native HubSpot integration. If your event needs to fit inside form submissions, lifecycle stage changes, and page views, and you are under your tier cap, the native integration is the right answer.
Plan half a day to follow HubSpot’s own KB walkthrough end to end, plus an hour for Test Events verification. No recurring cost beyond your HubSpot tier, no bridge, no developer.
Path 2: Skip the gaps with CustomerLabs. If you need deal-stage events, non-HubSpot form events, automatic hashing, automatic event_id deduplication, and a 30-minute go-live, a first-party data platform built for the HubSpot-to-Meta path is the cleanest fix.
The platform handles every step from connect to verify — the nine steps above collapse into source, destination, and go — and you get EMQ tuning support out of the box. Start at connecting HubSpot and Meta in under 30 minutes.
Path 3 — Map your deal stages next. If you have already finished the setup and want the deal-stage event mapping that turns this integration into pipeline signal, the sibling post is your next read.
It covers the deal-stage-to-Meta-event mapping table, the no-code wiring, and a B2B SaaS case study — send HubSpot deal-stage events to Meta walks the playbook.
The 2026 environment — shrunken windows, stripped click IDs, the retired Offline Conversions API — leaves server-side CRM signal as the only durable measurement layer. HubSpot is sitting on the right data.
Which of the three paths you take to connect Meta Conversions API with HubSpot is the only real question left.
But if you want to do it the easy limitation-free way then, have a free consultation with our onboarding experts or implement the entire setup using the free trial by watching the video linked above.